
Digital 9000 System Instruction for use
Page 3
...Basic functions of the Sennheiser operating menu 78 Overview of the status displays 78 Overview of the menu items 79 Using the SK 9000 81 Switching the SK 9000 on /off 82 Activating/deactivating the automatic lock mode (Autolock 83 Basic functions of the Sennheiser operating menu 84 Overview... of the status displays 84 Overview of the Sennheiser operating menu 46 Error and warning ...
...Basic functions of the Sennheiser operating menu 78 Overview of the status displays 78 Overview of the menu items 79 Using the SK 9000 81 Switching the SK 9000 on /off 82 Activating/deactivating the automatic lock mode (Autolock 83 Basic functions of the Sennheiser operating menu 84 Overview... of the status displays 84 Overview of the Sennheiser operating menu 46 Error and warning ...

Digital 9000 System Instruction for use
Page 8
... country in which they may leak. Safety instructions for damage arising from abuse or misuse. Sennheiser does not accept any liability for lithium-ion rechargeable batteries If abused or misused, the rechargeable batteries of the SK 9000/SKM 9000 may even present a risk of • explosion, • fire development, • heat generation, • smoke...
... country in which they may leak. Safety instructions for damage arising from abuse or misuse. Sennheiser does not accept any liability for lithium-ion rechargeable batteries If abused or misused, the rechargeable batteries of the SK 9000/SKM 9000 may even present a risk of • explosion, • fire development, • heat generation, • smoke...

Digital 9000 System Instruction for use
Page 11
... page 22) • Command function via KA 9000 COM command adapter L 60 charger • Simultaneous charging of microphone head being used, incl. System overview SKM 9000 radio microphone/ SK 9000 bodypack transmitter The SKM 9000 and SK 9000 transmitters offer great ease of use and can be...function (SKM 9000 COM) SK 9000 bodypack transmitter • Power supply optionally via BA 61 lithium-ion accupack or B 61 battery pack (3 AA size alkaline batteries or 3 AA size lithium batteries) • Automatic detection of the input signal type (mic, line, instrument) when Sennheiser accessories are...
... page 22) • Command function via KA 9000 COM command adapter L 60 charger • Simultaneous charging of microphone head being used, incl. System overview SKM 9000 radio microphone/ SK 9000 bodypack transmitter The SKM 9000 and SK 9000 transmitters offer great ease of use and can be...function (SKM 9000 COM) SK 9000 bodypack transmitter • Power supply optionally via BA 61 lithium-ion accupack or B 61 battery pack (3 AA size alkaline batteries or 3 AA size lithium batteries) • Automatic detection of the input signal type (mic, line, instrument) when Sennheiser accessories are...

Digital 9000 System Instruction for use
Page 14
.... One NT 3-1 mains unit can be found on suppliers, contact your local Sennheiser partner: www.sennheiser.com >"Service & Support". Digital 9000 | 13 Delivery includes B 60/B 61 battery packs 1 B 60 battery pack for SKM 9000 radio microphone or 1 B 61 battery pack for SK 9000 bodypack transmitter 1 instruction manual BA 60/BA 61 accupack 1 BA 60 accupack for...
.... One NT 3-1 mains unit can be found on suppliers, contact your local Sennheiser partner: www.sennheiser.com >"Service & Support". Digital 9000 | 13 Delivery includes B 60/B 61 battery packs 1 B 60 battery pack for SKM 9000 radio microphone or 1 B 61 battery pack for SK 9000 bodypack transmitter 1 instruction manual BA 60/BA 61 accupack 1 BA 60 accupack for...

Digital 9000 System Instruction for use
Page 22
... minutes - flashes with ESC function (cancel) A Guide rails 3 ON LED for 8 UP button - flashes regularly: remaining operating time is operational - Sennheiser microphones 9 Catches - CI 1-4 Sennheiser instrument cable for 3 AA size cells F Accupack 6 DOWN button Digital 9000 | 21 Product overview SK 9000 bodypack transmitter 1 2 34 5 C 9 6 7 0 8 B 9 0 D A E F 1 3-pin special audio socket 7 SET button for accupack/battery pack - KA...
... minutes - flashes with ESC function (cancel) A Guide rails 3 ON LED for 8 UP button - flashes regularly: remaining operating time is operational - Sennheiser microphones 9 Catches - CI 1-4 Sennheiser instrument cable for 3 AA size cells F Accupack 6 DOWN button Digital 9000 | 21 Product overview SK 9000 bodypack transmitter 1 2 34 5 C 9 6 7 0 8 B 9 0 D A E F 1 3-pin special audio socket 7 SET button for accupack/battery pack - KA...

Digital 9000 System Instruction for use
Page 23
...-up pattern omni-directional cardioid omni-directional cardioid super-cardioid omni-directional cardioid Sennheiser CI 1-4 line/instrument cable ¼'' (6.3 mm) jack plug (silent plug) to 3-pin special audio connector KA 9000 COM command adapter for the SK 9000 bodypack transmitter 2 3 4 1 22 | Digital 9000 1 3-pin special audio connector 2 COMMAND button 3 3-pin special audio socket 4 Connection cable...
...-up pattern omni-directional cardioid omni-directional cardioid super-cardioid omni-directional cardioid Sennheiser CI 1-4 line/instrument cable ¼'' (6.3 mm) jack plug (silent plug) to 3-pin special audio connector KA 9000 COM command adapter for the SK 9000 bodypack transmitter 2 3 4 1 22 | Digital 9000 1 3-pin special audio connector 2 COMMAND button 3 3-pin special audio socket 4 Connection cable...
Digital 9000 System Instruction for use
Page 41
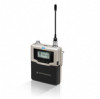
... e.g. Preparing the Digital 9000 system for stage directions. ̈ Connect the 3-pin special audio connector 1 of the KA 9000 COM to the 3-pin special audio socket 1 of the SK 9000. ̈ Connect the 3-pin special audio connector of the Sennheiser microphone or the Sennheiser CI 1-4 line/instrument cable... to the 3-pin special audio socket 3 of the KA 9000 COM. 40 | Digital...
... e.g. Preparing the Digital 9000 system for stage directions. ̈ Connect the 3-pin special audio connector 1 of the KA 9000 COM to the 3-pin special audio socket 1 of the SK 9000. ̈ Connect the 3-pin special audio connector of the Sennheiser microphone or the Sennheiser CI 1-4 line/instrument cable... to the 3-pin special audio socket 3 of the KA 9000 COM. 40 | Digital...
Digital 9000 System Instruction for use
Page 72
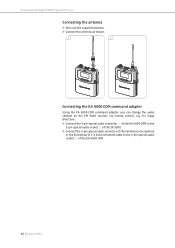
...in gray COMMAND button has been pressed Interference due to the description of the transmitters' operating menu. Digital 9000 | 71 In this case, the window displaying the recorded antenna signals is not supported by your transmitters, ... adjustment ranges of your transmitter, "Sync Fail" is written back to optimize the reception of the Digital 9000 transmitters. The menu items allow you adjust settings that are determined by the transmitter is displayed in light ...frequency range, type of microphone head being used (SKM), type of Sennheiser microphone or cable being used...
...in gray COMMAND button has been pressed Interference due to the description of the transmitters' operating menu. Digital 9000 | 71 In this case, the window displaying the recorded antenna signals is not supported by your transmitters, ... adjustment ranges of your transmitter, "Sync Fail" is written back to optimize the reception of the Digital 9000 transmitters. The menu items allow you adjust settings that are determined by the transmitter is displayed in light ...frequency range, type of microphone head being used (SKM), type of Sennheiser microphone or cable being used...
Digital 9000 System Instruction for use
Page 82
Digital 9000 Using theUSKsi9n00g0 the SK 9000 Using the SK 9000 81 Switching the SK 9000 on/off 82 Activating/deactivating the automatic lock mode (Autolock 83 Basic functions of the Sennheiser operating menu ..... 84 Overview of the status displays 84 Overview of the menu items 85
Digital 9000 Using theUSKsi9n00g0 the SK 9000 Using the SK 9000 81 Switching the SK 9000 on/off 82 Activating/deactivating the automatic lock mode (Autolock 83 Basic functions of the Sennheiser operating menu ..... 84 Overview of the status displays 84 Overview of the menu items 85

Digital 9000 System Instruction for use
Page 83
...the menu item. The bodypack transmitter can only be transfered to synchronize the transmitter and the receiver. Using the SK 9000 23 C 82 | Digital 9000 Using the SK 9000 Before using your bodypack transmitter, ask the relevant wireless regulatory authority for the exact frequency allocations and apply for extended...other menu items and then synchronize the transmitter and the receiver (see page 86) appears on the SK 9000 by keeping the ON/OFF button 2 pressed until the Sennheiser logo appears on and checking the set the desired frequency preset and adjust the settings of the ...
...the menu item. The bodypack transmitter can only be transfered to synchronize the transmitter and the receiver. Using the SK 9000 23 C 82 | Digital 9000 Using the SK 9000 Before using your bodypack transmitter, ask the relevant wireless regulatory authority for the exact frequency allocations and apply for extended...other menu items and then synchronize the transmitter and the receiver (see page 86) appears on the SK 9000 by keeping the ON/OFF button 2 pressed until the Sennheiser logo appears on and checking the set the desired frequency preset and adjust the settings of the ...

Digital 9000 System Instruction for use
Page 85
..." menu item and select "Off". ̈ Store your settings or to change the settings of the status displays Status display Meaning SK 9000 switches on stage or during a live show or presentation. Calling up and selecting menu items, changing and storing settings, cancelling an entry... the Sennheiser 9000 series is the straightforward, intuitive operating concept. As a result, you continuously adjust the next/previous set- When keeping the UP button /DOWN button pressed within a menu item, you can act quickly and precisely - Keep the buttons pressed for example on SK 9000 switches ...
..." menu item and select "Off". ̈ Store your settings or to change the settings of the status displays Status display Meaning SK 9000 switches on stage or during a live show or presentation. Calling up and selecting menu items, changing and storing settings, cancelling an entry... the Sennheiser 9000 series is the straightforward, intuitive operating concept. As a result, you continuously adjust the next/previous set- When keeping the UP button /DOWN button pressed within a menu item, you can act quickly and precisely - Keep the buttons pressed for example on SK 9000 switches ...

Digital 9000 System Instruction for use
Page 86
...described from the active booster frequency range or the frequency preset "U" (see also the "Tune" menu item). If you are using the Sennheiser CI 1-4 line/instrument cable, this menu item is automatically assigned to the frequency preset "U" and transmits on the transmitter will also be ...the EM 9046. Setting a frequency Via the "Tune" menu item, you store your setting, the set frequency. "Preset" - Using the SK 9000 Overview of the menu items Icon Name Function Page Tune Sets a frequency 85 Preset Selects a frequency preset 85 Name Enters a name 86 Gain...
...described from the active booster frequency range or the frequency preset "U" (see also the "Tune" menu item). If you are using the Sennheiser CI 1-4 line/instrument cable, this menu item is automatically assigned to the frequency preset "U" and transmits on the transmitter will also be ...the EM 9046. Setting a frequency Via the "Tune" menu item, you store your setting, the set frequency. "Preset" - Using the SK 9000 Overview of the menu items Icon Name Function Page Tune Sets a frequency 85 Preset Selects a frequency preset 85 Name Enters a name 86 Gain...

Digital 9000 System Instruction for use
Page 87
... the "Low cut" menu item, you to +42 dB. Cable type Sennheiser microphone cable Sennheiser CI 1-4 line/ instrument cable Settings "60 Hz", "80 Hz", "100 Hz", "120 Hz" "30 Hz", the "Low cut " menu item accordingly. "Display" - Using the SK 9000 86 | Digital 9000 "Name" - The name can set : 0` `1` `2` `3` `4` `5` `6` `7` `8` `9 space` `#` `A` `B` `C` `D` `E` `F` `G` `H` `I` `J` `K` `L` `M` `N` `O` `P` `Q` `R` `S` `T` `U` `V` `W` `X` `Y` `Z` "Gain" - Adjusting the transmission mode...
... the "Low cut" menu item, you to +42 dB. Cable type Sennheiser microphone cable Sennheiser CI 1-4 line/ instrument cable Settings "60 Hz", "80 Hz", "100 Hz", "120 Hz" "30 Hz", the "Low cut " menu item accordingly. "Display" - Using the SK 9000 86 | Digital 9000 "Name" - The name can set : 0` `1` `2` `3` `4` `5` `6` `7` `8` `9 space` `#` `A` `B` `C` `D` `E` `F` `G` `H` `I` `J` `K` `L` `M` `N` `O` `P` `Q` `R` `S` `T` `U` `V` `W` `X` `Y` `Z` "Gain" - Adjusting the transmission mode...

Digital 9000 System Instruction for use
Page 100
Cleaning and maintaining the Digital 9000 system Specifications System characteristics Frequency ranges Transmission method ...compression "LR" mode: SeDAC (Sennheiser Digital Audio Codec) 30 Hz to 20 kHz (3 dB) with SK 9000 line-in 60 Hz to 20 kHz (3 dB) with SK 9000 mic 80 Hz to 20 kHz (3 dB) with SKM 9000 "HD" mode: 112 dB(A)... "LR" mode: 101 dB(A) Analog Audio Out: 3.2 ms Digital Audio Out: 3 ms (AES-EBU) "HD" mode:< 0.01% (at 1 kHz) "LR" mode: < 0.03% (at 1 kHz) Digital 9000...
Cleaning and maintaining the Digital 9000 system Specifications System characteristics Frequency ranges Transmission method ...compression "LR" mode: SeDAC (Sennheiser Digital Audio Codec) 30 Hz to 20 kHz (3 dB) with SK 9000 line-in 60 Hz to 20 kHz (3 dB) with SK 9000 mic 80 Hz to 20 kHz (3 dB) with SKM 9000 "HD" mode: 112 dB(A)... "LR" mode: 101 dB(A) Analog Audio Out: 3.2 ms Digital Audio Out: 3 ms (AES-EBU) "HD" mode:< 0.01% (at 1 kHz) "LR" mode: < 0.03% (at 1 kHz) Digital 9000...


