Instructions for use
Page 1
XS WIRELESS Instruction manual
XS WIRELESS Instruction manual
Instructions for use
Page 2
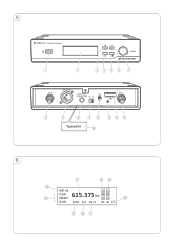
A XS WIRELESS TRUE DIVERSITY RECEIVER 1 2 set volume sync 345 6 7 ANT B BALANCED AUDIO OUT UNBALANCED LINE MIC SQ ANT A DC 12V 300mA 8 9 0 A B CDE Typenschild F B G HI O ANT AB N TUNE 615.375 PRESET J SCAN SYNC B.2 CH.12 RF AF M LK
A XS WIRELESS TRUE DIVERSITY RECEIVER 1 2 set volume sync 345 6 7 ANT B BALANCED AUDIO OUT UNBALANCED LINE MIC SQ ANT A DC 12V 300mA 8 9 0 A B CDE Typenschild F B G HI O ANT AB N TUNE 615.375 PRESET J SCAN SYNC B.2 CH.12 RF AF M LK
Instructions for use
Page 4
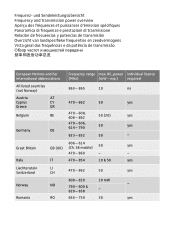
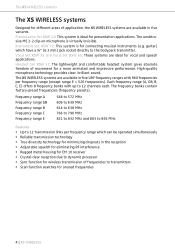
und Sendeleistungsübersicht Frequency and transmission power overview Aperçu des fréquences et puissances d'émission spécifiques Panoramica di frequenze e prestazioni di trasmissione Relación de frecuencias y potencias de transmisión Overzicht van landspecifieke frequenties en zendvermogens Vista geral das frequências e da potência de transmissão European Nations and her international abbreviations Frequency range max. RF_power individual licence (MHz) (mW - Italy IT 470 - 854 10 & 50 yes Liechtenstein LI Switzerland ...
und Sendeleistungsübersicht Frequency and transmission power overview Aperçu des fréquences et puissances d'émission spécifiques Panoramica di frequenze e prestazioni di trasmissione Relación de frecuencias y potencias de transmisión Overzicht van landspecifieke frequenties en zendvermogens Vista geral das frequências e da potência de transmissão European Nations and her international abbreviations Frequency range max. RF_power individual licence (MHz) (mW - Italy IT 470 - 854 10 & 50 yes Liechtenstein LI Switzerland ...
Instructions for use
Page 5
... ...10 Selecting and changing a receiver channel 10 Synchronizing a transmitter with the receiver 11 Adjusting the squelch threshold 11 Cleaning and maintaining the XS WIRELESS systems 12 If a problem occurs ...12 Specifications ...13 Manufacturer Declarations ...16 XS WIRELESS | 1 NL PT RU ZH
... ...10 Selecting and changing a receiver channel 10 Synchronizing a transmitter with the receiver 11 Adjusting the squelch threshold 11 Cleaning and maintaining the XS WIRELESS systems 12 If a problem occurs ...12 Specifications ...13 Manufacturer Declarations ...16 XS WIRELESS | 1 NL PT RU ZH
Instructions for use
Page 6
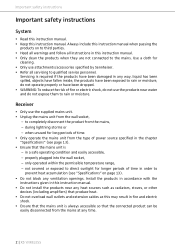
... accordance with the instructions given in this instruction manual. • Do not install the products near water and do not use attachments/accessories specified by Sennheiser. • Refer all instructions in this may result in order to completely disconnect the product from the wall socket, - to prevent heat accumulation (see page...
... accordance with the instructions given in this instruction manual. • Do not install the products near water and do not use attachments/accessories specified by Sennheiser. • Refer all instructions in this may result in order to completely disconnect the product from the wall socket, - to prevent heat accumulation (see page...
Instructions for use
Page 7
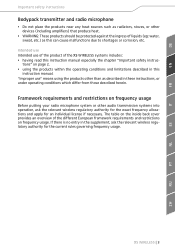
tions" on page 2, • using the products other than as this instruction manual. "Improper use of the product of the XS WIRELESS systems includes: • having read this instruction manual especially the chapter "Important safety instruc- If there is no entry in the supplement, ask the relevant wireless regulatory authority for an individual license if necessary. XS WIRELESS | 3 NL PT RU ZH Framework requirements and restrictions on frequency usage. The table on the inside back cover provides an overview of the different European framework requirements and restrictions...
tions" on page 2, • using the products other than as this instruction manual. "Improper use of the product of the XS WIRELESS systems includes: • having read this instruction manual especially the chapter "Important safety instruc- If there is no entry in the supplement, ask the relevant wireless regulatory authority for an individual license if necessary. XS WIRELESS | 3 NL PT RU ZH Framework requirements and restrictions on frequency usage. The table on the inside back cover provides an overview of the different European framework requirements and restrictions...
Instructions for use
Page 8
... frequency ranges with up to the bodypack transmitter. The frequency banks contain factory-preset frequencies (frequency presets). Presentation Set XSW 12: This system is virtually invisible. High-quality microphone technology provides clear, brilliant sound. Each frequency range (A, GB, ...8 frequency banks with 960 frequencies per frequency range which have a ¼" (6.3 mm) jack socket directly to 12 channels each. Headset Set XSW 52: The lightweight and comfortable headset system gives absolute freedom of movement for connecting musical instruments (e.g. The unobtrusive ME...
... frequency ranges with up to the bodypack transmitter. The frequency banks contain factory-preset frequencies (frequency presets). Presentation Set XSW 12: This system is virtually invisible. High-quality microphone technology provides clear, brilliant sound. Each frequency range (A, GB, ...8 frequency banks with 960 frequencies per frequency range which have a ¼" (6.3 mm) jack socket directly to 12 channels each. Headset Set XSW 52: The lightweight and comfortable headset system gives absolute freedom of movement for connecting musical instruments (e.g. The unobtrusive ME...

Instructions for use
Page 9
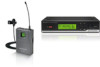
For information on the XS WIRELESS product page at www.sennheiser.com. XS WIRELESS | 5 NL PT RU ZH DE EM 10 receiver SKM 35 radio microphone, dynamic SKM 65 radio microphone, condenser SK 20 bodypack transmitter ... ME 3 headmic 2 rod antennas 2 AA size batteries Instruction manual EN FR IT ES Delivery includes Delivery includes XS WIRELESS systems Vocal Set XSW 35 Vocal Set XSW 65 Presentation Set XSW 12 Instrument Set XSW 72 Headset Set XSW 52 A list of accessories can be found on suppliers, contact your local Sennheiser partner: www.sennheiser.com > "Service & Support".
For information on the XS WIRELESS product page at www.sennheiser.com. XS WIRELESS | 5 NL PT RU ZH DE EM 10 receiver SKM 35 radio microphone, dynamic SKM 65 radio microphone, condenser SK 20 bodypack transmitter ... ME 3 headmic 2 rod antennas 2 AA size batteries Instruction manual EN FR IT ES Delivery includes Delivery includes XS WIRELESS systems Vocal Set XSW 35 Vocal Set XSW 65 Presentation Set XSW 12 Instrument Set XSW 72 Headset Set XSW 52 A list of accessories can be found on suppliers, contact your local Sennheiser partner: www.sennheiser.com > "Service & Support".
Instructions for use
Page 10
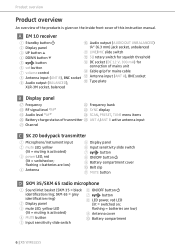
...) 2 Display panel ¼" (6.3 mm) jack socket, unbalanced 3 UP button 4 DOWN button A LINE/MIC slide switch B SQ rotary switch for squelch threshold 5 button C DC socket (DC 12 V, 300 mA) for 6 set button connection of mains unit 7 volume control D Cable grip for mains cable 8 Antenna input (ANT B), BNC socket E Antenna input (ANT A), BNC...
...) 2 Display panel ¼" (6.3 mm) jack socket, unbalanced 3 UP button 4 DOWN button A LINE/MIC slide switch B SQ rotary switch for squelch threshold 5 button C DC socket (DC 12 V, 300 mA) for 6 set button connection of mains unit 7 volume control D Cable grip for mains cable 8 Antenna input (ANT B), BNC socket E Antenna input (ANT A), BNC...
Instructions for use
Page 11
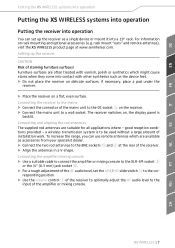
..., place a pad under the receiver. ̈ Place the receiver on rack mounting and optional accessories (e.g. Connecting the receiver to the BNC sockets E and 8 at www.sennheiser.com. Connecting and aligning the rod antennas The supplied rod antennas are often treated with varnish, polish or synthetics which are available as the device...
..., place a pad under the receiver. ̈ Place the receiver on rack mounting and optional accessories (e.g. Connecting the receiver to the BNC sockets E and 8 at www.sennheiser.com. Connecting and aligning the rod antennas The supplied rod antennas are often treated with varnish, polish or synthetics which are available as the device...
Instructions for use
Page 12
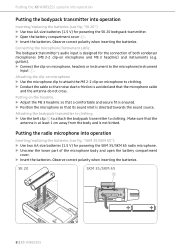
Make sure that its sound inlet is designed for powering the SKM 35/SKM 65 radio microphone. ̈ Unscrew the lower part of both condenser microphones (ME 2-2 clip-on the headmic ̈ Adjust the ME 3 headmic so that a comfortable and secure fit is ensured. ̈ Position the microphone so that the antenna is at least 1 cm away from the body and is avoided and that the microphone cable and the antenna do not cross. "SKM 35/SKM 65") ̈ Use two AA size batteries (1.5 V) for the connection of the microphone body and open the battery compartment cover. ̈ Insert the ...
Make sure that its sound inlet is designed for powering the SKM 35/SKM 65 radio microphone. ̈ Unscrew the lower part of both condenser microphones (ME 2-2 clip-on the headmic ̈ Adjust the ME 3 headmic so that a comfortable and secure fit is ensured. ̈ Position the microphone so that the antenna is at least 1 cm away from the body and is avoided and that the microphone cable and the antenna do not cross. "SKM 35/SKM 65") ̈ Use two AA size batteries (1.5 V) for the connection of the microphone body and open the battery compartment cover. ̈ Insert the ...
Instructions for use
Page 13
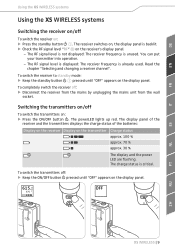
The receiver switches on, the display panel is critical. The RF signal level is not displayed: The receiver frequency is already used. To switch the receiver to standby mode: ̈ Keep the standby button 1 pressed until "OFF" appears on : ̈ Press the standby button 1. To completely switch the receiver off: ̈ Disconnect the receiver from the mains by unplugging the mains unit from the wall socket. Switching the transmitters on/off To switch the transmitters on the transmitter Charge status approx. 100 % approx. 70 % approx. 30 % The display and the power LED are flashing....
The receiver switches on, the display panel is critical. The RF signal level is not displayed: The receiver frequency is already used. To switch the receiver to standby mode: ̈ Keep the standby button 1 pressed until "OFF" appears on : ̈ Press the standby button 1. To completely switch the receiver off: ̈ Disconnect the receiver from the mains by unplugging the mains unit from the wall socket. Switching the transmitters on/off To switch the transmitters on the transmitter Charge status approx. 100 % approx. 70 % approx. 30 % The display and the power LED are flashing....
Instructions for use
Page 14
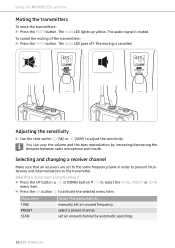
The mute LED goes off. Selecting a menu item and activating it ̈ Press the UP button 3 or DOWN button 4 to select the TUNE, PRESET or SCAN menu item. ̈ Press the set an unused frequency. select a preset channel. To cancel the muting of the transmitters: ̈ Press the MUTE button. Using the XS WIRELESS systems Muting the transmitters To mute the transmitters: ̈ Press the MUTE button. The audio signal is canceled. 615. 375 615. 375 Adjusting the sensitivity ̈ Use the slide switch 6 (SK) or 5 (SKM) to activate the selected menu item. You can vary the ...
The mute LED goes off. Selecting a menu item and activating it ̈ Press the UP button 3 or DOWN button 4 to select the TUNE, PRESET or SCAN menu item. ̈ Press the set an unused frequency. select a preset channel. To cancel the muting of the transmitters: ̈ Press the MUTE button. Using the XS WIRELESS systems Muting the transmitters To mute the transmitters: ̈ Press the MUTE button. The audio signal is canceled. 615. 375 615. 375 Adjusting the sensitivity ̈ Use the slide switch 6 (SK) or 5 (SKM) to activate the selected menu item. You can vary the ...
Instructions for use
Page 15
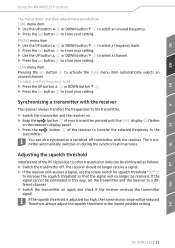
If the squelch threshold is adjusted too high, the transmission range will no longer receive a signal. ̈ If the receiver still receives a signal, use the rotary switch for squelch threshold "SQ" B to the lowest possible setting. Therefore, always adjust the squelch threshold to increase the squelch threshold so that the signal will be eliminated in this way, set button 6 to store your setting. The receiver should no longer be eliminated as follows: ̈ Switch the transmitter off transmitter with the receiver The receiver always transfers the frequencies to ...
If the squelch threshold is adjusted too high, the transmission range will no longer receive a signal. ̈ If the receiver still receives a signal, use the rotary switch for squelch threshold "SQ" B to the lowest possible setting. Therefore, always adjust the squelch threshold to increase the squelch threshold so that the signal will be eliminated in this way, set button 6 to store your setting. The receiver should no longer be eliminated as follows: ̈ Switch the transmitter off transmitter with the receiver The receiver always transfers the frequencies to ...
Instructions for use
Page 16
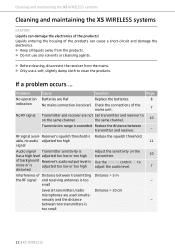
... is exceeded Reduce the distance between transmitter and receiver. - neously and the distance - between transmitting Distance > 5 m the RF signal and receiving antennas is too small 12 | XS WIRELESS Liquids entering the housing of the products can damage the electronics of the mains unit. 7 No RF signal Transmitter and receiver are used...
... is exceeded Reduce the distance between transmitter and receiver. - neously and the distance - between transmitting Distance > 5 m the RF signal and receiving antennas is too small 12 | XS WIRELESS Liquids entering the housing of the products can damage the electronics of the mains unit. 7 No RF signal Transmitter and receiver are used...
Instructions for use
Page 17
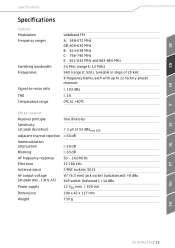
... MHz and 863-865 MHz 24 MHz (range E: 13 MHz) 960 (range E: 520), tuneable in steps of 25 kHz 8 frequency banks, each with up to 12 factory-preset channels ≥ 103 dBa ≤ 1% 0°C to +40°C EM 10 receiver Receiver principle true diversity Sensitivity (at peak deviation) < 3 μV at 52... 2 BNC sockets, 50 Ω AF output voltage (at peak dev., 1 kHz AF) ¼'' (6.3 mm) jack socket (unbalanced): +8 dBu XLR socket (balanced): +14 dBu Power supply 12 VDC nom. / 300 mA Dimensions 200 x 42 x 127 mm Weight 730 g ES NL PT RU ZH XS WIRELESS | 13
... MHz and 863-865 MHz 24 MHz (range E: 13 MHz) 960 (range E: 520), tuneable in steps of 25 kHz 8 frequency banks, each with up to 12 factory-preset channels ≥ 103 dBa ≤ 1% 0°C to +40°C EM 10 receiver Receiver principle true diversity Sensitivity (at peak deviation) < 3 μV at 52... 2 BNC sockets, 50 Ω AF output voltage (at peak dev., 1 kHz AF) ¼'' (6.3 mm) jack socket (unbalanced): +8 dBu XLR socket (balanced): +14 dBu Power supply 12 VDC nom. / 300 mA Dimensions 200 x 42 x 127 mm Weight 730 g ES NL PT RU ZH XS WIRELESS | 13
Instructions for use
Page 18
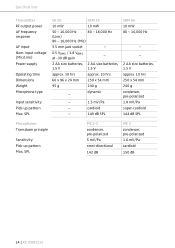
dynamic - 1.5 mV/Pa - SPL SK 20 SKM 35 10 mW 10 mW 50 - 16,000 Hz 80 - 16,000 Hz (Line) 80 - 16,000 Hz (Mic) 3.5 mm jack socket - 0.5 VRMS / 1.8 VRMS - SPL ME 2-2 condenser, pre-polarized 5 mV/Pa omni-directional 142 dB ME 3 condenser, pre-polarized 1.6 mV/Pa cardioid 150 dB 14 | XS WIRELESS cardioid - 149 dB SPL SKM 65 10 mW 80 - 16,000 Hz - - 2 AA size batteries, 1.5 V approx. 10 hrs 250 x 54 mm 240 g condenser, pre-polarized 1.8 mV/Pa super-cardioid 144 dB SPL Microphones Transducer principle Sensitivity Pick-up pattern Max. Specifications Transmitter RF...
dynamic - 1.5 mV/Pa - SPL SK 20 SKM 35 10 mW 10 mW 50 - 16,000 Hz 80 - 16,000 Hz (Line) 80 - 16,000 Hz (Mic) 3.5 mm jack socket - 0.5 VRMS / 1.8 VRMS - SPL ME 2-2 condenser, pre-polarized 5 mV/Pa omni-directional 142 dB ME 3 condenser, pre-polarized 1.6 mV/Pa cardioid 150 dB 14 | XS WIRELESS cardioid - 149 dB SPL SKM 65 10 mW 80 - 16,000 Hz - - 2 AA size batteries, 1.5 V approx. 10 hrs 250 x 54 mm 240 g condenser, pre-polarized 1.8 mV/Pa super-cardioid 144 dB SPL Microphones Transducer principle Sensitivity Pick-up pattern Max. Specifications Transmitter RF...
Instructions for use
Page 19
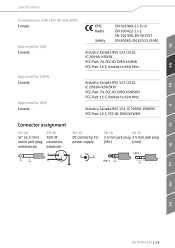
DE EN Specifications In compliance with (EM, SK and SKM) Europe: Approved by (SK) Canada: Approved by (SKM) Canada: Approved by (EM) Canada: EMC Radio Safety EN 301489-1/-3/-9 EN 300422-1/-2, EN 301440, EN 301357 EN 60065, EN 62311 (SAR) Industry Canada RSS 123 (210), IC 2099A-XSWSK FCC-Part 74, FCC-ID: DMO XSWSK FCC-Part 15 C, limited to 698 MHz Industry Canada RSS 123 (210), IC 2099A-XSWSKM FCC-Part 74, FCC-ID: DMO XSWSKM FCC-Part 15 C, limited to 698 MHz Industry Canada RSS 123, IC 2099A-XSWEM FCC-Part 15 C, FCC-ID: DMO XSWEM Connector assignment EM 10 ¼'' (6.3 mm) mono jack ...
DE EN Specifications In compliance with (EM, SK and SKM) Europe: Approved by (SK) Canada: Approved by (SKM) Canada: Approved by (EM) Canada: EMC Radio Safety EN 301489-1/-3/-9 EN 300422-1/-2, EN 301440, EN 301357 EN 60065, EN 62311 (SAR) Industry Canada RSS 123 (210), IC 2099A-XSWSK FCC-Part 74, FCC-ID: DMO XSWSK FCC-Part 15 C, limited to 698 MHz Industry Canada RSS 123 (210), IC 2099A-XSWSKM FCC-Part 74, FCC-ID: DMO XSWSKM FCC-Part 15 C, limited to 698 MHz Industry Canada RSS 123, IC 2099A-XSWEM FCC-Part 15 C, FCC-ID: DMO XSWEM Connector assignment EM 10 ¼'' (6.3 mm) mono jack ...
Instructions for use
Page 20
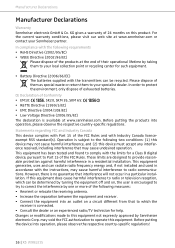
... XS WIRELESS These limits are designed to which can be recycled. For the current warranty conditions, please visit our web site at www.sennheiser.com. However, there is subject to the following measures: • Reorient or relocate the receiving antenna. • Increase the separation between...interference by taking them to Part 15 of exhausted batteries. CE Declaration of 24 months on , the user is available at www.sennheiser.com or contact your local collection point or recycling center for a Class B digital device, pursuant to your specialist dealer. This equipment...
... XS WIRELESS These limits are designed to which can be recycled. For the current warranty conditions, please visit our web site at www.sennheiser.com. However, there is subject to the following measures: • Reorient or relocate the receiving antenna. • Increase the separation between...interference by taking them to Part 15 of exhausted batteries. CE Declaration of 24 months on , the user is available at www.sennheiser.com or contact your local collection point or recycling center for a Class B digital device, pursuant to your specialist dealer. This equipment...

Instructions for use
Page 21
KG Am Labor 1, 30900 Wedemark, Germany www.sennheiser.com Printed in Taiwan, Publ. 01/12, 542696/A03 Sennheiser electronic GmbH & Co.
KG Am Labor 1, 30900 Wedemark, Germany www.sennheiser.com Printed in Taiwan, Publ. 01/12, 542696/A03 Sennheiser electronic GmbH & Co.
