Instructions for use
Page 1
XS WIRELESS Instruction manual
XS WIRELESS Instruction manual
Instructions for use
Page 2
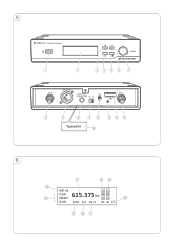
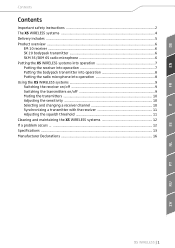
A XS WIRELESS TRUE DIVERSITY RECEIVER 1 2 set volume sync 345 6 7 ANT B BALANCED AUDIO OUT UNBALANCED LINE MIC SQ ANT A DC 12V 300mA 8 9 0 A B CDE Typenschild F B G HI O ANT AB N TUNE 615.375 PRESET J SCAN SYNC B.2 CH.12 RF AF M LK
A XS WIRELESS TRUE DIVERSITY RECEIVER 1 2 set volume sync 345 6 7 ANT B BALANCED AUDIO OUT UNBALANCED LINE MIC SQ ANT A DC 12V 300mA 8 9 0 A B CDE Typenschild F B G HI O ANT AB N TUNE 615.375 PRESET J SCAN SYNC B.2 CH.12 RF AF M LK
Instructions for use
Page 5
...into operation 7 Putting the receiver into operation 7 Putting the bodypack transmitter into operation 8 Putting the radio microphone into operation 8 Using the XS WIRELESS systems 9 Switching the receiver on/off 9 Switching the transmitters on/off 9 Muting the transmitters ...10 Adjusting the sensitivity ...10 Selecting and changing ...a receiver channel 10 Synchronizing a transmitter with the receiver 11 Adjusting the squelch threshold 11 Cleaning and maintaining the XS WIRELESS systems 12 If a problem occurs ...12 Specifications ...13 Manufacturer Declarations ...16 XS...
...into operation 7 Putting the receiver into operation 7 Putting the bodypack transmitter into operation 8 Putting the radio microphone into operation 8 Using the XS WIRELESS systems 9 Switching the receiver on/off 9 Switching the transmitters on/off 9 Muting the transmitters ...10 Adjusting the sensitivity ...10 Selecting and changing ...a receiver channel 10 Synchronizing a transmitter with the receiver 11 Adjusting the squelch threshold 11 Cleaning and maintaining the XS WIRELESS systems 12 If a problem occurs ...12 Specifications ...13 Manufacturer Declarations ...16 XS...
Instructions for use
Page 6
... lightning storms or - in order to qualified service personnel. when unused for cleaning. • Only use attachments/accessories specified by Sennheiser. • Refer all instructions in fire and electric shock. • Ensure that the mains unit is always accessible so that the.... properly plugged into the wall socket, - Install the products in accordance with the instructions given in any time. 2 | XS WIRELESS only operated within the permissible temperature range, - Servicing is - Always include this instruction manual when passing the products on page 13)....
... lightning storms or - in order to qualified service personnel. when unused for cleaning. • Only use attachments/accessories specified by Sennheiser. • Refer all instructions in fire and electric shock. • Ensure that the mains unit is always accessible so that the.... properly plugged into the wall socket, - Install the products in accordance with the instructions given in any time. 2 | XS WIRELESS only operated within the permissible temperature range, - Servicing is - Always include this instruction manual when passing the products on page 13)....
Instructions for use
Page 7
...and restrictions on frequency usage Before putting your radio microphone system or other audio transmission systems into operation, ask the relevant wireless regulatory authority for the exact frequency allocations and apply for the current rules governing frequency usage. tions" on page 2, ... products other than as this instruction manual especially the chapter "Important safety instruc- "Improper use of the product of the XS WIRELESS systems includes: • having read this can cause malfunctions due to shortages or corrosion, etc. Framework requirements and restrictions on ...
...and restrictions on frequency usage Before putting your radio microphone system or other audio transmission systems into operation, ask the relevant wireless regulatory authority for the exact frequency allocations and apply for the current rules governing frequency usage. tions" on page 2, ... products other than as this instruction manual especially the chapter "Important safety instruc- "Improper use of the product of the XS WIRELESS systems includes: • having read this can cause malfunctions due to shortages or corrosion, etc. Framework requirements and restrictions on ...
Instructions for use
Page 8
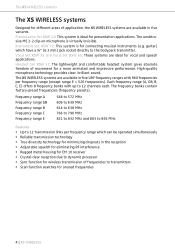
... High-quality microphone technology provides clear, brilliant sound. Headset Set XSW 52: The lightweight and comfortable headset system gives absolute freedom of movement for unused frequencies 4 | XS WIRELESS The frequency banks contain factory-preset frequencies (frequency presets). The ... microphone is ideal for presentation applications. The XS WIRELESS systems The XS WIRELESS systems Designed for different areas of application, the XS WIRELESS systems are available in five UHF frequency ranges with up to 12 channels each. Frequency range A Frequency range GB ...
... High-quality microphone technology provides clear, brilliant sound. Headset Set XSW 52: The lightweight and comfortable headset system gives absolute freedom of movement for unused frequencies 4 | XS WIRELESS The frequency banks contain factory-preset frequencies (frequency presets). The ... microphone is ideal for presentation applications. The XS WIRELESS systems The XS WIRELESS systems Designed for different areas of application, the XS WIRELESS systems are available in five UHF frequency ranges with up to 12 channels each. Frequency range A Frequency range GB ...

Instructions for use
Page 9
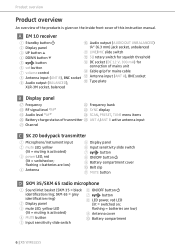
For information on the XS WIRELESS product page at www.sennheiser.com. DE EM 10 receiver SKM 35 radio microphone, dynamic SKM 65 radio microphone, condenser SK 20 bodypack transmitter Transmitter bag NT 2-3 mains unit ME ... AA size batteries Instruction manual EN FR IT ES Delivery includes Delivery includes XS WIRELESS systems Vocal Set XSW 35 Vocal Set XSW 65 Presentation Set XSW 12 Instrument Set XSW 72 Headset Set XSW 52 A list of accessories can be found on suppliers, contact your local Sennheiser partner: www.sennheiser.com > "Service & Support". XS WIRELESS | 5 NL PT RU ZH
For information on the XS WIRELESS product page at www.sennheiser.com. DE EM 10 receiver SKM 35 radio microphone, dynamic SKM 65 radio microphone, condenser SK 20 bodypack transmitter Transmitter bag NT 2-3 mains unit ME ... AA size batteries Instruction manual EN FR IT ES Delivery includes Delivery includes XS WIRELESS systems Vocal Set XSW 35 Vocal Set XSW 65 Presentation Set XSW 12 Instrument Set XSW 72 Headset Set XSW 52 A list of accessories can be found on suppliers, contact your local Sennheiser partner: www.sennheiser.com > "Service & Support". XS WIRELESS | 5 NL PT RU ZH
Instructions for use
Page 10
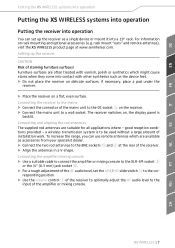
...) 2 Display panel ¼" (6.3 mm) jack socket, unbalanced 3 UP button 4 DOWN button A LINE/MIC slide switch B SQ rotary switch for squelch threshold 5 button C DC socket (DC 12 V, 300 mA) for 6 set button connection of mains unit 7 volume control D Cable grip for mains cable 8 Antenna input (ANT B), BNC socket E Antenna input (ANT A), BNC... A MUTE button D SKM 35/SKM 65 radio microphone 1 Sound inlet basket (SKM 35 = black identification ring; flashing = batteries are low) 9 Antenna cover 0 Battery compartment 6 | XS WIRELESS
...) 2 Display panel ¼" (6.3 mm) jack socket, unbalanced 3 UP button 4 DOWN button A LINE/MIC slide switch B SQ rotary switch for squelch threshold 5 button C DC socket (DC 12 V, 300 mA) for 6 set button connection of mains unit 7 volume control D Cable grip for mains cable 8 Antenna input (ANT B), BNC socket E Antenna input (ANT A), BNC... A MUTE button D SKM 35/SKM 65 radio microphone 1 Sound inlet basket (SKM 35 = black identification ring; flashing = batteries are low) 9 Antenna cover 0 Battery compartment 6 | XS WIRELESS
Instructions for use
Page 11
... Connecting the amplifier/mixing console ̈ Use a suitable cable to connect the amplifier or mixing console to the BNC sockets E and 8 at www.sennheiser.com. Connecting the receiver to the mains ̈ Connect the connector of the mains unit to the DC socket C on the receiver. ̈ Connect... ̈ Do not place the receiver on , the display panel is to the cor- rack mount "ears" and remote antennas), visit the XS WIRELESS product page at the rear of the amplifier or mixing console. good reception conditions provided - responding position. ̈ Use the volume control 7 of ...
... Connecting the amplifier/mixing console ̈ Use a suitable cable to connect the amplifier or mixing console to the BNC sockets E and 8 at www.sennheiser.com. Connecting the receiver to the mains ̈ Connect the connector of the mains unit to the DC socket C on the receiver. ̈ Connect... ̈ Do not place the receiver on , the display panel is to the cor- rack mount "ears" and remote antennas), visit the XS WIRELESS product page at the rear of the amplifier or mixing console. good reception conditions provided - responding position. ̈ Use the volume control 7 of ...
Instructions for use
Page 12
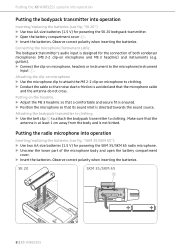
... avoided and that noise due to the microphone/instrument input 1. SK 20 SKM 35/SKM 65 A 1.5V AA 1.5V AA 8 | XS WIRELESS Putting the radio microphone into operation Inserting/replacing the batteries (see fig. "SKM 35/SKM 65") ̈ Use two AA size batteries (1.5...Attaching the bodypack transmitter to clothing ̈ Use the belt clip 0 to attach the bodypack transmitter to clothing. Putting the XS WIRELESS systems into operation Putting the bodypack transmitter into operation Inserting/replacing the batteries (see fig. Connecting the microphone/instrument cable The bodypack ...
... avoided and that noise due to the microphone/instrument input 1. SK 20 SKM 35/SKM 65 A 1.5V AA 1.5V AA 8 | XS WIRELESS Putting the radio microphone into operation Inserting/replacing the batteries (see fig. "SKM 35/SKM 65") ̈ Use two AA size batteries (1.5...Attaching the bodypack transmitter to clothing ̈ Use the belt clip 0 to attach the bodypack transmitter to clothing. Putting the XS WIRELESS systems into operation Putting the bodypack transmitter into operation Inserting/replacing the batteries (see fig. Connecting the microphone/instrument cable The bodypack ...
Instructions for use
Page 13
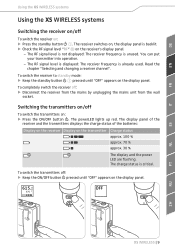
...615. The charge status is already used. Read the chapter "Selecting and changing a receiver channel". OFF 375 IT ES NL PT RU ZH XS WIRELESS | 9 Switching the transmitters on/off To switch the receiver on: ̈ Press the standby button 1. The display panel of the receiver and the...displays the charge status of the batteries: Display on the receiver Display on the display panel. DE EN FR Using the XS WIRELESS systems Using the XS WIRELESS systems Switching the receiver on/off To switch the transmitters on: ̈ Press the ON/OFF button . The receiver switches on...
...615. The charge status is already used. Read the chapter "Selecting and changing a receiver channel". OFF 375 IT ES NL PT RU ZH XS WIRELESS | 9 Switching the transmitters on/off To switch the receiver on: ̈ Press the standby button 1. The display panel of the receiver and the...displays the charge status of the batteries: Display on the receiver Display on the display panel. DE EN FR Using the XS WIRELESS systems Using the XS WIRELESS systems Switching the receiver on/off To switch the transmitters on: ̈ Press the ON/OFF button . The receiver switches on...
Instructions for use
Page 14
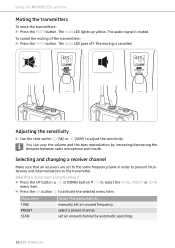
... the transmitters: ̈ Press the MUTE button. manually set an unused channel by increasing/decreasing the distance between radio microphone and mouth. Using the XS WIRELESS systems Muting the transmitters To mute the transmitters: ̈ Press the MUTE button. The muting is muted. Selecting and changing a receiver channel Make sure that...
... the transmitters: ̈ Press the MUTE button. manually set an unused channel by increasing/decreasing the distance between radio microphone and mouth. Using the XS WIRELESS systems Muting the transmitters To mute the transmitters: ̈ Press the MUTE button. The muting is muted. Selecting and changing a receiver channel Make sure that...
Instructions for use
Page 15
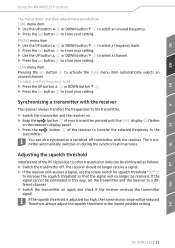
...to transfer the selected frequency to the transmitter. Synchronizing a transmitter with the receiver. You can be reduced. ES NL PT RU ZH XS WIRELESS | 11 Therefore, always adjust the squelch threshold to activate the SCAN menu item automatically selects an unused channel. If the signal cannot be... received. DE EN FR IT Using the XS WIRELESS systems The menu items and their adjustment possibilities TUNE menu item ̈ Use the UP button 3 or DOWN button 4 to select an...
...to transfer the selected frequency to the transmitter. Synchronizing a transmitter with the receiver. You can be reduced. ES NL PT RU ZH XS WIRELESS | 11 Therefore, always adjust the squelch threshold to activate the SCAN menu item automatically selects an unused channel. If the signal cannot be... received. DE EN FR IT Using the XS WIRELESS systems The menu items and their adjustment possibilities TUNE menu item ̈ Use the UP button 3 or DOWN button 4 to select an...
Instructions for use
Page 16
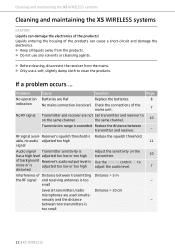
... too low or too high Adjust the sensitivity on the same channel the same channel. 10 Transmission range is too small 12 | XS WIRELESS neously and the distance - Problem Cause Solution Page No operation Batteries are flat Replace the batteries. 8 indication No mains ... of the mains unit. 7 No RF signal Transmitter and receiver are used simulta- Cleaning and maintaining the XS WIRELESS systems Cleaning and maintaining the XS WIRELESS systems CAUTION Liquids can cause a short-circuit and damage the electronics. ̈ Keep all liquids away from the...
... too low or too high Adjust the sensitivity on the same channel the same channel. 10 Transmission range is too small 12 | XS WIRELESS neously and the distance - Problem Cause Solution Page No operation Batteries are flat Replace the batteries. 8 indication No mains ... of the mains unit. 7 No RF signal Transmitter and receiver are used simulta- Cleaning and maintaining the XS WIRELESS systems Cleaning and maintaining the XS WIRELESS systems CAUTION Liquids can cause a short-circuit and damage the electronics. ̈ Keep all liquids away from the...
Instructions for use
Page 17
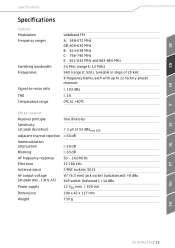
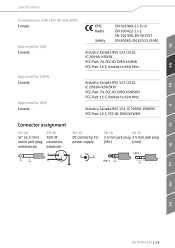
... MHz and 863-865 MHz 24 MHz (range E: 13 MHz) 960 (range E: 520), tuneable in steps of 25 kHz 8 frequency banks, each with up to 12 factory-preset channels ≥ 103 dBa ≤ 1% 0°C to +40°C EM 10 receiver Receiver principle true diversity Sensitivity (at peak deviation) < 3 μV at 52... 2 BNC sockets, 50 Ω AF output voltage (at peak dev., 1 kHz AF) ¼'' (6.3 mm) jack socket (unbalanced): +8 dBu XLR socket (balanced): +14 dBu Power supply 12 VDC nom. / 300 mA Dimensions 200 x 42 x 127 mm Weight 730 g ES NL PT RU ZH XS...
... MHz and 863-865 MHz 24 MHz (range E: 13 MHz) 960 (range E: 520), tuneable in steps of 25 kHz 8 frequency banks, each with up to 12 factory-preset channels ≥ 103 dBa ≤ 1% 0°C to +40°C EM 10 receiver Receiver principle true diversity Sensitivity (at peak deviation) < 3 μV at 52... 2 BNC sockets, 50 Ω AF output voltage (at peak dev., 1 kHz AF) ¼'' (6.3 mm) jack socket (unbalanced): +8 dBu XLR socket (balanced): +14 dBu Power supply 12 VDC nom. / 300 mA Dimensions 200 x 42 x 127 mm Weight 730 g ES NL PT RU ZH XS...
Instructions for use
Page 18
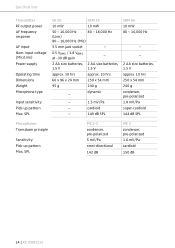
... AF input Nom. SPL ME 2-2 condenser, pre-polarized 5 mV/Pa omni-directional 142 dB ME 3 condenser, pre-polarized 1.6 mV/Pa cardioid 150 dB 14 | XS WIRELESS input voltage (Mic/Line) Power supply Operating time Dimensions Weight Microphone type Input sensitivity Pick-up pattern Max. cardioid - 149 dB SPL SKM 65 10...
... AF input Nom. SPL ME 2-2 condenser, pre-polarized 5 mV/Pa omni-directional 142 dB ME 3 condenser, pre-polarized 1.6 mV/Pa cardioid 150 dB 14 | XS WIRELESS input voltage (Mic/Line) Power supply Operating time Dimensions Weight Microphone type Input sensitivity Pick-up pattern Max. cardioid - 149 dB SPL SKM 65 10...
Instructions for use
Page 19
... SK 20 SK 20 DC connector for 3.5 mm jack plug 3.5 mm jack plug power supply (Mic) (Line) FR IT ES NL PT RU ZH XS WIRELESS | 15
... SK 20 SK 20 DC connector for 3.5 mm jack plug 3.5 mm jack plug power supply (Mic) (Line) FR IT ES NL PT RU ZH XS WIRELESS | 15
Instructions for use
Page 20
..., may cause harmful interference to protect the environment, only dispose of them as special waste or return them to your Sennheiser partner. Please dispose of exhausted batteries. Before putting the device into operation, please observe the respective country-specific regulations. ... Corp. For the current warranty conditions, please visit our web site at www.sennheiser.com. Before putting the products into operation, please observe the respective country-specific regulations! 16 | XS WIRELESS However, there is subject to Part 15 of the following measures: • ...
..., may cause harmful interference to protect the environment, only dispose of them as special waste or return them to your Sennheiser partner. Please dispose of exhausted batteries. Before putting the device into operation, please observe the respective country-specific regulations. ... Corp. For the current warranty conditions, please visit our web site at www.sennheiser.com. Before putting the products into operation, please observe the respective country-specific regulations! 16 | XS WIRELESS However, there is subject to Part 15 of the following measures: • ...
Frequency sheet A (548 - 572 MHz)
Page 1
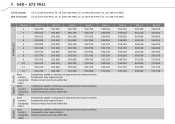
.... 30 (566-572 MHz) Ch. 30 (542-550 MHz), Ch. 31 (550-558 MHz), Ch. 32 (558-566 MHz), Ch. 33 (566-574 MHz) XS WIRELESS Channel 1 2 3 4 5 6 7 8 9 10 11 12 Note: -
.... 30 (566-572 MHz) Ch. 30 (542-550 MHz), Ch. 31 (550-558 MHz), Ch. 32 (558-566 MHz), Ch. 33 (566-574 MHz) XS WIRELESS Channel 1 2 3 4 5 6 7 8 9 10 11 12 Note: -
Frequency sheet A (548 - 572 MHz)
Page 2
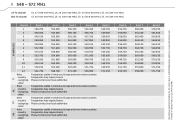
... (558-566 MHz), Ch. 33 (566-574 MHz) XS WIRELESS Channel 1 2 3 4 5 6 7 8 9 10 11 12 Note: - country - country - other Note: - KG | Am Labor 1, 30900 Wedemark, Germany | www.sennheiser.com Printed in Americas, Europe and some Asian countries Frequencies may ...require licence Please contact your local authorities Frequencies usable in Taiwan, Publ. 01/12, 547019/A01 country - country - other Note: - usergroup - usergroup -...
... (558-566 MHz), Ch. 33 (566-574 MHz) XS WIRELESS Channel 1 2 3 4 5 6 7 8 9 10 11 12 Note: - country - country - other Note: - KG | Am Labor 1, 30900 Wedemark, Germany | www.sennheiser.com Printed in Americas, Europe and some Asian countries Frequencies may ...require licence Please contact your local authorities Frequencies usable in Taiwan, Publ. 01/12, 547019/A01 country - country - other Note: - usergroup - usergroup -...

