
User Manual
Page 1
... Reference 29 Universal Plus Function 30 • Using the Video and Audio Input Jacks 31, 32 • Operation of Remote Control 33 - 37 • Before Calling for Service 38 • Calling for Service 38 • Specifications 39 •...; Limited Warranty 51 B189 WJ1 COLOR TELEVISION MODEL 25C340 L OPERATION MANUAL L CONTENTS PAGE • Important Information 2, 3 • Important Safeguards 3, 4 • Supplied Accessories 5 • Before Operating Your Television...
... Reference 29 Universal Plus Function 30 • Using the Video and Audio Input Jacks 31, 32 • Operation of Remote Control 33 - 37 • Before Calling for Service 38 • Calling for Service 38 • Specifications 39 •...; Limited Warranty 51 B189 WJ1 COLOR TELEVISION MODEL 25C340 L OPERATION MANUAL L CONTENTS PAGE • Important Information 2, 3 • Important Safeguards 3, 4 • Supplied Accessories 5 • Before Operating Your Television...

User Manual
Page 5
VOL TV A Infrared Remote Control/Part Number RRMCGA035WJSB Size AA Dry Batteries Before Operating Your Television Location • For normal operation, your thumbnail, pull up the slit as iron ... to remove the back cover. Do not defeat the safety feature of connections that magnets, electric clocks, toys using the television, prepare the Remote Control To use the remote control, insert batteries first. Insert two batteries (size "AA"). Antenna Connections Antennas • The antenna requirements for a long period, such as during a vacation...
VOL TV A Infrared Remote Control/Part Number RRMCGA035WJSB Size AA Dry Batteries Before Operating Your Television Location • For normal operation, your thumbnail, pull up the slit as iron ... to remove the back cover. Do not defeat the safety feature of connections that magnets, electric clocks, toys using the television, prepare the Remote Control To use the remote control, insert batteries first. Insert two batteries (size "AA"). Antenna Connections Antennas • The antenna requirements for a long period, such as during a vacation...

User Manual
Page 7
...8594; Exits MAIN MENU. Press again → Removes display. • Temporarily displays receiving channel when in -the-dark display on the remote control, place it under a fluorescent light or other lighting. • The phosphorescent material contains no radioactive or toxic material, so it... DVD/VCR CONTROL See page 33. Press again → Switch to charge the phosphorescent display will decrease with time and depending on the Remote Control glow in some instances where a Cable Converter Box requires an "enter" command after selecting channels, when using the 4 categories A, ...
...8594; Exits MAIN MENU. Press again → Removes display. • Temporarily displays receiving channel when in -the-dark display on the remote control, place it under a fluorescent light or other lighting. • The phosphorescent material contains no radioactive or toxic material, so it... DVD/VCR CONTROL See page 33. Press again → Switch to charge the phosphorescent display will decrease with time and depending on the Remote Control glow in some instances where a Cable Converter Box requires an "enter" command after selecting channels, when using the 4 categories A, ...
User Manual
Page 8
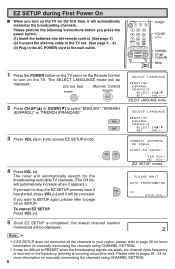
... Once EZ SETUP is completed, the lowest channel number memorized will be canceled. + If you press the power button. (1) Insert the batteries into the remote control. (See page 5) (2) Connect the antenna cable to the TV set. (See page 5 ~ 6) (3) Plug in your region, please refer ... VOL (-) and it will automatically search for more information on manually memorizing the channels using CHANNEL SETTING. • It may be displayed. (On the Set) (Remote Control) POWER 2 Press CH UP (8) or DOWN (9) to access EZ SETUP mode. CONNECT ANT ENNA OR CA B L E . YES : VOL + NO : VO L - (EZ...
... Once EZ SETUP is completed, the lowest channel number memorized will be canceled. + If you press the power button. (1) Insert the batteries into the remote control. (See page 5) (2) Connect the antenna cable to the TV set. (See page 5 ~ 6) (3) Plug in your region, please refer ... VOL (-) and it will automatically search for more information on manually memorizing the channels using CHANNEL SETTING. • It may be displayed. (On the Set) (Remote Control) POWER 2 Press CH UP (8) or DOWN (9) to access EZ SETUP mode. CONNECT ANT ENNA OR CA B L E . YES : VOL + NO : VO L - (EZ...
User Manual
Page 9
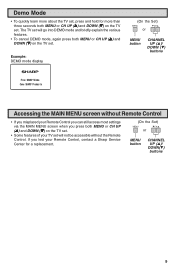
... the TV set. Example: DEMO mode display (On the Set) or MENU button CHANNEL UP (8)/ DOWN (9) buttons From SHARP Minds Come SHARP Products Accessing the MAIN MENU screen without the Remote Control. Demo Mode • To quickly learn more about the TV set, press and hold for more than three seconds... both MENU or CH UP (8) and DOWN (9) on the TV set. • Some features of your Remote Control, contact a Sharp Service Center for a replacement. (On the Set) or MENU button CHANNEL UP (8)/ DOWN(9) buttons 9 The TV set will not be accessible without...
... the TV set. Example: DEMO mode display (On the Set) or MENU button CHANNEL UP (8)/ DOWN (9) buttons From SHARP Minds Come SHARP Products Accessing the MAIN MENU screen without the Remote Control. Demo Mode • To quickly learn more about the TV set, press and hold for more than three seconds... both MENU or CH UP (8) and DOWN (9) on the TV set. • Some features of your Remote Control, contact a Sharp Service Center for a replacement. (On the Set) or MENU button CHANNEL UP (8)/ DOWN(9) buttons 9 The TV set will not be accessible without...
User Manual
Page 10
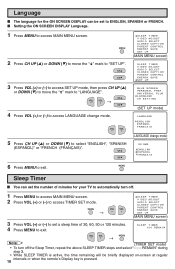
... Sleep Timer, repeat the above SLEEP TIMER steps and select "- - - Sleep Timer L You can be briefly displayed on-screen at regular intervals or when the remote's Display key is pressed. 10 REMAIN" during step 3. • While SLEEP TIMER is active, the time remaining will be set a sleep time of minutes for...
... Sleep Timer, repeat the above SLEEP TIMER steps and select "- - - Sleep Timer L You can be briefly displayed on-screen at regular intervals or when the remote's Display key is pressed. 10 REMAIN" during step 3. • While SLEEP TIMER is active, the time remaining will be set a sleep time of minutes for...
User Manual
Page 16
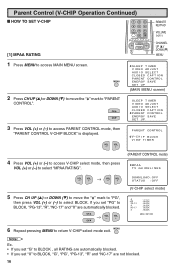
... - Parent Control (V-CHIP Operation Continued) L HOW TO SET V-CHIP [1] MPAA RATING 123 456 78 FLASHBACK 0 9 ENTER 100 PERSONAL PREFERENCE A B C D CH VOL VOL - + CH MENU MUTE REMOTE KEYPAD VOLUME (+)/(-) CHANNEL UP (8)/ DOWN (9) MENU 1 Press MENU to access MAIN MENU screen. 2 Press CH UP (8) or DOWN (9) to move the " " mark to "PG", then...
... - Parent Control (V-CHIP Operation Continued) L HOW TO SET V-CHIP [1] MPAA RATING 123 456 78 FLASHBACK 0 9 ENTER 100 PERSONAL PREFERENCE A B C D CH VOL VOL - + CH MENU MUTE REMOTE KEYPAD VOLUME (+)/(-) CHANNEL UP (8)/ DOWN (9) MENU 1 Press MENU to access MAIN MENU screen. 2 Press CH UP (8) or DOWN (9) to move the " " mark to "PG", then...
User Manual
Page 18
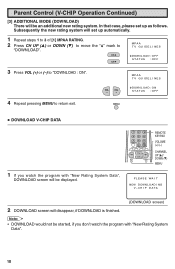
... : OFF 4 Repeat pressing MENU to return exit. • DOWNLOAD V-CHIP DATA 123 456 78 FLASHBACK 0 9 ENTER 100 PERSONAL PREFERENCE A B C D CH VOL VOL - + CH MENU MUTE REMOTE KEYPAD VOLUME (+)/(-) CHANNEL UP (8)/ DOWN (9) MENU 1 If you don't watch the program with "New Rating System Data". 18 Note: • DOWNLOAD would not be started...
... : OFF 4 Repeat pressing MENU to return exit. • DOWNLOAD V-CHIP DATA 123 456 78 FLASHBACK 0 9 ENTER 100 PERSONAL PREFERENCE A B C D CH VOL VOL - + CH MENU MUTE REMOTE KEYPAD VOLUME (+)/(-) CHANNEL UP (8)/ DOWN (9) MENU 1 If you don't watch the program with "New Rating System Data". 18 Note: • DOWNLOAD would not be started...
User Manual
Page 20
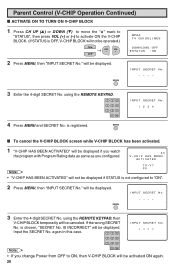
... SECRET No. again in this case. I NES DOWN L OAD : OF F S T A TUS : ON 2 Press MENU, then "INPUT SECRET No." using the REMOTE KEYPAD, then V-CHIP BLOCK temporarily will not be operated.) CH → VOL - I NPUT SECRET No . ---- 3 Enter the 4-digit SECRET No. I NPUT SECRET No... . ---- 3 Enter the 4-digit SECRET No. IS INCORRECT" will not be activated ON again. 20 using the REMOTE KEYPAD. is chosen, "SECRET No. Input the SECRET No. Parent Control (V-CHIP Operation Continued) L ACTIVATE ON TO TURN ON V-CHIP BLOCK 1 Press ...
... SECRET No. again in this case. I NES DOWN L OAD : OF F S T A TUS : ON 2 Press MENU, then "INPUT SECRET No." using the REMOTE KEYPAD, then V-CHIP BLOCK temporarily will not be operated.) CH → VOL - I NPUT SECRET No . ---- 3 Enter the 4-digit SECRET No. I NPUT SECRET No... . ---- 3 Enter the 4-digit SECRET No. IS INCORRECT" will not be activated ON again. 20 using the REMOTE KEYPAD. is chosen, "SECRET No. Input the SECRET No. Parent Control (V-CHIP Operation Continued) L ACTIVATE ON TO TURN ON V-CHIP BLOCK 1 Press ...
User Manual
Page 21
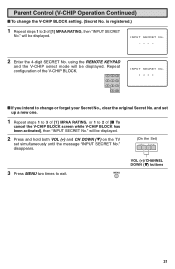
Repeat configuration of [1] MPAA RATING, or 1 to exit. using the REMOTE KEYPAD and the V-CHIP select mode will be displayed. disappears. (On the Set) 3 Press MENU two times to 2 of [1] MPAA RATING, then "INPUT SECRET No." ...
Repeat configuration of [1] MPAA RATING, or 1 to exit. using the REMOTE KEYPAD and the V-CHIP select mode will be displayed. disappears. (On the Set) 3 Press MENU two times to 2 of [1] MPAA RATING, then "INPUT SECRET No." ...
User Manual
Page 23
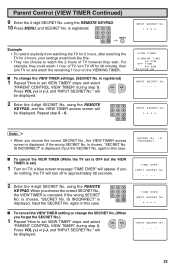
... the SECRET No. is canceled. IS INCORRECT" is chosen, "SECRET No. Parent Control (VIEW TIMER Continued) 9 Enter the 4-digit SECRET No. using the REMOTE KEYPAD. is set VIEW TIMER" steps and select "PARENT CONTROL VIEW TIMER" during step 3. For example, they wish. L To change the SECRET No. (... displayed. L To cancel the VIEW TIMER (While the TV set VIEW TIMER" steps and select "PARENT CONTROL VIEW TIMER" during step 3. using the REMOTE KEYPAD. 10 Press MENU, and SECRET No. If the wrong SECRET No. Input the SECRET No. again in approximately 30 seconds. 2 Enter the 4-...
... the SECRET No. is canceled. IS INCORRECT" is chosen, "SECRET No. Parent Control (VIEW TIMER Continued) 9 Enter the 4-digit SECRET No. using the REMOTE KEYPAD. is set VIEW TIMER" steps and select "PARENT CONTROL VIEW TIMER" during step 3. For example, they wish. L To change the SECRET No. (... displayed. L To cancel the VIEW TIMER (While the TV set VIEW TIMER" steps and select "PARENT CONTROL VIEW TIMER" during step 3. using the REMOTE KEYPAD. 10 Press MENU, and SECRET No. If the wrong SECRET No. Input the SECRET No. again in approximately 30 seconds. 2 Enter the 4-...

User Manual
Page 25
... SETUP is completed, the lowest channel number memorized will be displayed. 123 456 78 FLASHBACK 0 9 ENTER 100 PERSONAL PREFERENCE A B C D CH VOL VOL - + CH MENU MUTE REMOTE KEYPAD VOLUME (+)/(-) CHANNEL UP (8)/ DOWN (9) MENU S L EEP T I MER V I DEO AD J UST AUD I O SE L ECT C LOSED CAP T I ON PARENT CONTROL ENERGY SAVE SET UP (MAIN MENU...
... SETUP is completed, the lowest channel number memorized will be displayed. 123 456 78 FLASHBACK 0 9 ENTER 100 PERSONAL PREFERENCE A B C D CH VOL VOL - + CH MENU MUTE REMOTE KEYPAD VOLUME (+)/(-) CHANNEL UP (8)/ DOWN (9) MENU S L EEP T I MER V I DEO AD J UST AUD I O SE L ECT C LOSED CAP T I ON PARENT CONTROL ENERGY SAVE SET UP (MAIN MENU...
User Manual
Page 27
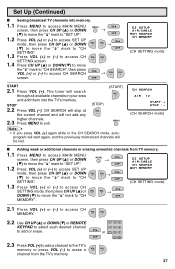
... move the " " mark to "CH CH → VOL + CH MEMORY". 2.1 Press VOL (+) or (-) to access CH MEMORY. VOL VOL - + 2.2 Use CH UP (8) or DOWN (9) or REMOTE KEYPAD to select each desired channel to access CH SETTING mode, then press CH UP (8) or VOL - VOL + EZ SETUP A I R / CABLE CH SEARCH CH MEMOR...
... move the " " mark to "CH CH → VOL + CH MEMORY". 2.1 Press VOL (+) or (-) to access CH MEMORY. VOL VOL - + 2.2 Use CH UP (8) or DOWN (9) or REMOTE KEYPAD to select each desired channel to access CH SETTING mode, then press CH UP (8) or VOL - VOL + EZ SETUP A I R / CABLE CH SEARCH CH MEMOR...
User Manual
Page 29
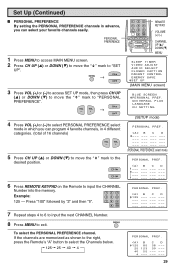
... " " mark to select the Channels below. 125 25 40 4 123 456 78 FLASHBACK 0 9 ENTER 100 PERSONAL PREFERENCE A B C D CH VOL VOL - + CH MENU MUTE REMOTE KEYPAD VOLUME (+)/(-) CHANNEL UP (8)/ DOWN (9) MENU S L EEP T I MER V I DEO AD J UST AUD I O SE L ECT C LOSED CAP T I NG (SETUP mode...B LUE SCREEN PERSONA L PRE F . B C D PERSONA L PREF . D 29 If the channels are memorized as shown to the right, press the Remote's "A" button to "PERSONAL PREFERENCE". PERSONAL PREFERENCE 1 Press MENU to access MAIN MENU screen. 2 Press CH UP (8) or DOWN (9) to move the " ...
... " " mark to select the Channels below. 125 25 40 4 123 456 78 FLASHBACK 0 9 ENTER 100 PERSONAL PREFERENCE A B C D CH VOL VOL - + CH MENU MUTE REMOTE KEYPAD VOLUME (+)/(-) CHANNEL UP (8)/ DOWN (9) MENU S L EEP T I MER V I DEO AD J UST AUD I O SE L ECT C LOSED CAP T I NG (SETUP mode...B LUE SCREEN PERSONA L PRE F . B C D PERSONA L PREF . D 29 If the channels are memorized as shown to the right, press the Remote's "A" button to "PERSONAL PREFERENCE". PERSONAL PREFERENCE 1 Press MENU to access MAIN MENU screen. 2 Press CH UP (8) or DOWN (9) to move the " ...
User Manual
Page 30
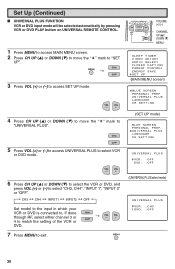
... F 30 Set Up (Continued) L UNIVERSAL PLUS FUNCTION VCR or DVD input mode will be selected automatically by pressing VCR or DVD PLAY button on UNIVERSAL REMOTE CONTROL. 1 Press MENU to access MAIN MENU screen. 2 Press CH UP (8) or DOWN (9) to move the " " mark to "UNIVERSAL PLUS". CH CH 5 Press VOL (+) or...
... F 30 Set Up (Continued) L UNIVERSAL PLUS FUNCTION VCR or DVD input mode will be selected automatically by pressing VCR or DVD PLAY button on UNIVERSAL REMOTE CONTROL. 1 Press MENU to access MAIN MENU screen. 2 Press CH UP (8) or DOWN (9) to move the " " mark to "UNIVERSAL PLUS". CH CH 5 Press VOL (+) or...
User Manual
Page 32
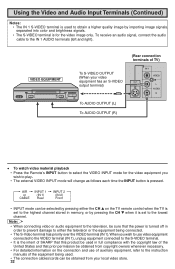
... equipment has an S-VIDEO output terminal) To AUDIO OUTPUT (L) To AUDIO OUTPUT (R) • To watch video material playback • Press the Remote's INPUT button to select the VIDEO INPUT mode for the video image only. separated into color and brightness signals. • The S-VIDEO terminal is... equipment you wish to use of auxiliary equipment, refer to the instruction manuals of SHARP that prior permission be obtained from copyright owners whenever necessary. • For detailed information on the TV remote control when the TV is set to the highest channel stored in memory, or...
... equipment has an S-VIDEO output terminal) To AUDIO OUTPUT (L) To AUDIO OUTPUT (R) • To watch video material playback • Press the Remote's INPUT button to select the VIDEO INPUT mode for the video image only. separated into color and brightness signals. • The S-VIDEO terminal is... equipment you wish to use of auxiliary equipment, refer to the instruction manuals of SHARP that prior permission be obtained from copyright owners whenever necessary. • For detailed information on the TV remote control when the TV is set to the highest channel stored in memory, or...
User Manual
Page 33
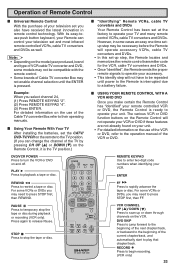
...may need to press STOP first, then REWIND. Example: When you may not enable channel selection until power to the Remote is pressed. L Using Your Remote With Your TV After installing the batteries, set -up or down through channels on the model year produced, brand and...manual of the current chapter/track, and automatically start to a battery failure. For some VCRs or DVDs, you select channel 24, (1) Press REMOTE KEYPAD "2". (2) Press REMOTE KEYPAD "4". (3) Press ENTER. With its easy-touse push button keyboard, your VCR. POWER TV DVD VCR DISPLAY INPUT 123 456 78 FLASHBACK ...
...may need to press STOP first, then REWIND. Example: When you may not enable channel selection until power to the Remote is pressed. L Using Your Remote With Your TV After installing the batteries, set -up or down through channels on the model year produced, brand and...manual of the current chapter/track, and automatically start to a battery failure. For some VCRs or DVDs, you select channel 24, (1) Press REMOTE KEYPAD "2". (2) Press REMOTE KEYPAD "4". (3) Press ENTER. With its easy-touse push button keyboard, your VCR. POWER TV DVD VCR DISPLAY INPUT 123 456 78 FLASHBACK ...
User Manual
Page 34
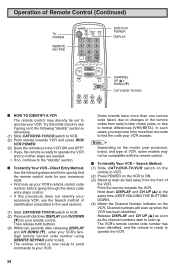
... feet away from early to later model years, or due to format differences (VHS/BETA). Search Method. (1) Slide CATV/DVD-TV/VCR switch on the remote to VCR. (2) Press POWER on to the following steps and list to quickly find the code your VCR. L To Identify Your VCR - Then release ...the direct code entry steps control. • If this procedure does not identify your accessory VCR, use the Search method of identification (described in the remote codes from the front of the VCR. Note: Depending on the VCR, Channel numbers will scan up when the VCR has been identified. Release DISPLAY...
... feet away from early to later model years, or due to format differences (VHS/BETA). Search Method. (1) Slide CATV/DVD-TV/VCR switch on the remote to VCR. (2) Press POWER on to the following steps and list to quickly find the code your VCR. L To Identify Your VCR - Then release ...the direct code entry steps control. • If this procedure does not identify your accessory VCR, use the Search method of identification (described in the remote codes from the front of the VCR. Note: Depending on the VCR, Channel numbers will scan up when the VCR has been identified. Release DISPLAY...
User Manual
Page 35
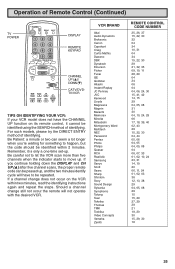
... ENTER 100 PERSONAL PREFERENCE A B C D CH VOL VOL - + CH MENU MUTE CATV TV DVD VCR REW PLAY FF PAUSE STOP REC CH/SKIP DISPLAY REMOTE KEYPAD CHANNEL UP (8)/ DOWN (9) CATV/DVDTV/VCR TIPS ON IDENTIFYING YOUR VCR: If your VCR model does not have to be repeated. Be careful not... Mitsubishi Montgomery Ward Multitech NEC Panasonic Pentax Philco Philips Quasar RCA Realistic Samsung Sanyo Scott Sears Sharp Shintom Sony Sound Design Sylvania Symphonic Tatung Teac Teknika Thomas TMK Toshiba Video Concepts Yamaha Zenith REMOTE CONTROL CODE NUMBER 25, 26, 37 15, 22, 30 32 04 34 10, 31...
... ENTER 100 PERSONAL PREFERENCE A B C D CH VOL VOL - + CH MENU MUTE CATV TV DVD VCR REW PLAY FF PAUSE STOP REC CH/SKIP DISPLAY REMOTE KEYPAD CHANNEL UP (8)/ DOWN (9) CATV/DVDTV/VCR TIPS ON IDENTIFYING YOUR VCR: If your VCR model does not have to be repeated. Be careful not... Mitsubishi Montgomery Ward Multitech NEC Panasonic Pentax Philco Philips Quasar RCA Realistic Samsung Sanyo Scott Sears Sharp Shintom Sony Sound Design Sylvania Symphonic Tatung Teac Teknika Thomas TMK Toshiba Video Concepts Yamaha Zenith REMOTE CONTROL CODE NUMBER 25, 26, 37 15, 22, 30 32 04 34 10, 31...
User Manual
Page 36
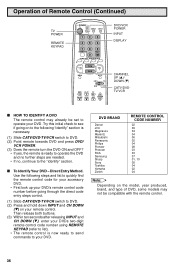
...VCR POWER. (3) Does the remote turn the DVD ON and OFF? • If yes, the remote is now ready to send commands to your remote control. DVD BRAND Denon JVC Magnavox Marantz Mitsubishi Panasonic Philips Pioneer Proscan RCA Samsung Sharp Sony Toshiba Yamaha Zenith REMOTE CONTROL CODE NUMBER 02 09 ...-TV/VCR switch to DVD. (2) Press and hold down INPUT and CH DOWN (9) on the model, year produced, brand, and type of Remote Control (Continued) TV POWER REMOTE KEYPAD POWER TV DVD VCR DISPLAY INPUT 123 456 78 FLASHBACK 0 9 ENTER 100 PERSONAL PREFERENCE A B C D CH VOL VOL - + ...
...VCR POWER. (3) Does the remote turn the DVD ON and OFF? • If yes, the remote is now ready to send commands to your remote control. DVD BRAND Denon JVC Magnavox Marantz Mitsubishi Panasonic Philips Pioneer Proscan RCA Samsung Sharp Sony Toshiba Yamaha Zenith REMOTE CONTROL CODE NUMBER 02 09 ...-TV/VCR switch to DVD. (2) Press and hold down INPUT and CH DOWN (9) on the model, year produced, brand, and type of Remote Control (Continued) TV POWER REMOTE KEYPAD POWER TV DVD VCR DISPLAY INPUT 123 456 78 FLASHBACK 0 9 ENTER 100 PERSONAL PREFERENCE A B C D CH VOL VOL - + ...


