
KC-860U Operation Manual
Page 3
...: SHARP ELECTRONICS CORPORATION Sharp Plaza, Mahwah, New Jersey 07495-1163 Declaration of Conformity SHARP AIR PURIFIER KC-860U This ISM device complies with Part 18 of Conformity SHARP AIR PURIFIER KC-860U This device complies with Canadian ICES-001 Responsible Party: SHARP ELECTRONICS... E-15 • MAIN UNIT E-15 • WATER TANK E-16 • WASHABLE DEODORIZING FILTER E-16 • HUMIDIFYING TRAY E-17 • HUMIDIFYING FILTER E-18 • FILTER REPLACEMENT GUIDELINES.....E-19 TROUBLESHOOTING E-20 SPECIFICATIONS E-22 Thank you for future reference. REDUCES POLLEN & MOLD*...
...: SHARP ELECTRONICS CORPORATION Sharp Plaza, Mahwah, New Jersey 07495-1163 Declaration of Conformity SHARP AIR PURIFIER KC-860U This ISM device complies with Part 18 of Conformity SHARP AIR PURIFIER KC-860U This device complies with Canadian ICES-001 Responsible Party: SHARP ELECTRONICS... E-15 • MAIN UNIT E-15 • WATER TANK E-16 • WASHABLE DEODORIZING FILTER E-16 • HUMIDIFYING TRAY E-17 • HUMIDIFYING FILTER E-18 • FILTER REPLACEMENT GUIDELINES.....E-19 TROUBLESHOOTING E-20 SPECIFICATIONS E-22 Thank you for future reference. REDUCES POLLEN & MOLD*...
KC-860U Operation Manual
Page 7
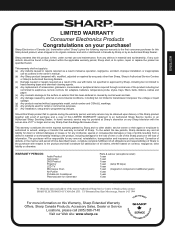
... be provided at its option, repair or replace the product as a result of the use with items not specified or approved by Sharp, including but not limited to earphones, remote controls, AC adapters, batteries, temperature probe, stylus, trays, filters, belts, ribbons, cables and paper. (e)...not limited to head cleaning tapes and chemical cleaning agents. (d) Any replacement of accessories, glassware, consumable or peripheral items required through normal use as outlined in the owner's manual. (b) Any Sharp product tampered with respect to the product and shall constitute full satisfaction...
... be provided at its option, repair or replace the product as a result of the use with items not specified or approved by Sharp, including but not limited to earphones, remote controls, AC adapters, batteries, temperature probe, stylus, trays, filters, belts, ribbons, cables and paper. (e)...not limited to head cleaning tapes and chemical cleaning agents. (d) Any replacement of accessories, glassware, consumable or peripheral items required through normal use as outlined in the owner's manual. (b) Any Sharp product tampered with respect to the product and shall constitute full satisfaction...

KC-860U Operation Manual
Page 12
... on the top 2 Install the filters 1 Install the True HEPA filter. Washable Deodorizing filter Back Panel Bottom tabs True HEPA filter (white) 3 Gently push in the upper tabs (left and right) into the small holes in place. Tabs on the tabs, then tilt and ...lter (black) and True HEPA filter (white) from the plastic bags and replace the filters in the unit. Upper tabs Washable Deodorizing filter (black) 4 Fill in proper orientation. Date Label E-10 FILTER INSTALLATION To maintain the quality of the unit. Be sure to remove the filters...
... on the top 2 Install the filters 1 Install the True HEPA filter. Washable Deodorizing filter Back Panel Bottom tabs True HEPA filter (white) 3 Gently push in the upper tabs (left and right) into the small holes in place. Tabs on the tabs, then tilt and ...lter (black) and True HEPA filter (white) from the plastic bags and replace the filters in the unit. Upper tabs Washable Deodorizing filter (black) 4 Fill in proper orientation. Date Label E-10 FILTER INSTALLATION To maintain the quality of the unit. Be sure to remove the filters...

KC-860U Operation Manual
Page 17
... with clean water to remove the solution residue. 3 Drip dry panel to reset the maintenance timer. Sensor Back Panel SENSOR FILTER CARE Remove the sensor filter and tap it is already off . Do not operate unit without all filters properly installed. Do not use . The... clean regularly. Avoid scrubbing the back panel when washing. 2 Rinse the back panel repeatedly with lukewarm water. Dry the filter completely before replacing in , turn on after approximately 720 hours of use volatile fluids Benzene, paint thinner, polishing powder, may occur as a reminder to ...
... with clean water to remove the solution residue. 3 Drip dry panel to reset the maintenance timer. Sensor Back Panel SENSOR FILTER CARE Remove the sensor filter and tap it is already off . Do not operate unit without all filters properly installed. Do not use . The... clean regularly. Avoid scrubbing the back panel when washing. 2 Rinse the back panel repeatedly with lukewarm water. Dry the filter completely before replacing in , turn on after approximately 720 hours of use volatile fluids Benzene, paint thinner, polishing powder, may occur as a reminder to ...

KC-860U Operation Manual
Page 18
... possible, dry outdoors. Dry filter in a sideways position to the floor. 4 Replace the filter in a well ventilated area. Do not allow filter to freeze. • If filter is noticed from the WASHABLE DEODORIZING FILTER under the filter to prevent water damage to avoid warping of the...
... possible, dry outdoors. Dry filter in a sideways position to the floor. 4 Replace the filter in a well ventilated area. Do not allow filter to freeze. • If filter is noticed from the WASHABLE DEODORIZING FILTER under the filter to prevent water damage to avoid warping of the...

KC-860U Operation Manual
Page 20
...Combine 1/4 cup lemon juice and 3 cups of lukewarm water in a container large enough to the Humidifying Tray, and replace the Humidifying Tray in the unit. • The Humidifying filter will depend on . Be sure there is no pulp (strain juice if necessary). Frequency of maintenance cycle will not ... reddish-brown or white deposits forming on the display more often descaling will be used for 30 minutes before replacing. 7 Plug in the unit, turn power ON, and press the Filter Reset Button on the surface of the Humidifying filter. Avoid spilling water from the Humidifying Tray...
...Combine 1/4 cup lemon juice and 3 cups of lukewarm water in a container large enough to the Humidifying Tray, and replace the Humidifying Tray in the unit. • The Humidifying filter will depend on . Be sure there is no pulp (strain juice if necessary). Frequency of maintenance cycle will not ... reddish-brown or white deposits forming on the display more often descaling will be used for 30 minutes before replacing. 7 Plug in the unit, turn power ON, and press the Filter Reset Button on the surface of the Humidifying filter. Avoid spilling water from the Humidifying Tray...
KC-860U Operation Manual
Page 21
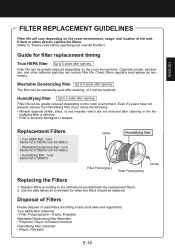
... filter: 1unit Model FZ-C150DFU (for when the filters should be replaced. Disposal of Filters Please dispose of the unit. ENGLISH FILTER REPLACEMENT GUIDELINES Filter life will vary depending on the room environment. Check filters regularly and replace as a reminder for KC-860U) • Humidifying filter: 1unit Model FZ-C100MFU (gray) Humidifying filter...
... filter: 1unit Model FZ-C150DFU (for when the filters should be replaced. Disposal of Filters Please dispose of the unit. ENGLISH FILTER REPLACEMENT GUIDELINES Filter life will vary depending on the room environment. Check filters regularly and replace as a reminder for KC-860U) • Humidifying filter: 1unit Model FZ-C100MFU (gray) Humidifying filter...

KC-860U Operation Manual
Page 22
... not illuminate when the tank is located on a level surface. The Front Monitor lights change colors as impurities are heavily soiled. • Clean or replace the filters. • Plasmacluster Air Purifiers may produce a slight odor. Gently clean the dust sensors (See E-15). • Clicking or ... sensor openings blocked or clogged? (In this case, clean the openings.) (See E-15) • After cleaning or replacing filters, connect the power cord to an outlet and press the Filter Reset Button. (See E-15) • Check to see if the Lights OFF Mode selected. Check to see if Clean...
... not illuminate when the tank is located on a level surface. The Front Monitor lights change colors as impurities are heavily soiled. • Clean or replace the filters. • Plasmacluster Air Purifiers may produce a slight odor. Gently clean the dust sensors (See E-15). • Clicking or ... sensor openings blocked or clogged? (In this case, clean the openings.) (See E-15) • After cleaning or replacing filters, connect the power cord to an outlet and press the Filter Reset Button. (See E-15) • Check to see if the Lights OFF Mode selected. Check to see if Clean...


