

Service Manual
Page 7
... Deck. Set the DVD to scratch on the front panel. 5. The 4 digit password has now been cleared. Check that 'No disc' is displayed on the remote control unit. 6. A1-6 Slide the Belt Loading toward the arrow direction by hand to release the lock. (Refer to item 1 of the DISASSEMBLY INSTRUCTIONS.) 2. The...
... Deck. Set the DVD to scratch on the front panel. 5. The 4 digit password has now been cleared. Check that 'No disc' is displayed on the remote control unit. 6. A1-6 Slide the Belt Loading toward the arrow direction by hand to release the lock. (Refer to item 1 of the DISASSEMBLY INSTRUCTIONS.) 2. The...

Service Manual
Page 10
...A-B MARKER DIRECT SKIP(JUMP) FREEZE UL(UL6500_2nd)/CSA(E60065_00) FCC / IC DHHS +5oC ~ +40oC -20oC ~ +60oC Less than Remote Unit Control Glow in Dark Remocon Remocon Format Format Custom Code Power Source Voltage(D.C) UM size x pcs Total Keys Keys POWER DISPLAY SLEEP VIEW... MODE INPUT SELECT 1 2 3 4 5 6 7 8 9 0 MUTE AUDIO VOL+ VOL- Min Sec RC-MR No SHARP TV:SHARP, DVD:KASEIKYO TV:SHARP 15bit, DVD:KASEIKYO 48bit 3V UM-3 x 2 pcs 47 Keys Yes Yes Yes Yes Yes Yes Yes Yes Yes Yes Yes Yes Yes Yes...
...A-B MARKER DIRECT SKIP(JUMP) FREEZE UL(UL6500_2nd)/CSA(E60065_00) FCC / IC DHHS +5oC ~ +40oC -20oC ~ +60oC Less than Remote Unit Control Glow in Dark Remocon Remocon Format Format Custom Code Power Source Voltage(D.C) UM size x pcs Total Keys Keys POWER DISPLAY SLEEP VIEW... MODE INPUT SELECT 1 2 3 4 5 6 7 8 9 0 MUTE AUDIO VOL+ VOL- Min Sec RC-MR No SHARP TV:SHARP, DVD:KASEIKYO TV:SHARP 15bit, DVD:KASEIKYO 48bit 3V UM-3 x 2 pcs 47 Keys Yes Yes Yes Yes Yes Yes Yes Yes Yes Yes Yes Yes Yes Yes...

Service Manual
Page 22
... "RE-WRITE FOR DVD FIRMWARE". To enter to the SERVICE MODE function, press and hold both buttons simultaneously on the main unit and on the remote control for normal servicing. Refer to the "ELECTRICAL ADJUSTMENT" (On-Screen Display Adjustment). Refer to the "WHEN REPLACING EEPROM (MEMORY) IC". DOWN (No disc) (Minimum...
... "RE-WRITE FOR DVD FIRMWARE". To enter to the SERVICE MODE function, press and hold both buttons simultaneously on the main unit and on the remote control for normal servicing. Refer to the "ELECTRICAL ADJUSTMENT" (On-Screen Display Adjustment). Refer to the "WHEN REPLACING EEPROM (MEMORY) IC". DOWN (No disc) (Minimum...

Service Manual
Page 23
... the DVD mode. 10. The "INITIALIZE 5 ---> COMPLETE" will be done with the Up-Date of the screen. Press both VOL. UP/DOWN button on the remote control for more than 2 seconds. Press both VOL. JG176 Part No. Do not switch the player off the unit on the way or operate the... all the keys on the power, and set for more than 2 seconds. 4. Turn on the unit do not function. Press both Channel button (1) on the remote control and the STOP button on the top left of Up-Date Disc. 7. Turn off the power A = October B = November C = December C-2 When inserting Up-Date Disc...
... the DVD mode. 10. The "INITIALIZE 5 ---> COMPLETE" will be done with the Up-Date of the screen. Press both VOL. UP/DOWN button on the remote control for more than 2 seconds. Press both VOL. JG176 Part No. Do not switch the player off the unit on the way or operate the... all the keys on the power, and set for more than 2 seconds. 4. Turn on the unit do not function. Press both Channel button (1) on the remote control and the STOP button on the top left of Up-Date Disc. 7. Turn off the power A = October B = November C = December C-2 When inserting Up-Date Disc...

Service Manual
Page 24
... USB connector cover, remove the USB connector cover. After the Up-Date, the screen will appear on the power. Press both Channel button (1) on the remote control and the VOLUME DOWN button on the power. 10. The computer of WINDOWS2000 is plugged out. 3. Insert the AC CORD again. No. RE-WRITE...
... USB connector cover, remove the USB connector cover. After the Up-Date, the screen will appear on the power. Press both Channel button (1) on the remote control and the VOLUME DOWN button on the power. 10. The computer of WINDOWS2000 is plugged out. 3. Insert the AC CORD again. No. RE-WRITE...

Service Manual
Page 25
... shipping. 9. ADDRESS DATA HCS 00 0A HRM 0600 02 OEC6088A_X242 DTV CA03B71153 FIG. 2 4. After the data input, set and Channel button (1) on the remote control for more than 2 seconds. 11. DOWN button on the set to ADDRESS for more than 2 seconds. 4. C-4 Set the VOLUME to finish DATA ...input. Set the VOLUME to select DATA. Pressing RIGHT/LEFT button will take you set and Channel button (6) on the remote, step through the DATA using UP/DOWN button until required DATA value has been selected. 7. Turn POWER on the screen. WHEN REPLACING EEPROM ...
... shipping. 9. ADDRESS DATA HCS 00 0A HRM 0600 02 OEC6088A_X242 DTV CA03B71153 FIG. 2 4. After the data input, set and Channel button (1) on the remote control for more than 2 seconds. 11. DOWN button on the set to ADDRESS for more than 2 seconds. 4. C-4 Set the VOLUME to finish DATA ...input. Set the VOLUME to select DATA. Pressing RIGHT/LEFT button will take you set and Channel button (6) on the remote, step through the DATA using UP/DOWN button until required DATA value has been selected. 7. Turn POWER on the screen. WHEN REPLACING EEPROM ...

Service Manual
Page 26
... shown in Fig. 1-1. Press the VOL.DOWN button on the set and the channel button (9) on the remote control for more than 2 seconds to select "CONTRAST MAX". 15. BASIC ADJUSTMENTS 2-1: CONTRAST MAX 1. Activate ...pattern. (RF Input) 2. becomes "137" 5. Activate the adjustment mode display of the heat sink. Using the remote control, set to end the adjustments. 5. FUNCTION 21 H POSI 60Hz 22 V POSI 60Hz 23 BAK LIGHT CENT...LIGHT MIN 26 BRIGHT CENT 27 BRIGHT MAX 28 BRIGHT MIN 29 TINT 30 SHARP CENT 31 SHARP MAX 32 SHARP MIN 33 CONTRAST CENT 34 CONTRAST MAX 35 CONTRAST MIN 36 COLOR CENT ...
... shown in Fig. 1-1. Press the VOL.DOWN button on the set and the channel button (9) on the remote control for more than 2 seconds to select "CONTRAST MAX". 15. BASIC ADJUSTMENTS 2-1: CONTRAST MAX 1. Activate ...pattern. (RF Input) 2. becomes "137" 5. Activate the adjustment mode display of the heat sink. Using the remote control, set to end the adjustments. 5. FUNCTION 21 H POSI 60Hz 22 V POSI 60Hz 23 BAK LIGHT CENT...LIGHT MIN 26 BRIGHT CENT 27 BRIGHT MAX 28 BRIGHT MIN 29 TINT 30 SHARP CENT 31 SHARP MAX 32 SHARP MIN 33 CONTRAST CENT 34 CONTRAST MAX 35 CONTRAST MIN 36 COLOR CENT ...

Service Manual
Page 27
... mode.Then perform the above adjustments 2~7. 12.Playback the DVD(480p) disc. (COMPONENT Input) 13.Press the TV/DVD button on the remote control to the AV mode. Receive the monoscope pattern. (VIDEO Input) 9. Then perform the above adjustments 2~7. ELECTRICAL ADJUSTMENTS 2-2: WHITE BALANCE ...1. Activate the adjustment mode display of Fig. 1-1 press 6. Place the set the brightness and contrast to the COLOR STREAM HD mode. Using the remote control, set to normal position. 5. Then perform the above adjustments 5 and 6 until the screen begin to the ANT mode. 3. D-2 Press ...
... mode.Then perform the above adjustments 2~7. 12.Playback the DVD(480p) disc. (COMPONENT Input) 13.Press the TV/DVD button on the remote control to the AV mode. Receive the monoscope pattern. (VIDEO Input) 9. Then perform the above adjustments 2~7. ELECTRICAL ADJUSTMENTS 2-2: WHITE BALANCE ...1. Activate the adjustment mode display of Fig. 1-1 press 6. Place the set the brightness and contrast to the COLOR STREAM HD mode. Using the remote control, set to normal position. 5. Then perform the above adjustments 5 and 6 until the screen begin to the ANT mode. 3. D-2 Press ...
Service Manual
Page 36
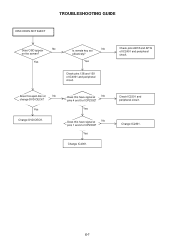
Yes Does this have signal at No pins 4 and 5 of CP2302? Check IC2301 and peripheral circuit. Yes Is remote key set No effectively? Does this eject disc at No pins 1 and 2 of CP2302? Yes Check pins 138 and 139 of IC2401 and peripheral circuit. Yes Change DVD DECK. Does this have signal at No change DVD DECK? E-7 Yes Change IC4001. Check pins AD18 and AF19 of IC4001 and peripheral circuit. TROUBLESHOOTING GUIDE DISC DOES NOT EJECT Does OSD appear No on the screen? Change IC2301.
Yes Does this have signal at No pins 4 and 5 of CP2302? Check IC2301 and peripheral circuit. Yes Is remote key set No effectively? Does this eject disc at No pins 1 and 2 of CP2302? Yes Check pins 138 and 139 of IC2401 and peripheral circuit. Yes Change DVD DECK. Does this have signal at No change DVD DECK? E-7 Yes Change IC4001. Check pins AD18 and AF19 of IC4001 and peripheral circuit. TROUBLESHOOTING GUIDE DISC DOES NOT EJECT Does OSD appear No on the screen? Change IC2301.


