

Operation Manual
Page 7
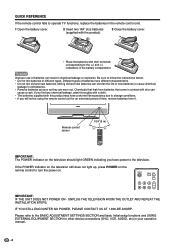
... TV falling over the base area to follow the instructions. 1. Remote control unit (X1) "AA" size battery (X2) AC cord (X1) Page 8 Cable Clamp (X1) Page 8 Stand unit (X1) Page 7 Operation manual (X1) ENGLISH FRANÇAIS ESPAÑOL LC-26SH10U LC-32SH10U LIQUID CRYSTAL TELEVISION TÉLÉVISEUR ACL TELEVISOR CON PANTALLA...
... TV falling over the base area to follow the instructions. 1. Remote control unit (X1) "AA" size battery (X2) AC cord (X1) Page 8 Cable Clamp (X1) Page 8 Stand unit (X1) Page 7 Operation manual (X1) ENGLISH FRANÇAIS ESPAÑOL LC-26SH10U LC-32SH10U LIQUID CRYSTAL TELEVISION TÉLÉVISEUR ACL TELEVISOR CON PANTALLA...
Operation Manual
Page 9
...in old batteries. • Remove batteries as soon as they are worn out. IF YOU STILL ENCOUNTER NO POWER, PLEASE CONTACT US AT 1-800-BE-SHARP. Be sure to follow the instructions below. • Do not mix batteries of batteries have different characteristics. • Do not mix old and new... batteries. Chemicals that leak from it. If you will not be using the remote control unit for other device connections (DVD, VCR, AUDIO, etc) in chemical leakage or explosion. IMPORTANT: IF THE UNIT DOES NOT POWER ON - Mixing...
...in old batteries. • Remove batteries as soon as they are worn out. IF YOU STILL ENCOUNTER NO POWER, PLEASE CONTACT US AT 1-800-BE-SHARP. Be sure to follow the instructions below. • Do not mix batteries of batteries have different characteristics. • Do not mix old and new... batteries. Chemicals that leak from it. If you will not be using the remote control unit for other device connections (DVD, VCR, AUDIO, etc) in chemical leakage or explosion. IMPORTANT: IF THE UNIT DOES NOT POWER ON - Mixing...

Operation Manual
Page 10
Contents IMPORTANT INFORMATION 1 Trademarks 2 DEAR SHARP CUSTOMER 3 IMPORTANT SAFETY INSTRUCTIONS 3 Supplied accessories 6 QUICK REFERENCE 6 Attaching the stand 6 Contents 9 Part names 10 TV (Front 10 TV (Rear 11 Remote control unit 12 Preparation 13 Using the remote control unit 13 Cautions regarding remote control unit ......... 13 Antennas 13 Watching TV 14 Preparation 14 Turning on the...
Contents IMPORTANT INFORMATION 1 Trademarks 2 DEAR SHARP CUSTOMER 3 IMPORTANT SAFETY INSTRUCTIONS 3 Supplied accessories 6 QUICK REFERENCE 6 Attaching the stand 6 Contents 9 Part names 10 TV (Front 10 TV (Rear 11 Remote control unit 12 Preparation 13 Using the remote control unit 13 Cautions regarding remote control unit ......... 13 Antennas 13 Watching TV 14 Preparation 14 Turning on the...

Operation Manual
Page 13
.... (See page 16.) 3 • (DOT): (See page 16.) 4 SURROUND: Display the WOW surround setting menu. (See page 18.) 5 FREEZE: Set the still image. Part names Remote control unit 11 1 2 3 4 5 6 7 8 9 10 1 POWER: Switch the power on the screen. 20 RETURN: Return to the previous menu screen. 21 VIEW MODE: Select the screen... size. (See page 28.) 22 AV MODE: Select an adjusted picture setting. (SPORTS, STANDARD, MOVIE, MEMORY.) (See page 27.) NOTE • When using the remote control unit, point it at the TV. (See page 8.) 12
.... (See page 16.) 3 • (DOT): (See page 16.) 4 SURROUND: Display the WOW surround setting menu. (See page 18.) 5 FREEZE: Set the still image. Part names Remote control unit 11 1 2 3 4 5 6 7 8 9 10 1 POWER: Switch the power on the screen. 20 RETURN: Return to the previous menu screen. 21 VIEW MODE: Select the screen... size. (See page 28.) 22 AV MODE: Select an adjusted picture setting. (SPORTS, STANDARD, MOVIE, MEMORY.) (See page 27.) NOTE • When using the remote control unit, point it at the TV. (See page 8.) 12
Operation Manual
Page 14
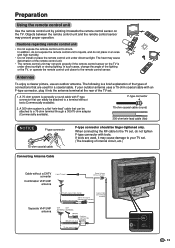
... the TV. When connecting the RF cable to the TV set, do not place in an area with tools. Objects between the remote control unit and the remote control sensor may cause damage to your outdoor antenna uses a 75-ohm coaxial cable with F-type connector that can be attached to... a 75-ohm terminal through a 300/75-ohm adapter (Commercially available). If your TV set . 1. Cautions regarding remote control unit • Do not expose the remote control unit to shock. The following is under direct sunlight. A 75-ohm system is a flat the rear of the TV...
... the TV. When connecting the RF cable to the TV set, do not place in an area with tools. Objects between the remote control unit and the remote control sensor may cause damage to your outdoor antenna uses a 75-ohm coaxial cable with F-type connector that can be attached to... a 75-ohm terminal through a 300/75-ohm adapter (Commercially available). If your TV set . 1. Cautions regarding remote control unit • Do not expose the remote control unit to shock. The following is under direct sunlight. A 75-ohm system is a flat the rear of the TV...

Operation Manual
Page 15
.... • If a station being viewed stops broadcasting, the TV will automatically shut itself off the power Press POWER on the TV, or POWER on the remote control. • The TV enters standby mode and the image on the screen disappears. • The POWER indicator on the TV changes to the AC.../CABLE CABLE AUTO CH MEMORY ADD/DELETE :SELECT :ADJUST 14 Plug in the AC cord to Red. NOTE • If you press POWER on the remote control unit. 1. Connect the antenna cable to remove the AC cord from the list. Initial setup Language setting When you press MENU for watching a TV...
.... • If a station being viewed stops broadcasting, the TV will automatically shut itself off the power Press POWER on the TV, or POWER on the remote control. • The TV enters standby mode and the image on the screen disappears. • The POWER indicator on the TV changes to the AC.../CABLE CABLE AUTO CH MEMORY ADD/DELETE :SELECT :ADJUST 14 Plug in the AC cord to Red. NOTE • If you press POWER on the remote control unit. 1. Connect the antenna cable to remove the AC cord from the list. Initial setup Language setting When you press MENU for watching a TV...

Operation Manual
Page 17
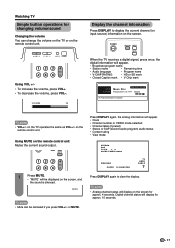
... TV. g., Channel 115): Press 1 1 5 ENT To select a 4-digit channel number (e. NOTE • FLASHBACK will not work if no operation within a few seconds. 16 Method 3 Using remote control buttons 0-9, • (DOT) to select channels for changing channels You can change channels in several ways. Watching TV Simple button operations for VHF/UHF... seconds. g., Channel 5): Press 5 ENT NOTE • When selecting a 1-digit channel number, it is not necessary to the currently tuned channel. Method 1 Using CH / on the remote control unit or on .
... TV. g., Channel 115): Press 1 1 5 ENT To select a 4-digit channel number (e. NOTE • FLASHBACK will not work if no operation within a few seconds. 16 Method 3 Using remote control buttons 0-9, • (DOT) to select channels for changing channels You can change channels in several ways. Watching TV Simple button operations for VHF/UHF... seconds. g., Channel 5): Press 5 ENT NOTE • When selecting a 1-digit channel number, it is not necessary to the currently tuned channel. Method 1 Using CH / on the remote control unit or on .
Operation Manual
Page 18
...8226; To decrease the volume, press VOL-. on the screen. MUTE NOTE • Mute can change the volume on the TV or on the remote control unit. Digital channel status will appear. • Broadcast program name • Station name • Remaining time • Audio language •... information will display for approx. 4 seconds. Press DISPLAY again, the analog information will be canceled if you press VOL+/- Using MUTE on the remote control unit Mutes the current sound output. 1 Press MUTE. • "MUTE" will appear. • Clock • Channel number or VIDEO...
...8226; To decrease the volume, press VOL-. on the screen. MUTE NOTE • Mute can change the volume on the TV or on the remote control unit. Digital channel status will appear. • Broadcast program name • Station name • Remaining time • Audio language •... information will display for approx. 4 seconds. Press DISPLAY again, the analog information will be canceled if you press VOL+/- Using MUTE on the remote control unit Mutes the current sound output. 1 Press MUTE. • "MUTE" will appear. • Clock • Channel number or VIDEO...
Operation Manual
Page 20
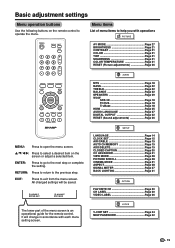
...go to the previous step. EXIT: Press to operate the menu. Menu items List of the menu screen is an operational guide for the remote control. All changed settings will change in accordance with operations PICTURE AV MODE Page 27 BRIGHTNESS Page 21 CONTRAST Page 21 COLOR Page 21 TINT... Page 21 SHARPNESS Page 21 COLOR TEMPERATURE Page 21 RESET (Picture adjustments Page 26 AUDIO MTS Page 18 BASS Page 22 TREBLE Page 22 BALANCE Page 22...
...go to the previous step. EXIT: Press to operate the menu. Menu items List of the menu screen is an operational guide for the remote control. All changed settings will change in accordance with operations PICTURE AV MODE Page 27 BRIGHTNESS Page 21 CONTRAST Page 21 COLOR Page 21 TINT... Page 21 SHARPNESS Page 21 COLOR TEMPERATURE Page 21 RESET (Picture adjustments Page 26 AUDIO MTS Page 18 BASS Page 22 TREBLE Page 22 BALANCE Page 22...
Operation Manual
Page 24
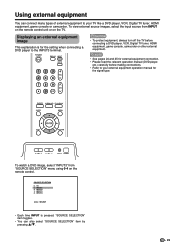
... a DVD player, VCR, Digital TV tuner, HDMI equipment, game console or camcorder. To watch a DVD image, select "INPUT3" from INPUT on the remote control unit or on the remote control. TV 1. INPUT4 [0-4] : SELECT • Each time INPUT is for the setting when connecting a DVD player to your external equipment operation manual for...
... a DVD player, VCR, Digital TV tuner, HDMI equipment, game console or camcorder. To watch a DVD image, select "INPUT3" from INPUT on the remote control unit or on the remote control. TV 1. INPUT4 [0-4] : SELECT • Each time INPUT is for the setting when connecting a DVD player to your external equipment operation manual for...

Operation Manual
Page 26
... (AUDIO). 3 Press / to select "HDMI". 4 Press / to select "HDMI" or "DVI". [0-4]:SELECT NOTE • Refer to the normal screen. 25 When using INPUT on the remote control unit or on the TV. (See page 23.) SOURCE SELECTION 0. INPUT2 3. HDMI cable (Commercially available) HDMI equipment Displaying an image from HDMI equipment 1 To...
... (AUDIO). 3 Press / to select "HDMI". 4 Press / to select "HDMI" or "DVI". [0-4]:SELECT NOTE • Refer to the normal screen. 25 When using INPUT on the remote control unit or on the TV. (See page 23.) SOURCE SELECTION 0. INPUT2 3. HDMI cable (Commercially available) HDMI equipment Displaying an image from HDMI equipment 1 To...
Operation Manual
Page 30
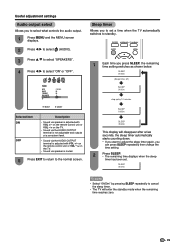
on the remote control unit or VOL -/+ on the TV. • Sound via speaker is muted. 5 Press EXIT to return to the normal screen. SLEEP 0h00m (Sleep timer .... 1 Each time you press SLEEP, the remaining time setting switches as shown below. Useful adjustment settings Audio output select Allows you to set . on the remote control unit or VOL -/+ on the TV. • Sound via the AUDIO OUTPUT terminal is not adjustable and outputs at a consistent level. • Sound via...
on the remote control unit or VOL -/+ on the TV. • Sound via speaker is muted. 5 Press EXIT to return to the normal screen. SLEEP 0h00m (Sleep timer .... 1 Each time you press SLEEP, the remaining time setting switches as shown below. Useful adjustment settings Audio output select Allows you to set . on the remote control unit or VOL -/+ on the TV. • Sound via the AUDIO OUTPUT terminal is not adjustable and outputs at a consistent level. • Sound via...

Operation Manual
Page 40
...Are batteries inserted with polarity (+, -) aligned? (See page 8.) • Are batteries worn out? (Replace with new batteries.) • Are you pressed POWER on the remote control unit. (See page 14.) If the indicator on the TV does not light up, press POWER on the TV. • Is the AC cord... location. Remove any objects blocking vent or clean. • Is connection to other components correct? (See pages 24 to direct sunlight or near the remote control sensor? • Are screen mode adjustments such as this case, operate the unit after connection? (See page 23.) • Is the correct...
...Are batteries inserted with polarity (+, -) aligned? (See page 8.) • Are batteries worn out? (Replace with new batteries.) • Are you pressed POWER on the remote control unit. (See page 14.) If the indicator on the TV does not light up, press POWER on the TV. • Is the AC cord... location. Remove any objects blocking vent or clean. • Is connection to other components correct? (See pages 24 to direct sunlight or near the remote control sensor? • Are screen mode adjustments such as this case, operate the unit after connection? (See page 23.) • Is the correct...

Operation Manual
Page 41
.../64 x 431/32 inch 3221/64 x 2315/64 x 53/32 inch 2615/16 x 221/4 x 119/64 inch 3221/64 x 259/16 x 119/64 inch Remote control unit (x1), AC cord (x1), "AA" size battery (x2), Cable clamp (x1), Stand unit (x1), Operation manual (x1) +32°F to +104&#...SHARP reserves the right to make design and specification changes for the LCD colour TV. Optional accessories The listed optional accessories are nominal values of production units. There may be some deviations from these values in individual units. No. When purchasing, please read the newest catalogue for LC-32SH10U...
.../64 x 431/32 inch 3221/64 x 2315/64 x 53/32 inch 2615/16 x 221/4 x 119/64 inch 3221/64 x 259/16 x 119/64 inch Remote control unit (x1), AC cord (x1), "AA" size battery (x2), Cable clamp (x1), Stand unit (x1), Operation manual (x1) +32°F to +104&#...SHARP reserves the right to make design and specification changes for the LCD colour TV. Optional accessories The listed optional accessories are nominal values of production units. There may be some deviations from these values in individual units. No. When purchasing, please read the newest catalogue for LC-32SH10U...
Operation Manual
Page 43
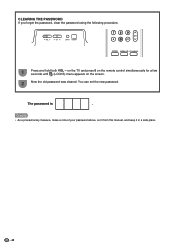
on the TV and press 0 on the remote control simultaneously for a few seconds until (LOCKS) menu appears on the screen. 2 Now the old password was cleared. The password is . CLEARING THE PASSWORD If you forget the password, clear the password using the following procedure. 1 Press and hold both VOL - You can set the new password. NOTE • As a precautionary measure, make a note of your password above, cut it from this manual, and keep it in a safe place. 42
on the TV and press 0 on the remote control simultaneously for a few seconds until (LOCKS) menu appears on the screen. 2 Now the old password was cleared. The password is . CLEARING THE PASSWORD If you forget the password, clear the password using the following procedure. 1 Press and hold both VOL - You can set the new password. NOTE • As a precautionary measure, make a note of your password above, cut it from this manual, and keep it in a safe place. 42


