

LC-26D7U | LC-32D7U | LC-37D7U Operation Manual
Page 8
... Do not mix old and new batteries. IMPORTANT: The POWER indicator on . Please refer to the BASIC ADJUSTMENT SETTINGS SECTION for EZ setup and basic channel setup functions and USING EXTERNAL EQUIPMENT SECTION for an extended period of batteries have power to the AQUOS television. Chemicals that leak from it. .... Mixing old and new batteries can result in the battery compartment. IF YOU STILL ENCOUNTER NO POWER, PLEASE CONTACT US AT 1-800-BE-SHARP. If the POWER indicator on the AQUOS television still does not light up, press TV POWER on the remote control to turn the power...
... Do not mix old and new batteries. IMPORTANT: The POWER indicator on . Please refer to the BASIC ADJUSTMENT SETTINGS SECTION for EZ setup and basic channel setup functions and USING EXTERNAL EQUIPMENT SECTION for an extended period of batteries have power to the AQUOS television. Chemicals that leak from it. .... Mixing old and new batteries can result in the battery compartment. IF YOU STILL ENCOUNTER NO POWER, PLEASE CONTACT US AT 1-800-BE-SHARP. If the POWER indicator on the AQUOS television still does not light up, press TV POWER on the remote control to turn the power...

LC-26D7U | LC-32D7U | LC-37D7U Operation Manual
Page 9
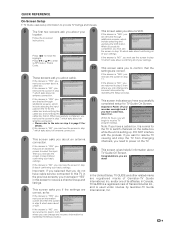
... sensor you found in step 2. holding down the button will display the Welcome Screen. Figure 1 Figure 2 Note: If you see the TV Guide On Screen Setup Welcome Screen. Use the double-sided tape to the TV as over-the-air broadcast. To control recording, find the VCR's IR sensor. 1 Turn the...the front while pressing POWER (Figure 2). (You must press and release the power button each G-LINK cable. QUICK REFERENCE TV GUIDE ON SCREEN™ QUICK SETUP SHEET Once you set up the TV according to this procedure using the cable box and its remote, and then go to select that the...
... sensor you found in step 2. holding down the button will display the Welcome Screen. Figure 1 Figure 2 Note: If you see the TV Guide On Screen Setup Welcome Screen. Use the double-sided tape to the TV as over-the-air broadcast. To control recording, find the VCR's IR sensor. 1 Turn the...the front while pressing POWER (Figure 2). (You must press and release the power button each G-LINK cable. QUICK REFERENCE TV GUIDE ON SCREEN™ QUICK SETUP SHEET Once you set up the TV according to this procedure using the cable box and its remote, and then go to select that the...
LC-26D7U | LC-32D7U | LC-37D7U Operation Manual
Page 10
... cable box while the unit is "NO", you are returned to step 5 from where you can change any incorrect information by repeating the Setup process. 9 In the United States, TV GUIDE and other related marks are done! location. include selecting the input used under license by repeating ... on step 4 in step 7 which 11 This screen indicates you have a cable box, it on the TV. QUICK REFERENCE On-Screen Setup • TV Guide uses setup information to provide TV listings and lineups. 5 The first two screens ask you about your 9 This screen asks you about an antenna connection...
... cable box while the unit is "NO", you are returned to step 5 from where you can change any incorrect information by repeating the Setup process. 9 In the United States, TV GUIDE and other related marks are done! location. include selecting the input used under license by repeating ... on step 4 in step 7 which 11 This screen indicates you have a cable box, it on the TV. QUICK REFERENCE On-Screen Setup • TV Guide uses setup information to provide TV listings and lineups. 5 The first two screens ask you about your 9 This screen asks you about an antenna connection...

LC-26D7U | LC-32D7U | LC-37D7U Operation Manual
Page 11
...38 AV input mode menu items 38 PC input mode menu items 39 EZ setup 39 Channel Setup 40 Antenna Setup - adjustment (PC input mode only) ... 65 Fine Sync. Contents IMPORTANT INFORMATION 1 DEAR SHARP CUSTOMER 3 IMPORTANT SAFETY INSTRUCTIONS 3 QUICK REFERENCE 6 Contents 10 Trademarks 11 ... Foreground Opacity 75 Background Color 75 Background Opacity 76 Character Edge 76 Secret number setting for PC source 49 Digital Setup 50 Video Setup 50 Audio Setup 51 Using external equipment 52 Displaying an external equipment image ...... 52 Connecting a DVD player 53 Connecting a VCR...
...38 AV input mode menu items 38 PC input mode menu items 39 EZ setup 39 Channel Setup 40 Antenna Setup - adjustment (PC input mode only) ... 65 Fine Sync. Contents IMPORTANT INFORMATION 1 DEAR SHARP CUSTOMER 3 IMPORTANT SAFETY INSTRUCTIONS 3 QUICK REFERENCE 6 Contents 10 Trademarks 11 ... Foreground Opacity 75 Background Color 75 Background Opacity 76 Character Edge 76 Secret number setting for PC source 49 Digital Setup 50 Video Setup 50 Audio Setup 51 Using external equipment 52 Displaying an external equipment image ...... 52 Connecting a DVD player 53 Connecting a VCR...

LC-26D7U | LC-32D7U | LC-37D7U Operation Manual
Page 18
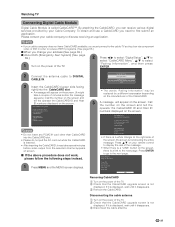
... status indicator (OPC/DL) "Off" is selected in Lighting (Red) progress TV Guide On Screen system is preparing to remove the AC cord from the Setup menu. Turning off the power TV POWER OPC/DL indicator Press POWER on the TV or press TV POWER on the remote control. • The... • Please do not unplug the AC cord when the OPC/DL indicator is red. If the TV has been turned on before, the EZ setup will not be sure to start timer Lighting (Red) recording or display reminder screen *OPC: Optical Picture Control *DL: DownLoad 17 Watching TV Simple operations...
... status indicator (OPC/DL) "Off" is selected in Lighting (Red) progress TV Guide On Screen system is preparing to remove the AC cord from the Setup menu. Turning off the power TV POWER OPC/DL indicator Press POWER on the TV or press TV POWER on the remote control. • The... • Please do not unplug the AC cord when the OPC/DL indicator is red. If the TV has been turned on before, the EZ setup will not be sure to start timer Lighting (Red) recording or display reminder screen *OPC: Optical Picture Control *DL: DownLoad 17 Watching TV Simple operations...

LC-26D7U | LC-32D7U | LC-37D7U Operation Manual
Page 19
...and press b to select "Standard", "HRC" or "IRC" for both ANALOG, DIGITAL (Air) and DIGITAL (Cable) channels. Press c/d to move down . Watching TV Initial setup When you turn on the TV for the first time, it will be selected when a proper CableCARD is inserted. Press c/d to select "Yes" for DIGITAL...[ 25 ] Found [ 25 ] Air ANALOG 2 Audio : MONO NOTE • Make sure what kind of connection is made with your TV and try EZ setup again. (See page 39.) 18 Perform the following steps before you press TV POWER on the screen, and then press ENTER. 2 Standby Mode setting Select...
...and press b to select "Standard", "HRC" or "IRC" for both ANALOG, DIGITAL (Air) and DIGITAL (Cable) channels. Press c/d to move down . Watching TV Initial setup When you turn on the TV for the first time, it will be selected when a proper CableCARD is inserted. Press c/d to select "Yes" for DIGITAL...[ 25 ] Found [ 25 ] Air ANALOG 2 Audio : MONO NOTE • Make sure what kind of connection is made with your TV and try EZ setup again. (See page 39.) 18 Perform the following steps before you press TV POWER on the screen, and then press ENTER. 2 Standby Mode setting Select...

LC-26D7U | LC-32D7U | LC-37D7U Operation Manual
Page 20
... Guide) The TV Guide On Screen system is a free, on-screen interactive television program guide ("IPG") built into your location, you will need to run SETUP again if you move to a different ZIP or postal code. Also, since the program information provided by a keyword such as they air. Reminders can sort... selected programs 19 TV Guide On Screen will not function. The TV Guide On Screen system was developed to the 4 main Guide Services(LISTINGS/SEARCH/SETUP/SCHEDULE) Tile -
... Guide) The TV Guide On Screen system is a free, on-screen interactive television program guide ("IPG") built into your location, you will need to run SETUP again if you move to a different ZIP or postal code. Also, since the program information provided by a keyword such as they air. Reminders can sort... selected programs 19 TV Guide On Screen will not function. The TV Guide On Screen system was developed to the 4 main Guide Services(LISTINGS/SEARCH/SETUP/SCHEDULE) Tile -

LC-26D7U | LC-32D7U | LC-37D7U Operation Manual
Page 21
... to receive the initial download in your LCD-TV. 1 Press a/b to select an option. • "Set up TV Guide On Screen now": Basic initial setup will start. • "Remind me to set up later": Returns to three sizes: Small, Large, and "No". Reminder screen If you previously skipped Guide... setup you will see the Reminder Screen when you power on your area. (Refer to Troubleshooting-TV Guide On Screen on . Leave your TV off Remind ...
... to receive the initial download in your LCD-TV. 1 Press a/b to select an option. • "Set up TV Guide On Screen now": Basic initial setup will start. • "Remind me to set up later": Returns to three sizes: Small, Large, and "No". Reminder screen If you previously skipped Guide... setup you will see the Reminder Screen when you power on your area. (Refer to Troubleshooting-TV Guide On Screen on . Leave your TV off Remind ...

LC-26D7U | LC-32D7U | LC-37D7U Operation Manual
Page 22
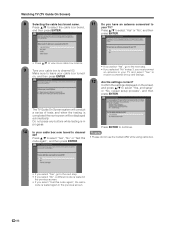
... the input you connected, and then press ENTER. 3 Do you will not receive any TV program listings. Watching TV (TV Guide On Screen) Basic initial setup 1 Which country is your answer is "No" skip to this TV? Press a/b to select the country. 4 Is a cable box connected to step 12 on the...
... the input you connected, and then press ENTER. 3 Do you will not receive any TV program listings. Watching TV (TV Guide On Screen) Basic initial setup 1 Which country is your answer is "No" skip to this TV? Press a/b to select the country. 4 Is a cable box connected to step 12 on the...
LC-26D7U | LC-32D7U | LC-37D7U Operation Manual
Page 23
... cable box turned on the screen and press a/b to channel 02. Press ENTER to continue. 10 Is your cable box to select "Yes, end setup" or "No, repeat setup process", and then press ENTER. Press a/b to channel NOTE 09? code again", and then press ENTER. • If you select "Yes", go to...
... cable box turned on the screen and press a/b to channel 02. Press ENTER to continue. 10 Is your cable box to select "Yes, end setup" or "No, repeat setup process", and then press ENTER. Press a/b to channel NOTE 09? code again", and then press ENTER. • If you select "Yes", go to...

LC-26D7U | LC-32D7U | LC-37D7U Operation Manual
Page 24
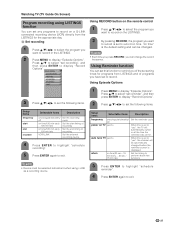
...not unplug the AC cord.) • You must redo the TV Guide On Screen system setup if you select "No", setup will begin loading over the next 24 hours when your LCD-TV is in your VCR, ..., play the media on the screen and press a/b to update. Move your LCD-TV to complete the SETUP. Press ENTER to a new ZIP or postal code - Press a/b to control VCR? Your VCR and ...easily schedule recordings using the one day for all eight days of listings to select "Yes, end setup" or "No, repeat setup process", and then press ENTER. 3 Selecting the VCR brand name. Press a/b to the recording...
...not unplug the AC cord.) • You must redo the TV Guide On Screen system setup if you select "No", setup will begin loading over the next 24 hours when your LCD-TV is in your VCR, ..., play the media on the screen and press a/b to update. Move your LCD-TV to complete the SETUP. Press ENTER to a new ZIP or postal code - Press a/b to control VCR? Your VCR and ...easily schedule recordings using the one day for all eight days of listings to select "Yes, end setup" or "No, repeat setup process", and then press ENTER. 3 Selecting the VCR brand name. Press a/b to the recording...

LC-26D7U | LC-32D7U | LC-37D7U Operation Manual
Page 25
...", or not to Service Bar". 3 Press ENTER. The Video Window also includes a clock display and a lock/ unlock icon to indicate the status of four services: SETUP, LISTINGS, SEARCH and SCHEDULE.
...", or not to Service Bar". 3 Press ENTER. The Video Window also includes a clock display and a lock/ unlock icon to indicate the status of four services: SETUP, LISTINGS, SEARCH and SCHEDULE.
LC-26D7U | LC-32D7U | LC-37D7U Operation Manual
Page 28
... this is set to "yes", the TV will be automatically changed . Using Episode Options 3 Press a/b/c/d to set the following items. Setup items frequency start timing of recording Set the end timing of programs you have set to record on a G-LINK connected recording device (VCR...Set the timing to perform above two functions 3 Press ENTER to highlight "schedule reminder". 4 Press ENTER again to display "Record Options". Setup items Selectable items Description frequency once/regularly/weekly/ off on time/120 min early ... 120 min late on time" is displayed. When this...
... this is set to "yes", the TV will be automatically changed . Using Episode Options 3 Press a/b/c/d to set the following items. Setup items frequency start timing of recording Set the end timing of programs you have set to record on a G-LINK connected recording device (VCR...Set the timing to perform above two functions 3 Press ENTER to highlight "schedule reminder". 4 Press ENTER again to display "Record Options". Setup items Selectable items Description frequency once/regularly/weekly/ off on time/120 min early ... 120 min late on time" is displayed. When this...

LC-26D7U | LC-32D7U | LC-37D7U Operation Manual
Page 31
.... 3 Press a/b to remind using 0-9 Set the external device or antenna source When this is listed by channel number in the SCHEDULE. 30 Setup items date start - When this is set to "yes", the channel will automatically switch on TV analog/digital air/ digital cable/input 1/ input...you can also define the schedule of setting a reminder from setting recordings using the program LISTINGS menus, you can set a reminder manually for . Setup items date Selectable items Description - Set a date to exit. end - input power on at the time the reminder was set for a program...
.... 3 Press a/b to remind using 0-9 Set the external device or antenna source When this is listed by channel number in the SCHEDULE. 30 Setup items date start - When this is set to "yes", the channel will automatically switch on TV analog/digital air/ digital cable/input 1/ input...you can also define the schedule of setting a reminder from setting recordings using the program LISTINGS menus, you can set a reminder manually for . Setup items date Selectable items Description - Set a date to exit. end - input power on at the time the reminder was set for a program...

LC-26D7U | LC-32D7U | LC-37D7U Operation Manual
Page 32
... to display the "Confirming Your Settings" screen. 4 Press a/b/c/d to set each function as follows: 1. You can make changes to System settings in the "SETUP" screen. 1 Press TV GUIDE and then press MENU. 2 Press a/b to select "go to Service Bar" in LISTINGS 2. the channel is only displayed ...to select "done", and then press ENTER to exit. 31 Watching TV (TV Guide On Screen) Changing system settings After you initially complete Guide Setup, you can set the following items. • If you want to display Set the channel display position • Depending on the screen is ...
... to display the "Confirming Your Settings" screen. 4 Press a/b/c/d to set each function as follows: 1. You can make changes to System settings in the "SETUP" screen. 1 Press TV GUIDE and then press MENU. 2 Press a/b to select "go to Service Bar" in LISTINGS 2. the channel is only displayed ...to select "done", and then press ENTER to exit. 31 Watching TV (TV Guide On Screen) Changing system settings After you initially complete Guide Setup, you can set the following items. • If you want to display Set the channel display position • Depending on the screen is ...

LC-26D7U | LC-32D7U | LC-37D7U Operation Manual
Page 33
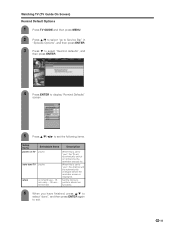
... Options", and then press ENTER. 2 Press a/b to select "go to Service Bar" in "Episode Options", and then press ENTER. 3 Press c/d to select "SETUP" . 3 Press b to select "Record defaults", and press ENTER. 4 Press b to select "General default options", and press ENTER. 4 Press ENTER to display...Defaults". 5 Press MENU to display "General Defaults". 5 Press a/b/c/d to set the following items. 6 Press a/b/c/d to set the following items. Setup items Info box size box cycle auto guide Selectable items last used/no/small/ large all/no only/small only/ large only/no & small...
... Options", and then press ENTER. 2 Press a/b to select "go to Service Bar" in "Episode Options", and then press ENTER. 3 Press c/d to select "SETUP" . 3 Press b to select "Record defaults", and press ENTER. 4 Press b to select "General default options", and press ENTER. 4 Press ENTER to display...Defaults". 5 Press MENU to display "General Defaults". 5 Press a/b/c/d to set the following items. 6 Press a/b/c/d to set the following items. Setup items Info box size box cycle auto guide Selectable items last used/no/small/ large all/no only/small only/ large only/no & small...
LC-26D7U | LC-32D7U | LC-37D7U Operation Manual
Page 34
... then press ENTER. 3 Press b to select "Remind defaults", and then press ENTER. 4 Press ENTER to display "Remind Defaults" screen. 5 Press a/b/c/d to set the following items. Setup items power on TV auto tune TV when Selectable items yes/no yes/no on time/30 sec - 15 min early ... 30 sec 15 min...
... then press ENTER. 3 Press b to select "Remind defaults", and then press ENTER. 4 Press ENTER to display "Remind Defaults" screen. 5 Press a/b/c/d to set the following items. Setup items power on TV auto tune TV when Selectable items yes/no yes/no on time/30 sec - 15 min early ... 30 sec 15 min...
LC-26D7U | LC-32D7U | LC-37D7U Operation Manual
Page 38
...: O.K. To obtain and use a CableCARD you change your address (See page 89.) ■ About EAS (Emergency Alert System) (See page 89.) 2 Press c/d to select "Digital Setup", a/b to select "CableCARD Menu", a/b to start cable service for this device, please contact your cable provider 1-888-555-2222 CableCARD(tm) ID: 7-561-034-449...
...: O.K. To obtain and use a CableCARD you change your address (See page 89.) ■ About EAS (Emergency Alert System) (See page 89.) 2 Press c/d to select "Digital Setup", a/b to select "CableCARD Menu", a/b to start cable service for this device, please contact your cable provider 1-888-555-2222 CableCARD(tm) ID: 7-561-034-449...
LC-26D7U | LC-32D7U | LC-37D7U Operation Manual
Page 39
... items to help you with operations Picture OPC Page 45 Backlight Page 44 Contrast Page 44 Brightness Page 44 Color Page 44 Tint Page 44 Sharpness Page 44 Advanced C.M.S Page 45 Color Temp Page 46 Black Page 46 3D-Y/C Page 46 Monochrome Page 47 Film Mode Page 47 I/P Setting ...76 Program Title Display Page 72 Digital Setup CableCARD Menu Page 37 Video Setup Page 50 Audio Setup Page 51 i.LINK Setup Pages 58-63 Power Control No Signal Off Page 49 No Operation Off Page 49 Setup EZ Setup Pages 39, 40 CH Setup Pages 40, 41 Antenna Setup-DIGITAL Page 42 Input Label Page 67...
... items to help you with operations Picture OPC Page 45 Backlight Page 44 Contrast Page 44 Brightness Page 44 Color Page 44 Tint Page 44 Sharpness Page 44 Advanced C.M.S Page 45 Color Temp Page 46 Black Page 46 3D-Y/C Page 46 Monochrome Page 47 Film Mode Page 47 I/P Setting ...76 Program Title Display Page 72 Digital Setup CableCARD Menu Page 37 Video Setup Page 50 Audio Setup Page 51 i.LINK Setup Pages 58-63 Power Control No Signal Off Page 49 No Operation Off Page 49 Setup EZ Setup Pages 39, 40 CH Setup Pages 40, 41 Antenna Setup-DIGITAL Page 42 Input Label Page 67...
LC-26D7U | LC-32D7U | LC-37D7U Operation Manual
Page 40
... 44 Advanced C.M.S Page 45 Audio Treble Page 48 Bass Page 48 Balance Page 48 Dolby Virtual Page 48 Power Control Power Management Page 49 Setup Input Signal Page 70 Auto Sync Page 65 Input Label Page 67 Fine Sync Page 65 Picture Flip Page 67 Standby Mode Page 42 Language... English Français Español Option Audio Only Page 70 Input Select Page 66 Output Select Page 71 Quick Shoot Page 71 Digital Setup i.LINK Setup Pages 58-63 39 Language setting Select from among 3 languages: English, French and Spanish. 1 Press MENU and the MENU screen displays. 2 Press c/d to ...
... 44 Advanced C.M.S Page 45 Audio Treble Page 48 Bass Page 48 Balance Page 48 Dolby Virtual Page 48 Power Control Power Management Page 49 Setup Input Signal Page 70 Auto Sync Page 65 Input Label Page 67 Fine Sync Page 65 Picture Flip Page 67 Standby Mode Page 42 Language... English Français Español Option Audio Only Page 70 Input Select Page 66 Output Select Page 71 Quick Shoot Page 71 Digital Setup i.LINK Setup Pages 58-63 39 Language setting Select from among 3 languages: English, French and Spanish. 1 Press MENU and the MENU screen displays. 2 Press c/d to ...

