

Operation Manual
Page 3
ENGLISH LC-40LE550U LIQUID CRYSTAL TELEVISION ENGLISH OPERATION MANUAL IMPORTANT: To aid reporting in case of important operating and maintenance(servicing)instruction in the space provided. NO USER-...
ENGLISH LC-40LE550U LIQUID CRYSTAL TELEVISION ENGLISH OPERATION MANUAL IMPORTANT: To aid reporting in case of important operating and maintenance(servicing)instruction in the space provided. NO USER-...

Operation Manual
Page 4
...televisions, use . To prevent electromagnetic interference with the instructions, may cause undesired operation. DECLARATION OF CONFORMITY: SHARP LIQUID CRYSTAL TELEVISION, MODEL LC-40LE550U This device complies with the limits for connections. If this equipment does cause harmful interference to radio or...and connectors for a Class B digital device, pursuant to radio communications. RESPONSIBLE PARTY: SHARP ELECTRONICS CORPORATION Sharp Plaza, Mahwah, New Jersey 07495-1163 TEL: 1-800-BE-SHARP For Business Customers: URL http://www.sharpusa.com INFORMATION: This equipment has been tested...
...televisions, use . To prevent electromagnetic interference with the instructions, may cause undesired operation. DECLARATION OF CONFORMITY: SHARP LIQUID CRYSTAL TELEVISION, MODEL LC-40LE550U This device complies with the limits for connections. If this equipment does cause harmful interference to radio or...and connectors for a Class B digital device, pursuant to radio communications. RESPONSIBLE PARTY: SHARP ELECTRONICS CORPORATION Sharp Plaza, Mahwah, New Jersey 07495-1163 TEL: 1-800-BE-SHARP For Business Customers: URL http://www.sharpusa.com INFORMATION: This equipment has been tested...
Operation Manual
Page 5
.... 3 Adjust only those controls that no objects filled with liquids, suchas vases, shall be placed on the apparatus. Never spill liquid of the Sharp Liquid Crystal Television. DEAR SHARP CUSTOMER Thank you are covered by the operating instructions as an improper adjustment of fire or electric shock, do not expose this apparatus...
.... 3 Adjust only those controls that no objects filled with liquids, suchas vases, shall be placed on the apparatus. Never spill liquid of the Sharp Liquid Crystal Television. DEAR SHARP CUSTOMER Thank you are covered by the operating instructions as an improper adjustment of fire or electric shock, do not expose this apparatus...
Operation Manual
Page 6
Unauthorized substitutions may result in fire, electric shock, or other hazards. 22) Safety Check-Upon completion of any servicing other than that when the mains plug or appliance coupler shall remain readily operable. • Where the MAINS plug or an appliance coupler is used as the disconnect device, the disconnect device shall remain readily operable. • Where an all-pole MAINS SWITCH is used as the original part. Article 810 of the National Electrical Code, ANSI/NFPA 70, provides information with regard to proper grounding of the mast and supporting structure, grounding ...
Unauthorized substitutions may result in fire, electric shock, or other hazards. 22) Safety Check-Upon completion of any servicing other than that when the mains plug or appliance coupler shall remain readily operable. • Where the MAINS plug or an appliance coupler is used as the disconnect device, the disconnect device shall remain readily operable. • Where an all-pole MAINS SWITCH is used as the original part. Article 810 of the National Electrical Code, ANSI/NFPA 70, provides information with regard to proper grounding of the mast and supporting structure, grounding ...

Operation Manual
Page 7
... with rubber or vinyl products for ordering, or VISIT http://www.sharpusa.com/SharpDirect. 5 Approved cleaning cloths are available directly from Sharp in the air vents or other electric light or power circuits, or where it by two people holding or otherwise putting pressure onto...of time. Caring for this product to lightning and power-line surges. • Power Lines - IMPORTANT SAFETY INSTRUCTIONS • Heat - Call 1-800-BE-SHARP for a long period of the cabinet. • If the cabinet is very dirty, wipe with a soft cloth (cotton, flannel, etc.) soaked in ...
... with rubber or vinyl products for ordering, or VISIT http://www.sharpusa.com/SharpDirect. 5 Approved cleaning cloths are available directly from Sharp in the air vents or other electric light or power circuits, or where it by two people holding or otherwise putting pressure onto...of time. Caring for this product to lightning and power-line surges. • Power Lines - IMPORTANT SAFETY INSTRUCTIONS • Heat - Call 1-800-BE-SHARP for a long period of the cabinet. • If the cabinet is very dirty, wipe with a soft cloth (cotton, flannel, etc.) soaked in ...

Operation Manual
Page 8
TUNE IN TO SAFETY • ALWAYS follow the manufacturer's recommendations for the safe installation of your television. • ALWAYS read and follow all instructions supplied by an independent laboratory (such as a chest of drawers. • ALWAYS install the television where it cannot be pushed, pulled over or knocked down. • ALWAYS route cords and cables connected to walls and ceilings with steel studs or cinder block construction. Special care should be made in the placement of older CRT televisions. • ALWAYS place your older CRT television on furniture that can...
TUNE IN TO SAFETY • ALWAYS follow the manufacturer's recommendations for the safe installation of your television. • ALWAYS read and follow all instructions supplied by an independent laboratory (such as a chest of drawers. • ALWAYS install the television where it cannot be pushed, pulled over or knocked down. • ALWAYS route cords and cables connected to walls and ceilings with steel studs or cinder block construction. Special care should be made in the placement of older CRT televisions. • ALWAYS place your older CRT television on furniture that can...

Operation Manual
Page 9
Remote control unit ( X 1) Page 8 "AAA" size battery ( X 2) Page 10 x4 Stand ( X 1) with Screws Page 7 Operation manual ( X 1) Connection guide ( X 1) • Always use the AC cord supplied with the product. Fasten the screws by a soft and smooth cloth. 2. Adjust the TV stand to the bottom of drop. • To detach the stand, perform the steps in the TV falling over the base area to lay the TV on a safe surface that is covered by using a cross-head screwdriver (Not supplied). 2 3 CAUTION • Do not push too hard or put excessive pressure to the stand neck to avoid the...
Remote control unit ( X 1) Page 8 "AAA" size battery ( X 2) Page 10 x4 Stand ( X 1) with Screws Page 7 Operation manual ( X 1) Connection guide ( X 1) • Always use the AC cord supplied with the product. Fasten the screws by a soft and smooth cloth. 2. Adjust the TV stand to the bottom of drop. • To detach the stand, perform the steps in the TV falling over the base area to lay the TV on a safe surface that is covered by using a cross-head screwdriver (Not supplied). 2 3 CAUTION • Do not push too hard or put excessive pressure to the stand neck to avoid the...

Operation Manual
Page 10
... the remote control unit to shock. Insert the batteries into the AC outlet. IF YOU STILL ENCOUNTER NO POWER, PLEASE CONTACT US AT 1-800-BE-SHARP. 8 In such cases, change the angle of the television. (See page 9.) 2. Connecting it towar ds the remote control sensor on the TV is attached. ■...
... the remote control unit to shock. Insert the batteries into the AC outlet. IF YOU STILL ENCOUNTER NO POWER, PLEASE CONTACT US AT 1-800-BE-SHARP. 8 In such cases, change the angle of the television. (See page 9.) 2. Connecting it towar ds the remote control sensor on the TV is attached. ■...
Operation Manual
Page 11
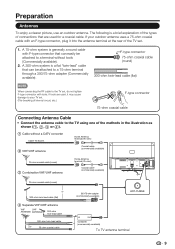
The following is a brief explanation of the types of connections that are used for a coaxial cable. A 300-ohm system is generally a round cable with F-type connector that can easily be attached to the TV using one of internal circuit, etc.) F-type connector 75-ohm coaxial cable Connecting Antenna Cable • Connect the antenna cable to a 75-ohm terminal through a 300/75-ohm adapter (Commercially available). If tools are used , it into the antenna terminal at ) 4 Separate VHF/UHF antenna VHF UHF ANTENNA ANTENNA 300-ohm twin-lead cable 300-ohm twin-lead cable or 75-...
The following is a brief explanation of the types of connections that are used for a coaxial cable. A 300-ohm system is generally a round cable with F-type connector that can easily be attached to the TV using one of internal circuit, etc.) F-type connector 75-ohm coaxial cable Connecting Antenna Cable • Connect the antenna cable to a 75-ohm terminal through a 300/75-ohm adapter (Commercially available). If tools are used , it into the antenna terminal at ) 4 Separate VHF/UHF antenna VHF UHF ANTENNA ANTENNA 300-ohm twin-lead cable 300-ohm twin-lead cable or 75-...
Operation Manual
Page 12
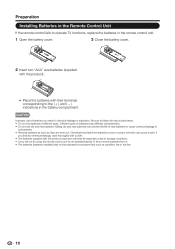
Different types of batteries have a shorter life expectancy due to excessive heat such as they are worn out. Mixing old and new batteries can shorten the life of new batteries or cause chemical leakage in old batteries. • Remove batteries as soon as sunshine, fire or the like. 10 Chemicals that leak from it. • The batteries (batteries installed) shall not be exposed to storage conditions. • If you will not be using the remote control unit for an extended period of time, remove batteries from batteries come in contact with skin can result in chemical leakage or ...
Different types of batteries have a shorter life expectancy due to excessive heat such as they are worn out. Mixing old and new batteries can shorten the life of new batteries or cause chemical leakage in old batteries. • Remove batteries as soon as sunshine, fire or the like. 10 Chemicals that leak from it. • The batteries (batteries installed) shall not be exposed to storage conditions. • If you will not be using the remote control unit for an extended period of time, remove batteries from batteries come in contact with skin can result in chemical leakage or ...

Operation Manual
Page 13
Contents IMPORTANT INFORMATION ...1 TRADEMARKS ...2 IMPORTANT SAFETY INSTRUCTIONS 3 QUICK REFERENCE ...7 Supplied Accessories ...7 Attaching/Detaching the Stand 7 Quick Installation Tips ...8 Using the Remote Control Unit 8 Antennas ...9 Connecting Antenna Cable ...9 Installing Batteries in the Remote Control Unit 10 Contents ...11 Part Names ...12 TV (Front) ...12 TV (Side/Rear) ...12 Remote Control Unit ...13 Introduction to Connections ...14 Experiencing HD Images ...14 Types of Connection ...14 Connecting to External Equipment 15 Connecting a Blu-ray Disc/DVD Player or HD Cable/...
Contents IMPORTANT INFORMATION ...1 TRADEMARKS ...2 IMPORTANT SAFETY INSTRUCTIONS 3 QUICK REFERENCE ...7 Supplied Accessories ...7 Attaching/Detaching the Stand 7 Quick Installation Tips ...8 Using the Remote Control Unit 8 Antennas ...9 Connecting Antenna Cable ...9 Installing Batteries in the Remote Control Unit 10 Contents ...11 Part Names ...12 TV (Front) ...12 TV (Side/Rear) ...12 Remote Control Unit ...13 Introduction to Connections ...14 Experiencing HD Images ...14 Types of Connection ...14 Connecting to External Equipment 15 Connecting a Blu-ray Disc/DVD Player or HD Cable/...
Operation Manual
Page 14
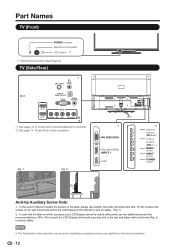
Fig. 1 Fig. 2 *1 RS-232C IOIOI Terminal (HDMI) INPUT 1 USB *2 Channel buttons (CH / ) Volume buttons (VOL+ / _) MENU button INPUT button POWER button Anti-tip Auxiliary Screw Hole: 1. In case that the table on which you place your LCD Display cannot be locked withscrews, use another two bolts( recommended size: T4*22) to fasten the screws on the table, please use two additional screws (the recommended size: M6 x 16) to mount the LCD Display via the wall mounting hole in the rear and fasten with a wire for safety. (Fig. 1) 2. In the event of failure to fasten the screws on the wall ...
Fig. 1 Fig. 2 *1 RS-232C IOIOI Terminal (HDMI) INPUT 1 USB *2 Channel buttons (CH / ) Volume buttons (VOL+ / _) MENU button INPUT button POWER button Anti-tip Auxiliary Screw Hole: 1. In case that the table on which you place your LCD Display cannot be locked withscrews, use another two bolts( recommended size: T4*22) to fasten the screws on the table, please use two additional screws (the recommended size: M6 x 16) to mount the LCD Display via the wall mounting hole in the rear and fasten with a wire for safety. (Fig. 1) 2. In the event of failure to fasten the screws on the wall ...

Operation Manual
Page 15
Press again to switch back to the previously tuned channel or external input mode. CH / : Select the channel. (See page 21.) 8. While watching, you to set a time when the TV automatically switches to a channel after a few seconds, and the sleep timer automatically starts counting down. (See page 21.) 26. POWER: Switch the power on the screen. (See page 26.) 11. VOL +/- : Set the volume. (See page 21.) 21. TV: Direct switch TV source. 23. USB: Direct switch USB source. 24. CC: Display captions during closed-caption source.(See page 22.) 13 PC: Direct switch PC source. ...
Press again to switch back to the previously tuned channel or external input mode. CH / : Select the channel. (See page 21.) 8. While watching, you to set a time when the TV automatically switches to a channel after a few seconds, and the sleep timer automatically starts counting down. (See page 21.) 26. POWER: Switch the power on the screen. (See page 26.) 11. VOL +/- : Set the volume. (See page 21.) 21. TV: Direct switch TV source. 23. USB: Direct switch USB source. 24. CC: Display captions during closed-caption source.(See page 22.) 13 PC: Direct switch PC source. ...

Operation Manual
Page 16
To enjoy HD images on the TV, you should get HD programming from the following: • Over-the-air broadcasting via HD quality antenna • HD cable/satellite subscription • HD compatible external equipment • For information on updating to external equipment, use its appropriate terminals for explanation purposes and may vary slightly from the selected source automatically displays. 14 To enjoy clearer images, check the output terminals of your cable/satellite service provider. POWER INPUT Example • The Input source list screen displays. 1 2 3 4 5 6 7 ...
To enjoy HD images on the TV, you should get HD programming from the following: • Over-the-air broadcasting via HD quality antenna • HD cable/satellite subscription • HD compatible external equipment • For information on updating to external equipment, use its appropriate terminals for explanation purposes and may vary slightly from the selected source automatically displays. 14 To enjoy clearer images, check the output terminals of your cable/satellite service provider. POWER INPUT Example • The Input source list screen displays. 1 2 3 4 5 6 7 ...
Operation Manual
Page 17
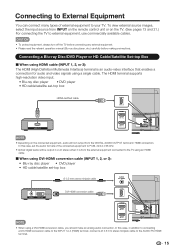
The HDMI terminal supports high-resolution video input. • Blu-ray disc player • DVD player • HD cable/satellite set-top box HDMI-certified cable HDMI OUT INPUT 2 INPUT 3 • Depending on the TV. (See pages 13 and 21.) For connecting the TV to external equipment, use commercially available cables. In this case, set -top box Ø 3.5 mm stereo minijack cable AUDIO PC/HDMI AUDIO DVI OUT DVI-HDMI conversion cable INPUT 2 INPUT 3 • When using a DVI-HDMI conversion cable, you should make an analog audio connection. Connecting a Blu-ray Disc/DVD Player ...
The HDMI terminal supports high-resolution video input. • Blu-ray disc player • DVD player • HD cable/satellite set-top box HDMI-certified cable HDMI OUT INPUT 2 INPUT 3 • Depending on the TV. (See pages 13 and 21.) For connecting the TV to external equipment, use commercially available cables. In this case, set -top box Ø 3.5 mm stereo minijack cable AUDIO PC/HDMI AUDIO DVI OUT DVI-HDMI conversion cable INPUT 2 INPUT 3 • When using a DVI-HDMI conversion cable, you should make an analog audio connection. Connecting a Blu-ray Disc/DVD Player ...
Operation Manual
Page 18
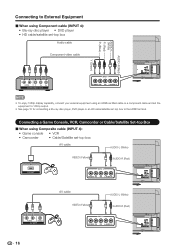
Connecting a Game Console, VCR, Camcorder or Cable/Satellite Set-top Box When using an HDMI-certified cable or a component cable and set the equipment to the HDMI terminal. Connecting to External Equipment When using Component cable (INPUT 4): • Blu-ray disc player • DVD player • HD cable/satellite set-top box Audio cable Component video cable AUDIO-R (Red) AUDIO-L (White) PR (Red) PB (Blue) Y (Green) COMPONENT OUT INPUT 4 Y/VIDEO PB PR L-AUDIO-R • To enjoy 1080p display capability, connect your external equipment using Composite cable (INPUT 4): &#...
Connecting a Game Console, VCR, Camcorder or Cable/Satellite Set-top Box When using an HDMI-certified cable or a component cable and set the equipment to the HDMI terminal. Connecting to External Equipment When using Component cable (INPUT 4): • Blu-ray disc player • DVD player • HD cable/satellite set-top box Audio cable Component video cable AUDIO-R (Red) AUDIO-L (White) PR (Red) PB (Blue) Y (Green) COMPONENT OUT INPUT 4 Y/VIDEO PB PR L-AUDIO-R • To enjoy 1080p display capability, connect your external equipment using Composite cable (INPUT 4): &#...
Operation Manual
Page 19
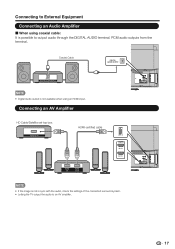
Coaxial Cable DIGITAL AUDIO OUTPUT OPTICAL DIGITAL AUDIO INPUT • Digital Audio output is not available when using coaxial cable: It is not in sync with the audio, check the settings of the connected surround system. • Letting the TV output the audio to an AV amplifier. 17 PCM audio outputs from the terminal. Connecting to External Equipment Connecting an Audio Amplifier When using an HDMI input. Connecting an AV Amplifier HD Cable/Satellite set-top box HDMI OUT HDMI-certified cable INPUT 2 INPUT 3 HDMI IN HDMI OUT • If the image is ...
Coaxial Cable DIGITAL AUDIO OUTPUT OPTICAL DIGITAL AUDIO INPUT • Digital Audio output is not available when using coaxial cable: It is not in sync with the audio, check the settings of the connected surround system. • Letting the TV output the audio to an AV amplifier. 17 PCM audio outputs from the terminal. Connecting to External Equipment Connecting an Audio Amplifier When using an HDMI input. Connecting an AV Amplifier HD Cable/Satellite set-top box HDMI OUT HDMI-certified cable INPUT 2 INPUT 3 HDMI IN HDMI OUT • If the image is ...

Operation Manual
Page 20
When using a DVI-HDMI conversion cable, you should make an analog audio connection. Connecting to External Equipment Connecting a PC Refer to page 41 for a list of PC IN. 18 When using DVI-HDMI conversion cable (INPUT 1,2,3): AUDIO DVI OUT Ø 3.5 mm stereo minijack cable DVI-HDMI conversion cable INPUT 2 INPUT 3 AUDIO PC/HDMI INPUT 2 INPUT 3 • When using HDMI cable (INPUT 1, 2 or 3): HDMI-certified cable HDMI OUT • The HDMI terminals only support digital signal. When using analog RGB cable (PC IN): PC IN AUDIO PC/HDMI Analog RGB cable (D-sub 15-pin cable...
When using a DVI-HDMI conversion cable, you should make an analog audio connection. Connecting to External Equipment Connecting a PC Refer to page 41 for a list of PC IN. 18 When using DVI-HDMI conversion cable (INPUT 1,2,3): AUDIO DVI OUT Ø 3.5 mm stereo minijack cable DVI-HDMI conversion cable INPUT 2 INPUT 3 AUDIO PC/HDMI INPUT 2 INPUT 3 • When using HDMI cable (INPUT 1, 2 or 3): HDMI-certified cable HDMI OUT • The HDMI terminals only support digital signal. When using analog RGB cable (PC IN): PC IN AUDIO PC/HDMI Analog RGB cable (D-sub 15-pin cable...

Operation Manual
Page 21
... RETURN 1. Language setting • Select the OSD menu language from the AC outlet. • Small amount of time, be optimized for Your Purchase of our SHARP Liquid Crystal Television Please press [Enter] to start the Wizard. Home Store Select Enter Enter Return Back EXIT Exit 19 Watching TV Turning On/Off...
... RETURN 1. Language setting • Select the OSD menu language from the AC outlet. • Small amount of time, be optimized for Your Purchase of our SHARP Liquid Crystal Television Please press [Enter] to start the Wizard. Home Store Select Enter Enter Return Back EXIT Exit 19 Watching TV Turning On/Off...

Operation Manual
Page 22
TV EZ Setup CH Search Searching receivable channels Start Cancel 7. The TV will show "EZ Setup Completed", press ENTER to finish the EZ Setup. Please wait until the channel scan to complete. • If you press EXIT, the process will return to the previous step. • If you see the Auto programming complete message. Completed After setting complete, the screen will then switch to the first channel found. Select Enter Enter Return Back EXIT Exit 6. Analog: 0 Digital: 0 22% EXIT Cancel 20 Now tuning Channels automatically.. Air/Cable(Antenna setting)...
TV EZ Setup CH Search Searching receivable channels Start Cancel 7. The TV will show "EZ Setup Completed", press ENTER to finish the EZ Setup. Please wait until the channel scan to complete. • If you press EXIT, the process will return to the previous step. • If you see the Auto programming complete message. Completed After setting complete, the screen will then switch to the first channel found. Select Enter Enter Return Back EXIT Exit 6. Analog: 0 Digital: 0 22% EXIT Cancel 20 Now tuning Channels automatically.. Air/Cable(Antenna setting)...
