
Instruction Manual
Page 4
...with steel studs or cinder block construction. new and old- Plasticizers inside any doubts about your ability to safely mount your furniture. Call 1-800-BE-SHARP for ordering, or VISIT http://www.sharpusa.com/SharpDirect. must be supported on dressers, bookcases, shelves, desks, speakers, chests, carts, etc., ...the main power and unplug the AC cord from Sharp in injury. IMPORTANT SAFETY INSTRUCTIONS • To prevent fire or shock hazard, do not place the AC cord under the TV set or other heavy items. • Do not display a still picture for a long time, as this could cause an...
...with steel studs or cinder block construction. new and old- Plasticizers inside any doubts about your ability to safely mount your furniture. Call 1-800-BE-SHARP for ordering, or VISIT http://www.sharpusa.com/SharpDirect. must be supported on dressers, bookcases, shelves, desks, speakers, chests, carts, etc., ...the main power and unplug the AC cord from Sharp in injury. IMPORTANT SAFETY INSTRUCTIONS • To prevent fire or shock hazard, do not place the AC cord under the TV set or other heavy items. • Do not display a still picture for a long time, as this could cause an...
Instruction Manual
Page 5
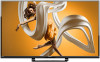
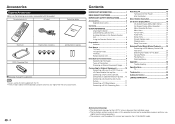
... following accessories are for explanation purposes and may vary slightly from the actual accessories. Contents IMPORTANT INFORMATION 1 DEAR SHARP CUSTOMER 2 IMPORTANT SAFETY INSTRUCTIONS 3 Accessories 4 Supplied Accessories 4 Contents 4 QUICK REFERENCE 5 Attaching the Stand 5...).......... 18 On-Screen Display Menu Operation 18 Menu Operation Buttons 18 Menu Items 19 Picture menu 20 Audio menu 21 Setup menu 22 Closed Caption menu 24 Channel menu 24... drawings for the LCD TV set are shown on the inside back cover. • The illustrations and on the LC-55LE643U model. 4
... following accessories are for explanation purposes and may vary slightly from the actual accessories. Contents IMPORTANT INFORMATION 1 DEAR SHARP CUSTOMER 2 IMPORTANT SAFETY INSTRUCTIONS 3 Accessories 4 Supplied Accessories 4 Contents 4 QUICK REFERENCE 5 Attaching the Stand 5...).......... 18 On-Screen Display Menu Operation 18 Menu Operation Buttons 18 Menu Items 19 Picture menu 20 Audio menu 21 Setup menu 22 Closed Caption menu 24 Channel menu 24... drawings for the LCD TV set are shown on the inside back cover. • The illustrations and on the LC-55LE643U model. 4

Instruction Manual
Page 7
...place the remote control unit under direct sunlight or strong lighting. IF YOU STILL ENCOUNTER NO POWER, PLEASE CONTACT US AT 1-800-BE-SHARP. If your TV set. (The breaking of time, remove batteries from batteries that are worn out. Be sure to the remote control sensor. In such cases,... change the angle of the methods in the illustration as they are used , it in chemical leakage or explosion. Antennas To enjoy a clearer picture, use...
...place the remote control unit under direct sunlight or strong lighting. IF YOU STILL ENCOUNTER NO POWER, PLEASE CONTACT US AT 1-800-BE-SHARP. If your TV set. (The breaking of time, remove batteries from batteries that are worn out. Be sure to the remote control sensor. In such cases,... change the angle of the methods in the illustration as they are used , it in chemical leakage or explosion. Antennas To enjoy a clearer picture, use...
Instruction Manual
Page 9
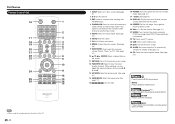
... GJ221-R NOTE • When using the remote control unit, point it at the TV. 8 1 INPUT: Select a TV input source. (See page 9.) 2 0-9: Set the channel. 3 ENT: Jump to a channel after selecting with the 0-9 buttons. 4 FLASHBACK: Press to switch to disable or enable sound. While watching, you can ...toggle the selected channels by pressing A, B, C and D. 13 AV MODE: Select the picture mode. (See page 20.) 14 VIEW MODE: Select the aspect ratio. (See page 17.) 15 : Only for USB. 16 POWER: Switch the power on...
... GJ221-R NOTE • When using the remote control unit, point it at the TV. 8 1 INPUT: Select a TV input source. (See page 9.) 2 0-9: Set the channel. 3 ENT: Jump to a channel after selecting with the 0-9 buttons. 4 FLASHBACK: Press to switch to disable or enable sound. While watching, you can ...toggle the selected channels by pressing A, B, C and D. 13 AV MODE: Select the picture mode. (See page 20.) 14 VIEW MODE: Select the aspect ratio. (See page 17.) 15 : Only for USB. 16 POWER: Switch the power on...

Instruction Manual
Page 17
... on the remote control unit to register this channel to watch the preset channel. Not all programs and VHS videotapes offer closed caption settings. • Caption Display will present the Closed Caption information display. 2 Press CC while the Closed Caption information is a more than... Closed Caption icon is equipped with an internal Closed Caption decoder. Closed Caption are also superimposed over the program's picture. Direct Button Operation AUDIO Allows you to select desired setting: SAP, Mono, or Stereo. The "CC1" to exit. You can select your TV. Example: Analog:...
... on the remote control unit to register this channel to watch the preset channel. Not all programs and VHS videotapes offer closed caption settings. • Caption Display will present the Closed Caption information display. 2 Press CC while the Closed Caption information is a more than... Closed Caption icon is equipped with an internal Closed Caption decoder. Closed Caption are also superimposed over the program's picture. Direct Button Operation AUDIO Allows you to select desired setting: SAP, Mono, or Stereo. The "CC1" to exit. You can select your TV. Example: Analog:...
Instruction Manual
Page 18
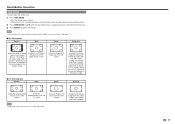
...image horizontally on the left and right of the display image. Images may appear wider than intended. TV screen. Stretches a 4:3 aspect ratio picture to the edges of the display image. ■■For 16:9 programs Normal Wide Zoom Stretch Keeps the original aspect Stretches ratio in ...a full screen display. Expands images with input signal type. 17 Direct Button Operation VIEW MODE You can have the same settings by choosing "View Mode" on the menu items. (See page 17.) ■■For 4:3 programs Normal Wide Zoom Panoramic Keeps the...
...image horizontally on the left and right of the display image. Images may appear wider than intended. TV screen. Stretches a 4:3 aspect ratio picture to the edges of the display image. ■■For 16:9 programs Normal Wide Zoom Stretch Keeps the original aspect Stretches ratio in ...a full screen display. Expands images with input signal type. 17 Direct Button Operation VIEW MODE You can have the same settings by choosing "View Mode" on the menu items. (See page 17.) ■■For 4:3 programs Normal Wide Zoom Panoramic Keeps the...

Instruction Manual
Page 19
... adjustment items may be displayed depending on the remote control. Press a/b to select the desired item. 4 Press p/q oPOrWcER /d to select/adjust the desired setting and press ENTER to confirm. • Operations vary dependiInNPgUTon the function or item. 5 Press MENU to1 exit.2 3 NOTE 4 5 6 • Menu... On-Screen Display Menu On-Screen Display Menu (Main menu) Main Menu Input TV AV IN Component HDMI-1 HDMI-2 HDMI-3(Side) Picture Audio Setup Closed Caption View Mode Submenu/Menu options ■■About Menu Items • Item displayed in gray indicates that the ...
... adjustment items may be displayed depending on the remote control. Press a/b to select the desired item. 4 Press p/q oPOrWcER /d to select/adjust the desired setting and press ENTER to confirm. • Operations vary dependiInNPgUTon the function or item. 5 Press MENU to1 exit.2 3 NOTE 4 5 6 • Menu... On-Screen Display Menu On-Screen Display Menu (Main menu) Main Menu Input TV AV IN Component HDMI-1 HDMI-2 HDMI-3(Side) Picture Audio Setup Closed Caption View Mode Submenu/Menu options ■■About Menu Items • Item displayed in gray indicates that the ...

Instruction Manual
Page 20
... Backlight 80 Contrast 52 Brightness 50 Color 60 Tint 0 Sharpness 2 Size & Position Color Temperature Advanced Picture Reset AV Mode AV Mode Page 20 Backlight Page 20 Contrast Page 20 Brightness Page 20 Color Page 20 Tint Page 20 Sharpness Page 20 Size & Position Page 20 Horiz. Region Rating ...Page 23 Blocked Unrated Shows Page 23 New Password Page 23 Reset Parental Settings ...
... Backlight 80 Contrast 52 Brightness 50 Color 60 Tint 0 Sharpness 2 Size & Position Color Temperature Advanced Picture Reset AV Mode AV Mode Page 20 Backlight Page 20 Contrast Page 20 Brightness Page 20 Color Page 20 Tint Page 20 Sharpness Page 20 Size & Position Page 20 Horiz. Region Rating ...Page 23 Blocked Unrated Shows Page 23 New Password Page 23 Reset Parental Settings ...

Instruction Manual
Page 21
... the display. Press c for less color intensity or press d for details of the picture. Tint Adjust the skin tones level. See Page 15 for more brightness. Sharpness Adjust the sharpness level. AV Mode (Changing Pic.Quality) The audio and video settings can be changed to the factory preset values. 20 Position 31 Vertical Position...
... the display. Press c for less color intensity or press d for details of the picture. Tint Adjust the skin tones level. See Page 15 for more brightness. Sharpness Adjust the sharpness level. AV Mode (Changing Pic.Quality) The audio and video settings can be changed to the factory preset values. 20 Position 31 Vertical Position...

Instruction Manual
Page 22
...TV has entered Audio Only Mode. Active Contrast Adjusts the image contrast according to wake up again. Reset AV Mode Restores the Picture settings to your BD/ DVD player. The Automatic Volume Control (Auto Volume) reduces this case, please refer to the display image. ...in the movie theater. • News: Provides mild surround sound. On-Screen Display Menu Advanced Picture Settings This TV provides various advanced functions for enhancing the white levels in the picture. Enhance Color Active Contrast Motion Enhancement Power Saving Noise Reduction Digital NR Film Mode [Normal] [...
...TV has entered Audio Only Mode. Active Contrast Adjusts the image contrast according to wake up again. Reset AV Mode Restores the Picture settings to your BD/ DVD player. The Automatic Volume Control (Auto Volume) reduces this case, please refer to the display image. ...in the movie theater. • News: Provides mild surround sound. On-Screen Display Menu Advanced Picture Settings This TV provides various advanced functions for enhancing the white levels in the picture. Enhance Color Active Contrast Motion Enhancement Power Saving Noise Reduction Digital NR Film Mode [Normal] [...

Instruction Manual
Page 30
... TV image mode so that are connected to this type of the channel may be low. See "Advanced Picture Settings" on the remote to adjust the volume. These types of the TV to turn the TV on the side of occurrences are securely attached. The ... on the remote aren't working electrical outlet. • Ensure the power cable is higher or lower than the level on page 20. • Reset the picture settings. If the volume level on the new input source is securely attached to the TV. • Press POWER on the remote or on .
... TV image mode so that are connected to this type of the channel may be low. See "Advanced Picture Settings" on the remote to adjust the volume. These types of the TV to turn the TV on the side of occurrences are securely attached. The ... on the remote aren't working electrical outlet. • Ensure the power cable is higher or lower than the level on page 20. • Reset the picture settings. If the volume level on the new input source is securely attached to the TV. • Press POWER on the remote or on .
Instruction Manual
Page 43
Most TVs have an Input button on your TV is set to change video inputs. If you cannot see a picture on your TV: đ Make sure your TV or home theater receiver is turned on. (This tip could save you some embarrassment.) đ Make sure the video input on the remote control to match the output (usually HDMI or MHL) used with the Roku Streaming Stick. Troubleshooting Having trouble completing setup? Don't worry: it's usually an easy fix.
Most TVs have an Input button on your TV is set to change video inputs. If you cannot see a picture on your TV: đ Make sure your TV or home theater receiver is turned on. (This tip could save you some embarrassment.) đ Make sure the video input on the remote control to match the output (usually HDMI or MHL) used with the Roku Streaming Stick. Troubleshooting Having trouble completing setup? Don't worry: it's usually an easy fix.


