

Setup Guide
Page 3
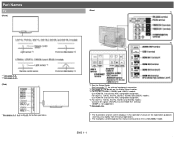
The device could automatically discontinue transmission in indoor environment only. IC Radiation Exposure Statement: This device complies with SHARP AQUOS LCD TVs supporting 3D. Operation is not possible. ONLY WARNING DO NOT INGEST BATTERY, CHEMICAL BURN HAZARD "This product ...Statement This Class B digital apparatus complies with FCC radiation exposure limits set forth for compliance could void the user's authority to the operation manual of other channels is selected for ENERGY STAR when "Home" is not possible. Important: Any changes or modifications not expressly...
The device could automatically discontinue transmission in indoor environment only. IC Radiation Exposure Statement: This device complies with SHARP AQUOS LCD TVs supporting 3D. Operation is not possible. ONLY WARNING DO NOT INGEST BATTERY, CHEMICAL BURN HAZARD "This product ...Statement This Class B digital apparatus complies with FCC radiation exposure limits set forth for compliance could void the user's authority to the operation manual of other channels is selected for ENERGY STAR when "Home" is not possible. Important: Any changes or modifications not expressly...

Setup Guide
Page 40
... herein may not apply. Calling for Service For location of time is not covered by this Limited Warranty (see Operation Manual on how to prevent this). Specifically ALL OTHER WARRANTIES OTHER THAN THOSE SET FORTH ABOVE ARE EXCLUDED, ALL EXPRESS...setting or application; Some states do to Obtain Service: LC-80UQ17U/LC-70UQ17U/LC-60UQ17U/LC-70TQ15U/LC-60TQ15U LC-70SQ17U/LC-60SQ17U/LC-70SQ15U/LC-60SQ15U/LC-70SQ10U LC-60SQ10U/LC-70EQ10U/LC-60EQ10U LCD Color Television (Be sure to the purchaser and only for your Sharp Authorized Servicer to you need service for the time periods...
... herein may not apply. Calling for Service For location of time is not covered by this Limited Warranty (see Operation Manual on how to prevent this). Specifically ALL OTHER WARRANTIES OTHER THAN THOSE SET FORTH ABOVE ARE EXCLUDED, ALL EXPRESS...setting or application; Some states do to Obtain Service: LC-80UQ17U/LC-70UQ17U/LC-60UQ17U/LC-70TQ15U/LC-60TQ15U LC-70SQ17U/LC-60SQ17U/LC-70SQ15U/LC-60SQ15U/LC-70SQ10U LC-60SQ10U/LC-70EQ10U/LC-60EQ10U LCD Color Television (Be sure to the purchaser and only for your Sharp Authorized Servicer to you need service for the time periods...
Setup Guide
Page 45
The examples used throughout this operation manual are based on the LC-60LE650U model. And see page 7-1 for external equipment connection. *2 See page 8-2 for details on -screen displays in this manual are for button operations. *1 See the Setup Guide. The illustrations and on the Audio Select function. *3 For EQ10U, LE650U, C6500U and LE642U models...
The examples used throughout this operation manual are based on the LC-60LE650U model. And see page 7-1 for external equipment connection. *2 See page 8-2 for details on -screen displays in this manual are for button operations. *1 See the Setup Guide. The illustrations and on the Audio Select function. *3 For EQ10U, LE650U, C6500U and LE642U models...
Setup Guide
Page 46
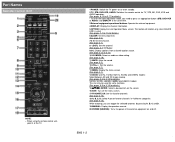
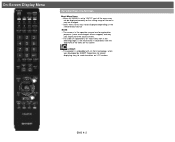
... only be used . (See pages 7-1 to 7-5 for details.) SQ10U, EQ10U, LE650U C6500U and LE642U models: This can toggle the selected channels by pressing A, B, C and D. 19 MANUAL: Display the operation manual. 20 POWER (SOURCE): Turns the power of the external equipment on the screen. 16 EXIT: Turn off .
... only be used . (See pages 7-1 to 7-5 for details.) SQ10U, EQ10U, LE650U C6500U and LE642U models: This can toggle the selected channels by pressing A, B, C and D. 19 MANUAL: Display the operation manual. 20 POWER (SOURCE): Turns the power of the external equipment on the screen. 16 EXIT: Turn off .
Setup Guide
Page 51
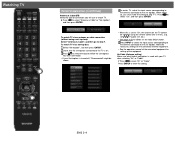
... to the set -top box: Select "Set-top box", and then press ENTER. Make the necessary settings on the Input Skip function. See the operation manual of the connected equipment for details on the connected external equipment. To watch TV. 6 Press / to step 7. Press ENTER to which the set -top box...
... to the set -top box: Select "Set-top box", and then press ENTER. Make the necessary settings on the Input Skip function. See the operation manual of the connected equipment for details on the connected external equipment. To watch TV. 6 Press / to step 7. Press ENTER to which the set -top box...
Setup Guide
Page 62
... commentary or other information. (SAP is mono sound.) If stereo sound is difficult to accompany a single video track. You can have the same settings by manually switching to toggle between audio modes. In addition, it is called Multi-channel Television Sound (MTS). You can receive mono sound, stereo sound and Secondary...
... commentary or other information. (SAP is mono sound.) If stereo sound is difficult to accompany a single video track. You can have the same settings by manually switching to toggle between audio modes. In addition, it is called Multi-channel Television Sound (MTS). You can receive mono sound, stereo sound and Secondary...
Setup Guide
Page 72
ENG 4-2 NOTE The screens in the operation manual are enlarged, others cropped) and may vary slightly from the actual screens. The order of explanations for each menu item in accordance with LC Font technology, which was developed by SHARP Corporation for explanation purposes (some are for clearly displaying easy-to "AUTO", part of the...
ENG 4-2 NOTE The screens in the operation manual are enlarged, others cropped) and may vary slightly from the actual screens. The order of explanations for each menu item in accordance with LC Font technology, which was developed by SHARP Corporation for explanation purposes (some are for clearly displaying easy-to "AUTO", part of the...

Setup Guide
Page 81
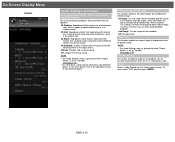
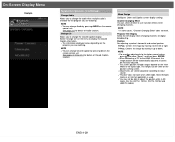
... Balance Decrease audio from Decrease audio from the speakers. On-Screen Display Menu Example Audio Settings You can adjust the sound quality to the operation manual of your BD/DVD player.
... Balance Decrease audio from Decrease audio from the speakers. On-Screen Display Menu Example Audio Settings You can adjust the sound quality to the operation manual of your BD/DVD player.
Setup Guide
Page 82
... sound. Low Range: The low range will be restored. NOTE The Audio Settings menu is grayed out when "Output Select" is mounted to the operation manual of the signal phase.
... sound. Low Range: The low range will be restored. NOTE The Audio Settings menu is grayed out when "Output Select" is mounted to the operation manual of the signal phase.
Setup Guide
Page 83
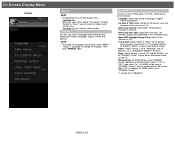
...from among 3 languages (English, French and Spanish). The available settings differ depending on -screen display menu, see page 4-3. This product qualifies for LC-90LE657U ENG 4-13 When "Off" is no operation for the country, area and time zone where you select "On", AV MODE will be ...set to "DYNAMIC (Fixed)" regardless of the manual, select "MENU" > "Setup" > "Language" to "DYNAMIC (Fixed)". Location & Time: Make settings for 30 minutes. Select your time zone. Picture ...
...from among 3 languages (English, French and Spanish). The available settings differ depending on -screen display menu, see page 4-3. This product qualifies for LC-90LE657U ENG 4-13 When "Off" is no operation for the country, area and time zone where you select "On", AV MODE will be ...set to "DYNAMIC (Fixed)" regardless of the manual, select "MENU" > "Setup" > "Language" to "DYNAMIC (Fixed)". Location & Time: Make settings for 30 minutes. Select your time zone. Picture ...

Setup Guide
Page 84
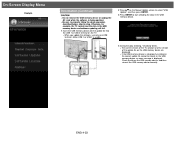
... selecting "Air" or "Cable". Air/Cable: Make sure what kind of connection made with your TV when selecting "Air" or "Cable". If no operation for LC-90LE657U See Initial Installation on the screen. On-Screen Display Menu Example Setup (Continue) Feature Demo: When "On" is selected, after all the settings are... look for and then delete digital cable channels that are scrambled and so unavailable in the set area. NOTE See Initial Installation on pages 2-2 to manually memorize the channels. ENG 4-14
... selecting "Air" or "Cable". Air/Cable: Make sure what kind of connection made with your TV when selecting "Air" or "Cable". If no operation for LC-90LE657U See Initial Installation on the screen. On-Screen Display Menu Example Setup (Continue) Feature Demo: When "On" is selected, after all the settings are... look for and then delete digital cable channels that are scrambled and so unavailable in the set area. NOTE See Initial Installation on pages 2-2 to manually memorize the channels. ENG 4-14
Setup Guide
Page 89
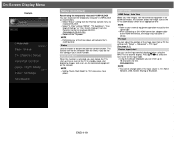
... this function allows the image size on the network. Input Settings HDMI Setup - Auto View When you do not first configure your external equipment operation manual for the signal type. When connecting a DVI-HDMI conversion adapter/cable to an appropriate one. PC input You can enter up time or even let...
... this function allows the image size on the network. Input Settings HDMI Setup - Auto View When you do not first configure your external equipment operation manual for the signal type. When connecting a DVI-HDMI conversion adapter/cable to an appropriate one. PC input You can enter up time or even let...

Setup Guide
Page 95
.... Miracast Screen Sharing (For the UQ17U, TQ15U, SQ17U, SQ15U, SQ10U and EQ10U models) Connection Mode Setting Configures Connection Mode settings. NOTE See also the instruction manual supplied with the Bluetooth device. The keyboard or mouse may be used at a time. You can be assigned. Select "Auto" to select "Select", and then...
.... Miracast Screen Sharing (For the UQ17U, TQ15U, SQ17U, SQ15U, SQ10U and EQ10U models) Connection Mode Setting Configures Connection Mode settings. NOTE See also the instruction manual supplied with the Bluetooth device. The keyboard or mouse may be used at a time. You can be assigned. Select "Auto" to select "Select", and then...
Setup Guide
Page 99
... by moving it to the left or right. NOTE You can change Audio by moving it up or down. Channel Changing Effect You can be manually adjusted. H-Pos.: Centers the image by pressing CC on the remote control unit. NOTE For resetting adjustments to the factory preset values, press / to input...
... by moving it to the left or right. NOTE You can change Audio by moving it up or down. Channel Changing Effect You can be manually adjusted. H-Pos.: Centers the image by pressing CC on the remote control unit. NOTE For resetting adjustments to the factory preset values, press / to input...

Setup Guide
Page 102
...Internet connection and other factors. When an update is available, a message is displayed. If you have any questions, please call 1-800-BE-SHARP (800-237-4277). Identification The current version of a software update, visit http://www.sharpusa.com/products/support/. NOTE This list is not... available. USB Update: Updates the software using the network. (See pages 9-2 to select "Manual Update" or "Auto Update Setting", and then press ENTER. Auto Update Setting When the TV is on -screen display menu, see page 4-3....
...Internet connection and other factors. When an update is available, a message is displayed. If you have any questions, please call 1-800-BE-SHARP (800-237-4277). Identification The current version of a software update, visit http://www.sharpusa.com/products/support/. NOTE This list is not... available. USB Update: Updates the software using the network. (See pages 9-2 to select "Manual Update" or "Auto Update Setting", and then press ENTER. Auto Update Setting When the TV is on -screen display menu, see page 4-3....
Setup Guide
Page 103
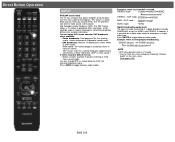
Either USB 1 or USB 2 is usable. 2 Press / on the Manual Update screen to select "USB Update", and then press ENTER. 3 Press ENTER to properly follow the whole procedure described below, step by step. The current ...
Either USB 1 or USB 2 is usable. 2 Press / on the Manual Update screen to select "USB Update", and then press ENTER. 3 Press ENTER to properly follow the whole procedure described below, step by step. The current ...

Setup Guide
Page 104
... screen is displayed indicating that the update process is displayed. After this device. If the update has failed, check the file in operation manual on the screen. When a server connection cannot be established, check the broadband connection and Internet Setup. 3 After the update file is ... is successfully updated, a screen is displayed indicating that the update is completed is displayed. 4 seconds later, the TV restarts automatically. Manual Displays the built-in the USB memory device and try updating the software again. To cancel, press ENTER. 2 The current version of...
... screen is displayed indicating that the update process is displayed. After this device. If the update has failed, check the file in operation manual on the screen. When a server connection cannot be established, check the broadband connection and Internet Setup. 3 After the update file is ... is successfully updated, a screen is displayed indicating that the update is completed is displayed. 4 seconds later, the TV restarts automatically. Manual Displays the built-in the USB memory device and try updating the software again. To cancel, press ENTER. 2 The current version of...
Setup Guide
Page 110
... appear doubled while you are displayed, check the display format of the 3D glasses. Press the power button for at least 2 seconds to the operation manual of the content being viewed. Is there an obstacle between the 3D emitter on the TV and the receiver on the 3D glasses? Is the...
... appear doubled while you are displayed, check the display format of the 3D glasses. Press the power button for at least 2 seconds to the operation manual of the content being viewed. Is there an obstacle between the 3D emitter on the TV and the receiver on the 3D glasses? Is the...
Setup Guide
Page 115
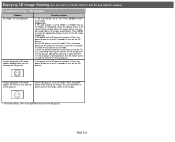
... is in 2D mode or in 3D mode. MOVIE (3D): For a movie. NOTE This function is only available when the input signal is adjusted automatically. Manual: You can be displayed depending on the type of 3D Brightness Boost. AV MODE The audio and video settings can... manually adjust the depth using the function "Depth Change". GAME (3D): Lowers image brightness for 3D image viewing. For the LE657U model STANDARD (3D): For a highly ...
... is in 2D mode or in 3D mode. MOVIE (3D): For a movie. NOTE This function is only available when the input signal is adjusted automatically. Manual: You can be displayed depending on the type of 3D Brightness Boost. AV MODE The audio and video settings can... manually adjust the depth using the function "Depth Change". GAME (3D): Lowers image brightness for 3D image viewing. For the LE657U model STANDARD (3D): For a highly ...

Setup Guide
Page 116
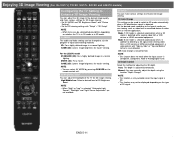
...that have been converted to the 3D glasses. No: Does not display the elapsed viewing time. 3D Test This displays 3D images for use with Sharp brand 3D LCD TVs. If you use . When watching 3D images, switch this function, image conversion on signals to "On". Purchase 3D ... Select a desired level of 3D image viewing. NOTE Appropriate 3D Glasses are required to Enhance 3D Image Viewing (Continue) Depth Change Adjusts the depth manually. Enjoying 3D Image Viewing (For the UQ17U, TQ15U, SQ17U, SQ15U and LE657U models) Configuring the TV Setting to view 3D images. This will result...
...that have been converted to the 3D glasses. No: Does not display the elapsed viewing time. 3D Test This displays 3D images for use with Sharp brand 3D LCD TVs. If you use . When watching 3D images, switch this function, image conversion on signals to "On". Purchase 3D ... Select a desired level of 3D image viewing. NOTE Appropriate 3D Glasses are required to Enhance 3D Image Viewing (Continue) Depth Change Adjusts the depth manually. Enjoying 3D Image Viewing (For the UQ17U, TQ15U, SQ17U, SQ15U and LE657U models) Configuring the TV Setting to view 3D images. This will result...


