Operation Manual
Page 11
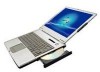
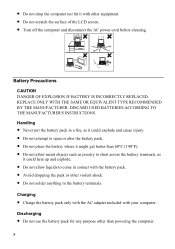
... for any purpose other than 60°C (140°F). • Do not allow metal objects such as jewelry to short across the battery terminals, as it could heat up and explode. • Do not allow liquids to come in contact with your computer. x REPLACE ONLY WITH THE ...SAME OR EQUIVALENT TYPE RECOMMENDED BY THE MANUFACTURER. Charging • Charge the battery pack only with the AC adapter included with the battery pack. • Avoid dropping the pack or other equipment. • Do not scratch the surface of the LCD screen. &#...
... for any purpose other than 60°C (140°F). • Do not allow metal objects such as jewelry to short across the battery terminals, as it could heat up and explode. • Do not allow liquids to come in contact with your computer. x REPLACE ONLY WITH THE ...SAME OR EQUIVALENT TYPE RECOMMENDED BY THE MANUFACTURER. Charging • Charge the battery pack only with the AC adapter included with the battery pack. • Avoid dropping the pack or other equipment. • Do not scratch the surface of the LCD screen. &#...
Operation Manual
Page 12
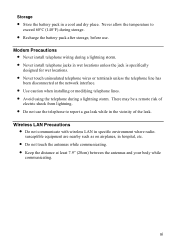
...LAN in a cool and dry place. xi Never allow the temperature to exceed 60°C (140°F) during storage. • Recharge the battery pack after storage, before use the telephone to report a gas leak while in wet locations unless the jack is specifically designed for wet locations. ...your body while communicating. There may be a remote risk of electric shock from lightning. • Do not use . Storage • Store the battery pack in specific environment where radio- susceptible equipment are nearby such as on airplanes, in hospital, etc. • Do not touch the antennas while...
...LAN in a cool and dry place. xi Never allow the temperature to exceed 60°C (140°F) during storage. • Recharge the battery pack after storage, before use the telephone to report a gas leak while in wet locations unless the jack is specifically designed for wet locations. ...your body while communicating. There may be a remote risk of electric shock from lightning. • Do not use . Storage • Store the battery pack in specific environment where radio- susceptible equipment are nearby such as on airplanes, in hospital, etc. • Do not touch the antennas while...

Operation Manual
Page 13
...a commitment on the part of all important data. All other reproduction of this material. SHARP Corporation and its functions, such as a result of improper use, repairs, defects, battery replacement, use of this manual is subject to proprietary information which is a trademark of ...technical or editorial errors or omissions contained herein; xii Therefore, SHARP assumes no responsibility directly or indirectly, for incidental or consequential damages resulting from the use after the specified battery life has expired, or any electronic memory product under certain circumstances...
...a commitment on the part of all important data. All other reproduction of this material. SHARP Corporation and its functions, such as a result of improper use, repairs, defects, battery replacement, use of this manual is subject to proprietary information which is a trademark of ...technical or editorial errors or omissions contained herein; xii Therefore, SHARP assumes no responsibility directly or indirectly, for incidental or consequential damages resulting from the use after the specified battery life has expired, or any electronic memory product under certain circumstances...
Operation Manual
Page 15
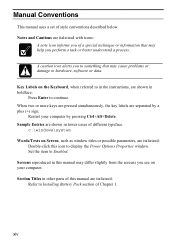
... Properties window. When two or more keys are pressed simultaneously, the key labels are shown in lower cases of Chapter 1. Set the item to Installing Battery Pack section of different typeface. Section Titles in other parts of style conventions described below. Manual Conventions This manual uses a set of this manual may...
... Properties window. When two or more keys are pressed simultaneously, the key labels are shown in lower cases of Chapter 1. Set the item to Installing Battery Pack section of different typeface. Section Titles in other parts of style conventions described below. Manual Conventions This manual uses a set of this manual may...

Operation Manual
Page 16
...Safety Precautions ...ix About This Manual xii Recording Important Information xiii Manual Conventions xiv Table of Contents...xv Overview of Computer xvii Quick Setup Installing a Battery Pack 1-1 Connecting to AC Power Source 1-2 Setting Up Windows 1-4 Turning Off the Computer 1-6 Basic Operations Choosing Power Source 2-1 Resetting the System ... to CD-R/RW Disks 2-10 Watching DVD-ROM Videos 2-11 Controlling Audio 2-15 Adjusting the Display 2-16 Sharing the Computer 2-18 Battery and Power Management Battery Pack...3-1 Optional Add-on Battery Pack 3-6 Power Management 3-10 xv
...Safety Precautions ...ix About This Manual xii Recording Important Information xiii Manual Conventions xiv Table of Contents...xv Overview of Computer xvii Quick Setup Installing a Battery Pack 1-1 Connecting to AC Power Source 1-2 Setting Up Windows 1-4 Turning Off the Computer 1-6 Basic Operations Choosing Power Source 2-1 Resetting the System ... to CD-R/RW Disks 2-10 Watching DVD-ROM Videos 2-11 Controlling Audio 2-15 Adjusting the Display 2-16 Sharing the Computer 2-18 Battery and Power Management Battery Pack...3-1 Optional Add-on Battery Pack 3-6 Power Management 3-10 xv

Operation Manual
Page 18
Overview of your computer may be slightly different depending on the model. Actual appearance of Computer Each number after an arrow indicates the page referring to the part. Front LCD Screen →2-16 Antennas (which function only for built-in wireless LAN model) →5-7 Power Indicator →2-1 Power Button →1-3 Battery Indicator →2-1,3-3 Glide Pad →2-4 Antenna Indicator ( which function only for built-in wireless LAN model) →5-7 Status Indicators N A Optical Drive Scroll Lock Keyboard →2-6 Hard Disk Caps Lock Num Lock xvii
Overview of your computer may be slightly different depending on the model. Actual appearance of Computer Each number after an arrow indicates the page referring to the part. Front LCD Screen →2-16 Antennas (which function only for built-in wireless LAN model) →5-7 Power Indicator →2-1 Power Button →1-3 Battery Indicator →2-1,3-3 Glide Pad →2-4 Antenna Indicator ( which function only for built-in wireless LAN model) →5-7 Status Indicators N A Optical Drive Scroll Lock Keyboard →2-6 Hard Disk Caps Lock Num Lock xvii
Operation Manual
Page 22
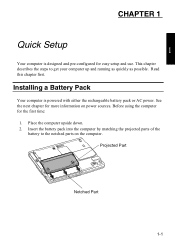
... running as quickly as possible. CHAPTER 1 Quick Setup 1 Your computer is powered with either the rechargeable battery pack or AC power. This chapter describes the steps to the notched parts on power sources. Installing a Battery Pack Your computer is designed and pre-configured for more information on the computer. Place the computer...
... running as quickly as possible. CHAPTER 1 Quick Setup 1 Your computer is powered with either the rechargeable battery pack or AC power. This chapter describes the steps to the notched parts on power sources. Installing a Battery Pack Your computer is designed and pre-configured for more information on the computer. Place the computer...
Operation Manual
Page 23
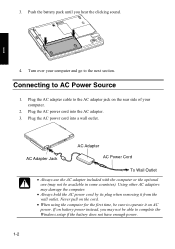
... power cord into the AC adapter. 3. Using other AC adapters may not be able to complete the Windows setup if the battery does not have enough power. 1-2 Push the battery pack until you may not be available in some countries). Plug the AC adapter cable to operate it from the wall outlet... with the computer or the optional one (may damage the computer. • Always hold the AC power cord by its plug when removing it on battery power instead, you hear the clicking sound. 1 4. 3. If on AC power.
... power cord into the AC adapter. 3. Using other AC adapters may not be able to complete the Windows setup if the battery does not have enough power. 1-2 Push the battery pack until you may not be available in some countries). Plug the AC adapter cable to operate it from the wall outlet... with the computer or the optional one (may damage the computer. • Always hold the AC power cord by its plug when removing it on battery power instead, you hear the clicking sound. 1 4. 3. If on AC power.

Operation Manual
Page 25
...Otherwise your computer may malfunction. • If the display turns off, some power management may not be able to complete the Windows setup if the battery does not have enough power. • Do not connect any key to resume your computer from the power management. • If you cannot set ...up Windows later. • Be sure to connect the computer to AC power source. Be sure that the battery indicator turns off the computer until Windows setup completes. then, after more than 10 seconds, press the power button to turn it on again. Double...
...Otherwise your computer may malfunction. • If the display turns off, some power management may not be able to complete the Windows setup if the battery does not have enough power. • Do not connect any key to resume your computer from the power management. • If you cannot set ...up Windows later. • Be sure to connect the computer to AC power source. Be sure that the battery indicator turns off the computer until Windows setup completes. then, after more than 10 seconds, press the power button to turn it on again. Double...
Operation Manual
Page 28
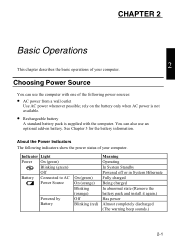
...from a wall outlet Use AC power whenever possible; See Chapter 3 for the battery information. You can use an optional add-on the battery only when AC power is not available. • Rechargeable battery A standard battery pack is supplied with one of the following indicators show the power status of ... Power Source You can also use the computer with the computer. Indicator Light Power On (green) Blinking (green) Off Battery Connected to AC Power Source Powered by Battery On (green) On (orange) Blinking (orange) Off Blinking (red) Meaning Operating In System Standby Powered off or in...
...from a wall outlet Use AC power whenever possible; See Chapter 3 for the battery information. You can use an optional add-on the battery only when AC power is not available. • Rechargeable battery A standard battery pack is supplied with one of the following indicators show the power status of ... Power Source You can also use the computer with the computer. Indicator Light Power On (green) Blinking (green) Off Battery Connected to AC Power Source Powered by Battery On (green) On (orange) Blinking (orange) Off Blinking (red) Meaning Operating In System Standby Powered off or in...
Operation Manual
Page 29
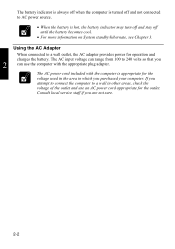
...the outlet and use the computer with the computer is hot, the battery indicator may turn off and stay off and not connected to AC power source. • When the battery is appropriate for operation and charges the battery. Using the AC Adapter When connected to 240 volts so that ...you purchased your computer. The AC power cord included with the appropriate plug adapter. The battery indicator is always off when the computer is...
...the outlet and use the computer with the computer is hot, the battery indicator may turn off and stay off and not connected to AC power source. • When the battery is appropriate for operation and charges the battery. Using the AC Adapter When connected to 240 volts so that ...you purchased your computer. The AC power cord included with the appropriate plug adapter. The battery indicator is always off when the computer is...
Operation Manual
Page 37
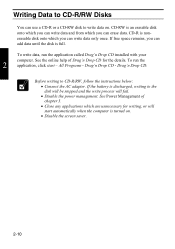
... will fail. • Disable the power management. CD-R is nonerasable disk onto which you can add data until the disk is turned on . If the battery is an erasable disk onto which you can write data and from which you can erase data. Drag'n Drop CD. CD-RW is discharged, writing...
... will fail. • Disable the power management. CD-R is nonerasable disk onto which you can add data until the disk is turned on . If the battery is an erasable disk onto which you can write data and from which you can erase data. Drag'n Drop CD. CD-RW is discharged, writing...

Operation Manual
Page 38
... copyright protection technology that is protected by Macrovision Corporation, and is set to a region code applicable to open the Setup dialog box. 2-11 If the battery is reached, it . Once the limit is discharged, the operation will stop. • Disable the power management. InterVideo WinDVD4. • Before watching DVD-ROM video...
... copyright protection technology that is protected by Macrovision Corporation, and is set to a region code applicable to open the Setup dialog box. 2-11 If the battery is reached, it . Once the limit is discharged, the operation will stop. • Disable the power management. InterVideo WinDVD4. • Before watching DVD-ROM video...
Operation Manual
Page 48
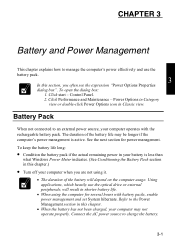
... Classic view. Connect the AC power source to the Power Management section in shorter battery life. • When using it. • The duration of the battery life may not operate properly. CHAPTER 3 Battery and Power Management This chapter explains how to manage the computer's power effectively and ... peripherals, will depend on the computer usage. Control Panel. 2. See the next section for several hours with the rechargeable battery pack. Refer to charge the battery. 3-1 Power Options in Category view or double-click Power Options icon in this chapter.) • Turn off your...
... Classic view. Connect the AC power source to the Power Management section in shorter battery life. • When using it. • The duration of the battery life may not operate properly. CHAPTER 3 Battery and Power Management This chapter explains how to manage the computer's power effectively and ... peripherals, will depend on the computer usage. Control Panel. 2. See the next section for several hours with the rechargeable battery pack. Refer to charge the battery. 3-1 Power Options in Category view or double-click Power Options icon in this chapter.) • Turn off your...

Operation Manual
Page 49
... long usage), it may take longer to the status of the computer. • The battery indicator may vary according to be installed correctly if the battery indicator blinks orange. Charging the Battery Pack 1. Close the Control Panel window. • The remaining operating time depends on the ...taskbar and click OK. 3. then, install the battery pack and connect the AC adapter again. This is because the battery pack is fully charged, the battery indicator turns green. If you are consuming. In the Power Options Properties dialog box, select...
... long usage), it may take longer to the status of the computer. • The battery indicator may vary according to be installed correctly if the battery indicator blinks orange. Charging the Battery Pack 1. Close the Control Panel window. • The remaining operating time depends on the ...taskbar and click OK. 3. then, install the battery pack and connect the AC adapter again. This is because the battery pack is fully charged, the battery indicator turns green. If you are consuming. In the Power Options Properties dialog box, select...
Operation Manual
Page 50
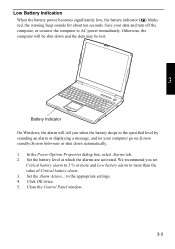
...) blinks red, the warning beep sounds for about ten seconds. In the Power Options Properties dialog box, select Alarms tab. 2. Set the battery level at which the alarms are activated. Click OK twice. 5. to AC power immediately. Save your computer go on System standby/System hibernate or... automatically. 1. Otherwise, the computer will be shut down and the data may be lost. 3 Battery Indicator On Windows, the alarm will tell you set Critical battery alarm to 5 % or more and Low battery alarm to the specified level by sounding an alarm or displaying a message, and let your data ...
...) blinks red, the warning beep sounds for about ten seconds. In the Power Options Properties dialog box, select Alarms tab. 2. Set the battery level at which the alarms are activated. Click OK twice. 5. to AC power immediately. Save your computer go on System standby/System hibernate or... automatically. 1. Otherwise, the computer will be shut down and the data may be lost. 3 Battery Indicator On Windows, the alarm will tell you set Critical battery alarm to 5 % or more and Low battery alarm to the specified level by sounding an alarm or displaying a message, and let your data ...

Operation Manual
Page 51
... Turn off . Turn on the operating environment). then, turns to green when the battery pack is 3 completely discharged and the system shuts down automatically. 5. Changing the Battery Pack The capacity of a battery pack gradually decreases when used repeatedly (the deterioration rate depends on the computer. 3. ...Close the display cover and turn over the computer on until the battery is fully charged. Make sure the computer is less than what Windows Power Meter indicates, or you buy a new standard battery pack. Restart the computer. Do not connect the computer to open...
... Turn off . Turn on the operating environment). then, turns to green when the battery pack is 3 completely discharged and the system shuts down automatically. 5. Changing the Battery Pack The capacity of a battery pack gradually decreases when used repeatedly (the deterioration rate depends on the computer. 3. ...Close the display cover and turn over the computer on until the battery is fully charged. Make sure the computer is less than what Windows Power Meter indicates, or you buy a new standard battery pack. Restart the computer. Do not connect the computer to open...

Operation Manual
Page 52
then, pull out the battery pack. Battery Stopper Battery Release Lever 3 4. Projected Part Notched Part 5. Insert a new battery pack into the computer by matching the projected parts of the computer to use. 3-5 then, unlock the battery release lever of the battery pack to the left and hold it ; Turn over the computer and it's ready to the left and hold it ; Unlock the battery stopper of the battery with the notched parts on the computer. Push the battery pack until you hear the clicking sound. 6. 3.
then, pull out the battery pack. Battery Stopper Battery Release Lever 3 4. Projected Part Notched Part 5. Insert a new battery pack into the computer by matching the projected parts of the computer to use. 3-5 then, unlock the battery release lever of the battery pack to the left and hold it ; Turn over the computer and it's ready to the left and hold it ; Unlock the battery stopper of the battery with the notched parts on the computer. Push the battery pack until you hear the clicking sound. 6. 3.
Operation Manual
Page 53
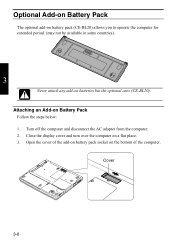
Cover 3-6 Optional Add-on Battery Pack The optional add-on battery pack (CE-BL20) allows you to operate the computer for extended period. (may not be available in some countries). 3 Never attach any add-on the bottom of the add-on battery pack socket on batteries but the optional ones (CE-BL20). Open the cover of the computer. Close the display cover and turn over the computer on Battery Pack Follow the steps below: 1. Attaching an Add-on a flat place. 3. Turn off the computer and disconnect the AC adapter from the computer. 2.
Cover 3-6 Optional Add-on Battery Pack The optional add-on battery pack (CE-BL20) allows you to operate the computer for extended period. (may not be available in some countries). 3 Never attach any add-on the bottom of the add-on battery pack socket on batteries but the optional ones (CE-BL20). Open the cover of the computer. Close the display cover and turn over the computer on Battery Pack Follow the steps below: 1. Attaching an Add-on a flat place. 3. Turn off the computer and disconnect the AC adapter from the computer. 2.
Operation Manual
Page 54
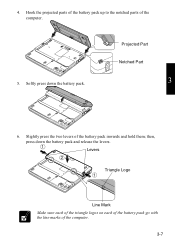
then, press down the battery pack. Softly press down the battery pack and release the levers. Slightly press the two levers of the computer. 5. Hook the projected parts of the battery pack up to the notched parts of the battery pack inwards and hold them; Levers Triangle Logo Line Mark Make sure each of the triangle logos on each of the battery pack go with the line marks of the computer. 3-7 Projected Part Notched Part 3 6. 4.
then, press down the battery pack. Softly press down the battery pack and release the levers. Slightly press the two levers of the computer. 5. Hook the projected parts of the battery pack up to the notched parts of the battery pack inwards and hold them; Levers Triangle Logo Line Mark Make sure each of the triangle logos on each of the battery pack go with the line marks of the computer. 3-7 Projected Part Notched Part 3 6. 4.