Operation Manual
Page 1
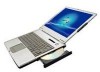
NOTEBOOK COMPUTER PC-MV10 Series OPERATION MANUAL
NOTEBOOK COMPUTER PC-MV10 Series OPERATION MANUAL

Operation Manual
Page 2
... authority to radio communications. If this product meets the ENERGY STAR® guidelines for energy efficiency. Declaration of Conformity SHARP PERSONAL COMPUTER, PC-MV Series This device complies with the instructions, may cause harmful interference to operate this device must accept any interference received... cable is required to insure compliance with FCC regulation for Class B computing equipment. * As an ENERGY STAR® Partner, SHARP has determined that this equipment does cause harmful interference to radio or television reception, which the receiver is no guarantee that to...
... authority to radio communications. If this product meets the ENERGY STAR® guidelines for energy efficiency. Declaration of Conformity SHARP PERSONAL COMPUTER, PC-MV Series This device complies with the instructions, may cause harmful interference to operate this device must accept any interference received... cable is required to insure compliance with FCC regulation for Class B computing equipment. * As an ENERGY STAR® Partner, SHARP has determined that this equipment does cause harmful interference to radio or television reception, which the receiver is no guarantee that to...
Operation Manual
Page 7
Notice for Users in Europe About the Modem Your Sharp PC-MV series with integral modem has been designed to work with the analogue PSTN's in the following setting should contact your dealer or network operator. ...
Notice for Users in Europe About the Modem Your Sharp PC-MV series with integral modem has been designed to work with the analogue PSTN's in the following setting should contact your dealer or network operator. ...
Operation Manual
Page 10
... to sudden shocks or extreme vibration. Immediately shut off the computer before installing or removing a peripheral device (except when connecting USB devices, IEEE1394 devices and PC cards). • Check the AC power cord and power connectors periodically for an extended period during operation or charging to avoid injury from an extremely...
... to sudden shocks or extreme vibration. Immediately shut off the computer before installing or removing a peripheral device (except when connecting USB devices, IEEE1394 devices and PC cards). • Check the AC power cord and power connectors periodically for an extended period during operation or charging to avoid injury from an extremely...
Operation Manual
Page 17
Peripherals Using Peripherals...4-1 Optional External Floppy Disk Drive Unit 4-3 Display...4-5 Audio System ...4-7 USB Device ...4-11 PC Card...4-12 Printer ...4-14 IEEE 1394 Device 4-16 Communication Functions Built-in Modem ...5-1 LAN unit...5-4 Wireless LAN ...5-7 Network Setup Utility 5-11 Setup Utility Running the Setup Utility 6-1 Main Menu ...6-3 Advanced Menu...6-4 Security Menu...6-5 Boot Menu ...6-7 Exit Menu ...6-8 Appendixes Memory Module ...A-1 Installing the Weight Saver A-4 Maintenance and Care A-6 Troubleshooting Index xvi
Peripherals Using Peripherals...4-1 Optional External Floppy Disk Drive Unit 4-3 Display...4-5 Audio System ...4-7 USB Device ...4-11 PC Card...4-12 Printer ...4-14 IEEE 1394 Device 4-16 Communication Functions Built-in Modem ...5-1 LAN unit...5-4 Wireless LAN ...5-7 Network Setup Utility 5-11 Setup Utility Running the Setup Utility 6-1 Main Menu ...6-3 Advanced Menu...6-4 Security Menu...6-5 Boot Menu ...6-7 Exit Menu ...6-8 Appendixes Memory Module ...A-1 Installing the Weight Saver A-4 Maintenance and Care A-6 Troubleshooting Index xvi

Operation Manual
Page 49
... green. then, install the battery pack and connect the AC adapter again. Check Always show icon on the power you are using the audio system, PC card slot, hard disk drive, floppy disk drive or optical disk drive, your computer may consume more battery life. • If the actual remaining power...
... green. then, install the battery pack and connect the AC adapter again. Check Always show icon on the power you are using the audio system, PC card slot, hard disk drive, floppy disk drive or optical disk drive, your computer may consume more battery life. • If the actual remaining power...
Operation Manual
Page 62
.... • Be sure to turn off the computer and the peripheral device before connecting them (except when connecting USB devices, IEEE 1394 devices or inserting a PC card). • Confirm the peripheral device you will connect is turned on. • Some devices require that you install their drivers before use the peripheral...
.... • Be sure to turn off the computer and the peripheral device before connecting them (except when connecting USB devices, IEEE 1394 devices or inserting a PC card). • Confirm the peripheral device you will connect is turned on. • Some devices require that you install their drivers before use the peripheral...
Operation Manual
Page 63
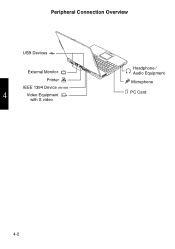
Peripheral Connection Overview USB Devices External Monitor Printer IEEE 1394 Device 4 Video Equipment with S video Headphone / Audio Equipment Microphone PC Card 4-2
Peripheral Connection Overview USB Devices External Monitor Printer IEEE 1394 Device 4 Video Equipment with S video Headphone / Audio Equipment Microphone PC Card 4-2

Operation Manual
Page 73
... When a new card is correctly inserted, the appropriate driver is equipped with a PC card (PCMCIA) slot, which can insert/eject a PC card without turning off the computer. PC Card Your computer is automatically installed. Confirm the PC card eject button is not installed correctly, you will see a message on the screen. 1. If the driver...
... When a new card is correctly inserted, the appropriate driver is equipped with a PC card (PCMCIA) slot, which can insert/eject a PC card without turning off the computer. PC Card Your computer is automatically installed. Confirm the PC card eject button is not installed correctly, you will see a message on the screen. 1. If the driver...
Operation Manual
Page 74
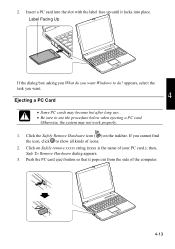
... with the label face up until it pops out from the side of the computer. 4-13 2. If you want . 4 Ejecting a PC Card • Some PC cards may not work properly. 1. Insert a PC card into place. appears, select the task you want Windows to do you cannot find the icon, click to use . •...; Be sure to show all kinds of your PC card.); then, Safe To Remove Hardware dialog appears. 3. Click on the taskbar. Otherwise, the system may become hot after long use the procedure below when...
... with the label face up until it pops out from the side of the computer. 4-13 2. If you want . 4 Ejecting a PC Card • Some PC cards may not work properly. 1. Insert a PC card into place. appears, select the task you want Windows to do you cannot find the icon, click to use . •...; Be sure to show all kinds of your PC card.); then, Safe To Remove Hardware dialog appears. 3. Click on the taskbar. Otherwise, the system may become hot after long use the procedure below when...
Operation Manual
Page 75
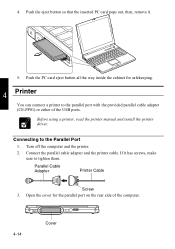
... You can connect a printer to the parallel port with the provided parallel cable adapter (CE-PP01) or either of the computer. 4-14 Cover Push the PC card eject button all the way inside the cabinet for the parallel port on the rear side of the USB ports. 4. Parallel Cable Adapter Printer... off the computer and the printer. 2. Connect the parallel cable adapter and the printer cable. If it . 5. Push the eject button so that the inserted PC card pops out, then, remove it has screws, make sure to the Parallel Port 1.
... You can connect a printer to the parallel port with the provided parallel cable adapter (CE-PP01) or either of the computer. 4-14 Cover Push the PC card eject button all the way inside the cabinet for the parallel port on the rear side of the USB ports. 4. Parallel Cable Adapter Printer... off the computer and the printer. 2. Connect the parallel cable adapter and the printer cable. If it . 5. Push the eject button so that the inserted PC card pops out, then, remove it has screws, make sure to the Parallel Port 1.
Operation Manual
Page 89
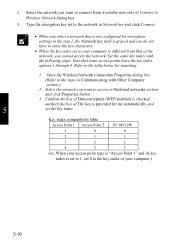
... the network in the step 2, the Network key field is grayed and you cannot access the network. Key index compatibility table Access Point 1 Access Point 2 PC-MV12W 1 0 0 2 1 1 3 2 2 4 3 3 (ex. Open the Wireless Network Connection Properties dialog box. (Refer to the table below for matching. 1. Select the network you select a network that some access...
... the network in the step 2, the Network key field is grayed and you cannot access the network. Key index compatibility table Access Point 1 Access Point 2 PC-MV12W 1 0 0 2 1 1 3 2 2 4 3 3 (ex. Open the Wireless Network Connection Properties dialog box. (Refer to the table below for matching. 1. Select the network you select a network that some access...
Operation Manual
Page 96
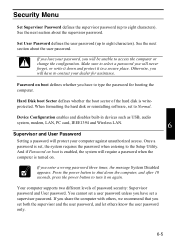
... write it down the computer, and after 10 seconds, press the power button to turn it in devices such as USB, audio system, modem, LAN, PC card, IEEE1394 and Wireless LAN. 6 Supervisor and User Password Setting a password will be unable to contact your password, you enter a wrong password three times, the...
... write it down the computer, and after 10 seconds, press the power button to turn it in devices such as USB, audio system, modem, LAN, PC card, IEEE1394 and Wireless LAN. 6 Supervisor and User Password Setting a password will be unable to contact your password, you enter a wrong password three times, the...
Operation Manual
Page 123
...loading, 5-11 switching, 5-11 O Optical drive troubleshooting, T-5 P Passwords changing, 2-19, 6-6 deleting, 2-20, 6-6 setting, 2-19, 6-6 PC cards ejecting, 4-13 inserting, 4-12 Peripherals audio equipment, 4-7 connecting guidelines, 4-1 external floppy disk drive, 4-3 external monitor, 4-5 headphones, 4-9 IEEE 1394 device, ...4-16 microphone, 4-10 PC cards, 4-12 printer, 4-14 speakers, 4-7 television set, 2-13 troubleshooting, T-9 USB device, 4-11 Power choosing AC or battery,...
...loading, 5-11 switching, 5-11 O Optical drive troubleshooting, T-5 P Passwords changing, 2-19, 6-6 deleting, 2-20, 6-6 setting, 2-19, 6-6 PC cards ejecting, 4-13 inserting, 4-12 Peripherals audio equipment, 4-7 connecting guidelines, 4-1 external floppy disk drive, 4-3 external monitor, 4-5 headphones, 4-9 IEEE 1394 device, ...4-16 microphone, 4-10 PC cards, 4-12 printer, 4-14 speakers, 4-7 television set, 2-13 troubleshooting, T-9 USB device, 4-11 Power choosing AC or battery,...