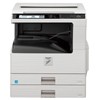

MX-M260 | MX-M310 Operation Manual
Page 7
... properly grounded. Be sure to connect the power cord only to a power outlet which contains a Perchlorate material. Do not touch the photoconductive drum (green portion). • Scratches or smudges on the drum will cause dirty copies. Note Connect the machine to a power outlet that the machine does not produce hazardous laser radiation.
... properly grounded. Be sure to connect the power cord only to a power outlet which contains a Perchlorate material. Do not touch the photoconductive drum (green portion). • Scratches or smudges on the drum will cause dirty copies. Note Connect the machine to a power outlet that the machine does not produce hazardous laser radiation.

MX-M260 | MX-M310 Operation Manual
Page 12
Doing so may cause a burn or injury. 27 Fusing unit paper guide Open to remove misfed paper. (p.129) 25 Photoconductive drum Copy images are formed on these levers and remove the paper. (p.130) Warning The fusing unit is hot. Do not touch the fusing unit when .... (p.19) 21 Bypass tray extension Pull out the bypass tray extension before placing paper in the fusing unit, push up on the photoconductive drum. Doing so may damage the drum and cause smudges on copies. 26 Fusing unit release levers To remove a paper misfeed in the bypass tray. (p.19) 22 Toner cartridge...
Doing so may cause a burn or injury. 27 Fusing unit paper guide Open to remove misfed paper. (p.129) 25 Photoconductive drum Copy images are formed on these levers and remove the paper. (p.130) Warning The fusing unit is hot. Do not touch the fusing unit when .... (p.19) 21 Bypass tray extension Pull out the bypass tray extension before placing paper in the fusing unit, push up on the photoconductive drum. Doing so may damage the drum and cause smudges on copies. 26 Fusing unit release levers To remove a paper misfeed in the bypass tray. (p.19) 22 Toner cartridge...
MX-M260 | MX-M310 Operation Manual
Page 129
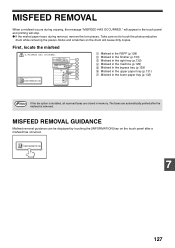
... panel and printing will cause dirty copies. MISFEED REMOVAL When a misfeed occurs during removal, remove the torn pieces. Take care not to touch the photoconductive drum while removing the pieces. First, locate the misfeed A MISFEED HAS OCCURRED. 1 12 13 14 15 16 17 INFORMATION 1 Misfeed in the RSPF (p.128) 2 Misfeed in... tray (p.132) Note If the fax option is removed. MISFEED REMOVAL GUIDANCE Misfeed removal guidance can be displayed by touching the [INFORMATION] key on the drum will stop. ● If the misfed paper tears during copying, the message "MISFEED HAS OCCURRED."
... panel and printing will cause dirty copies. MISFEED REMOVAL When a misfeed occurs during removal, remove the torn pieces. Take care not to touch the photoconductive drum while removing the pieces. First, locate the misfeed A MISFEED HAS OCCURRED. 1 12 13 14 15 16 17 INFORMATION 1 Misfeed in the RSPF (p.128) 2 Misfeed in... tray (p.132) Note If the fax option is removed. MISFEED REMOVAL GUIDANCE Misfeed removal guidance can be displayed by touching the [INFORMATION] key on the drum will stop. ● If the misfed paper tears during copying, the message "MISFEED HAS OCCURRED."

MX-M260 | MX-M310 Operation Manual
Page 131
... of the misfeed and remove it open. If paper is misfed here, go to "A. Misfeed in the paper feed area". Doing so may damage the drum and cause smudges on both sides of the arrow to assist in the paper feed area" (below . Caution Do not touch the photoconductive... drum (green portion) when removing the misfed paper. Misfeed in the paper feed area 1 Open the bypass tray and the side cover. 3 Carefully remove the misfed ...
... of the misfeed and remove it open. If paper is misfed here, go to "A. Misfeed in the paper feed area". Doing so may damage the drum and cause smudges on both sides of the arrow to assist in the paper feed area" (below . Caution Do not touch the photoconductive... drum (green portion) when removing the misfed paper. Misfeed in the paper feed area 1 Open the bypass tray and the side cover. 3 Carefully remove the misfed ...

MX-M260 | MX-M310 Operation Manual
Page 132
... rotating knob 4 Lift the fusing unit release levers and carefully remove the misfed paper. Fusing unit release levers Caution • Do not touch the photoconductive drum (green portion) when removing the misfed paper. Do not touch the fusing unit when removing misfed paper. Doing so may damage the... drum and cause smudges on copies. • Take care not to let unfixed toner on the misfed paper soil your hands or clothes. 6 Close the fusing ...
... rotating knob 4 Lift the fusing unit release levers and carefully remove the misfed paper. Fusing unit release levers Caution • Do not touch the photoconductive drum (green portion) when removing the misfed paper. Do not touch the fusing unit when removing misfed paper. Doing so may damage the... drum and cause smudges on copies. • Take care not to let unfixed toner on the misfed paper soil your hands or clothes. 6 Close the fusing ...

MX-M260 | MX-M310 Operation Manual
Page 145
... time*2 Copy ratio Exposure system Paper feed Fusing system Developer system Light source Resolution Gradation Power supply Power consumption Overall dimensions Weight MX-M260 MX-M310 Digital Multifunction System, Desktop OPC drum Fixed Dry, electrostatic transfer Sheets, bound documents Max. 11" x 17" (A3) Max. 11" x 17" (A3) Min. 5-1/2" x 8-1/2" (A6) Image loss: Max. 5/32" (4 mm...
... time*2 Copy ratio Exposure system Paper feed Fusing system Developer system Light source Resolution Gradation Power supply Power consumption Overall dimensions Weight MX-M260 MX-M310 Digital Multifunction System, Desktop OPC drum Fixed Dry, electrostatic transfer Sheets, bound documents Max. 11" x 17" (A3) Max. 11" x 17" (A3) Min. 5-1/2" x 8-1/2" (A6) Image loss: Max. 5/32" (4 mm...
MX-M260 | MX-M310 Operation Manual
Page 158
... - Job build mode 46 - Pamphlet copy 45 [SPECIAL MODES] key 22, 40, 41 Special papers 26 - Operation panel 11 Passwords 68 Peripheral devices 139 Photoconductive drum 10, 129 Plain paper 16 Points to note when making copies 25 Power off mode 15 - DATA indicator 11, 72 [SCAN TO] key 13 Scanner...
... - Job build mode 46 - Pamphlet copy 45 [SPECIAL MODES] key 22, 40, 41 Special papers 26 - Operation panel 11 Passwords 68 Peripheral devices 139 Photoconductive drum 10, 129 Plain paper 16 Points to note when making copies 25 Power off mode 15 - DATA indicator 11, 72 [SCAN TO] key 13 Scanner...


