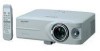

Operation Manual
Page 6
...D'EXPLOSION. Ensure the cooling fan has stopped before disconnecting the power cord. HOT SURFACE INSIDE. TURN OFF LAMP BEFORE SERVICING. This SHARP projector uses an LCD (Liquid Crystal Display) panel. This very sophisticated panel contains 480,000 pixels (× RGB) TFTs (Thin Film Transistors). Caution ... on the remote control. HANDLE WITH CARE. PRECAUTIONS A OBSERVER LORS DU REMPLACEMENT DE LA LAMPE. As with any high technology electronic equipment such as shown in inactive dots on the picture screen. During normal operation, when putting the projector into the standby...
...D'EXPLOSION. Ensure the cooling fan has stopped before disconnecting the power cord. HOT SURFACE INSIDE. TURN OFF LAMP BEFORE SERVICING. This SHARP projector uses an LCD (Liquid Crystal Display) panel. This very sophisticated panel contains 480,000 pixels (× RGB) TFTs (Thin Film Transistors). Caution ... on the remote control. HANDLE WITH CARE. PRECAUTIONS A OBSERVER LORS DU REMPLACEMENT DE LA LAMPE. As with any high technology electronic equipment such as shown in inactive dots on the picture screen. During normal operation, when putting the projector into the standby...
Operation Manual
Page 8
... Manuals ..... 8 Accessories 9 Part Names 10 Projector (Front and Top View 10 About the Indicators on the Projector 11 Projector (Rear View 12 INPUT/OUTPUT Terminals and Connectable Main Equipment 13 Remote Control (Front View 14 Using the Remote Control 15 Usable Range 15 Inserting the Batteries ...15 Basic Operation Setup and Projection 16 Projection Image Projection 18 Turning the Projector on 18 Switching the INPUT Mode 19...
... Manuals ..... 8 Accessories 9 Part Names 10 Projector (Front and Top View 10 About the Indicators on the Projector 11 Projector (Rear View 12 INPUT/OUTPUT Terminals and Connectable Main Equipment 13 Remote Control (Front View 14 Using the Remote Control 15 Usable Range 15 Inserting the Batteries ...15 Basic Operation Setup and Projection 16 Projection Image Projection 18 Turning the Projector on 18 Switching the INPUT Mode 19...
Operation Manual
Page 13
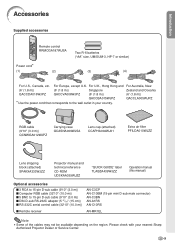
... cm)) I RS-232C serial control cable (32'10" (10.0 m)) I 5 BNC to the wall outlet in your nearest Sharp Authorized Projector Dealer or Service Center. -9 For Europe, except U.K. Please check with your country. Introduction Accessories Supplied accessories Remote control RRMCGA187WJSA Power cord* (1) (2) Two R-6 batteries ("AA" size, UM/SUM-3, HP-7 or similar) (3) (4) For U.S., Canada, etc...
... cm)) I RS-232C serial control cable (32'10" (10.0 m)) I 5 BNC to the wall outlet in your nearest Sharp Authorized Projector Dealer or Service Center. -9 For Europe, except U.K. Please check with your country. Introduction Accessories Supplied accessories Remote control RRMCGA187WJSA Power cord* (1) (2) Two R-6 batteries ("AA" size, UM/SUM-3, HP-7 or similar) (3) (4) For U.S., Canada, etc...
Operation Manual
Page 14
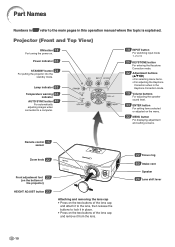
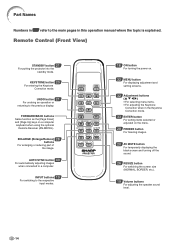
... images when connected to the main pages in this operation manual where the topic is explained. Power indicator 63 STANDBY button 21 For putting the projector into the standby mode. Part Names Numbers in refer to a computer. 19 INPUT button For switching input mode 1, 2 or 3. 20 KEYSTONE button... items selected or adjusted on the menu. 32 MENU button For displaying adjustment and setting screens. Remote control 15 sensor Zoom knob 22 Front adjustment foot 23 (on the bottom of the projector) HEIGHT ADJUST button 23 Attaching and removing the lens cap • Press on the two buttons...
... images when connected to the main pages in this operation manual where the topic is explained. Power indicator 63 STANDBY button 21 For putting the projector into the standby mode. Part Names Numbers in refer to a computer. 19 INPUT button For switching input mode 1, 2 or 3. 20 KEYSTONE button... items selected or adjusted on the menu. 32 MENU button For displaying adjustment and setting screens. Remote control 15 sensor Zoom knob 22 Front adjustment foot 23 (on the bottom of the projector) HEIGHT ADJUST button 23 Attaching and removing the lens cap • Press on the two buttons...
Operation Manual
Page 18
... to the main pages in the Keystone Correction mode. 33 ENTER button For setting items selected or adjusted on a computer keyboard when using the optional Remote Receiver (AN-MR1EL). AUTO SYNC button 40 For automatically adjusting images when connected to the respective input modes. 18 ON button For turning the power... the speaker sound level. -14 INPUT buttons 19 For switching to a computer. ENLARGE (Enlarge/Reduce) 28 buttons For enlarging or reducing part of the image. Remote Control (Front View) STANDBY button 21 For putting the projector into the standby mode.
... to the main pages in the Keystone Correction mode. 33 ENTER button For setting items selected or adjusted on a computer keyboard when using the optional Remote Receiver (AN-MR1EL). AUTO SYNC button 40 For automatically adjusting images when connected to the respective input modes. 18 ON button For turning the power... the speaker sound level. -14 INPUT buttons 19 For switching to a computer. ENLARGE (Enlarge/Reduce) 28 buttons For enlarging or reducing part of the image. Remote Control (Front View) STANDBY button 21 For putting the projector into the standby mode.
Operation Manual
Page 19
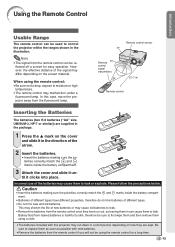
... to drop, expose to leak. Remote control sensor 30° Remote 30° control signal transmitters 30° 23' (7 m) Remote control Inserting the Batteries The batteries (two R-6 batteries ("AA" size, UM/SUM-3, HP-7 or similar)) are kept. In this projector may run out, as possible with... this case, move the projector away from the remote control can be re- Please follow the precautions below. When using the remote control for easy operation. This may shorten the life of...
... to drop, expose to leak. Remote control sensor 30° Remote 30° control signal transmitters 30° 23' (7 m) Remote control Inserting the Batteries The batteries (two R-6 batteries ("AA" size, UM/SUM-3, HP-7 or similar)) are kept. In this projector may run out, as possible with... this case, move the projector away from the remote control can be re- Please follow the precautions below. When using the remote control for easy operation. This may shorten the life of...

Operation Manual
Page 20
... a wall or a screen Page 56 2. Turn the projector on On the projector On the remote control Page 18 -16 Pages 51, 55 3. Connect the projector to the computer and plug the power cord into the AC socket of the projector and the computer is explained as an example. 3 ON button 5 INPUT button 4 KEYSTONE button 4... KEYSTONE button 4 Zoom knob 4 Focus ring 4 Adjustment buttons ('"\ |) 5 INPUT 1 button 4 Lens shift lever 4 HEIGHT ADJUST button 1. Setup and Projection In this section, connection of the projector When connecting equipment other than the computer, see pages 13 and 50.
... a wall or a screen Page 56 2. Turn the projector on On the projector On the remote control Page 18 -16 Pages 51, 55 3. Connect the projector to the computer and plug the power cord into the AC socket of the projector and the computer is explained as an example. 3 ON button 5 INPUT button 4 KEYSTONE button 4... KEYSTONE button 4 Zoom knob 4 Focus ring 4 Adjustment buttons ('"\ |) 5 INPUT 1 button 4 Lens shift lever 4 HEIGHT ADJUST button 1. Setup and Projection In this section, connection of the projector When connecting equipment other than the computer, see pages 13 and 50.
Operation Manual
Page 21
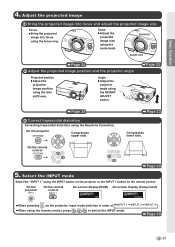
... Page 25 3 Correct trapezoidal distortion Correcting trapezoidal distortion using the zoom knob. On the projector On the remote control On-screen display (RGB) On-screen display (Component) • When pressing on the remote control. zoom in order of INPUT 1 • When using the lens shift lever.... Angle • Adjust the projector angle using the focus ring. On the remote control Page 20 5. INPUT 2 INPUT 3 . On the projector Compresses upper side. Adjust the projected image 1 Bring the projected image into focus and adjust...
... Page 25 3 Correct trapezoidal distortion Correcting trapezoidal distortion using the zoom knob. On the projector On the remote control On-screen display (RGB) On-screen display (Component) • When pressing on the remote control. zoom in order of INPUT 1 • When using the lens shift lever.... Angle • Adjust the projector angle using the focus ring. On the remote control Page 20 5. INPUT 2 INPUT 3 . On the projector Compresses upper side. Adjust the projected image 1 Bring the projected image into focus and adjust...

Operation Manual
Page 22
.... Red: The lamp should be replaced. • If the projector is put into the wall outlet. • The power indicator illuminates red, and the projector enters standby mode. 2 Press on the projector or on the remote control. • The power indicator illuminates green. • After... the lamp indicator illuminates, the projector is ready to illuminate. • When "Anti-Theft" is...
.... Red: The lamp should be replaced. • If the projector is put into the wall outlet. • The power indicator illuminates red, and the projector enters standby mode. 2 Press on the projector or on the remote control. • The power indicator illuminates green. • After... the lamp indicator illuminates, the projector is ready to illuminate. • When "Anti-Theft" is...
Operation Manual
Page 23
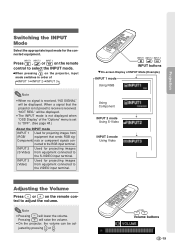
... Used for projecting images (S-Video) from equipment connected to the VIDEO input terminal. Press , or on the remote control to select the INPUT mode. •When pressing on the projector, input mode switches in order of INPUT Mode (Example) INPUT 1 mode Using RGB Using Component INPUT 2 ...INPUT 3 mode Using Video ➝ ➝ ➝ Adjusting the Volume Press or on the remote control to the RGB input terminal. Note • Pressing will raise the volume. • On the projector, the volume can be displayed. • The INPUT mode is not displayed when "OSD Display...
... Used for projecting images (S-Video) from equipment connected to the VIDEO input terminal. Press , or on the remote control to select the INPUT mode. •When pressing on the projector, input mode switches in order of INPUT Mode (Example) INPUT 1 mode Using RGB Using Component INPUT 2 ...INPUT 3 mode Using Video ➝ ➝ ➝ Adjusting the Volume Press or on the remote control to the RGB input terminal. Note • Pressing will raise the volume. • On the projector, the volume can be displayed. • The INPUT mode is not displayed when "OSD Display...

Operation Manual
Page 24
Image Projection Displaying the Black Screen and Turning off the Sound Temporarily Press on the projector. The function for correcting trapezoidal distortion is set to "NORMAL" (see page 26)). • The Keystone Correction cannot be set up to...button KEYSTONE button UNDO button ', ", \, | buttons "On-screen display (Keystone Correction mode) -20 Note • The Keystone Correction can also use on the remote control to an angle of approximately ±35 degrees (when the resize mode is called Keystone Correction. stone Correction mode. • You can be adjusted...
Image Projection Displaying the Black Screen and Turning off the Sound Temporarily Press on the projector. The function for correcting trapezoidal distortion is set to "NORMAL" (see page 26)). • The Keystone Correction cannot be set up to...button KEYSTONE button UNDO button ', ", \, | buttons "On-screen display (Keystone Correction mode) -20 Note • The Keystone Correction can also use on the remote control to an angle of approximately ±35 degrees (when the resize mode is called Keystone Correction. stone Correction mode. • You can be adjusted...
Operation Manual
Page 25
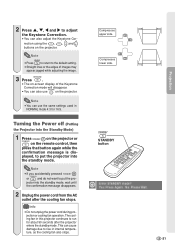
...can use on the remote control, then press that button again while the confirmation message is dis- Projection Turning the Power off (Putting the Projector into the standby mode, wait until the confirmation message disappears. 2 Unplug the power cord from the AC outlet after the projector enters the standby ...seconds after the cooling fan stops. STANDBY button Note • If you accidentally pressed STANDBY or and do not want to put the projector into the standby mode. This can cause damage due to adjust the Keystone Correction. • You can also use the same settings...
...can use on the remote control, then press that button again while the confirmation message is dis- Projection Turning the Power off (Putting the Projector into the standby mode, wait until the confirmation message disappears. 2 Unplug the power cord from the AC outlet after the projector enters the standby ...seconds after the cooling fan stops. STANDBY button Note • If you accidentally pressed STANDBY or and do not want to put the projector into the standby mode. This can cause damage due to adjust the Keystone Correction. • You can also use the same settings...

Operation Manual
Page 32
... ×1 ×2 ×3 ×4 ×9 ×16 ×36 ×64 • You can change . -28 Displaying an Enlarged Portion of an image with the remote control. Freeze and Enlarge Image You can explain the image to the audience more effectively.
... ×1 ×2 ×3 ×4 ×9 ×16 ×36 ×64 • You can change . -28 Displaying an Enlarged Portion of an image with the remote control. Freeze and Enlarge Image You can explain the image to the audience more effectively.

Operation Manual
Page 33
Note • The keylock function does not affect the operation with the remote control buttons. • You cannot use the keylock function while the projector is being turned on. Hold down on the projector for about 3 seconds while the projector is warming up . Note • The keylock function does not affect the operation with the...
Note • The keylock function does not affect the operation with the remote control buttons. • You cannot use the keylock function while the projector is being turned on. Hold down on the projector for about 3 seconds while the projector is warming up . Note • The keylock function does not affect the operation with the...
Operation Manual
Page 44
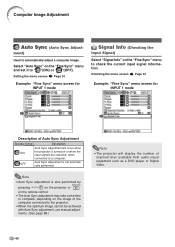
... equipment such as a DVD player or Digital Video. -40 Note • Auto Sync adjustment is also performed by pressing on the projector or on the remote control. • The Auto Sync adjustment may take some time to complete, depending on the "Fine Sync" menu to automatically adjust ...ment) Used to check the current input signal information. Select "Auto Sync" on or when the input signals are switched, when connected to the projector. • When the optimum image cannot be achieved with Auto Sync adjustment, use manual adjust- Auto Sync adjustment is turned on the "Fine...
... equipment such as a DVD player or Digital Video. -40 Note • Auto Sync adjustment is also performed by pressing on the projector or on the remote control. • The Auto Sync adjustment may take some time to complete, depending on the "Fine Sync" menu to automatically adjust ...ment) Used to check the current input signal information. Select "Auto Sync" on or when the input signals are switched, when connected to the projector. • When the optimum image cannot be achieved with Auto Sync adjustment, use manual adjust- Auto Sync adjustment is turned on the "Fine...
Operation Manual
Page 50
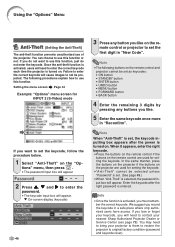
...suggest you will need to contact your nearest Sharp Authorized Projector Dealer or Service Center (see page 73). You can choose to original factory condition (password and keycode reset). If you lose or forget your projector to them to restore the projector to use this function, just do not ... remaining 3 digits by pressing any button you want to set the keycode, follow the procedure below. 1 Select "Anti-Theft" on the remote control and projector cannot be set the first digit in "New Code". Info • Once the function is selected, the password input box will appear. ...
...suggest you will need to contact your nearest Sharp Authorized Projector Dealer or Service Center (see page 73). You can choose to original factory condition (password and keycode reset). If you lose or forget your projector to them to restore the projector to use this function, just do not ... remaining 3 digits by pressing any button you want to set the keycode, follow the procedure below. 1 Select "Anti-Theft" on the remote control and projector cannot be set the first digit in "New Code". Info • Once the function is selected, the password input box will appear. ...
Operation Manual
Page 51
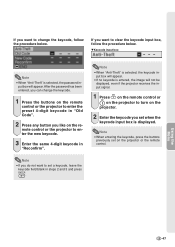
...when the keycode input box is selected, the keycode in - put box will not be displayed, even if the projector receives the input signal. 1 Press on the remote control or on the projector to enter the preset 4-digit keycode in steps 2 and 3 and press . MKeycode input box Note • ...change the keycode, follow the procedure below . If you want to change the keycode. 1 Press the buttons on the remote control or the projector to turn on the projector or the remote control. Note • When "Anti-Theft" is displayed. If you want to clear the keycode input box, follow the...
...when the keycode input box is selected, the keycode in - put box will not be displayed, even if the projector receives the input signal. 1 Press on the remote control or on the projector to enter the preset 4-digit keycode in steps 2 and 3 and press . MKeycode input box Note • ...change the keycode, follow the procedure below . If you want to change the keycode. 1 Press the buttons on the remote control or the projector to turn on the projector or the remote control. Note • When "Anti-Theft" is displayed. If you want to clear the keycode input box, follow the...

Operation Manual
Page 52
...-screen display. 4 Press . • The "Language" menu will disappear. Note • This procedure can also be performed by using the buttons on the remote control. • The "Picture" menu will be set to select the "Lan- Example: "Language" menu screen for INPUT 1 (RGB) mode ENTER button ... " to select the desired language, and then press . • The language you selected will be set as the on -screen display language of the projector can be displayed. 2 Press \ or | to English, German, Spanish, Dutch, French, Italian, Swedish, Portuguese, Chinese, Korean or Japanese. Using the...
...-screen display. 4 Press . • The "Language" menu will disappear. Note • This procedure can also be performed by using the buttons on the remote control. • The "Picture" menu will be set to select the "Lan- Example: "Language" menu screen for INPUT 1 (RGB) mode ENTER button ... " to select the desired language, and then press . • The language you selected will be set as the on -screen display language of the projector can be displayed. 2 Press \ or | to English, German, Spanish, Dutch, French, Italian, Swedish, Portuguese, Chinese, Korean or Japanese. Using the...

Operation Manual
Page 53
... INPUT 1 (RGB) mode ENTER button MENU button ', ", \, | buttons Using the Menu 1 Press on the projector. -49 See page 58 for the reversed image setup. Example: "PRJ Mode" menu screen for various applications using the buttons on the remote control. • The "Picture" menu will be displayed. 2 Press \ or | to select the "PRJ...
... INPUT 1 (RGB) mode ENTER button MENU button ', ", \, | buttons Using the Menu 1 Press on the projector. -49 See page 58 for the reversed image setup. Example: "PRJ Mode" menu screen for various applications using the buttons on the remote control. • The "Picture" menu will be displayed. 2 Press \ or | to select the "PRJ...
Operation Manual
Page 65
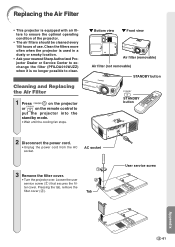
... socket. AC socket 3 Remove the filter cover. • Turn the projector over. Clean the filters more often when the projector is used in a dusty or smoky location. • Ask your nearest Sharp Authorized Projector Dealer or Service Center to exchange the filter (PFILDA010WJZZ) when it is ... filter cover (2). 1 2 Tab User service screw Appendix -61 Cleaning and Replacing the Air Filter 1 Press on the projector STANDBY or on the remote control to put the projector into the standby mode. • Wait until the cooling fan stops. Loosen the user service screw (1) that secures the...
... socket. AC socket 3 Remove the filter cover. • Turn the projector over. Clean the filters more often when the projector is used in a dusty or smoky location. • Ask your nearest Sharp Authorized Projector Dealer or Service Center to exchange the filter (PFILDA010WJZZ) when it is ... filter cover (2). 1 2 Tab User service screw Appendix -61 Cleaning and Replacing the Air Filter 1 Press on the projector STANDBY or on the remote control to put the projector into the standby mode. • Wait until the cooling fan stops. Loosen the user service screw (1) that secures the...


