
Operation Manual
Page 3
SPECIAL NOTE FOR USERS IN THE U.K. Always refit the fuse cover after replacing the fuse. To fit an appropriate plug to the terminal which is fitted with the following code: Green-and-yellow : Earth Blue : Neutral Brown : Live ... blue must be connected to the terminal which is marked with the letter N or coloured black. • The wire which is coloured brown must be replaced, a BSI or ASTA approved BS 1362 fuse marked or and of the same rating as above, which is marked with the plug supplied, cut -off...
SPECIAL NOTE FOR USERS IN THE U.K. Always refit the fuse cover after replacing the fuse. To fit an appropriate plug to the terminal which is fitted with the following code: Green-and-yellow : Earth Blue : Neutral Brown : Live ... blue must be connected to the terminal which is marked with the letter N or coloured black. • The wire which is coloured brown must be replaced, a BSI or ASTA approved BS 1362 fuse marked or and of the same rating as above, which is marked with the plug supplied, cut -off...

Operation Manual
Page 6
... cooling fan has stopped before disconnecting the power cord. HANDLE WITH CARE. This SHARP projector uses an LCD (Liquid Crystal Display) panel. "QUICK GUIDE" Label • Microsoft and Windows are trademarks or registered trademarks of their respective compa- REPLACE WITH SAME SHARP LAMP UNIT TYPE BQC-PGB10S//1 ONLY. PRECAUTIONS A OBSERVER LORS DU REMPLACEMENT DE LA...
... cooling fan has stopped before disconnecting the power cord. HANDLE WITH CARE. This SHARP projector uses an LCD (Liquid Crystal Display) panel. "QUICK GUIDE" Label • Microsoft and Windows are trademarks or registered trademarks of their respective compa- REPLACE WITH SAME SHARP LAMP UNIT TYPE BQC-PGB10S//1 ONLY. PRECAUTIONS A OBSERVER LORS DU REMPLACEMENT DE LA...
Operation Manual
Page 9
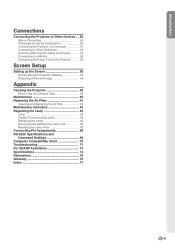
...This projector can be connected to 50 Connecting the Projector to a Computer 51 Connecting to Video Equipment 52 Controlling the Projector Using a Computer 54 Connecting to a Monitor 55 Connecting the Power Cord to the Projector ...Projecting a Revered Image 58 Appendix Carrying the Projector 59 How to Use the Carrying Case 59 Maintenance 60 Replacing the Air Filter 61 Cleaning and Replacing the Air Filter 61 Maintenance Indicators 63 Regarding... the Lamp 65 Lamp 65 Caution Concerning the Lamp 65 Replacing the Lamp 65 Removing and Installing the Lamp Unit 66 Resetting ...
...This projector can be connected to 50 Connecting the Projector to a Computer 51 Connecting to Video Equipment 52 Controlling the Projector Using a Computer 54 Connecting to a Monitor 55 Connecting the Power Cord to the Projector ...Projecting a Revered Image 58 Appendix Carrying the Projector 59 How to Use the Carrying Case 59 Maintenance 60 Replacing the Air Filter 61 Cleaning and Replacing the Air Filter 61 Maintenance Indicators 63 Regarding... the Lamp 65 Lamp 65 Caution Concerning the Lamp 65 Replacing the Lamp 65 Removing and Installing the Lamp Unit 66 Resetting ...
Operation Manual
Page 10
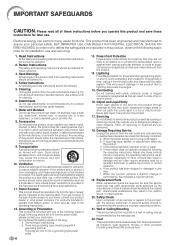
...overload wall outlets, extension cords, or integral convenience receptacles as an improper adjustment of any kind into the product. b. d. Replacement Parts When replacement parts are covered by the operating instructions, as this product from the type of power supply to fit into a grounding type...Unplug this can perform many useful functions. Wall or Ceiling Mounting This product should never be sure the service technician has used replacement parts specified by the manufacturer, or sold with a grounding terminal. Use a damp cloth for later use liquid cleaners or ...
...overload wall outlets, extension cords, or integral convenience receptacles as an improper adjustment of any kind into the product. b. d. Replacement Parts When replacement parts are covered by the operating instructions, as this product from the type of power supply to fit into a grounding type...Unplug this can perform many useful functions. Wall or Ceiling Mounting This product should never be sure the service technician has used replacement parts specified by the manufacturer, or sold with a grounding terminal. Use a damp cloth for later use liquid cleaners or ...
Operation Manual
Page 11
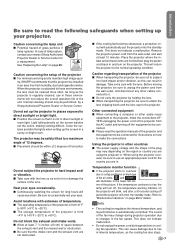
... up your eyes. I Take care with the lens. I Placement should only be connected for details. I Do not carry the projector by a Sharp Authorized Projector Dealer or Service Center. I Continuously watching the screen for a replacement. Temperature monitor function I Please read the following safeguards when setting up the screen in the lower left cor- This can...
... up your eyes. I Take care with the lens. I Placement should only be connected for details. I Do not carry the projector by a Sharp Authorized Projector Dealer or Service Center. I Continuously watching the screen for a replacement. Temperature monitor function I Please read the following safeguards when setting up the screen in the lower left cor- This can...
Operation Manual
Page 19
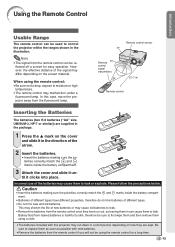
.... 1 Press the L mark on the screen material. Incorrect use of the signal may malfunction under a fluorescent lamp. Be sure to control the projector within the ranges shown in can cause them to moisture or high temperature. • The remote control may differ depending on the cover and slide...of different types. • Do not mix new and old batteries. Introduction Using the Remote Control Usable Range The remote control can be used to replace them as soon as leaving them in the illustration. Note • The signal from the remote control can be re- flected off a screen ...
.... 1 Press the L mark on the screen material. Incorrect use of the signal may malfunction under a fluorescent lamp. Be sure to control the projector within the ranges shown in can cause them to moisture or high temperature. • The remote control may differ depending on the cover and slide...of different types. • Do not mix new and old batteries. Introduction Using the Remote Control Usable Range The remote control can be used to replace them as soon as leaving them in the illustration. Note • The signal from the remote control can be re- flected off a screen ...

Operation Manual
Page 22
... angle, see "Using the Adjustment Feet" on page 23 or "Variable Lens Shift Feature" on Connect the required external equipment to the projector before carrying out the following procedures. (See page 50.) Info • The language preset at the factory is English. MKeycode input box... lamp is ready. Enter the keycode. Red: The lamp should be replaced. • If the projector is put into the wall outlet. • The power indicator illuminates red, and the projector enters standby mode. 2 Press on the projector or on again, the lamp indicator may take some time to illuminate...
... angle, see "Using the Adjustment Feet" on page 23 or "Variable Lens Shift Feature" on Connect the required external equipment to the projector before carrying out the following procedures. (See page 50.) Info • The language preset at the factory is English. MKeycode input box... lamp is ready. Enter the keycode. Red: The lamp should be replaced. • If the projector is put into the wall outlet. • The power indicator illuminates red, and the projector enters standby mode. 2 Press on the projector or on again, the lamp indicator may take some time to illuminate...
Operation Manual
Page 45
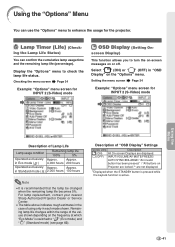
...using only in Eco mode ( ) Remaining lamp life 100% 5% Approx. in "OSD Display" on or off. For lamp replacement, contact your nearest Sharp Authorized Projector Dealer or Service Center. • The table above indicates rough estimates in the case of Lamp Life Lamp usage condition Operated ... This function allows you to check the lamp life status. Checking the menu screen Page 34 Example: "Options" menu screen for the projector. Using the "Options" Menu You can confirm the cumulative lamp usage time and the remaining lamp life (percentage). Approx. Description of the...
...using only in Eco mode ( ) Remaining lamp life 100% 5% Approx. in "OSD Display" on or off. For lamp replacement, contact your nearest Sharp Authorized Projector Dealer or Service Center. • The table above indicates rough estimates in the case of Lamp Life Lamp usage condition Operated ... This function allows you to check the lamp life status. Checking the menu screen Page 34 Example: "Options" menu screen for the projector. Using the "Options" Menu You can confirm the cumulative lamp usage time and the remaining lamp life (percentage). Approx. Description of the...
Operation Manual
Page 65
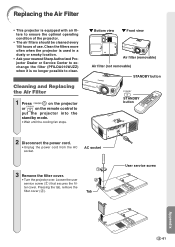
... Cleaning and Replacing the Air Filter 1 Press on the projector STANDBY or on the remote control to ensure the optimal operating condition of the projector. • The air filters should be cleaned every 100 hours of use. AC socket 3 Remove the filter cover. • Turn the projector over. "... the user service screw (1) that secures the fil- Clean the filters more often when the projector is used in a dusty or smoky location. • Ask your nearest Sharp Authorized Projector Dealer or Service Center to exchange the filter (PFILDA010WJZZ) when it is equipped with air filters...
... Cleaning and Replacing the Air Filter 1 Press on the projector STANDBY or on the remote control to ensure the optimal operating condition of the projector. • The air filters should be cleaned every 100 hours of use. AC socket 3 Remove the filter cover. • Turn the projector over. "... the user service screw (1) that secures the fil- Clean the filters more often when the projector is used in a dusty or smoky location. • Ask your nearest Sharp Authorized Projector Dealer or Service Center to exchange the filter (PFILDA010WJZZ) when it is equipped with air filters...
Operation Manual
Page 66
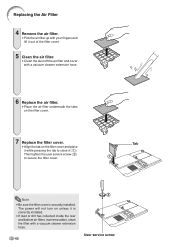
... inside the rear and bottom air filters (not removable), clean the filter with a vacuum cleaner extension hose. 6 Replace the air filter. • Place the air filter underneath the tabs on the filter cover. 7 Replace the filter cover. • Align the tab on unless it (1). The power will not turn on the filter... cover and place it while pressing the tab to secure the filter cover. Replacing the Air Filter 4 Remove the air filter. • Pick the air filter up with your fingers and lift it out of the filter cover. 5 Clean...
... inside the rear and bottom air filters (not removable), clean the filter with a vacuum cleaner extension hose. 6 Replace the air filter. • Place the air filter underneath the tabs on the filter cover. 7 Replace the filter cover. • Align the tab on unless it (1). The power will not turn on the filter... cover and place it while pressing the tab to secure the filter cover. Replacing the Air Filter 4 Remove the air filter. • Pick the air filter up with your fingers and lift it out of the filter cover. 5 Clean...

Operation Manual
Page 67
... lamp life becomes 5% or less, " " (yellow) will be - I If you try to turn on the projector a fourth time without replacing the lamp, the projector will not turn off and the temperature warning indicator will blink, the cooling fan will run for advice. -63 Appendix ... The lamp does not illuminate. • Carefully replace the lamp. (See • Remaining lamp life page 66.) becomes 5% or less. • Take the projector to your nearest Sharp Authorized Projector Dealer or Service Center for a further 90 seconds, and then the projector will enter the standby mode. After " " ...
... lamp life becomes 5% or less, " " (yellow) will be - I If you try to turn on the projector a fourth time without replacing the lamp, the projector will not turn off and the temperature warning indicator will blink, the cooling fan will run for advice. -63 Appendix ... The lamp does not illuminate. • Carefully replace the lamp. (See • Remaining lamp life page 66.) becomes 5% or less. • Take the projector to your nearest Sharp Authorized Projector Dealer or Service Center for a further 90 seconds, and then the projector will enter the standby mode. After " " ...
Operation Manual
Page 68
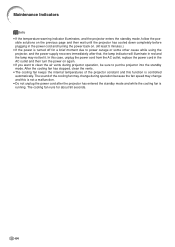
... wait until the projector has cooled down completely before plugging in the power cord and turning the power back on again. • If you want to clean the air vents during operation because the fan speed may change and this case, unplug the power cord from the AC outlet, replace the power... cord in red and the lamp may not be sure to power outage or some other cause while using the projector, and the power supply recovers immediately after the projector has entered the standby mode and while the cooling fan...
... wait until the projector has cooled down completely before plugging in the power cord and turning the power back on again. • If you want to clean the air vents during operation because the fan speed may change and this case, unplug the power cord from the AC outlet, replace the power... cord in red and the lamp may not be sure to power outage or some other cause while using the projector, and the power supply recovers immediately after the projector has entered the standby mode and while the cooling fan...

Operation Manual
Page 69
... mercury lamp. All service of this section. ONLY Caution Concerning the Lamp I For lamp replacement, please consult your nearest Sharp Authorized Projector Dealer or Service Center. A loud sound may be vented into the room from your nearest Sharp Authorized Projector Dealer or Service Center to remove the damaged lamp and assure safe operation. I When the...
... mercury lamp. All service of this section. ONLY Caution Concerning the Lamp I For lamp replacement, please consult your nearest Sharp Authorized Projector Dealer or Service Center. A loud sound may be vented into the room from your nearest Sharp Authorized Projector Dealer or Service Center to remove the damaged lamp and assure safe operation. I When the...

Operation Manual
Page 71
... lamp unit by the handle and pull it while pressing the tab (2) to the projector. At this may cause the lamp to become damaged or explode. Resetting the Lamp Timer Reset the lamp timer after replacing the lamp. 1 Connect the power cord. • Plug the power cord into ...the lamp unit compartment. Then tighten the user service screw (3) to reset the lamp timer only when replacing the lamp. Fasten the securing screws. 7 Replace the lamp unit cover. • Align the tab on the projector. • "LAMP 0000H" is displayed, indicating that the lamp timer is connected to close it...
... lamp unit by the handle and pull it while pressing the tab (2) to the projector. At this may cause the lamp to become damaged or explode. Resetting the Lamp Timer Reset the lamp timer after replacing the lamp. 1 Connect the power cord. • Plug the power cord into ...the lamp unit compartment. Then tighten the user service screw (3) to reset the lamp timer only when replacing the lamp. Fasten the securing screws. 7 Replace the lamp unit cover. • Align the tab on the projector. • "LAMP 0000H" is displayed, indicating that the lamp timer is connected to close it...

Operation Manual
Page 76
Check • Change the input signal type setting. • The lamp indicator is green on INPUT 1 RGB. Page 38 63 36 -72 Troubleshooting Problem Picture is illuminating in red. Replace the lamp. • Picture adjustments are incorrectly set. Picture is dark. Picture is too bright and whitish. Picture is pink (no green) on INPUT 1 COMPONENT.
Check • Change the input signal type setting. • The lamp indicator is green on INPUT 1 RGB. Page 38 63 36 -72 Troubleshooting Problem Picture is illuminating in red. Replace the lamp. • Picture adjustments are incorrectly set. Picture is dark. Picture is too bright and whitish. Picture is pink (no green) on INPUT 1 COMPONENT.
Operation Manual
Page 78
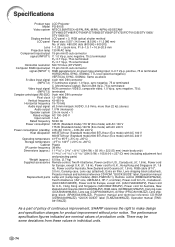
... positive, 75 Ω terminated HORIZONTAL SYNC. Specifications Product type LCD Projector Model PG-B10S Video system NTSC3.58/NTSC4.43/PAL/PAL-M/PAL-N/PAL-60/SECAM...cap (attached), Extra air filter, Lens shipping block (attached), Projector manual and technical reference CD-ROM, "QUICK GUIDE" label, Operation manual Replacement parts Lamp unit (Lamp/cage module) (BQC-PGB10S//1), Remote...), Projector manual and technical reference CD-ROM (UDSKAA039WJZZ), "QUICK GUIDE" label (TLABZA439WJZZ), Operation manual (TINSA917WJZZ) As a part of policy of continuous improvement, SHARP reserves...
... positive, 75 Ω terminated HORIZONTAL SYNC. Specifications Product type LCD Projector Model PG-B10S Video system NTSC3.58/NTSC4.43/PAL/PAL-M/PAL-N/PAL-60/SECAM...cap (attached), Extra air filter, Lens shipping block (attached), Projector manual and technical reference CD-ROM, "QUICK GUIDE" label, Operation manual Replacement parts Lamp unit (Lamp/cage module) (BQC-PGB10S//1), Remote...), Projector manual and technical reference CD-ROM (UDSKAA039WJZZ), "QUICK GUIDE" label (TLABZA439WJZZ), Operation manual (TINSA917WJZZ) As a part of policy of continuous improvement, SHARP reserves...
Operation Manual
Page 81
... Projected Images 49 Rear adjustment foot 23 Red 36 Remote control 14 Remote control sensor 15 Replacing the lamp 65 RESIZE button 26 RGB cable 51 RGB OUTPUT terminal 55 RS-232C terminal 54 Sharp 36 Signal Info 40 Signal Type 38 Special Modes 39 sRGB 37 STANDBY button 21 STRETCH 26...
... Projected Images 49 Rear adjustment foot 23 Red 36 Remote control 14 Remote control sensor 15 Replacing the lamp 65 RESIZE button 26 RGB cable 51 RGB OUTPUT terminal 55 RS-232C terminal 54 Sharp 36 Signal Info 40 Signal Type 38 Special Modes 39 sRGB 37 STANDBY button 21 STRETCH 26...


