
Operation Manual
Page 7
...used in this step Menu Selections (Adjustments) • The following procedure is selected. 2 Press \ or | to achieve two functions, adjustment and setting. (For adjusting the menu items, see pages 34 and 35.) Example: "Picture" menu screen for explanation, and may differ slightly from actual ...ENTER button UNDO button MENU button ', ", \, | buttons Menu icons Buttons used in this operation Info ........Indicates safeguards when using the projector. The menu can also be operated to display the other menu screens. • The menu icon for the selected input mode is ...
...used in this step Menu Selections (Adjustments) • The following procedure is selected. 2 Press \ or | to achieve two functions, adjustment and setting. (For adjusting the menu items, see pages 34 and 35.) Example: "Picture" menu screen for explanation, and may differ slightly from actual ...ENTER button UNDO button MENU button ', ", \, | buttons Menu icons Buttons used in this operation Info ........Indicates safeguards when using the projector. The menu can also be operated to display the other menu screens. • The menu icon for the selected input mode is ...
Operation Manual
Page 8
...the Remote Control 15 Usable Range 15 Inserting the Batteries 15 Basic Operation Setup and Projection 16 Projection Image Projection 18 Turning the Projector on 18 Switching the INPUT Mode 19 Adjusting the Volume 19 Displaying the Black Screen and Turning off the Sound Temporarily 20 Correcting...Function 43 Menu Position (Selecting the Menu Screen Position 44 Menu Color (Selecting the Menu Color 44 Password (Setting a Password 45 If You Forget Your Password 45 Anti-Theft (Setting the Anti-Theft 46 Using the "Language" Menu 48 Selecting the On-screen Display Language 48 Using the...
...the Remote Control 15 Usable Range 15 Inserting the Batteries 15 Basic Operation Setup and Projection 16 Projection Image Projection 18 Turning the Projector on 18 Switching the INPUT Mode 19 Adjusting the Volume 19 Displaying the Black Screen and Turning off the Sound Temporarily 20 Correcting...Function 43 Menu Position (Selecting the Menu Screen Position 44 Menu Color (Selecting the Menu Color 44 Password (Setting a Password 45 If You Forget Your Password 45 Anti-Theft (Setting the Anti-Theft 46 Using the "Language" Menu 48 Selecting the On-screen Display Language 48 Using the...
Operation Manual
Page 9
... a Computer 54 Connecting to a Monitor 55 Connecting the Power Cord to the Projector 55 Screen Setup Setting up the Screen 56 Screen Size and Projection Distance 57 Projecting a Revered Image 58 Appendix Carrying the Projector 59 How to Use the Carrying Case 59 Maintenance 60 Replacing the Air Filter ... Removing and Installing the Lamp Unit 66 Resetting the Lamp Timer 67 Connecting Pin Assignments 68 RS-232C Specifications and Command Settings 69 Computer Compatibility Chart 70 Troubleshooting 71 For SHARP Assistance 73 Specifications 74 Dimensions 75 Glossary 76 Index 77 -5
... a Computer 54 Connecting to a Monitor 55 Connecting the Power Cord to the Projector 55 Screen Setup Setting up the Screen 56 Screen Size and Projection Distance 57 Projecting a Revered Image 58 Appendix Carrying the Projector 59 How to Use the Carrying Case 59 Maintenance 60 Replacing the Air Filter ... Removing and Installing the Lamp Unit 66 Resetting the Lamp Timer 67 Connecting Pin Assignments 68 RS-232C Specifications and Command Settings 69 Computer Compatibility Chart 70 Troubleshooting 71 For SHARP Assistance 73 Specifications 74 Dimensions 75 Glossary 76 Index 77 -5
Operation Manual
Page 11
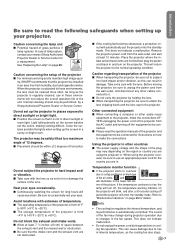
...will automatically put the projector into the standby mode. When the projector is from 41°F to 95°F (+5°C to +35°C). Light falling directly on page 65. Close the curtains and dim the lights when setting up your nearest Sharp Authorized Projector Dealer or Service Center ...for a replacement. I If the projector starts to overheat due to setup problems or blockage of the air vents, " " and " "...
...will automatically put the projector into the standby mode. When the projector is from 41°F to 95°F (+5°C to +35°C). Light falling directly on page 65. Close the curtains and dim the lights when setting up your nearest Sharp Authorized Projector Dealer or Service Center ...for a replacement. I If the projector starts to overheat due to setup problems or blockage of the air vents, " " and " "...
Operation Manual
Page 14
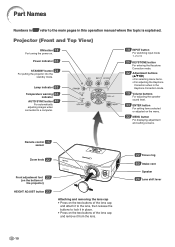
... the Keystone Correction when in the Keystone Correction mode. 19 Volume buttons For adjusting the speaker sound level. 33 ENTER button For setting items selected or adjusted on . Projector (Front and Top View) ON button 18 For turning the power on the menu. 32 MENU button For displaying adjustment and... setting screens. Part Names Numbers in refer to lock it in place. • Press on the two buttons of the lens cap and ...
... the Keystone Correction when in the Keystone Correction mode. 19 Volume buttons For adjusting the speaker sound level. 33 ENTER button For setting items selected or adjusted on . Projector (Front and Top View) ON button 18 For turning the power on the menu. 32 MENU button For displaying adjustment and... setting screens. Part Names Numbers in refer to lock it in place. • Press on the two buttons of the lens cap and ...
Operation Manual
Page 18
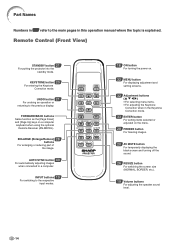
... connected to the previous display. INPUT buttons 19 For switching to the main pages in the Keystone Correction mode. 33 ENTER button For setting items selected or adjusted on the menu. 28 FREEZE button For freezing images. 20 AV MUTE button For temporarily displaying the black screen ..., BORDER, etc.). 19 Volume buttons For adjusting the speaker sound level. -14 Remote Control (Front View) STANDBY button 21 For putting the projector into the standby mode. KEYSTONE button 20 For entering the Keystone Correction mode. Part Names Numbers in refer to the respective input modes. 18 ON...
... connected to the previous display. INPUT buttons 19 For switching to the main pages in the Keystone Correction mode. 33 ENTER button For setting items selected or adjusted on the menu. 28 FREEZE button For freezing images. 20 AV MUTE button For temporarily displaying the black screen ..., BORDER, etc.). 19 Volume buttons For adjusting the speaker sound level. -14 Remote Control (Front View) STANDBY button 21 For putting the projector into the standby mode. KEYSTONE button 20 For entering the Keystone Correction mode. Part Names Numbers in refer to the respective input modes. 18 ON...

Operation Manual
Page 22
...Blinking in green: The lamp is ready. MKeycode input box ON button -18 Image Projection Turning the Projector on Connect the required external equipment to illuminate. • When "Anti-Theft" is set, the keycode input box will appear. Enter the keycode. If you want to change the on-screen ... on the remote control. • The power indicator illuminates green. • After the lamp indicator illuminates, the projector is ready to "Anti-Theft (Setting the AntiTheft)" on page 46. • When bringing the image into the standby mode and immediately turned on again, the lamp ...
...Blinking in green: The lamp is ready. MKeycode input box ON button -18 Image Projection Turning the Projector on Connect the required external equipment to illuminate. • When "Anti-Theft" is set, the keycode input box will appear. Enter the keycode. If you want to change the on-screen ... on the remote control. • The power indicator illuminates green. • After the lamp indicator illuminates, the projector is ready to "Anti-Theft (Setting the AntiTheft)" on page 46. • When bringing the image into the standby mode and immediately turned on again, the lamp ...
Operation Manual
Page 23
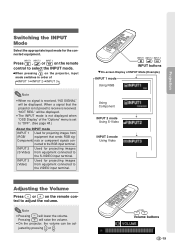
... Note • When no signal is received, "NO SIGNAL" will be displayed. Press , or on the projector, input mode switches in order of the "Options" menu is set to the VIDEO input terminal. When a signal that sends RGB sig- Projection Switching the INPUT Mode Select the appropriate... input mode for projecting images (S-Video) from (RGB/ equipment that the projector is not preset to the S-VIDEO input terminal...
... Note • When no signal is received, "NO SIGNAL" will be displayed. Press , or on the projector, input mode switches in order of the "Options" menu is set to the VIDEO input terminal. When a signal that sends RGB sig- Projection Switching the INPUT Mode Select the appropriate... input mode for projecting images (S-Video) from (RGB/ equipment that the projector is not preset to the S-VIDEO input terminal...

Operation Manual
Page 24
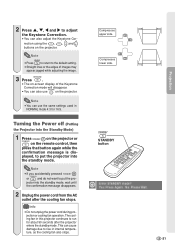
... to an angle of approximately ±35 degrees and the screen can also use on the projector. stone Correction mode. • You can also be set to "NORMAL" (see page 26)). • The Keystone Correction cannot be adjusted in the lateral direction. 1 Press to temporarily display a black screen and turn the ...
... to an angle of approximately ±35 degrees and the screen can also use on the projector. stone Correction mode. • You can also be set to "NORMAL" (see page 26)). • The Keystone Correction cannot be adjusted in the lateral direction. 1 Press to temporarily display a black screen and turn the ...
Operation Manual
Page 25
... -screen display of images may appear jagged while adjusting the image. 3 Press . • The on the projector. jector into the standby mode. played, to the default setting. • Straight lines or the edges of the Keystone Correction mode will disappear. • You can also ... Compresses upper side. Compresses lower side. This can cause damage due to adjust the Keystone Correction. • You can also use the same settings used in NORMAL mode 4:3 for about 90 seconds after the cooling fan stops. 2 Press ', ", \ and | to rise in internal temperature...
... -screen display of images may appear jagged while adjusting the image. 3 Press . • The on the projector. jector into the standby mode. played, to the default setting. • Straight lines or the edges of the Keystone Correction mode will disappear. • You can also ... Compresses upper side. Compresses lower side. This can cause damage due to adjust the Keystone Correction. • You can also use the same settings used in NORMAL mode 4:3 for about 90 seconds after the cooling fan stops. 2 Press ', ", \ and | to rise in internal temperature...

Operation Manual
Page 34
..."Signal Type" is set to "RGB" or set to "Auto" and the input signal is recognized as a component signal. • In the "Picture" menu of INPUT 2 or INPUT 3, "Sharp" is INPUT 1. -30 When using the INPUT 2 or INPUT 3 mode: • There is no "Signal Type" item in the projector. "Fine Sync" ... Page 40 When using the INPUT 1 mode: • In the "Picture" menu of INPUT 1, "Color", "Tint" and "Sharp" are only displayed when "Signal Type" is set to "Component" or set to "Auto" and the input signal is recognized as an RGB signal. "Picture" menu Main menu Picture Page 36 Contrast...
..."Signal Type" is set to "RGB" or set to "Auto" and the input signal is recognized as a component signal. • In the "Picture" menu of INPUT 2 or INPUT 3, "Sharp" is INPUT 1. -30 When using the INPUT 2 or INPUT 3 mode: • There is no "Signal Type" item in the projector. "Fine Sync" ... Page 40 When using the INPUT 1 mode: • In the "Picture" menu of INPUT 1, "Color", "Tint" and "Sharp" are only displayed when "Signal Type" is set to "Component" or set to "Auto" and the input signal is recognized as an RGB signal. "Picture" menu Main menu Picture Page 36 Contrast...

Operation Manual
Page 36
...; The on-screen display shown on the right is displayed when the INPUT 1 (RGB) mode is selected. 2 Press \ or | to adjust the image and various projector settings. For setting the menu items, see pages 34 and 35.) Example: "Picture" menu screen for INPUT 1 (RGB) mode Menu Selections (Adjustments) • The following procedure is...
...; The on-screen display shown on the right is displayed when the INPUT 1 (RGB) mode is selected. 2 Press \ or | to adjust the image and various projector settings. For setting the menu items, see pages 34 and 35.) Example: "Picture" menu screen for INPUT 1 (RGB) mode Menu Selections (Adjustments) • The following procedure is...

Operation Manual
Page 38
...; The following procedure is the operating method in a setting menu. • This operation can also be performed by using the buttons on the projector. 1 Press . • The "Picture" menu screen for INPUT 1 mode Note • The on-screen display shown on pages 30 and 31. -34 Example: "Options" menu ...
...; The following procedure is the operating method in a setting menu. • This operation can also be performed by using the buttons on the projector. 1 Press . • The "Picture" menu screen for INPUT 1 mode Note • The on-screen display shown on pages 30 and 31. -34 Example: "Options" menu ...
Operation Manual
Page 39
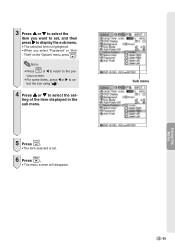
lect the icon using " ". 4 Press ' or " to se- ting of the item displayed in the sub menu. 5 Press . • The item selected is highlighted. • When you want to set, and then press | to the pre- Theft" on the "Options" menu, press . vious screen. • For some items, press \ or | to select the set . 6 Press . • The menu screen will disappear. Note • Press or \ to return to display the sub menu. • The selected item is set - Sub menu Using the Menu -35 3 Press ' or " to select the item you select "Password" or "Anti-
lect the icon using " ". 4 Press ' or " to se- ting of the item displayed in the sub menu. 5 Press . • The item selected is highlighted. • When you want to set, and then press | to the pre- Theft" on the "Options" menu, press . vious screen. • For some items, press \ or | to select the set . 6 Press . • The menu screen will disappear. Note • Press or \ to return to display the sub menu. • The selected item is set - Sub menu Using the Menu -35 3 Press ' or " to select the item you select "Password" or "Anti-

Operation Manual
Page 40
..., reddish incandescent-like images. Bright for weaker blue. Picture Adjustment You can be adjusted when "sRGB" is set to "ON". • "Sharp" can adjust the projector's picture to your preferences using the "Picture" menu. for making skin tones greenish. Tint for making skin tones... on the "Picture" menu and adjust the image. Note • "Color", "Tint" and "Sharp" are not displayed when selecting INPUT 1 and setting the "Signal Type" to "RGB" or setting the "Signal Type" to "Auto" and the input signal is recognized as a component signal. &#...
..., reddish incandescent-like images. Bright for weaker blue. Picture Adjustment You can be adjusted when "sRGB" is set to "ON". • "Sharp" can adjust the projector's picture to your preferences using the "Picture" menu. for making skin tones greenish. Tint for making skin tones... on the "Picture" menu and adjust the image. Note • "Color", "Tint" and "Sharp" are not displayed when selecting INPUT 1 and setting the "Signal Type" to "RGB" or setting the "Signal Type" to "Auto" and the input signal is recognized as a component signal. &#...

Operation Manual
Page 41
... portions of the image without altering the brightness of image for a more enhanced presentations. tion, visit "http://www.srgb.com/". Info • When "sRGB" is set to " " (ON). Gamma (Gamma Correction) Gamma is not available. • "Red", "Blue" or "CLR Temp" on the "Picture" menu cannot be ...to see and gives the impression of image for more exciting theater experience. Select "Gamma" on the "Picture" menu is set to " " (ON). Note • When "sRGB" is set to " " (ON), the projected image may become dark, but this feature makes the dark scenes easier to darker ...
... portions of the image without altering the brightness of image for a more enhanced presentations. tion, visit "http://www.srgb.com/". Info • When "sRGB" is set to " " (ON). Gamma (Gamma Correction) Gamma is not available. • "Red", "Blue" or "CLR Temp" on the "Picture" menu cannot be ...to see and gives the impression of image for more exciting theater experience. Select "Gamma" on the "Picture" menu is set to " " (ON). Note • When "sRGB" is set to " " (ON), the projected image may become dark, but this feature makes the dark scenes easier to darker ...

Operation Manual
Page 42
...Memory 4 any input mode. No matter which input mode or signal type is selected, you can select and apply the settings you want to store the settings. Setting the menu screen Page 34 Example: "Picture" screen menu for INPUT 1. Memory 5 Memory OFF Besides "Memory 1" to "Memory ... the "Picture" Memory 2 menu can be selected in memory location. If you have stored the settings. Picture Adjustment Signal Type (Signal Type Setting) The signal type setting is preset to store the adjustment settings on the "Picture" menu. Select "Memory" on the "Picture" menu and the memory location...
...Memory 4 any input mode. No matter which input mode or signal type is selected, you can select and apply the settings you want to store the settings. Setting the menu screen Page 34 Example: "Picture" screen menu for INPUT 1. Memory 5 Memory OFF Besides "Memory 1" to "Memory ... the "Picture" Memory 2 menu can be selected in memory location. If you have stored the settings. Picture Adjustment Signal Type (Signal Type Setting) The signal type setting is preset to store the adjustment settings on the "Picture" menu. Select "Memory" on the "Picture" menu and the memory location...

Operation Manual
Page 43
... Phase adjust horizontal noise (similar to tracking on the "Fine Sync" menu and adjust the computer image. Note • If your VCR). Setting the menu screen Page 34 Example: "Fine Sync" menu screen for INPUT 1 mode Using the Menu Description of Adjustment Items Selectable items Use \...can adjust the computer image, match the computer display mode, and check the input signal. However, for INPUT 1 mode Special Modes (Special Mode Settings) Ordinarily, the type of the screen even if "Auto Sync" is automatically selected. Computer Image Adjustment Using the "Fine Sync" menu, you...
... Phase adjust horizontal noise (similar to tracking on the "Fine Sync" menu and adjust the computer image. Note • If your VCR). Setting the menu screen Page 34 Example: "Fine Sync" menu screen for INPUT 1 mode Using the Menu Description of Adjustment Items Selectable items Use \...can adjust the computer image, match the computer display mode, and check the input signal. However, for INPUT 1 mode Special Modes (Special Mode Settings) Ordinarily, the type of the screen even if "Auto Sync" is automatically selected. Computer Image Adjustment Using the "Fine Sync" menu, you...
Operation Manual
Page 44
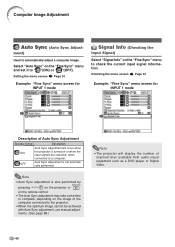
...as a DVD player or Digital Video. -40 ments. (See page 39.) Note • The projector will occur when the projector is turned on the "Fine Sync" menu and set it to the projector. • When the optimum image cannot be achieved with Auto Sync adjustment, use manual adjust- ment...for INPUT 1 mode Description of Auto Sync Adjustment Selectable Settings Description ON OFF Auto Sync adjustment will display the number of the computer connected to " "(ON) or " "(OFF). Auto Sync adjustment is also performed by pressing on the projector or on the remote control. • The Auto...
...as a DVD player or Digital Video. -40 ments. (See page 39.) Note • The projector will occur when the projector is turned on the "Fine Sync" menu and set it to the projector. • When the optimum image cannot be achieved with Auto Sync adjustment, use manual adjust- ment...for INPUT 1 mode Description of Auto Sync Adjustment Selectable Settings Description ON OFF Auto Sync adjustment will display the number of the computer connected to " "(ON) or " "(OFF). Auto Sync adjustment is also performed by pressing on the projector or on the remote control. • The Auto...
Operation Manual
Page 45
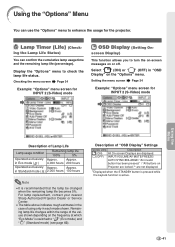
... " (OFF) in each mode shown. Approx. 4,000 hours 200 hours Operated exclusively Approx. For lamp replacement, contact your nearest Sharp Authorized Projector Dealer or Service Center. • The table above indicates rough estimates in the case of Lamp Life Lamp usage condition Operated exclusively ...that the lamp be changed when the remaining lamp life becomes 5%. Remaining lamp life changes within the range of "OSD Display" Settings Selectable settings Description (ON) All On-screen Displays are displayed. (OFF) INPUT/VOLUME/AV MUTE/FREEZE/ AUTO SYNC/ENLARGE/ "An ...
... " (OFF) in each mode shown. Approx. 4,000 hours 200 hours Operated exclusively Approx. For lamp replacement, contact your nearest Sharp Authorized Projector Dealer or Service Center. • The table above indicates rough estimates in the case of Lamp Life Lamp usage condition Operated exclusively ...that the lamp be changed when the remaining lamp life becomes 5%. Remaining lamp life changes within the range of "OSD Display" Settings Selectable settings Description (ON) All On-screen Displays are displayed. (OFF) INPUT/VOLUME/AV MUTE/FREEZE/ AUTO SYNC/ENLARGE/ "An ...

