
PGD210U Operation Manual
Page 2
... CAUTION: TO REDUCE THE RISK OF ELECTRIC SHOCK, DO NOT REMOVE COVER. We sincerely hope that SHARP may be required to persons. Model No.: PG-D210U Serial No.: Important Information There are now the owner of sufficient magnitude to constitute a risk or electric... shock to give under the 1972 Consumer Product Safety Act, PLEASE READ CAREFULLY THE IMPORTANT "LIMITED WARRANTY" CLAUSE. REFER SERVICING TO QUALIFIED SERVICE PERSONNEL. Every SHARP Color LCD Projector...
... CAUTION: TO REDUCE THE RISK OF ELECTRIC SHOCK, DO NOT REMOVE COVER. We sincerely hope that SHARP may be required to persons. Model No.: PG-D210U Serial No.: Important Information There are now the owner of sufficient magnitude to constitute a risk or electric... shock to give under the 1972 Consumer Product Safety Act, PLEASE READ CAREFULLY THE IMPORTANT "LIMITED WARRANTY" CLAUSE. REFER SERVICING TO QUALIFIED SERVICE PERSONNEL. Every SHARP Color LCD Projector...

PGD210U Operation Manual
Page 3
...the product manufacturer as a bookcase or rack unless proper ventilation is operated in installation such as they are designed to ensure your LCD Projector, please be read these openings must be retained for future reference. 3. Use only with a cart, stand, tripod, bracket, or... this equipment not expressly approved by the manufacturer could void the user's authority to defeat the safeguards incorporated into this LCD Projector, observe the following basic rules for its installation, use and servicing. ONLY Important Safeguards Electrical energy can radiate radio frequency ...
...the product manufacturer as a bookcase or rack unless proper ventilation is operated in installation such as they are designed to ensure your LCD Projector, please be read these openings must be retained for future reference. 3. Use only with a cart, stand, tripod, bracket, or... this equipment not expressly approved by the manufacturer could void the user's authority to defeat the safeguards incorporated into this LCD Projector, observe the following basic rules for its installation, use and servicing. ONLY Important Safeguards Electrical energy can radiate radio frequency ...
PGD210U Operation Manual
Page 5
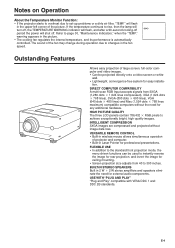
Notes on Operation About the Temperature Monitor Function: • If the projector starts to overheat due to page 30, "Maintenance Indicators," when the "TEMP." tion. INTELLIGENT COMPRESSION SXGA images are compressed and projected without the need... for external audio components. turn off, the TEMPERATURE WARNING indicator will flash, and after a 90-second cooling-off . Outstanding Features Allows easy projection of projector and computer. • Built-in wireless mouse allows simultaneous operation of large screen, full-color computer and video images. • Can be used to ...
Notes on Operation About the Temperature Monitor Function: • If the projector starts to overheat due to page 30, "Maintenance Indicators," when the "TEMP." tion. INTELLIGENT COMPRESSION SXGA images are compressed and projected without the need... for external audio components. turn off, the TEMPERATURE WARNING indicator will flash, and after a 90-second cooling-off . Outstanding Features Allows easy projection of projector and computer. • Built-in wireless mouse allows simultaneous operation of large screen, full-color computer and video images. • Can be used to ...
PGD210U Operation Manual
Page 6
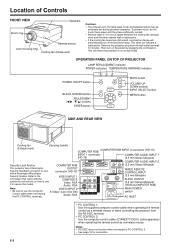
...: RCA Note: • Be sure to use it to use the Computer Control cable when connecting the PC CONTROL terminals. E-5 Remove the projector plug from the RS-232C terminal. • PC CONTROL 2: Use the computer control cable (CTANZ0711CE01) (sold separately) when operating the remote ...2 connector (HD-15) INPUT 1 connector COMPUTER AUDIO INPUT 1 (HD-15) (3.5 mm Stereo Minijack) Security Lock Anchor COMPUTER RGB This projector has a Kensington OUTPUT Security Standard connector for instructions on the power by plugging the cord back in. This will automatically turn on how to...
...: RCA Note: • Be sure to use it to use the Computer Control cable when connecting the PC CONTROL terminals. E-5 Remove the projector plug from the RS-232C terminal. • PC CONTROL 2: Use the computer control cable (CTANZ0711CE01) (sold separately) when operating the remote ...2 connector (HD-15) INPUT 1 connector COMPUTER AUDIO INPUT 1 (HD-15) (3.5 mm Stereo Minijack) Security Lock Anchor COMPUTER RGB This projector has a Kensington OUTPUT Security Standard connector for instructions on the power by plugging the cord back in. This will automatically turn on how to...
PGD210U Operation Manual
Page 7
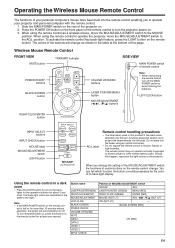
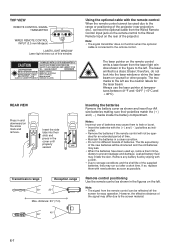
...SELECT buttons INPUT CHECK button MOUSE label MOUSE/ADJUSTMENT switch LIGHT button R-CLICK/ENTER INPUT SELECT DATA1 DATA2 VIDEO1 VIDEO2 CHECK MOUSE ADJ. LIGHT LCD PROJECTOR ADJ. The remote control may not operate normally if exposed to the ADJ. Note: • If the MAIN POWER switch on . 2....the skin, however please be careful not to shocks, liquids or high humidity. Operating the Wireless Mouse Remote Control The functions of your projector and personal computer with the remote control. 1. To activate the remote control key back-light feature, press the LIGHT button on the ...
...SELECT buttons INPUT CHECK button MOUSE label MOUSE/ADJUSTMENT switch LIGHT button R-CLICK/ENTER INPUT SELECT DATA1 DATA2 VIDEO1 VIDEO2 CHECK MOUSE ADJ. LIGHT LCD PROJECTOR ADJ. The remote control may not operate normally if exposed to the ADJ. Note: • If the MAIN POWER switch on . 2....the skin, however please be careful not to shocks, liquids or high humidity. Operating the Wireless Mouse Remote Control The functions of your projector and personal computer with the remote control. 1. To activate the remote control key back-light feature, press the LIGHT button on the ...
PGD210U Operation Manual
Page 8
... look into their polarities match the ()ם and ( )מmarks inside the battery compartment. Always use of the projector (rear projection, etc.), connect the optional cable from the Wired Remote Control Input jack on the arrow mark and remove. Leaked battery fluid ..., MAHWAH, NEW JERSEY 07430 TEL : 1-800-BE-SHARP U.S.A. If so, replace them immediately to leak or burst. • Insert the batteries with new batteries as soon as indi- However, the effective distance of the projector. The laser pointer on the rear of the signal may cause them...
... look into their polarities match the ()ם and ( )מmarks inside the battery compartment. Always use of the projector (rear projection, etc.), connect the optional cable from the Wired Remote Control Input jack on the arrow mark and remove. Leaked battery fluid ..., MAHWAH, NEW JERSEY 07430 TEL : 1-800-BE-SHARP U.S.A. If so, replace them immediately to leak or burst. • Insert the batteries with new batteries as soon as indi- However, the effective distance of the projector. The laser pointer on the rear of the signal may cause them...
PGD210U Operation Manual
Page 9
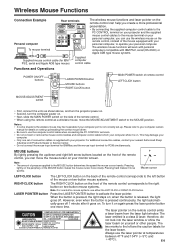
... • Do not connect or remove the mouse control cables and computer control cable to the left arrow buttons located on . LIGHT LCD PROJECTOR LASER POINTER button MOUSE buttons RIGHT-CLICK button R/C OFF MAIN POWER switch of remote control LEFT-CLICK button • First, connect the units...on setting-up /down and right/left are the caution labels for PC98 simultaneously. E-8 This may be inoperable if your nearest Authorized Sharp Industrial LCD Products Dealer or Service Center. • Do not connect the mouse input terminal for IBM/Mac and the mouse input ...
... • Do not connect or remove the mouse control cables and computer control cable to the left arrow buttons located on . LIGHT LCD PROJECTOR LASER POINTER button MOUSE buttons RIGHT-CLICK button R/C OFF MAIN POWER switch of remote control LEFT-CLICK button • First, connect the units...on setting-up /down and right/left are the caution labels for PC98 simultaneously. E-8 This may be inoperable if your nearest Authorized Sharp Industrial LCD Products Dealer or Service Center. • Do not connect the mouse input terminal for IBM/Mac and the mouse input ...

PGD210U Operation Manual
Page 10
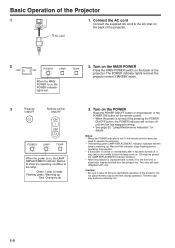
...POWER switch on the power. 3. Turn on the POWER Press the POWER ON/OFF button on the projector or the POWER ON button on the remote control to turn on the back of the projector. 2. Adjusting the zoom Rotate the zoom ring. The picture can be adjusted to the wide angle ...position) Rotate the zoom ring on the lens until the image on projector setup. The picture can be adjusted within the zoom range. (Zoom) E-9 SIDE VIEW Zoom Ceiling setting Invert Image 2 POWER LAMP TEMP. Rotating the zoom ...
...POWER switch on the power. 3. Turn on the POWER Press the POWER ON/OFF button on the projector or the POWER ON button on the remote control to turn on the back of the projector. 2. Adjusting the zoom Rotate the zoom ring. The picture can be adjusted to the wide angle ...position) Rotate the zoom ring on the lens until the image on projector setup. The picture can be adjusted within the zoom range. (Zoom) E-9 SIDE VIEW Zoom Ceiling setting Invert Image 2 POWER LAMP TEMP. Rotating the zoom ...
PGD210U Operation Manual
Page 11
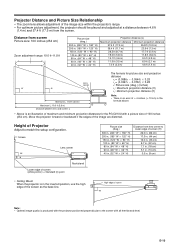
...cm) 7.1 in. (18 cm) 5.1 in. (13 cm) 3.5 in. (9 cm) • Ceiling Mount When the projector is an illustration of maximum and minimum projection distances for the PG-D210U with all feet flat and level. Screen Lens center 90˚ H Rack/stand Lower edge of screen (white portion) = ...; H) Distance from the screen. H High edge of screen 90˚ Note: • Optimal image quality is produced with the projector positioned perpendicular to match the setup configuration. Projector Distance and Picture Size Relationship • The zoom lens allows adjustment of the image size within the...
...cm) 7.1 in. (18 cm) 5.1 in. (13 cm) 3.5 in. (9 cm) • Ceiling Mount When the projector is an illustration of maximum and minimum projection distances for the PG-D210U with all feet flat and level. Screen Lens center 90˚ H Rack/stand Lower edge of screen (white portion) = ...; H) Distance from the screen. H High edge of screen 90˚ Note: • Optimal image quality is produced with the projector positioned perpendicular to match the setup configuration. Projector Distance and Picture Size Relationship • The zoom lens allows adjustment of the image size within the...
PGD210U Operation Manual
Page 12
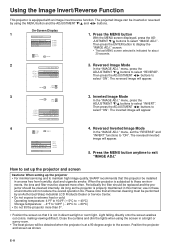
...ADJUSTMENT ƒ/∂ buttons to select "INVERT". MENU : E N D :SEL. Periodically the filter should be replaced and the projector should be inverted or reversed by an Authorized Sharp Industrial LCD Products Dealer or Service Center. • Do not expose to ם60°C) • Do not ...tilt the projector more often. Reversed Image Mode INVERT REVERSE INPUT DISPLAY BLK SCRN DISP IMAGE...
...ADJUSTMENT ƒ/∂ buttons to select "INVERT". MENU : E N D :SEL. Periodically the filter should be replaced and the projector should be inverted or reversed by an Authorized Sharp Industrial LCD Products Dealer or Service Center. • Do not expose to ם60°C) • Do not ...tilt the projector more often. Reversed Image Mode INVERT REVERSE INPUT DISPLAY BLK SCRN DISP IMAGE...
PGD210U Operation Manual
Page 13
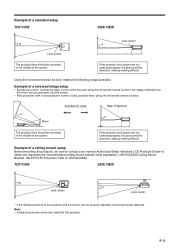
... Lens center 90˚ Lens center • If the relative positions of the projector and the screen are not centered properly, the picture will be distorted, making viewing difficult. If the projector and screen are not properly adjusted, the picture will be centered in the middle .... Example of a standard setup TOP VIEW SIDE VIEW 90˚ Lens center Lens center 90˚ The projector lens should be sure to contact your nearest Authorized Sharp Industrial LCD Products Dealer to obtain the manufacturer recommended ceiling mount bracket (sold separately). (AN-XGCM40 Ceiling Mount ...
... Lens center 90˚ Lens center • If the relative positions of the projector and the screen are not centered properly, the picture will be distorted, making viewing difficult. If the projector and screen are not properly adjusted, the picture will be centered in the middle .... Example of a standard setup TOP VIEW SIDE VIEW 90˚ Lens center Lens center 90˚ The projector lens should be sure to contact your nearest Authorized Sharp Industrial LCD Products Dealer to obtain the manufacturer recommended ceiling mount bracket (sold separately). (AN-XGCM40 Ceiling Mount ...

PGD210U Operation Manual
Page 14
... the Height of the Picture Use the adjuster release to adjust the angle of the projector and height of the projector. Adjuster release Adjusters 1 2 3 Adjuster release 1. Remove your fingers caught in position. Release the projector once you are sure the adjuster legs have locked in some cases, all of the... be resting on the lens cap to prevent damage to the surface of the table. 2. Press the adjuster release and lift the projector to the desired angle with the adjusters. Note: • Always put on the table. Caution: • Do not lift or carry the...
... the Height of the Picture Use the adjuster release to adjust the angle of the projector and height of the projector. Adjuster release Adjusters 1 2 3 Adjuster release 1. Remove your fingers caught in position. Release the projector once you are sure the adjuster legs have locked in some cases, all of the... be resting on the lens cap to prevent damage to the surface of the table. 2. Press the adjuster release and lift the projector to the desired angle with the adjusters. Note: • Always put on the table. Caution: • Do not lift or carry the...
PGD210U Operation Manual
Page 15
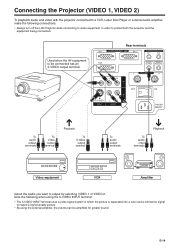
Used when the AV equipment to be amplified for greater sound. E-14 Connecting the Projector (VIDEO 1, VIDEO 2) To playback audio and video with the projector connected to a VCR, Laser Disc Player or external audio amplifier, make the following when using the external amplifier, the ...volume can be connected has an S-VIDEO output terminal. Note the following connections. • Always turn off the LCD Projector while connecting to video equipment, in which the picture is separated into a color and a luminance signal to output by selecting VIDEO 1 or ...
Used when the AV equipment to be amplified for greater sound. E-14 Connecting the Projector (VIDEO 1, VIDEO 2) To playback audio and video with the projector connected to a VCR, Laser Disc Player or external audio amplifier, make the following when using the external amplifier, the ...volume can be connected has an S-VIDEO output terminal. Note the following connections. • Always turn off the LCD Projector while connecting to video equipment, in which the picture is separated into a color and a luminance signal to output by selecting VIDEO 1 or ...
PGD210U Operation Manual
Page 16
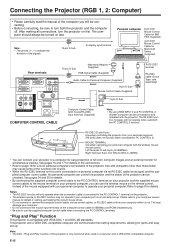
...the computer control cable for a list of personal computers connectable to operate your personal computer. E-15 After making all connections, turn both the projector and the computer off. Note: • The arrows (←, ↔) indicate the direction of the signals. 15-pin D-Sub To display...: • The DDC, "Plug and Play" function of full color computer images and an external monitor for details on last. Connecting the Projector (RGB 1, 2: Computer) • Please carefully read the manual of the computer you can use the supplied computer control cable when connecting the...
...the computer control cable for a list of personal computers connectable to operate your personal computer. E-15 After making all connections, turn both the projector and the computer off. Note: • The arrows (←, ↔) indicate the direction of the signals. 15-pin D-Sub To display...: • The DDC, "Plug and Play" function of full color computer images and an external monitor for details on last. Connecting the Projector (RGB 1, 2: Computer) • Please carefully read the manual of the computer you can use the supplied computer control cable when connecting the...

PGD210U Operation Manual
Page 17
...RGB Signal Input Socket 1. Connecting to a computer and the computer is turned on, the display mode cannot be connected to and operated with the projector. 2 ! RGB Signal Input Socket Macintosh RGB Signal Output Socket ANALOG RGB OUT RGB Signal Cable (Supplied) Notes: • Be sure to... switches 2 and 3 to "ON" and 1, 4, 5 and 6 to "OFF". @ Connect the supplied Macintosh adaptor to the RGB signal output terminal on your projector to a Macintosh Series Computer 640 480, 832 624 or 1,024 768 resolution ! RGB Signal...
...RGB Signal Input Socket 1. Connecting to a computer and the computer is turned on, the display mode cannot be connected to and operated with the projector. 2 ! RGB Signal Input Socket Macintosh RGB Signal Output Socket ANALOG RGB OUT RGB Signal Cable (Supplied) Notes: • Be sure to... switches 2 and 3 to "ON" and 1, 4, 5 and 6 to "OFF". @ Connect the supplied Macintosh adaptor to the RGB signal output terminal on your projector to a Macintosh Series Computer 640 480, 832 624 or 1,024 768 resolution ! RGB Signal...
PGD210U Operation Manual
Page 18
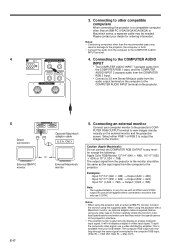
... Do not connect the COMPUTER RGB OUTPUT to any other than the recommended types may be the same as the input signal from the projector to monitors that they match the specifications of monitor, carefully check the monitor's interface specifications and make sure that only use C-SYNC. Notes...RGB input. (VGA IN → VGA OUT, Mac IN → Mac OUT) It will only loop through the same signal connected to the projector. Before using the supplied cable. ONLY or External IBM-PC monitor External Macintosh monitor E-17 5. Connecting to the COMPUTER AUDIO INPUT • The...
... Do not connect the COMPUTER RGB OUTPUT to any other than the recommended types may be the same as the input signal from the projector to monitors that they match the specifications of monitor, carefully check the monitor's interface specifications and make sure that only use C-SYNC. Notes...RGB input. (VGA IN → VGA OUT, Mac IN → Mac OUT) It will only loop through the same signal connected to the projector. Before using the supplied cable. ONLY or External IBM-PC monitor External Macintosh monitor E-17 5. Connecting to the COMPUTER AUDIO INPUT • The...
PGD210U Operation Manual
Page 19
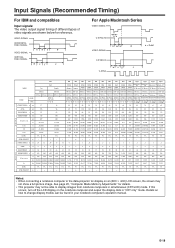
See page 20, "Computer Mode Memory Adjustments" for details. • This projector may not show a full picture image. Notes: • When connecting a notebook computer to display images from notebook computers in simultaneous (CRT/LCD) mode. FRONT PORCH w H ....538 60.0 79.76 T TL - If this occurs, turn off the LCD display on how to change display modes can be able to the data-projector for reference. Input Signals (Recommended Timing) For IBM and compatibles Input signals: The video output signal timing of different types of video signals are shown...
See page 20, "Computer Mode Memory Adjustments" for details. • This projector may not show a full picture image. Notes: • When connecting a notebook computer to display images from notebook computers in simultaneous (CRT/LCD) mode. FRONT PORCH w H ....538 60.0 79.76 T TL - If this occurs, turn off the LCD display on how to change display modes can be able to the data-projector for reference. Input Signals (Recommended Timing) For IBM and compatibles Input signals: The video output signal timing of different types of video signals are shown...
PGD210U Operation Manual
Page 20
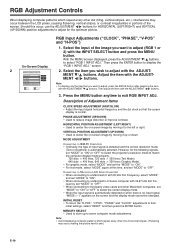
... for HORIZONTAL (LEFT/RIGHT) and VERTICAL (UP/DOWN) position adjustments to adjust for the following signals, set "MODE" to "ON" or "OFF" to select the projector's resolution mode to match the computer display mode properly. 720 dots ן400 lines, 720 dots ן350 lines (Text Mode...
... for HORIZONTAL (LEFT/RIGHT) and VERTICAL (UP/DOWN) position adjustments to adjust for the following signals, set "MODE" to "ON" or "OFF" to select the projector's resolution mode to match the computer display mode properly. 720 dots ן400 lines, 720 dots ן350 lines (Text Mode...
PGD210U Operation Manual
Page 21
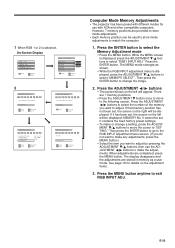
.... Press the ADJUSTMENT ß/© buttons to select the number of the memory you want to "SETTING." ENTER : E N T E R MENU : E N D Computer Mode Memory Adjustments • The projector has been preset with different modes for details on the left will be set , the screen on the right will be used to store mode...
.... Press the ADJUSTMENT ß/© buttons to select the number of the memory you want to "SETTING." ENTER : E N T E R MENU : E N D Computer Mode Memory Adjustments • The projector has been preset with different modes for details on the left will be set , the screen on the right will be used to store mode...
PGD210U Operation Manual
Page 22
...has stopped running. • See page 30, "Lamp/Maintenance Indicators" for the first time, a slight odor may be used to operate the projector. • The flashing green LAMP REPLACEMENT indicator indicates that the lamp is on, the LAMP REPLACEMENT indicator flashes to show the operating condition of ...will not turn off the lens cap before the lamp turns on. (During this period the LAMP REPLACEMENT indicator flashes.) • After the projector is unpacked and turned on immediately after it has been turned off, it may become extremely hot. The lens cap may take off until ...
...has stopped running. • See page 30, "Lamp/Maintenance Indicators" for the first time, a slight odor may be used to operate the projector. • The flashing green LAMP REPLACEMENT indicator indicates that the lamp is on, the LAMP REPLACEMENT indicator flashes to show the operating condition of ...will not turn off the lens cap before the lamp turns on. (During this period the LAMP REPLACEMENT indicator flashes.) • After the projector is unpacked and turned on immediately after it has been turned off, it may become extremely hot. The lens cap may take off until ...


