
TL-M4600 , TL-M5200 Operation Manual
Page 6
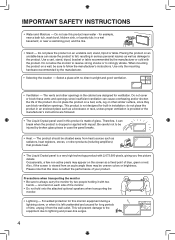
..., heat registers, stoves, or other openings in the cabinet are followed. • The Liquid Crystal panel used in an enclosed place such as a fixed point of the monitor. • Do not hold onto the attached optional speakers when transporting the monitor. • Lightning - Precautions when transporting the monitor • Be sure to...
..., heat registers, stoves, or other openings in the cabinet are followed. • The Liquid Crystal panel used in an enclosed place such as a fixed point of the monitor. • Do not hold onto the attached optional speakers when transporting the monitor. • Lightning - Precautions when transporting the monitor • Be sure to...

TL-M4600 , TL-M5200 Operation Manual
Page 9
...SHARP CUSTOMER 1 IMPORTANT INFORMATION 1 Trademarks 2 IMPORTANT SAFETY INSTRUCTIONS........ 3 How to Access the PDF Operation Manuals 8 SETUP MANUAL 8 Accessories 9 Part Names 10 Preparation How to Install the Monitor 13 Mounting precautions 13 Attaching the setup stand 13 Mounting the monitor on the wall 14 Connecting Peripheral Equipment 16 Connecting external speakers...input mode 24 Adjusting the volume 24 Displaying the black screen and turning off the...moving image 27 Selecting AV mode 27 Displaying an enlarged portion of an image ...SHARP Assistance 46 Specifications 47 Index...
...SHARP CUSTOMER 1 IMPORTANT INFORMATION 1 Trademarks 2 IMPORTANT SAFETY INSTRUCTIONS........ 3 How to Access the PDF Operation Manuals 8 SETUP MANUAL 8 Accessories 9 Part Names 10 Preparation How to Install the Monitor 13 Mounting precautions 13 Attaching the setup stand 13 Mounting the monitor on the wall 14 Connecting Peripheral Equipment 16 Connecting external speakers...input mode 24 Adjusting the volume 24 Displaying the black screen and turning off the...moving image 27 Selecting AV mode 27 Displaying an enlarged portion of an image ...SHARP Assistance 46 Specifications 47 Index...

TL-M4600 , TL-M5200 Operation Manual
Page 11
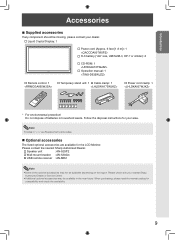
... Display: 1 Power cord (Approx. 6 feet [1.8 m]): 1 R-6 battery ("AA" size, UM/SUM-3, HP-7 or similar): 2 CD-ROM: 1 Operation manual: 1 Remote control: 1 Setup stand: 1 Cable clamp: 1 Power cord clamp: 1 * For environmental protection! o Speaker ...Please check with your nearest Sharp Authorized Dealer or Service Center. • Additional optional accessories may not be available depending on the region. When purchasing, please read the newest catalog for the LCD Monitor. n Optional accessories ...
... Display: 1 Power cord (Approx. 6 feet [1.8 m]): 1 R-6 battery ("AA" size, UM/SUM-3, HP-7 or similar): 2 CD-ROM: 1 Operation manual: 1 Remote control: 1 Setup stand: 1 Cable clamp: 1 Power cord clamp: 1 * For environmental protection! o Speaker ...Please check with your nearest Sharp Authorized Dealer or Service Center. • Additional optional accessories may not be available depending on the region. When purchasing, please read the newest catalog for the LCD Monitor. n Optional accessories ...

TL-M4600 , TL-M5200 Operation Manual
Page 12
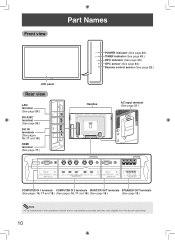
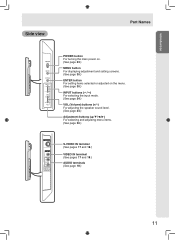
Front view Part Names LCD panel Rear view LAN terminal (See page 20.) RS-232C terminal (See page 20.) DVI IN terminals (See pages 16, 17 and 18.) HDMI terminal (See ... SPEAKER OUT terminals (See pages 16, 17 and 18.) (See pages 16, 17 and 18.) (See page 18.) (See page 19.) Note • The illustrations in this operation manual are for explanation purposes and may vary slightly from the actual operations. • The illustrations used throughout this manual are based on TL-M5200...
Front view Part Names LCD panel Rear view LAN terminal (See page 20.) RS-232C terminal (See page 20.) DVI IN terminals (See pages 16, 17 and 18.) HDMI terminal (See ... SPEAKER OUT terminals (See pages 16, 17 and 18.) (See pages 16, 17 and 18.) (See page 18.) (See page 19.) Note • The illustrations in this operation manual are for explanation purposes and may vary slightly from the actual operations. • The illustrations used throughout this manual are based on TL-M5200...

TL-M4600 , TL-M5200 Operation Manual
Page 13
Introduction Side view Part Names POWER button For turning the main power on. (See page 23.) MENU button For displaying adjustment and setting screens. (See page 30.) ENTER button For setting items selected or adjusted on the menu. (See page 30.) INPUT buttons ( / ) For selecting the input mode. (See page 24.) VOL (Volume) buttons (+/-) For adjusting the speaker sound level. (See page 24.) Adjustment buttons For selecting and adjusting menu items. (See page 30.) S-VIDEO IN terminal (See pages 17 and 18.) VIDEO IN terminal (See pages 17 and 18.) AUDIO terminals (See page 18.) 11
Introduction Side view Part Names POWER button For turning the main power on. (See page 23.) MENU button For displaying adjustment and setting screens. (See page 30.) ENTER button For setting items selected or adjusted on the menu. (See page 30.) INPUT buttons ( / ) For selecting the input mode. (See page 24.) VOL (Volume) buttons (+/-) For adjusting the speaker sound level. (See page 24.) Adjustment buttons For selecting and adjusting menu items. (See page 30.) S-VIDEO IN terminal (See pages 17 and 18.) VIDEO IN terminal (See pages 17 and 18.) AUDIO terminals (See page 18.) 11

TL-M4600 , TL-M5200 Operation Manual
Page 14
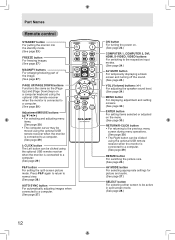
... to the respective input modes. (See page 24.) AV MUTE button For temporarily displaying a black screen and turning off the sound. (See page 24.) VOL (Volume) buttons (+/-) For adjusting the speaker sound level. (See page 24.) MENU button For displaying adjustment and setting screens. (See page 30.) ENTER button For setting items selected...
... to the respective input modes. (See page 24.) AV MUTE button For temporarily displaying a black screen and turning off the sound. (See page 24.) VOL (Volume) buttons (+/-) For adjusting the speaker sound level. (See page 24.) MENU button For displaying adjustment and setting screens. (See page 30.) ENTER button For setting items selected...

TL-M4600 , TL-M5200 Operation Manual
Page 21
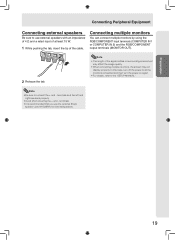
... • For details, refer to connect the + and - Note • The length of the cable. terminals and the left and right speakers properly. • Avoid short circuiting the + and - Connecting multiple monitors You can connect multiple monitors by using the RGB/COMPONENT input terminals (... cables or surrounding environment may affect the image quality. • When connecting multiple monitors, the screen may not display properly. Preparation Connecting Peripheral Equipment Connecting external speakers Be sure to use the optional Sharp speaker unit (AN-52SP2/AN-46SP2) for external...
... • For details, refer to connect the + and - Note • The length of the cable. terminals and the left and right speakers properly. • Avoid short circuiting the + and - Connecting multiple monitors You can connect multiple monitors by using the RGB/COMPONENT input terminals (... cables or surrounding environment may affect the image quality. • When connecting multiple monitors, the screen may not display properly. Preparation Connecting Peripheral Equipment Connecting external speakers Be sure to use the optional Sharp speaker unit (AN-52SP2/AN-46SP2) for external...

TL-M4600 , TL-M5200 Operation Manual
Page 36
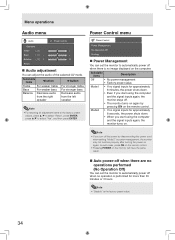
...;button Treble Bass Balance For weaker treble For weaker bass Decrease audio from the right speaker For stronger treble For stronger bass Decrease audio from the left speaker Note • For resetting all adjustment items to the factory preset values, press ...▲/▼ to select "Reset", press ENTER, press ▲/▼ to automatically power off when there is performed for approximately 8 minutes, the power shuts down . • When you turn off when no operation is no image displayed...
...;button Treble Bass Balance For weaker treble For weaker bass Decrease audio from the right speaker For stronger treble For stronger bass Decrease audio from the left speaker Note • For resetting all adjustment items to the factory preset values, press ...▲/▼ to select "Reset", press ENTER, press ▲/▼ to automatically power off when there is performed for approximately 8 minutes, the power shuts down . • When you turn off when no operation is no image displayed...

TL-M4600 , TL-M5200 Operation Manual
Page 42
... signal from the audio output terminal is equipped with the volume level of the program provider. • While displaying on some TV programs and on -screen displays, Closed Caption information disappears. Selecting "VAO" synchronizes video and audio automatically. 40 It allows you , select ..."VAO" on or off and when switching the input. • When the monitor is muted. • When "Audio Output" has been set to "VAO", sound via speakers...
... signal from the audio output terminal is equipped with the volume level of the program provider. • While displaying on some TV programs and on -screen displays, Closed Caption information disappears. Selecting "VAO" synchronizes video and audio automatically. 40 It allows you , select ..."VAO" on or off and when switching the input. • When the monitor is muted. • When "Audio Output" has been set to "VAO", sound via speakers...

TL-M4600 , TL-M5200 Operation Manual
Page 47
... Internal temperature rises quickly if dust accumulates inside the monitor or around the vents. Consult a Sharp Authorized Dealer about removing internal dust. room, office), the picture may cause the cabinet to deform and the LCD panel to malfunction. • Storage temperature: -4°F to +140°F (-20°C to... change automatically. • Is "Sleep Timer" and/or "Schedule" set to minimum. (See page 24.) • Are audio cables and speaker cables connected properly? (See pages 18 and 19.) • Is the audio signal input properly to direct sunlight or near a heater, as ...
... Internal temperature rises quickly if dust accumulates inside the monitor or around the vents. Consult a Sharp Authorized Dealer about removing internal dust. room, office), the picture may cause the cabinet to deform and the LCD panel to malfunction. • Storage temperature: -4°F to +140°F (-20°C to... change automatically. • Is "Sleep Timer" and/or "Schedule" set to minimum. (See page 24.) • Are audio cables and speaker cables connected properly? (See pages 18 and 19.) • Is the audio signal input properly to direct sunlight or near a heater, as ...

TL-M4600 , TL-M5200 Operation Manual
Page 49
...2519/32" x 411/64" (without prior notice. As a part of our policy of continuous improvement, SHARP reserves the right to make design and specification changes for product improvement without Setup Stand) (1243 ... an HDCP-compatible device. Appendix Specifications n Product specifications Item Model TL-M5200 TL-M4600 LCD Panel ASV low-reflection black TFT LCD Screen size 521/32" (1322 mm measured diagonally) 4563/64... mini D-sub 15-pin (RGB/Component*3) Audio output Ø3.5 mm stereo minijack Speaker output LR push terminal type LAN RJ-45 8-pin modular RS-232C D-sub 9-...
...2519/32" x 411/64" (without prior notice. As a part of our policy of continuous improvement, SHARP reserves the right to make design and specification changes for product improvement without Setup Stand) (1243 ... an HDCP-compatible device. Appendix Specifications n Product specifications Item Model TL-M5200 TL-M4600 LCD Panel ASV low-reflection black TFT LCD Screen size 521/32" (1322 mm measured diagonally) 4563/64... mini D-sub 15-pin (RGB/Component*3) Audio output Ø3.5 mm stereo minijack Speaker output LR push terminal type LAN RJ-45 8-pin modular RS-232C D-sub 9-...

TL-M4600 , TL-M5200 Operation Manual
Page 54
... Input Label 37 Input select 24 Input skip 36 IP Address 39 Keylock 36 LAN 10, 20 LAN terminal 10, 20 Language 42 LED 44 52 Magnify 27 Menu tree 31 MONITOR OUT terminals 10, 18 Monochrome 33 Mouse 29 Multi Screen 44 Network 20 OPC 32 OPC indicator, sensor 10... 25, 42 RGB cable 16, 17, 18 RS-232C 38 RS-232C terminal 10, 20 Schedule 43 Setup stand 13, 14 Sharpness 32 Signal Type 41 Sleep Timer 43 SPEAKER OUT terminals 10, 19 sRGB 32 Standby Mode 38 Status 39 Stretch 25 Subnet Mask 39 Supplied accessories 9 S-VIDEO IN terminal 11...
... Input Label 37 Input select 24 Input skip 36 IP Address 39 Keylock 36 LAN 10, 20 LAN terminal 10, 20 Language 42 LED 44 52 Magnify 27 Menu tree 31 MONITOR OUT terminals 10, 18 Monochrome 33 Mouse 29 Multi Screen 44 Network 20 OPC 32 OPC indicator, sensor 10... 25, 42 RGB cable 16, 17, 18 RS-232C 38 RS-232C terminal 10, 20 Schedule 43 Setup stand 13, 14 Sharpness 32 Signal Type 41 Sleep Timer 43 SPEAKER OUT terminals 10, 19 sRGB 32 Standby Mode 38 Status 39 Stretch 25 Subnet Mask 39 Supplied accessories 9 S-VIDEO IN terminal 11...
TLM5200 Operation Manual
Page 6
...product. Therefore, it from an acute angle there may appear on each side of the monitor. • Do not hold onto the attached optional speakers when transporting the monitor. • Lightning - one hand on the screen as radiators, heat registers, stoves, or other openings in a wet ...basement; in the cabinet are followed. • The Liquid Crystal panel used in installation; Be careful not to be sure to fall, resulting in case the panel breaks. • Heat - Occasionally, a few non-active pixels may be situated away from heat sources...
...product. Therefore, it from an acute angle there may appear on each side of the monitor. • Do not hold onto the attached optional speakers when transporting the monitor. • Lightning - one hand on the screen as radiators, heat registers, stoves, or other openings in a wet ...basement; in the cabinet are followed. • The Liquid Crystal panel used in installation; Be careful not to be sure to fall, resulting in case the panel breaks. • Heat - Occasionally, a few non-active pixels may be situated away from heat sources...

TLM5200 Operation Manual
Page 9
...SHARP CUSTOMER 1 IMPORTANT INFORMATION 1 Trademarks 2 IMPORTANT SAFETY INSTRUCTIONS ....... 3 How to Access the PDF Operation Manuals 8 SETUP MANUAL 8 Accessories 9 Part Names 10 Preparation How to Install the Monitor 13 Mounting precautions 13 Attaching the temporary stand 13 Mounting the monitor on the wall 14 Connecting Peripheral Equipment 16 Connecting external speakers... the input mode 24 Adjusting the volume 24 Displaying the black screen and turning off the sound ...For SHARP Assistance 46 Specifications 47 Index 52 Warranty 53 Français CHER CLIENT SHARP 55...
...SHARP CUSTOMER 1 IMPORTANT INFORMATION 1 Trademarks 2 IMPORTANT SAFETY INSTRUCTIONS ....... 3 How to Access the PDF Operation Manuals 8 SETUP MANUAL 8 Accessories 9 Part Names 10 Preparation How to Install the Monitor 13 Mounting precautions 13 Attaching the temporary stand 13 Mounting the monitor on the wall 14 Connecting Peripheral Equipment 16 Connecting external speakers... the input mode 24 Adjusting the volume 24 Displaying the black screen and turning off the sound ...For SHARP Assistance 46 Specifications 47 Index 52 Warranty 53 Français CHER CLIENT SHARP 55...
TLM5200 Operation Manual
Page 11
.... † Liquid Crystal Display: 1 † Power cord (Approx. 6 feet [1.8 m]): 1 † R-6 battery ("AA" size, UM/SUM-3, HP-7 or similar): 2 † CD-ROM: 1 † Operation manual: 1 † Remote control: 1 † Temporary stand unit: 1 † Cable clamp: 1 † Power cord clamp: 1 * For environmental protection! Please contact the nearest Sharp Authorized Dealer. † Speaker unit : AN-52SP2...
.... † Liquid Crystal Display: 1 † Power cord (Approx. 6 feet [1.8 m]): 1 † R-6 battery ("AA" size, UM/SUM-3, HP-7 or similar): 2 † CD-ROM: 1 † Operation manual: 1 † Remote control: 1 † Temporary stand unit: 1 † Cable clamp: 1 † Power cord clamp: 1 * For environmental protection! Please contact the nearest Sharp Authorized Dealer. † Speaker unit : AN-52SP2...
TLM5200 Operation Manual
Page 12
Front view Part Names LCD panel Rear view LAN terminal (See page 20.) RS-232C terminal (See page 20.) DVI IN terminals (See pages 16, 17 and 18.) HDMI terminal (See ... (See page 33.) Remote control sensor (See page 22.) Handles AC input terminal (See page 21.) COMPUTER IN 1 terminals COMPUTER IN 2 terminals MONITOR OUT terminals SPEAKER OUT terminals (See pages 16, 17 and 18.) (See pages 16, 17 and 18.) (See page 18.) (See page 19.) Note • The illustrations in...
Front view Part Names LCD panel Rear view LAN terminal (See page 20.) RS-232C terminal (See page 20.) DVI IN terminals (See pages 16, 17 and 18.) HDMI terminal (See ... (See page 33.) Remote control sensor (See page 22.) Handles AC input terminal (See page 21.) COMPUTER IN 1 terminals COMPUTER IN 2 terminals MONITOR OUT terminals SPEAKER OUT terminals (See pages 16, 17 and 18.) (See pages 16, 17 and 18.) (See page 18.) (See page 19.) Note • The illustrations in...
TLM5200 Operation Manual
Page 13
Introduction Side view Part Names POWER button For turning the main power on. (See page 23.) MENU button For displaying adjustment and setting screens. (See page 30.) ENTER button For setting items selected or adjusted on the menu. (See page 30.) INPUT buttons ( / ) For selecting the input mode. (See page 24.) VOL (Volume) buttons (+/-) For adjusting the speaker sound level. (See page 24.) Adjustment buttons For selecting and adjusting menu items. (See page 30.) S-VIDEO IN terminal (See pages 17 and 18.) VIDEO IN terminal (See pages 17 and 18.) AUDIO terminals (See page 18.) 11
Introduction Side view Part Names POWER button For turning the main power on. (See page 23.) MENU button For displaying adjustment and setting screens. (See page 30.) ENTER button For setting items selected or adjusted on the menu. (See page 30.) INPUT buttons ( / ) For selecting the input mode. (See page 24.) VOL (Volume) buttons (+/-) For adjusting the speaker sound level. (See page 24.) Adjustment buttons For selecting and adjusting menu items. (See page 30.) S-VIDEO IN terminal (See pages 17 and 18.) VIDEO IN terminal (See pages 17 and 18.) AUDIO terminals (See page 18.) 11
TLM5200 Operation Manual
Page 14
... to the respective input modes. (See page 24.) AV MUTE button For temporarily displaying a black screen and turning off the sound. (See page 24.) VOL (Volume) buttons (+/-) For adjusting the speaker sound level. (See page 24.) MENU button For displaying adjustment and setting screens. (See page 30.) ENTER button For setting items selected...
... to the respective input modes. (See page 24.) AV MUTE button For temporarily displaying a black screen and turning off the sound. (See page 24.) VOL (Volume) buttons (+/-) For adjusting the speaker sound level. (See page 24.) MENU button For displaying adjustment and setting screens. (See page 30.) ENTER button For setting items selected...
TLM5200 Operation Manual
Page 21
Note • The length of the cable. Preparation Connecting Peripheral Equipment Connecting external speakers Be sure to use the optional Sharp speaker unit (AN-52SP2) for external speakers. 19 Connecting multiple monitors You can connect multiple monitors by using the RGB/COMPONENT input terminals (... external speakers with an impedance of 4 Ω and a rated input of at least 15 W. 1 While pushing the tab, insert the tip of the signal cables or surrounding environment may affect the image quality. • When connecting multiple monitors, the screen may not display properly....
Note • The length of the cable. Preparation Connecting Peripheral Equipment Connecting external speakers Be sure to use the optional Sharp speaker unit (AN-52SP2) for external speakers. 19 Connecting multiple monitors You can connect multiple monitors by using the RGB/COMPONENT input terminals (... external speakers with an impedance of 4 Ω and a rated input of at least 15 W. 1 While pushing the tab, insert the tip of the signal cables or surrounding environment may affect the image quality. • When connecting multiple monitors, the screen may not display properly....
TLM5200 Operation Manual
Page 36
..." in power management, the monitor may not function properly after turning the power on the computer. Note • "Disable" is no image displayed on again. Selectable items Description Off Mode1 Mode2 • No power management • Factory preset value. • If no signal inputs for...9668;button ►button Treble Bass Balance For weaker treble For weaker bass Decrease audio from the right speaker For stronger treble For stronger bass Decrease audio from the left speaker Note • For resetting all adjustment items to the factory preset values, press ▲/▼ to...
..." in power management, the monitor may not function properly after turning the power on the computer. Note • "Disable" is no image displayed on again. Selectable items Description Off Mode1 Mode2 • No power management • Factory preset value. • If no signal inputs for...9668;button ►button Treble Bass Balance For weaker treble For weaker bass Decrease audio from the right speaker For stronger treble For stronger bass Decrease audio from the left speaker Note • For resetting all adjustment items to the factory preset values, press ▲/▼ to...


