

XG-C330X , XG-C335X , XG-C430X Operation Manual
Page 1
Introduction Quick Start LCD PROJECTOR MODEL XG-C430X XG-C335X XG-C330X OPERATION MANUAL Setup Connections Basic Operation Useful Features Appendix
Introduction Quick Start LCD PROJECTOR MODEL XG-C430X XG-C335X XG-C330X OPERATION MANUAL Setup Connections Basic Operation Useful Features Appendix

XG-C330X , XG-C335X , XG-C430X Operation Manual
Page 2
... alemán, francés, sueco, español, italiano, holandés, portugués, chino y coreano. Lees de handleiding zorgvuldig door voor u de projector in English, German, French, Swedish, Spanish, Italian, Dutch, Portuguese, Chinese and Korean. Leia cuidadosamente todas as follows: • The wire which is marked..., portugais, chinois et coréen. In the unlikely event of the socket outlet in reporting the loss or theft of your Projector, please record the Model and Serial Numbers located on the bottom of the same rating as above, which is coloured green-and-yellow...
... alemán, francés, sueco, español, italiano, holandés, portugués, chino y coreano. Lees de handleiding zorgvuldig door voor u de projector in English, German, French, Swedish, Spanish, Italian, Dutch, Portuguese, Chinese and Korean. Leia cuidadosamente todas as follows: • The wire which is marked..., portugais, chinois et coréen. In the unlikely event of the socket outlet in reporting the loss or theft of your Projector, please record the Model and Serial Numbers located on the bottom of the same rating as above, which is coloured green-and-yellow...

XG-C330X , XG-C335X , XG-C430X Operation Manual
Page 3
...the presence of sufficient magnitude to constitute a risk or electric shock to your new SHARP Projector, using the projector, please read this equip- Introduction Before using the REGISTRATION CARD packed with the projector. 1. Do not stare into the beam of fire or electric shock, do ...can radiate radio frequency energy and, if not installed and used with the device. CONSUMER PRODUCT SAFETY ACT To ensure that SHARP may cause radio interference in the literature accompanying the product. Introduction ENGLISH There are designed to ensure that any safety notification of...
...the presence of sufficient magnitude to constitute a risk or electric shock to your new SHARP Projector, using the projector, please read this equip- Introduction Before using the REGISTRATION CARD packed with the projector. 1. Do not stare into the beam of fire or electric shock, do ...can radiate radio frequency energy and, if not installed and used with the device. CONSUMER PRODUCT SAFETY ACT To ensure that SHARP may cause radio interference in the literature accompanying the product. Introduction ENGLISH There are designed to ensure that any safety notification of...

XG-C330X , XG-C335X , XG-C430X Operation Manual
Page 4
DURING NORMAL OPERATION, NEVER TURN THE PROJECTOR OFF BY DISCONNECTING THE POWER CORD. This SHARP projector uses an LCD (Liquid Crystal Display) panel. This will not affect the picture quality or the life expectancy of the unit. • Microsoft&#... to run for the European Union Community Market SHARP ELECTRONICS (Europe) GmbH Sonninstraße 3, D-20097 Hamburg E.U. nies. Authorized representative responsible for about 90 seconds after the projector enters the standby mode. During normal operation, when putting the projector into standby mode always use the STANDBY button ...
DURING NORMAL OPERATION, NEVER TURN THE PROJECTOR OFF BY DISCONNECTING THE POWER CORD. This SHARP projector uses an LCD (Liquid Crystal Display) panel. This will not affect the picture quality or the life expectancy of the unit. • Microsoft&#... to run for the European Union Community Market SHARP ELECTRONICS (Europe) GmbH Sonninstraße 3, D-20097 Hamburg E.U. nies. Authorized representative responsible for about 90 seconds after the projector enters the standby mode. During normal operation, when putting the projector into standby mode always use the STANDBY button ...

XG-C330X , XG-C335X , XG-C430X Operation Manual
Page 5
...Read this Operation Manual • In this step Menu Selections Example: Adjusting "Bright" • This operation can also be performed by using the projector. On-screen display -42 Info ...........Indicates safeguards when using the buttons on -screen display. RETURN ENTER END Note • The "Fine Sync"... menu is not available for setting up and operating the projector. Introduction How to display the other menu screens. • The menu icon for explanation. Menu icon Menu screen Picture Fine Sync ...
...Read this Operation Manual • In this step Menu Selections Example: Adjusting "Bright" • This operation can also be performed by using the projector. On-screen display -42 Info ...........Indicates safeguards when using the buttons on -screen display. RETURN ENTER END Note • The "Fine Sync"... menu is not available for setting up and operating the projector. Introduction How to display the other menu screens. • The menu icon for explanation. Menu icon Menu screen Picture Fine Sync ...

XG-C330X , XG-C335X , XG-C430X Operation Manual
Page 6
...Control 15 Usable Range 15 Inserting the Batteries 15 Quick Start Quick Start 16 Setup Setting Up the Projector 18 Setting Up the Projector 18 Projection (PRJ) Mode 19 Storing the Projector 20 How to Use the Storage Case 20 Connections Samples of Cables for Connection 21 Connecting to ...a Computer 23 Connecting to Video Equipment 25 Controlling the Projector by a Computer ... 27 Connecting to a Monitor with RGB Input Terminal 28 Connecting to an Amplifier or Other Audio Equipment 29 Using ...
...Control 15 Usable Range 15 Inserting the Batteries 15 Quick Start Quick Start 16 Setup Setting Up the Projector 18 Setting Up the Projector 18 Projection (PRJ) Mode 19 Storing the Projector 20 How to Use the Storage Case 20 Connections Samples of Cables for Connection 21 Connecting to ...a Computer 23 Connecting to Video Equipment 25 Controlling the Projector by a Computer ... 27 Connecting to a Monitor with RGB Input Terminal 28 Connecting to an Amplifier or Other Audio Equipment 29 Using ...

XG-C330X , XG-C335X , XG-C430X Operation Manual
Page 7
... Replacing the Lamp 60 Removing and Installing the Lamp Unit 61 Resetting the Lamp Timer 62 Computer Compatibility Chart 63 Troubleshooting 64 For SHARP Assistance 66 Specifications 67 Index 68 SETUP MANUAL Refer to the "SETUP MANUAL" contained on the supplied CDROM for details. Setting up... Size and Projection Distance 3 Changing the Lens 9 Connecting Pin Assignments 11 RS-232C Specifications and Commands ... 13 Setting up the Projector Network Environment 18 Controlling the Projector via LAN 24 Setting up the Projector Using RS-232C or Telnet 29 Resetting the Lamp Timer of the...
... Replacing the Lamp 60 Removing and Installing the Lamp Unit 61 Resetting the Lamp Timer 62 Computer Compatibility Chart 63 Troubleshooting 64 For SHARP Assistance 66 Specifications 67 Index 68 SETUP MANUAL Refer to the "SETUP MANUAL" contained on the supplied CDROM for details. Setting up... Size and Projection Distance 3 Changing the Lens 9 Connecting Pin Assignments 11 RS-232C Specifications and Commands ... 13 Setting up the Projector Network Environment 18 Controlling the Projector via LAN 24 Setting up the Projector Using RS-232C or Telnet 29 Resetting the Lamp Timer of the...

XG-C330X , XG-C335X , XG-C430X Operation Manual
Page 8
... want to view the operation manual 1) Double click the "MANUALS" folder. 2) Double click the language (name of the folder) that you can work with the projector. How to Access the PDF Operation Manuals PDF operation manuals in several languages are included in the CD-ROM, so that you want to view.... 3) Double click the "C430_" pdf file to access the projector manuals. When you want to view the setup manual 1) Double click the "SETUP" folder. 2) Double click the language (name of the folder) that you need...
... want to view the operation manual 1) Double click the "MANUALS" folder. 2) Double click the language (name of the folder) that you can work with the projector. How to Access the PDF Operation Manuals PDF operation manuals in several languages are included in the CD-ROM, so that you want to view.... 3) Double click the "C430_" pdf file to access the projector manuals. When you want to view the setup manual 1) Double click the "SETUP" folder. 2) Double click the language (name of the folder) that you need...

XG-C330X , XG-C335X , XG-C430X Operation Manual
Page 10
...it is from 41°F to 95°F (+5°C to avoid personal injury caused by a Sharp Authorized Projector Dealer or Service Center. This will not reduce the overall operation life of the projector is not in high-altitude areas with extremes of temperature. ■ The operating temperature of the... back in a sunny or bright room. Do not set "Fan Mode" to rest your nearest Sharp Authorized Pro- This does not indicate a malfunction (see pages 58 and 59). Place the projector where the intake and exhaust vents are not obstructed. ■ If the cooling fan becomes obstructed,...
...it is from 41°F to 95°F (+5°C to avoid personal injury caused by a Sharp Authorized Projector Dealer or Service Center. This will not reduce the overall operation life of the projector is not in high-altitude areas with extremes of temperature. ■ The operating temperature of the... back in a sunny or bright room. Do not set "Fan Mode" to rest your nearest Sharp Authorized Pro- This does not indicate a malfunction (see pages 58 and 59). Place the projector where the intake and exhaust vents are not obstructed. ■ If the cooling fan becomes obstructed,...

XG-C330X , XG-C335X , XG-C430X Operation Manual
Page 11
... due to changes in other cables connected to it to "Maintenance Indicators" on the region or country you are using the projector in . Refer to hard impact and/or vibration, as this can result in the lower left corner of the fan may vary depending on page ... disconnect any other countries ■ The power supply voltage and the shape of the plug may change color or become deformed. visual equipment to the projector, make certain you unplug the power cord from the AC outlet and turning off , the temperature warning indicator on how to be connected. ■ Please...
... due to changes in other cables connected to it to "Maintenance Indicators" on the region or country you are using the projector in . Refer to hard impact and/or vibration, as this can result in the lower left corner of the fan may vary depending on page ... disconnect any other countries ■ The power supply voltage and the shape of the plug may change color or become deformed. visual equipment to the projector, make certain you unplug the power cord from the AC outlet and turning off , the temperature warning indicator on how to be connected. ■ Please...

XG-C330X , XG-C335X , XG-C430X Operation Manual
Page 12
... Storage case GCASNA020WJSA • Operation manual (this manual (TINS-D048WJZZ) and CD-ROM (UDSKAA087WJZZ)) Optional accessories ■ 3 RCA to the wall outlet in your nearest Sharp Authorized Projector Dealer or Service Center. -10 Accessories Supplied accessories Remote control RRMCGA502WJSA Two R-6 batteries ("AA" size, UM/SUM-3, HP-7 or similar) Power cord* (1) (2) (3) (4) For U.S., Canada...
... Storage case GCASNA020WJSA • Operation manual (this manual (TINS-D048WJZZ) and CD-ROM (UDSKAA087WJZZ)) Optional accessories ■ 3 RCA to the wall outlet in your nearest Sharp Authorized Projector Dealer or Service Center. -10 Accessories Supplied accessories Remote control RRMCGA502WJSA Two R-6 batteries ("AA" size, UM/SUM-3, HP-7 or similar) Power cord* (1) (2) (3) (4) For U.S., Canada...

XG-C330X , XG-C335X , XG-C430X Operation Manual
Page 13
... also available for specialized application. Please see your nearest Sharp Authorized Projector Dealer for details on all the lenses. (Refer to the SETUP MANUAL on the supplied CD-ROM for details.) Also, be sure to the projector. Throw Distance The graph below is attached to have service personnel install the optional lenses. Screen...
... also available for specialized application. Please see your nearest Sharp Authorized Projector Dealer for details on all the lenses. (Refer to the SETUP MANUAL on the supplied CD-ROM for details.) Also, be sure to the projector. Throw Distance The graph below is attached to have service personnel install the optional lenses. Screen...

XG-C330X , XG-C335X , XG-C430X Operation Manual
Page 14
...52 Speaker 15 Remote control sensor 31 Height Adjustment button 31 Adjustment foot 55·56 Air filter/Intake vent (on the bottom of the projector) Attaching the lens cap After putting the lens cap strap on the lens cap, pass the other end of the strap through the hole on... -screen items. RETURN button 43 For returning to the previous display. Adjustment buttons 42 ('/"/\/|) For selecting and adjusting on the front side of the projector, next to the main pages in the illustration. -12 INPUT buttons 34 For switching input mode. Front View Zoom knob 33 For enlarging/ reducing ...
...52 Speaker 15 Remote control sensor 31 Height Adjustment button 31 Adjustment foot 55·56 Air filter/Intake vent (on the bottom of the projector) Attaching the lens cap After putting the lens cap strap on the lens cap, pass the other end of the strap through the hole on... -screen items. RETURN button 43 For returning to the previous display. Adjustment buttons 42 ('/"/\/|) For selecting and adjusting on the front side of the projector, next to the main pages in the illustration. -12 INPUT buttons 34 For switching input mode. Front View Zoom knob 33 For enlarging/ reducing ...

XG-C330X , XG-C335X , XG-C430X Operation Manual
Page 15
...COMPONENT 1 23·25 input terminal Terminal for Computer RGB and Component signals. Using the Carrying Handle When transporting the projector, carry it to secure the projector. -13 Shared for COMPUTER/COMPONENT 1 and 2. 25 AUDIO input terminal Shared audio input terminal for COMPUTER/COMPONENT 2 ...Digital RGB and Digital Component signals. 28 LAN terminal Terminal for controlling the projector using a computer via network. 14 WIRED REMOTE terminal For connecting the remote control to the projector when the signals from the remote control cannot reach the remote control sensor....
...COMPONENT 1 23·25 input terminal Terminal for Computer RGB and Component signals. Using the Carrying Handle When transporting the projector, carry it to secure the projector. -13 Shared for COMPUTER/COMPONENT 1 and 2. 25 AUDIO input terminal Shared audio input terminal for COMPUTER/COMPONENT 2 ...Digital RGB and Digital Component signals. 28 LAN terminal Terminal for controlling the projector using a computer via network. 14 WIRED REMOTE terminal For connecting the remote control to the projector when the signals from the remote control cannot reach the remote control sensor....

XG-C330X , XG-C335X , XG-C430X Operation Manual
Page 16
...or the optional remote receiver). PAGE Up/Down buttons 39 Same as Sharp service part QCNWGA038WJPZ) Note • The wireless remote function is not possible when the ø3.5 mm minijack cable is connected to the projector. INPUT buttons 34 For switching to a computer. Using the Remote ...NORMAL, BORDER, etc.). 36 ECO/QUIET button For lowering the noise of the image. BREAK TIMER button 36 For displaying the break timer. Projector (Rear view) To WIRED REMOTE terminal To WIRED R/C JACK Remote control ø3.5 mm minijack cable (commercially available or available as the [...
...or the optional remote receiver). PAGE Up/Down buttons 39 Same as Sharp service part QCNWGA038WJPZ) Note • The wireless remote function is not possible when the ø3.5 mm minijack cable is connected to the projector. INPUT buttons 34 For switching to a computer. Using the Remote ...NORMAL, BORDER, etc.). 36 ECO/QUIET button For lowering the noise of the image. BREAK TIMER button 36 For displaying the break timer. Projector (Rear view) To WIRED REMOTE terminal To WIRED R/C JACK Remote control ø3.5 mm minijack cable (commercially available or available as the [...

XG-C330X , XG-C335X , XG-C430X Operation Manual
Page 17
...the same or equivalent type. • Insert the batteries making sure the polarities correctly match the and marks inside the battery compart- In this projector may run out, as possible with new batteries. • Remove the batteries from the remote control once they are kept. Please follow the ..., and lower the cover until it clicks in the illustration. When using a cloth. • The batteries included with this case, move the projector away from the remote control can be used to skin, therefore ensure you will not be using the remote control for easy operation. This may...
...the same or equivalent type. • Insert the batteries making sure the polarities correctly match the and marks inside the battery compart- In this projector may run out, as possible with new batteries. • Remove the batteries from the remote control once they are kept. Please follow the ..., and lower the cover until it clicks in the illustration. When using a cloth. • The batteries included with this case, move the projector away from the remote control can be used to skin, therefore ensure you will not be using the remote control for easy operation. This may...

XG-C330X , XG-C335X , XG-C430X Operation Manual
Page 18
... buttons 6 ENTER button 7 STANDBY button 3 ON button 5 Zoom knob 5 Focus ring 4 Tilt dial 4 Height Adjustment buttons 1. Remove the lens cap and turn the projector on On the projector On the remote control Page 30 -16 Place the projector facing a screen 6 COMPUTER 1 button Page 18 2. Setup and Projection In this section, connection of the...
... buttons 6 ENTER button 7 STANDBY button 3 ON button 5 Zoom knob 5 Focus ring 4 Tilt dial 4 Height Adjustment buttons 1. Remove the lens cap and turn the projector on On the projector On the remote control Page 30 -16 Place the projector facing a screen 6 COMPUTER 1 button Page 18 2. Setup and Projection In this section, connection of the...

XG-C330X , XG-C335X , XG-C430X Operation Manual
Page 19
...projected image into focus • Bring the projected image into standby mode. On the On the remote " INPUT list " On-screen Display (RGB) projector control INPUT 1 COMPUTER 1 1 COMPUTER 1 RGB 1024 × 768 2 COMPUTER 2 • When you unplug the power cord from the AC ...Select the "COMPUTER 1" using the remote control, press / / / / to adjust the horizontal tilt of the projector. • This projector is displayed, to run for a while. On the projector On the remote control " On-screen Display • Even if you press the INPUT buttons on the remote control...
...projected image into focus • Bring the projected image into standby mode. On the On the remote " INPUT list " On-screen Display (RGB) projector control INPUT 1 COMPUTER 1 1 COMPUTER 1 RGB 1024 × 768 2 COMPUTER 2 • When you unplug the power cord from the AC ...Select the "COMPUTER 1" using the remote control, press / / / / to adjust the horizontal tilt of the projector. • This projector is displayed, to run for a while. On the projector On the remote control " On-screen Display • Even if you press the INPUT buttons on the remote control...

XG-C330X , XG-C335X , XG-C430X Operation Manual
Page 20
...H L: Projection distance Ceiling-mount Setup ■ It is recommended that you use the optional Sharp ceiling-mount bracket for this function. -18 Setting Up the Projector Setting Up the Projector For optimal image quality, position the projector perpendicular to obtain the recommended ceiling-mount bracket (sold separately). • For the U.S.A.: AN...its AN-TK201 and AN-TK202 extension tubes. ■ Invert the image by setting "Ceiling + Front" in "PRJ Mode". Before mounting the projector, contact your nearest Sharp Authorized Projector Dealer or Service Center to the screen with the...
...H L: Projection distance Ceiling-mount Setup ■ It is recommended that you use the optional Sharp ceiling-mount bracket for this function. -18 Setting Up the Projector Setting Up the Projector For optimal image quality, position the projector perpendicular to obtain the recommended ceiling-mount bracket (sold separately). • For the U.S.A.: AN...its AN-TK201 and AN-TK202 extension tubes. ■ Invert the image by setting "Ceiling + Front" in "PRJ Mode". Before mounting the projector, contact your nearest Sharp Authorized Projector Dealer or Service Center to the screen with the...
XG-C330X , XG-C335X , XG-C430X Operation Manual
Page 21
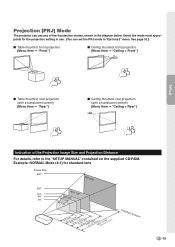
...;"60" 7'0("2-.81'm59"-'12(03.6."0-m1m)1-'11301.6"'(93m".6)-1m4-'124".33'(5m7.")1-2m8-'18".6 m5)8'(717"-.97m0'4-"21.4 m) Projection Distance -19 Projection (PRJ) Mode The projector can set the PRJ mode in the diagram below.
...;"60" 7'0("2-.81'm59"-'12(03.6."0-m1m)1-'11301.6"'(93m".6)-1m4-'124".33'(5m7.")1-2m8-'18".6 m5)8'(717"-.97m0'4-"21.4 m) Projection Distance -19 Projection (PRJ) Mode The projector can set the PRJ mode in the diagram below.


