

XG-C330X , XG-C335X , XG-C430X Operation Manual
Page 3
..." within a triangle is intended to alert the user to the presence of the parts, service and labor warranty applicable to your new SHARP Projector, using the projector, please read this product may cause radio interference in which case the user will promptly receive any unauthorized changes or modifications to this equipment... be used in a commercial environment. Introduction ENGLISH There are designed to ensure that any safety notification of light. NO USER-SERVICEABLE PARTS EXCEPT LAMP UNIT. U.S.A. In a domestic environment this operation manual carefully.
..." within a triangle is intended to alert the user to the presence of the parts, service and labor warranty applicable to your new SHARP Projector, using the projector, please read this product may cause radio interference in which case the user will promptly receive any unauthorized changes or modifications to this equipment... be used in a commercial environment. Introduction ENGLISH There are designed to ensure that any safety notification of light. NO USER-SERVICEABLE PARTS EXCEPT LAMP UNIT. U.S.A. In a domestic environment this operation manual carefully.

XG-C330X , XG-C335X , XG-C430X Operation Manual
Page 4
...trademark of their respective compa- During normal operation, when putting the projector into standby mode always use the STANDBY button on the projector or on the picture screen. This SHARP projector uses an LCD (Liquid Crystal Display) panel. As with any high technology electronic .... FAILURE TO OBSERVE THIS WILL RESULT IN PREMATURE LAMP FAILURE. DURING NORMAL OPERATION, NEVER TURN THE PROJECTOR OFF BY DISCONNECTING THE POWER CORD. PRODUCT DISPOSAL This projector utilizes tin-lead solder, and a pressurized lamp containing a small amount of America, the Electronic Industries...
...trademark of their respective compa- During normal operation, when putting the projector into standby mode always use the STANDBY button on the projector or on the picture screen. This SHARP projector uses an LCD (Liquid Crystal Display) panel. As with any high technology electronic .... FAILURE TO OBSERVE THIS WILL RESULT IN PREMATURE LAMP FAILURE. DURING NORMAL OPERATION, NEVER TURN THE PROJECTOR OFF BY DISCONNECTING THE POWER CORD. PRODUCT DISPOSAL This projector utilizes tin-lead solder, and a pressurized lamp containing a small amount of America, the Electronic Industries...

XG-C330X , XG-C335X , XG-C430X Operation Manual
Page 6
...to Use the Storage Case 20 Connections Samples of Cables for Connection 21 Connecting to a Computer 23 Connecting to Video Equipment 25 Controlling the Projector by a Computer ... 27 Connecting to a Monitor with RGB Input Terminal 28 Connecting to an Amplifier or Other Audio Equipment 29 Using Basic...the Computer Image 46 Resolution Setting 46 Auto Sync Adjustment 46 Checking the Input Signal 46 Using the "Options1" Menu 47 Checking the Lamp Life Status 47 Setting the Resize Mode 47 Adjusting the Image Position 47 Keystone Correction 48 Setting On-screen Display 48 Selecting a ...
...to Use the Storage Case 20 Connections Samples of Cables for Connection 21 Connecting to a Computer 23 Connecting to Video Equipment 25 Controlling the Projector by a Computer ... 27 Connecting to a Monitor with RGB Input Terminal 28 Connecting to an Amplifier or Other Audio Equipment 29 Using Basic...the Computer Image 46 Resolution Setting 46 Auto Sync Adjustment 46 Checking the Input Signal 46 Using the "Options1" Menu 47 Checking the Lamp Life Status 47 Setting the Resize Mode 47 Adjusting the Image Position 47 Keystone Correction 48 Setting On-screen Display 48 Selecting a ...

XG-C330X , XG-C335X , XG-C430X Operation Manual
Page 7
...RS-232C Specifications and Commands ... 13 Setting up the Projector Network Environment 18 Controlling the Projector via LAN 24 Setting up the Projector Using RS-232C or Telnet 29 Resetting the Lamp Timer of the Projector via LAN 39 Troubleshooting 41 Dimensions 44 -5 Introduction Reference... 56 Maintenance Indicators 58 Regarding the Lamp 60 Lamp 60 Caution Concerning the Lamp 60 Replacing the Lamp 60 Removing and Installing the Lamp Unit 61 Resetting the Lamp Timer 62 Computer Compatibility Chart 63 Troubleshooting 64 For SHARP Assistance 66 Specifications 67 Index 68 ...
...RS-232C Specifications and Commands ... 13 Setting up the Projector Network Environment 18 Controlling the Projector via LAN 24 Setting up the Projector Using RS-232C or Telnet 29 Resetting the Lamp Timer of the Projector via LAN 39 Troubleshooting 41 Dimensions 44 -5 Introduction Reference... 56 Maintenance Indicators 58 Regarding the Lamp 60 Lamp 60 Caution Concerning the Lamp 60 Replacing the Lamp 60 Removing and Installing the Lamp Unit 61 Resetting the Lamp Timer 62 Computer Compatibility Chart 63 Troubleshooting 64 For SHARP Assistance 66 Specifications 67 Index 68 ...

XG-C330X , XG-C335X , XG-C430X Operation Manual
Page 10
... the power cord back in and turn on page 60. tion, make certain it is carefully secured to rest your nearest Sharp Authorized Pro- Remove the projector power cord from -4°F to 140°F (-20°C to direct sunlight or bright light. ■ Position the ...If the cooling fan becomes obstructed, a protection circuit will cause eye strain. ticles if lamp ruptures. ter for long hours will automatically put the projector into standby mode to maintain high image quality, SHARP recommends that this can affect the longevity of approximately 1,500 meters (4,900 feet) or more...
... the power cord back in and turn on page 60. tion, make certain it is carefully secured to rest your nearest Sharp Authorized Pro- Remove the projector power cord from -4°F to 140°F (-20°C to direct sunlight or bright light. ■ Position the ...If the cooling fan becomes obstructed, a protection circuit will cause eye strain. ticles if lamp ruptures. ter for long hours will automatically put the projector into standby mode to maintain high image quality, SHARP recommends that this can affect the longevity of approximately 1,500 meters (4,900 feet) or more...

XG-C330X , XG-C335X , XG-C430X Operation Manual
Page 11
...This does not indicate malfunction. • Even if you unplug the power cord after a 90-second cool- When you place the projector into the storage case, make the connections. Take extra care with the lens. Info • The cooling fan regulates the internal temperature... is automatically controlled. If the temperature continues to rise, the lamp will turn off, the temperature warning indicator on the projector will illumi- Introduction Caution regarding usage of the projector ■ When using the projector overseas, make certain you unplug the power cord from the AC...
...This does not indicate malfunction. • Even if you unplug the power cord after a 90-second cool- When you place the projector into the storage case, make the connections. Take extra care with the lens. Info • The cooling fan regulates the internal temperature... is automatically controlled. If the temperature continues to rise, the lamp will turn off, the temperature warning indicator on the projector will illumi- Introduction Caution regarding usage of the projector ■ When using the projector overseas, make certain you unplug the power cord from the AC...

XG-C330X , XG-C335X , XG-C430X Operation Manual
Page 12
...; Operation manual (this manual (TINS-D048WJZZ) and CD-ROM (UDSKAA087WJZZ)) Optional accessories ■ 3 RCA to the wall outlet in your nearest Sharp Authorized Projector Dealer or Service Center. -10 Accessories Supplied accessories Remote control RRMCGA502WJSA Two R-6 batteries ("AA" size, UM/SUM-3, HP-7 or similar) Power... (6' (1.8 m)) QACCBA036WJPZ * Use the power cord that corresponds to 15-pin D-sub cable (10' (3.0 m)) ■ Remote receiver ■ Lamp unit AN-C3CP2 AN-MR2 AN-C430LP Note • Some of the optional accessories may not be available depending on the region.
...; Operation manual (this manual (TINS-D048WJZZ) and CD-ROM (UDSKAA087WJZZ)) Optional accessories ■ 3 RCA to the wall outlet in your nearest Sharp Authorized Projector Dealer or Service Center. -10 Accessories Supplied accessories Remote control RRMCGA502WJSA Two R-6 batteries ("AA" size, UM/SUM-3, HP-7 or similar) Power... (6' (1.8 m)) QACCBA036WJPZ * Use the power cord that corresponds to 15-pin D-sub cable (10' (3.0 m)) ■ Remote receiver ■ Lamp unit AN-C3CP2 AN-MR2 AN-C430LP Note • Some of the optional accessories may not be available depending on the region.

XG-C330X , XG-C335X , XG-C430X Operation Manual
Page 14
...Adjustment foot 31 Push both sides of the lens cap to attach or remove. 30·58 Lamp indicator 58 Temperature warning indicator 46 AUTO SYNC button For automatically adjusting images when connected to a computer...setting screens. 36 ECO/QUIET button For lowering the noise of the cooling fan and extending the lamp life. 33 Focus ring For adjusting the focus. 52 Speaker 15 Remote control sensor 31 Height ...Adjustment button 31 Adjustment foot 55·56 Air filter/Intake vent (on the bottom of the projector) Attaching the lens cap After putting the lens cap strap on the lens cap, pass the other...
...Adjustment foot 31 Push both sides of the lens cap to attach or remove. 30·58 Lamp indicator 58 Temperature warning indicator 46 AUTO SYNC button For automatically adjusting images when connected to a computer...setting screens. 36 ECO/QUIET button For lowering the noise of the cooling fan and extending the lamp life. 33 Focus ring For adjusting the focus. 52 Speaker 15 Remote control sensor 31 Height ...Adjustment button 31 Adjustment foot 55·56 Air filter/Intake vent (on the bottom of the projector) Attaching the lens cap After putting the lens cap strap on the lens cap, pass the other...

XG-C330X , XG-C335X , XG-C430X Operation Manual
Page 16
... the menu. ENLARGE (Enlarge/Reduce) 35 buttons For enlarging/reducing part of the projector, use a ø3.5 mm minijack cable to connect the remote control to a computer. PAGE Up/Down buttons 39 Same as Sharp service part QCNWGA038WJPZ) Note • The wireless remote function is not possible when.../QUIET button For lowering the noise of the cooling fan and extending the lamp life. Now you can control the projector with a Signal Cable When the signals from the remote control cannot be disconnected from the projector. -14 Should the wireless remote operation be required, the ø3.5 mm...
... the menu. ENLARGE (Enlarge/Reduce) 35 buttons For enlarging/reducing part of the projector, use a ø3.5 mm minijack cable to connect the remote control to a computer. PAGE Up/Down buttons 39 Same as Sharp service part QCNWGA038WJPZ) Note • The wireless remote function is not possible when.../QUIET button For lowering the noise of the cooling fan and extending the lamp life. Now you can control the projector with a Signal Cable When the signals from the remote control cannot be disconnected from the projector. -14 Should the wireless remote operation be required, the ø3.5 mm...

XG-C330X , XG-C335X , XG-C430X Operation Manual
Page 17
...as leaving them in place. Incorrect use of worn-out batteries. -15 Be sure to leak. • Remove the batteries from the fluorescent lamp. When using the remote control: • Take care not to drop, expose to moisture or high temperature. • The remote control ... polarities correctly match the and marks inside the battery compartment. 3 Insert the lower tab of explosion if battery is harmful to control the projector within the ranges shown in a short period, depending on the screen material. Note • The signal from leaked batteries is incorrectly replaced...
...as leaving them in place. Incorrect use of worn-out batteries. -15 Be sure to leak. • Remove the batteries from the fluorescent lamp. When using the remote control: • Take care not to drop, expose to moisture or high temperature. • The remote control ... polarities correctly match the and marks inside the battery compartment. 3 Insert the lower tab of explosion if battery is harmful to control the projector within the ranges shown in a short period, depending on the screen material. Note • The signal from leaked batteries is incorrectly replaced...

XG-C330X , XG-C335X , XG-C430X Operation Manual
Page 32
... right keycode to start operation. • When System Lock is set to "Enable", the projector will be turned on page 54. Blinking green: The lamp is put the projector into Standby Mode) 1 Press STANDBY/ON on the projector or STANDBY on the remote control, then press that you want to change the on... standby mode. -30 ▼On-screen Display Info • You can unplug the power cord even if the projector is on the projector, a slight flickering of the lamp. dicating the status of the image may take some time to put into the AC outlet. (See page 50.) • English is the ...
... right keycode to start operation. • When System Lock is set to "Enable", the projector will be turned on page 54. Blinking green: The lamp is put the projector into Standby Mode) 1 Press STANDBY/ON on the projector or STANDBY on the remote control, then press that you want to change the on... standby mode. -30 ▼On-screen Display Info • You can unplug the power cord even if the projector is on the projector, a slight flickering of the lamp. dicating the status of the image may take some time to put into the AC outlet. (See page 50.) • English is the ...

XG-C330X , XG-C335X , XG-C430X Operation Manual
Page 38
...mode changes in 1 minute units). 3 Press BREAK TIMER to count down , the power consumption will decrease, and the lamp life will extend. (Projection brightness decreases 20%.) Power consumption Brightness (When using AC 100V) Lamp life On 80% 300 W Approx. 3,000 hours Off 100% 360 W Approx. 2,000 hours Selecting the Picture ... Mode" is displayed on the screen. -36 Switching the Eco/Quiet Mode Press ECO/QUIET on the remote control or ECO/ QUIET on the projector to switch the Eco/Quiet mode between 1 and 60 minutes (in order of the cooling fan will turn down from 5 minutes.
...mode changes in 1 minute units). 3 Press BREAK TIMER to count down , the power consumption will decrease, and the lamp life will extend. (Projection brightness decreases 20%.) Power consumption Brightness (When using AC 100V) Lamp life On 80% 300 W Approx. 3,000 hours Off 100% 360 W Approx. 2,000 hours Selecting the Picture ... Mode" is displayed on the screen. -36 Switching the Eco/Quiet Mode Press ECO/QUIET on the remote control or ECO/ QUIET on the projector to switch the Eco/Quiet mode between 1 and 60 minutes (in order of the cooling fan will turn down from 5 minutes.

XG-C330X , XG-C335X , XG-C430X Operation Manual
Page 43
... 52 Monitor Out Page 52 LAN/RS232C Page 52 RS-232C Page 52 DHCP Client Page 53 TCP/IP Page 53 MAC Address Page 54 Projector Page 54 All Reset Page 54 Sub Menu Old Password New Password Reconfirm On Off FAO VAO Front Ceiling + Front Rear Ceiling + Rear ...set to "Off" *2 Display only English Deutsch Español Nederlands Français Italiano Svenska Português -41 Useful Features "Options1" menu Options1 Lamp Timer (Life) Resize Image Shift 0 Keystone 0 Auto Keystone OSD Display Background Eco/Quiet Mode Auto Power Off System Sound Menu Position System Lock Direct Power...
... 52 Monitor Out Page 52 LAN/RS232C Page 52 RS-232C Page 52 DHCP Client Page 53 TCP/IP Page 53 MAC Address Page 54 Projector Page 54 All Reset Page 54 Sub Menu Old Password New Password Reconfirm On Off FAO VAO Front Ceiling + Front Rear Ceiling + Rear ...set to "Off" *2 Display only English Deutsch Español Nederlands Français Italiano Svenska Português -41 Useful Features "Options1" menu Options1 Lamp Timer (Life) Resize Image Shift 0 Keystone 0 Auto Keystone OSD Display Background Eco/Quiet Mode Auto Power Off System Sound Menu Position System Lock Direct Power...

XG-C330X , XG-C335X , XG-C430X Operation Manual
Page 50
.... (See page 36.) 8 Auto Power Off Function Selectable items Description On The projector automatically enters the standby mode when no input signal is detected for correcting trapezoidal distortion...button Menu operation Page 42 6 Selecting a Startup and Background Image Selectable items Description Logo SHARP default image Blue Blue screen None Black screen 7 Eco/Quiet Mode Setting Selectable items Brightness... Low Power consumption (When using AC 110V) 300 W Off 100% Normal 360 W Lamp life Approx. 3,000 hours Approx. 2,000 hours Note • The Keystone Correction can...
.... (See page 36.) 8 Auto Power Off Function Selectable items Description On The projector automatically enters the standby mode when no input signal is detected for correcting trapezoidal distortion...button Menu operation Page 42 6 Selecting a Startup and Background Image Selectable items Description Logo SHARP default image Blue Blue screen None Black screen 7 Eco/Quiet Mode Setting Selectable items Brightness... Low Power consumption (When using AC 110V) 300 W Off 100% Normal 360 W Lamp life Approx. 3,000 hours Approx. 2,000 hours Note • The Keystone Correction can...

XG-C330X , XG-C335X , XG-C430X Operation Manual
Page 56
... or menu cannot be initialized. • "Fine Sync" menu Resolution • "Options1" menu Lamp Timer (Life) System Lock • "Language" menu -54 SEL./ADJ. Projector The projector name is displayed. Menu operation Page 42 Language English Deutsch Español Nederlands Français ... among 11 languages. Displayed items Description MAC Address The MAC address of the projector is displayed. Helpful Functions Set during Installation ("Options2" menu) q Confirming the Network Information for the Projector You can switch the on how to initialize the settings you to change the...
... or menu cannot be initialized. • "Fine Sync" menu Resolution • "Options1" menu Lamp Timer (Life) System Lock • "Language" menu -54 SEL./ADJ. Projector The projector name is displayed. Menu operation Page 42 Language English Deutsch Español Nederlands Français ... among 11 languages. Displayed items Description MAC Address The MAC address of the projector is displayed. Helpful Functions Set during Installation ("Options2" menu) q Confirming the Network Information for the Projector You can switch the on how to initialize the settings you to change the...

XG-C330X , XG-C335X , XG-C430X Operation Manual
Page 60
... temperature keeps on the screen. When the percentage becomes 0%, it will change to " " (red), the lamp will automatically turn on. -58 After the projector has entered the standby mode, follow the procedures given below. Maintenance Indicators Power indicator Lamp indicator Temperature warning indicator About the temperature warning indicator If the temperature inside the...
... temperature keeps on the screen. When the percentage becomes 0%, it will change to " " (red), the lamp will automatically turn on. -58 After the projector has entered the standby mode, follow the procedures given below. Maintenance Indicators Power indicator Lamp indicator Temperature warning indicator About the temperature warning indicator If the temperature inside the...

XG-C330X , XG-C335X , XG-C430X Operation Manual
Page 61
...• Clean the exhaust and intake vents. (See page 55.) The lamp does not illuminate. • The lamp is shut down or Service Center (see page 8). • Take the projector to your nearest Sharp Authorized Projector Dealer or Service Center (see page 66) for advice. Appendix -59 ...AC outlet and then turn the power on The lamp does (Standby) not illuminate. • Carefully replace the lamp. (See • Remaining lamp life page 61.) becomes 5% or less. • Take the projector to your nearest Sharp Authorized Projector Dealer or Service Center (see page 66) for ...
...• Clean the exhaust and intake vents. (See page 55.) The lamp does not illuminate. • The lamp is shut down or Service Center (see page 8). • Take the projector to your nearest Sharp Authorized Projector Dealer or Service Center (see page 66) for advice. Appendix -59 ...AC outlet and then turn the power on The lamp does (Standby) not illuminate. • Carefully replace the lamp. (See • Remaining lamp life page 61.) becomes 5% or less. • Take the projector to your nearest Sharp Authorized Projector Dealer or Service Center (see page 66) for ...

XG-C330X , XG-C335X , XG-C430X Operation Manual
Page 62
...you wish, you may cause burn or injury. • Wait at your nearest Sharp Authorized Projector Dealer or Service Center. * If the new lamp does not illuminate after replacement, take your projector to the nearest Sharp Authorized Projector Dealer or Service Center for repair. -60 See page 47. ■ Purchase...as soon as : excessive shock, improper cooling, surface scratches or deterioration of the lamp due to a lapse of the lamp unit to the released gas. All service of purchase, nearest Sharp Authorized Projector Dealer or Service Center. The period of time up to note that failure can...
...you wish, you may cause burn or injury. • Wait at your nearest Sharp Authorized Projector Dealer or Service Center. * If the new lamp does not illuminate after replacement, take your projector to the nearest Sharp Authorized Projector Dealer or Service Center for repair. -60 See page 47. ■ Purchase...as soon as : excessive shock, improper cooling, surface scratches or deterioration of the lamp due to a lapse of the lamp unit to the released gas. All service of purchase, nearest Sharp Authorized Projector Dealer or Service Center. The period of time up to note that failure can...
XG-C330X , XG-C335X , XG-C430X Operation Manual
Page 63
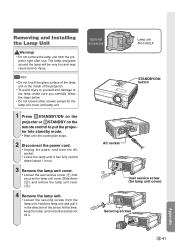
... AN-C430LP STANDBY/ON button AC socket 2 3 1 User service screw (for the lamp unit cover and lamp unit. 1 Press STANDBY/ON on the projector or STANDBY on the remote control to put the projector into standby mode. • Wait until the cooling fan stops. 2 Disconnect the power cord. • Unplug the power cord... hot and may cause burn or injury. Info • Do not touch the glass surface of the lamp unit or the inside of the projector. • To avoid injury to yourself and damage to the lamp, make sure you carefully follow the steps below. • Do not loosen other screws except for...
... AN-C430LP STANDBY/ON button AC socket 2 3 1 User service screw (for the lamp unit cover and lamp unit. 1 Press STANDBY/ON on the projector or STANDBY on the remote control to put the projector into standby mode. • Wait until the cooling fan stops. 2 Disconnect the power cord. • Unplug the power cord... hot and may cause burn or injury. Info • Do not touch the glass surface of the lamp unit or the inside of the projector. • To avoid injury to yourself and damage to the lamp, make sure you carefully follow the steps below. • Do not loosen other screws except for...

XG-C330X , XG-C335X , XG-C430X Operation Manual
Page 64
...slide it to reset the lamp timer only when replacing the lamp. Then tighten the user service screw to secure the lamp unit cover. Regarding the Lamp 5 Insert the new lamp unit. • Press the lamp unit firmly into the AC socket of the projector. 2 Reset the lamp timer. • While ...simultaneously holding down ", ENTER and MENU on the projector, press STANDBY/ON on , ...
...slide it to reset the lamp timer only when replacing the lamp. Then tighten the user service screw to secure the lamp unit cover. Regarding the Lamp 5 Insert the new lamp unit. • Press the lamp unit firmly into the AC socket of the projector. 2 Reset the lamp timer. • While ...simultaneously holding down ", ENTER and MENU on the projector, press STANDBY/ON on , ...


