

XG-MB67X Operation Manual
Page 6
... the STANDBY/ON button on the projector or the STANDBY button on page 55. Caution Concerning Lamp Replacement See "Replacing the Lamp" on the remote control. This SHARP projector uses a DMD panel. The enclosed computer cable must conform to run for about 90 seconds after the projector enters standby mode. DURING NORMAL...
... the STANDBY/ON button on the projector or the STANDBY button on page 55. Caution Concerning Lamp Replacement See "Replacing the Lamp" on the remote control. This SHARP projector uses a DMD panel. The enclosed computer cable must conform to run for about 90 seconds after the projector enters standby mode. DURING NORMAL...
XG-MB67X Operation Manual
Page 8
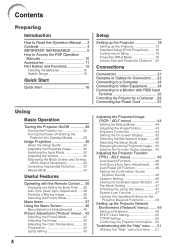
... Projector Network Environment ("Network" menu) ........ 49 Setting a Password 49 DHCP Client Setting 50 TCP/IP Setting 50 Confirming the Projector Information ... 50 Troubleshooting with the Remote Control .... 36 Displaying and Setting the Break Timer .... 36 Auto Sync (Auto Sync Adjustment) ..... 36 Freezing a Moving Image 36 Selecting the Picture Mode 36 Menu...
... Projector Network Environment ("Network" menu) ........ 49 Setting a Password 49 DHCP Client Setting 50 TCP/IP Setting 50 Confirming the Projector Information ... 50 Troubleshooting with the Remote Control .... 36 Displaying and Setting the Break Timer .... 36 Auto Sync (Auto Sync Adjustment) ..... 36 Freezing a Moving Image 36 Selecting the Picture Mode 36 Menu...
XG-MB67X Operation Manual
Page 15
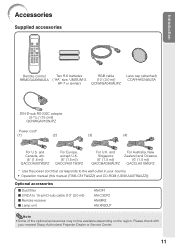
... manual (this manual (TINS-C517WJZZ) and CD-ROM (UDSKAA078WJZZ)) Optional accessories I Dust filter I 3 RCA to the wall outlet in your nearest Sharp Authorized Projector Dealer or Service Center. 11 and Canada, etc. (6' (1.8 m)) QACCDA007WJPZ For Europe, except U.K. (6' (1.8 m)) QACCVA011WJPZ For U.K. and...Australia, New Zealand and Oceania (6' (1.8 m)) QACCLA018WJPZ * Use the power cord that corresponds to 15-pin D-sub cable (10n (3.0 m)) I Remote receiver I Lamp unit AN-DF1 AN-C3CP2 AN-MR2 AN-XR20LP Note • Some of the optional accessories may not be available depending on ...
... manual (this manual (TINS-C517WJZZ) and CD-ROM (UDSKAA078WJZZ)) Optional accessories I Dust filter I 3 RCA to the wall outlet in your nearest Sharp Authorized Projector Dealer or Service Center. 11 and Canada, etc. (6' (1.8 m)) QACCDA007WJPZ For Europe, except U.K. (6' (1.8 m)) QACCVA011WJPZ For U.K. and...Australia, New Zealand and Oceania (6' (1.8 m)) QACCLA018WJPZ * Use the power cord that corresponds to 15-pin D-sub cable (10n (3.0 m)) I Remote receiver I Lamp unit AN-DF1 AN-C3CP2 AN-MR2 AN-XR20LP Note • Some of the optional accessories may not be available depending on ...

XG-MB67X Operation Manual
Page 16
... and setting screens, and help screen. 40 Adjustment buttons (P/R/O/Q) For selecting menu items. 52 Intake vent 30 Zoom ring For enlarging/ reducing the picture. 15 Remote control sensor Push both sides of the lens cap to the main pages in Z refer to attach or remove. Part Names and Functions Numbers in...
... and setting screens, and help screen. 40 Adjustment buttons (P/R/O/Q) For selecting menu items. 52 Intake vent 30 Zoom ring For enlarging/ reducing the picture. 15 Remote control sensor Push both sides of the lens cap to the main pages in Z refer to attach or remove. Part Names and Functions Numbers in...
XG-MB67X Operation Manual
Page 18
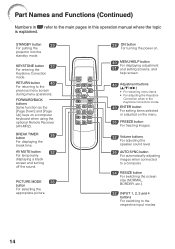
FORWARD/BACK buttons Same function as the [Page Down] and [Page Up] keys on a computer keyboard when using the optional Remote Receiver (AN-MR2). RETURN button 40 For returning to the respective input modes. 14 AV MUTE button 32 For temporarily displaying a black screen and turning ...
FORWARD/BACK buttons Same function as the [Page Down] and [Page Up] keys on a computer keyboard when using the optional Remote Receiver (AN-MR2). RETURN button 40 For returning to the respective input modes. 14 AV MUTE button 32 For temporarily displaying a black screen and turning ...
XG-MB67X Operation Manual
Page 19
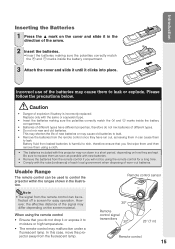
...with new batteries. • Remove the batteries from the fluorescent lamp. However, the effective distance of the signal may cause them using the remote control for easy operation. Introduction Inserting the Batteries 1 Press the P mark on the cover and slide it in the direction of the arrow....and n marks inside the battery compartment. 3 Attach the cover and slide it until it to leak. • Remove the batteries from the remote control once they are kept. Incorrect use of explosion if battery is harmful to leak. Caution • Danger of the batteries may differ ...
...with new batteries. • Remove the batteries from the fluorescent lamp. However, the effective distance of the signal may cause them using the remote control for easy operation. Introduction Inserting the Batteries 1 Press the P mark on the cover and slide it in the direction of the arrow....and n marks inside the battery compartment. 3 Attach the cover and slide it until it to leak. • Remove the batteries from the remote control once they are kept. Incorrect use of explosion if battery is harmful to leak. Caution • Danger of the batteries may differ ...
XG-MB67X Operation Manual
Page 20
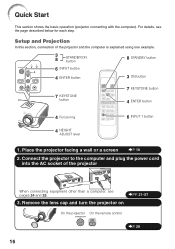
... This section shows the basic operation (projector connecting with the computer). Remove the lens cap and turn the projector on On the projector On the remote control _P. 28 16 Place the projector facing a wall or a screen _P. 18 2. For details, see pages 24 and 25. _PP. 21-27 3. Setup and...
... This section shows the basic operation (projector connecting with the computer). Remove the lens cap and turn the projector on On the projector On the remote control _P. 28 16 Place the projector facing a wall or a screen _P. 18 2. For details, see pages 24 and 25. _PP. 21-27 3. Setup and...
XG-MB67X Operation Manual
Page 21
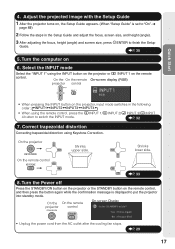
... screen size, press TENTER to switch the INPUT mode. _P. 32 7. Adjust the projected image with the Setup Guide 1 After the projector turns on the remote control, and then press the button again while the confirmation message is set to put the projector into standby mode. On the... the STANDBY button on , the Setup Guide appears. (When "Setup Guide" is displayed to "On". On the projector Shrinks upper side. On the On the remote projector control On-screen Display • Unplug the power cord from the AC outlet after the cooling fan stops. _P. 29 17 Shrinks lower side...
... screen size, press TENTER to switch the INPUT mode. _P. 32 7. Adjust the projected image with the Setup Guide 1 After the projector turns on the remote control, and then press the button again while the confirmation message is set to put the projector into standby mode. On the... the STANDBY button on , the Setup Guide appears. (When "Setup Guide" is displayed to "On". On the projector Shrinks upper side. On the On the remote projector control On-screen Display • Unplug the power cord from the AC outlet after the cooling fan stops. _P. 29 17 Shrinks lower side...

XG-MB67X Operation Manual
Page 32
... performing the operations written below. (See pages 23 to 27.) Remove the lens cap and press S STANDBY/ON on the projector or fON on the remote control. • When System Lock is put into standby mode and immediately turned on again, the lamp may be experienced within the first minute after...
... performing the operations written below. (See pages 23 to 27.) Remove the lens cap and press S STANDBY/ON on the projector or fON on the remote control. • When System Lock is put into standby mode and immediately turned on again, the lamp may be experienced within the first minute after...

XG-MB67X Operation Manual
Page 33
Turning the Power off (Putting the Projector into Standby Mode) 1 Press SSTANDBY/ON on the projector or eSTANDBY on the remote control, then press that button again while the confirmation message is displayed, to put the projector into standby mode. 2 Unplug the power cord from the ...
Turning the Power off (Putting the Projector into Standby Mode) 1 Press SSTANDBY/ON on the projector or eSTANDBY on the remote control, then press that button again while the confirmation message is displayed, to put the projector into standby mode. 2 Unplug the power cord from the ...

XG-MB67X Operation Manual
Page 36
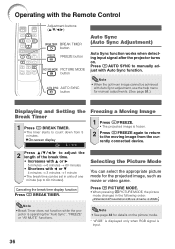
...; When "Auto Search" is connected to external equipment, set to adjust the volume. PressC INPUT 1, C INPUT 2, DINPUT 3 or EINPUT 4 on the remote control to select the input mode. • When pressing INPUT (P/R) on the projector, input mode switches in "PRJ-ADJ" menu to "Off". (See page... equipment. Note • Pressing K/-O will lower the volume. • Pressing L/Q+ will turn off the Sound Temporarily Press MAV MUTE on the remote control to temporarily display a black screen and turn the projected image back on the projector to "On", INPUT (P/ R) on the projector functions ...
...; When "Auto Search" is connected to external equipment, set to adjust the volume. PressC INPUT 1, C INPUT 2, DINPUT 3 or EINPUT 4 on the remote control to select the input mode. • When pressing INPUT (P/R) on the projector, input mode switches in "PRJ-ADJ" menu to "Off". (See page... equipment. Note • Pressing K/-O will lower the volume. • Pressing L/Q+ will turn off the Sound Temporarily Press MAV MUTE on the remote control to temporarily display a black screen and turn the projected image back on the projector to "On", INPUT (P/ R) on the projector functions ...
XG-MB67X Operation Manual
Page 40
... Setting the Break Timer 1 Press k BREAK TIMER. • The timer starts to count down from the currently connected device. 2 Press P /R /O /Q to manually adjust with the Remote Control Adjustment buttons (P/R/O/Q) BREAK TIMER button FREEZE button PICTURE MODE button AUTO SYNC button Auto Sync (Auto Sync Adjustment) Auto Sync function works when detecting...
... Setting the Break Timer 1 Press k BREAK TIMER. • The timer starts to count down from the currently connected device. 2 Press P /R /O /Q to manually adjust with the Remote Control Adjustment buttons (P/R/O/Q) BREAK TIMER button FREEZE button PICTURE MODE button AUTO SYNC button Auto Sync (Auto Sync Adjustment) Auto Sync function works when detecting...

XG-MB67X Operation Manual
Page 41
... Game sRGB*1 Contrast -30 +30 Bright -30 +30 Red -30 +30 *1 Blue -30 +30 *1 Color -30 +30 *2 Tint -30 +30 *2*3 Sharp -30 +30 *2 Page 43 CLR Temp Page 43 Bright Boost [0/1/2] Page 43 Progressive Page 43 Lamp Setting Page 43 Reset 5500K 6500K 7500K 8500K 9300K... input signals). Menu Items The following shows the items that can adjust the picture tone with icons ( , , and ) using the respective buttons on the remote control. *1 Items when inputting RGB signal through INPUT 1 or INPUT 2. *2 Items when inputting component signal through INPUT 1 or INPUT 2, or when selecting ...
... Game sRGB*1 Contrast -30 +30 Bright -30 +30 Red -30 +30 *1 Blue -30 +30 *1 Color -30 +30 *2 Tint -30 +30 *2*3 Sharp -30 +30 *2 Page 43 CLR Temp Page 43 Bright Boost [0/1/2] Page 43 Progressive Page 43 Lamp Setting Page 43 Reset 5500K 6500K 7500K 8500K 9300K... input signals). Menu Items The following shows the items that can adjust the picture tone with icons ( , , and ) using the respective buttons on the remote control. *1 Items when inputting RGB signal through INPUT 1 or INPUT 2. *2 Items when inputting component signal through INPUT 1 or INPUT 2, or when selecting ...

XG-MB67X Operation Manual
Page 46
...MODE on an original image, when "sRGB" is an international standard of each item in a natural tint based on the remote control to the projected image. As the fixed color area has been decided by the IEC (International Electrotechnical Commission). You cannot ...Picture Mode CLR Temp Bright Boost Lamp Setting 8500K 1 Bright 8500K 2 Bright 6500K 0 Eco + Quiet 8500K 2 Bright - - Game Gives sharpness to your preference. For additional information about the sRGB function, visit "http://www.srgb.com/". ENTER END Menu operation n Page 40 Q Example:...
...MODE on an original image, when "sRGB" is an international standard of each item in a natural tint based on the remote control to the projected image. As the fixed color area has been decided by the IEC (International Electrotechnical Commission). You cannot ...Picture Mode CLR Temp Bright Boost Lamp Setting 8500K 1 Bright 8500K 2 Bright 6500K 0 Eco + Quiet 8500K 2 Bright - - Game Gives sharpness to your preference. For additional information about the sRGB function, visit "http://www.srgb.com/". ENTER END Menu operation n Page 40 Q Example:...
XG-MB67X Operation Manual
Page 48
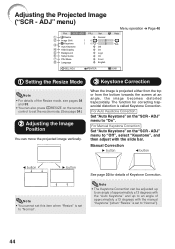
... 1 Setting the Resize Mode Note • For details of the Resize mode, see pages 34 and 35. • You can also press HRESIZE on the remote control to set the resize mode. (See page 34.) 2 Adjusting the Image Position You can be adjusted up to an angle of approximately ±13...
... 1 Setting the Resize Mode Note • For details of the Resize mode, see pages 34 and 35. • You can also press HRESIZE on the remote control to set the resize mode. (See page 34.) 2 Adjusting the Image Position You can be adjusted up to an angle of approximately ±13...

XG-MB67X Operation Manual
Page 50
... On Off Description A confirmation sound is set to "On" • If two or more than the input mode selected by pressing F AUTO SYNC on the remote control. • The Auto Sync adjustment may take some time to complete, depending on the image of INPUT 1 n INPUT 2 n INPUT 3 n INPUT 4 when ...made when the projector turns on , or when the INPUT button is set to "On", press C INPUT 1,C INPUT 2, D INPUT 3 or EINPUT 4 on the remote control to a computer. jector selects the input source in X min." Note • When the Auto Power Off function is pressed. The audio signal is not...
... On Off Description A confirmation sound is set to "On" • If two or more than the input mode selected by pressing F AUTO SYNC on the remote control. • The Auto Sync adjustment may take some time to complete, depending on the image of INPUT 1 n INPUT 2 n INPUT 3 n INPUT 4 when ...made when the projector turns on , or when the INPUT button is set to "On", press C INPUT 1,C INPUT 2, D INPUT 3 or EINPUT 4 on the remote control to a computer. jector selects the input source in X min." Note • When the Auto Power Off function is pressed. The audio signal is not...

XG-MB67X Operation Manual
Page 51
... a charge. ADJ Setting the System Lock Old Code New Code Reconfirm Note • If you lose or forget your keycode, contact your nearest Sharp Authorized Projector Dealer or Service Center (see page 61). Menu operation n Page 40 6 Selecting the Transmission Speed (RS-232C) Make sure that ... condition. 1 Select "System Lock", then press hENTER or Q. • The screen for entering the keycode appears. 2 Press the 4 buttons on the remote control or on the projector to enter the preset keycode in a safe place where only authorized users have access. Even if the product warranty is...
... a charge. ADJ Setting the System Lock Old Code New Code Reconfirm Note • If you lose or forget your keycode, contact your nearest Sharp Authorized Projector Dealer or Service Center (see page 61). Menu operation n Page 40 6 Selecting the Transmission Speed (RS-232C) Make sure that ... condition. 1 Select "System Lock", then press hENTER or Q. • The screen for entering the keycode appears. 2 Press the 4 buttons on the remote control or on the projector to enter the preset keycode in a safe place where only authorized users have access. Even if the product warranty is...

XG-MB67X Operation Manual
Page 52
...about 5 seconds. Input screen for about 5 seconds. PRJ - ROn-screen Display • The keylock function does not affect the operation with the remote control. When the System Lock is set • When System Lock is set • Press R on . ROn-screen Display • When...Lock Old Code New Code Reconfirm **** ---- ---- 4 Enter the same keycode in setting your keycode, the keycode cannot be canceled with the remote control buttons. • You cannot use the following buttons for about 5 seconds while the projector is turned on the projector as an ...
...about 5 seconds. Input screen for about 5 seconds. PRJ - ROn-screen Display • The keylock function does not affect the operation with the remote control. When the System Lock is set • When System Lock is set • Press R on . ROn-screen Display • When...Lock Old Code New Code Reconfirm **** ---- ---- 4 Enter the same keycode in setting your keycode, the keycode cannot be canceled with the remote control buttons. • You cannot use the following buttons for about 5 seconds while the projector is turned on the projector as an ...
XG-MB67X Operation Manual
Page 53
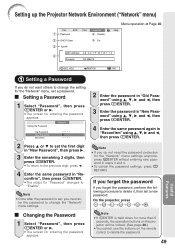
...; You cannot use the buttons on the remote control to "Enable". Note • If TENTER is set a password. Setting up the Projector Network Environment ("Network" menu) Menu operation n Page 40 Pict. SCR PRJ Password Network Disable Help DHCP Client On TCP/IP MAC Address 0 8 : 0 0 : 1 F : B 1 : B 7 : 7 4 Projector XG-MB67X SEL./ADJ. Note • Once after...
...; You cannot use the buttons on the remote control to "Enable". Note • If TENTER is set a password. Setting up the Projector Network Environment ("Network" menu) Menu operation n Page 40 Pict. SCR PRJ Password Network Disable Help DHCP Client On TCP/IP MAC Address 0 8 : 0 0 : 1 F : B 1 : B 7 : 7 4 Projector XG-MB67X SEL./ADJ. Note • Once after...
XG-MB67X Operation Manual
Page 56
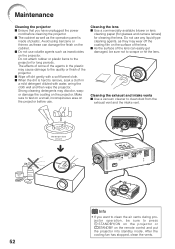
... with water, wring the cloth well and then wipe the projector. I Use a vacuum cleaner to press S STANDBY/ON on the projector or eSTANDBY on the remote control and put the projector into standby mode. Cleaning the lens I As the surface of the lens. Do not attach rubber or plastic items to...
... with water, wring the cloth well and then wipe the projector. I Use a vacuum cleaner to press S STANDBY/ON on the projector or eSTANDBY on the remote control and put the projector into standby mode. Cleaning the lens I As the surface of the lens. Do not attach rubber or plastic items to...


