

XG-MB67X Operation Manual
Page 1
MULTIMEDIA PROJECTOR MODEL XG-MB67X OPERATION MANUAL Introduction Quick Start Setup Connections Basic Operation Useful Features Appendix
MULTIMEDIA PROJECTOR MODEL XG-MB67X OPERATION MANUAL Introduction Quick Start Setup Connections Basic Operation Useful Features Appendix
XG-MB67X Operation Manual
Page 2
... DOUBT, CONSULT A QUALIFIED ELECTRICIAN. ii IMPORTANT • For your assistance in reporting the loss or theft of your Projector, please record the Model and Serial Number located on the bottom of the projector and retain this information. • Before recycling the packaging, please ensure that you have checked the contents of the...
... DOUBT, CONSULT A QUALIFIED ELECTRICIAN. ii IMPORTANT • For your assistance in reporting the loss or theft of your Projector, please record the Model and Serial Number located on the bottom of the projector and retain this information. • Before recycling the packaging, please ensure that you have checked the contents of the...
XG-MB67X Operation Manual
Page 5
...Safety Act, PLEASE READ CAREFULLY THE IMPORTANT "LIMITED WARRANTY" CLAUSE. See bottom of your purchase. 2. The lightning flash with the projector. 1. ONLY INFORMATION This equipment has been tested and found to comply with the operation manual, may be of light, or view...to cause harmful interference, in accordance with the limits for prompt warranty registration of projector. CONSUMER PRODUCT SAFETY ACT To ensure that you will be required to your new SHARP Projector, using the projector, please read this equipment. U.S.A. This equipment generates, uses, and can radiate...
...Safety Act, PLEASE READ CAREFULLY THE IMPORTANT "LIMITED WARRANTY" CLAUSE. See bottom of your purchase. 2. The lightning flash with the projector. 1. ONLY INFORMATION This equipment has been tested and found to comply with the operation manual, may be of light, or view...to cause harmful interference, in accordance with the limits for prompt warranty registration of projector. CONSUMER PRODUCT SAFETY ACT To ensure that you will be required to your new SHARP Projector, using the projector, please read this equipment. U.S.A. This equipment generates, uses, and can radiate...

XG-MB67X Operation Manual
Page 6
... equipment such as large screen TVs, video systems and video cameras, there are located in inactive dots on the remote control. This SHARP projector uses a DMD panel. This unit has some inactive pixels within acceptable tolerances which case the user may be required to run for... THIS WILL RESULT IN PREMATURE LAMP FAILURE. Caution Concerning Lamp Replacement See "Replacing the Lamp" on page 55. In a domestic environment this projector continues to take adequate measures. The cable is a Class A product. Ensure the cooling fan has stopped before disconnecting the power cord. As...
... equipment such as large screen TVs, video systems and video cameras, there are located in inactive dots on the remote control. This SHARP projector uses a DMD panel. This unit has some inactive pixels within acceptable tolerances which case the user may be required to run for... THIS WILL RESULT IN PREMATURE LAMP FAILURE. Caution Concerning Lamp Replacement See "Replacing the Lamp" on page 55. In a domestic environment this projector continues to take adequate measures. The cable is a Class A product. Ensure the cooling fan has stopped before disconnecting the power cord. As...

XG-MB67X Operation Manual
Page 7
...display are simplified for explanation, and may differ slightly from the actual display. Note .........Indicates additional information for setting up and operating the projector. Example: "Picture" screen menu for INPUT 1 (RGB) mode Menu item 2 Press Q or O and select "Picture" to...the menu is displayed. Menu Selections (Adjustments) Example: Adjusting "Bright". • This operation can also be performed by using the projector. Using the Menu Screen ENTER button Adjustment buttons (P/R/O/Q) MENU/HELP button Adjustment buttons (P/R/O/Q) MENU/HELP button ENTER button RETURN button &#...
...display are simplified for explanation, and may differ slightly from the actual display. Note .........Indicates additional information for setting up and operating the projector. Example: "Picture" screen menu for INPUT 1 (RGB) mode Menu item 2 Press Q or O and select "Picture" to...the menu is displayed. Menu Selections (Adjustments) Example: Adjusting "Bright". • This operation can also be performed by using the projector. Using the Menu Screen ENTER button Adjustment buttons (P/R/O/Q) MENU/HELP button Adjustment buttons (P/R/O/Q) MENU/HELP button ENTER button RETURN button &#...
XG-MB67X Operation Manual
Page 8
...the Background Image ........ 45 Selecting the Setup Guide 45 Reversing/Inverting Projected Images ... 45 Selecting the On-screen Display Language ... 45 Adjusting the Projector Function ("PRJ - ADJ" menu 46 Auto Search Function 46 Auto Sync (Auto Sync Adjustment) ..... 46 Auto Power Off Function 46 Setting the ...Checking the Lamp Life Status 47 System Lock Function 47 Locking the Operation Buttons on 28 Turning the Power off (Putting the Projector into Standby Mode 29 Image Projection 30 About the Setup Guide 30 Adjusting the Projected Image 30 Switching the Input Mode 32 Adjusting...
...the Background Image ........ 45 Selecting the Setup Guide 45 Reversing/Inverting Projected Images ... 45 Selecting the On-screen Display Language ... 45 Adjusting the Projector Function ("PRJ - ADJ" menu 46 Auto Search Function 46 Auto Sync (Auto Sync Adjustment) ..... 46 Auto Power Off Function 46 Setting the ...Checking the Lamp Life Status 47 System Lock Function 47 Locking the Operation Buttons on 28 Turning the Power off (Putting the Projector into Standby Mode 29 Image Projection 30 About the Setup Guide 30 Adjusting the Projected Image 30 Switching the Input Mode 32 Adjusting...
XG-MB67X Operation Manual
Page 12
...) of glass par- ticles if lamp ruptures. Caution regarding placing of the projector I For minimal servicing and to hard impact and/or vibration. Caution concerning the setup of temperature. It will return the projector to occasionally rest your nearest Sharp Authorized Projector Dealer or Service Center for long hours will cause eye strain. This...
...) of glass par- ticles if lamp ruptures. Caution regarding placing of the projector I For minimal servicing and to hard impact and/or vibration. Caution concerning the setup of temperature. It will return the projector to occasionally rest your nearest Sharp Authorized Projector Dealer or Service Center for long hours will cause eye strain. This...
XG-MB67X Operation Manual
Page 13
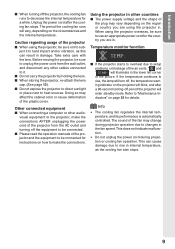
... and the internal temperature. ing indicator on page 53 for the country you are in the fan speed. dicators" on the projector will turn off the projector, the cooling fan runs to setup problems or blockage of the plug may change during projection or cooling fan operation. This does... not indicate malfunction. • Do not unplug the power cord during projector operation due to rise in damage. This can result in internal temperature, as this can cause damage due to changes in . ject it ....
... and the internal temperature. ing indicator on page 53 for the country you are in the fan speed. dicators" on the projector will turn off the projector, the cooling fan runs to setup problems or blockage of the plug may change during projection or cooling fan operation. This does... not indicate malfunction. • Do not unplug the power cord during projector operation due to rise in damage. This can result in internal temperature, as this can cause damage due to changes in . ject it ....
XG-MB67X Operation Manual
Page 14
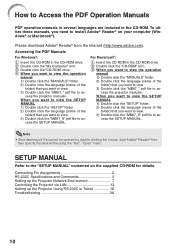
...the supplied CD-ROM for details. Connecting Pin Assignments 2 RS-232C Specifications and Commands 3 Setting up the Projector Network Environment 7 Controlling the Projector via LAN 13 Setting up the Projector Using RS-232C or Telnet 18 Troubleshooting 28 10 When you want to view the SETUP MANUAL 1) Double ..." pdf file to ac- Accessing the PDF Manuals For Windows®: 1 Insert the CD-ROM in the CD-ROM. cess the projector manuals. cess the projector manuals. Note • If the desired pdf file cannot be opened by double clicking the mouse, start Adobe® Reader® ...
...the supplied CD-ROM for details. Connecting Pin Assignments 2 RS-232C Specifications and Commands 3 Setting up the Projector Network Environment 7 Controlling the Projector via LAN 13 Setting up the Projector Using RS-232C or Telnet 18 Troubleshooting 28 10 When you want to view the SETUP MANUAL 1) Double ..." pdf file to ac- Accessing the PDF Manuals For Windows®: 1 Insert the CD-ROM in the CD-ROM. cess the projector manuals. cess the projector manuals. Note • If the desired pdf file cannot be opened by double clicking the mouse, start Adobe® Reader® ...
XG-MB67X Operation Manual
Page 15
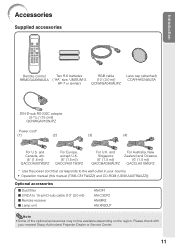
... Oceania (6' (1.8 m)) QACCLA018WJPZ * Use the power cord that corresponds to 15-pin D-sub cable (10n (3.0 m)) I Remote receiver I 3 RCA to the wall outlet in your nearest Sharp Authorized Projector Dealer or Service Center. 11 Please check with your country. • Operation manual (this manual (TINS-C517WJZZ) and CD-ROM (UDSKAA078WJZZ)) Optional accessories I Dust filter...
... Oceania (6' (1.8 m)) QACCLA018WJPZ * Use the power cord that corresponds to 15-pin D-sub cable (10n (3.0 m)) I Remote receiver I 3 RCA to the wall outlet in your nearest Sharp Authorized Projector Dealer or Service Center. 11 Please check with your country. • Operation manual (this manual (TINS-C517WJZZ) and CD-ROM (UDSKAA078WJZZ)) Optional accessories I Dust filter...

XG-MB67X Operation Manual
Page 16
... enlarging/ reducing the picture. 15 Remote control sensor Push both sides of the lens cap to the main pages in Z refer to attach or remove. Projector Top View Power indicator 29, 53 STANDBY/ 28, 29 ON button For turning the power on the menu. ENTER button 40 For setting items selected...
... enlarging/ reducing the picture. 15 Remote control sensor Push both sides of the lens cap to the main pages in Z refer to attach or remove. Projector Top View Power indicator 29, 53 STANDBY/ 28, 29 ON button For turning the power on the menu. ENTER button 40 For setting items selected...

XG-MB67X Operation Manual
Page 17
... 2) INPUT 1 and 23 INPUT 2 terminals Terminals for 24 computer RGB 25 and component signals. 26 RS-232C terminal Terminal for controlling the projector using a computer via network. OUTPUT (INPUT 1, 2) 25 terminal (Shared computer RGB and component signals output terminal for INPUT 1 and 2) Terminal... vent 52 24 AUDIO (INPUT 25 3, 4) terminal (Shared for INPUT 3 and 4) 25 INPUT 4 terminal Terminal for controlling the projector using a computer. 27 LAN terminal Terminal for connecting video equipment. 52 Exhaust vent 46 Speaker Rear adjustment 31 foot Kensington Security 27 ...
... 2) INPUT 1 and 23 INPUT 2 terminals Terminals for 24 computer RGB 25 and component signals. 26 RS-232C terminal Terminal for controlling the projector using a computer via network. OUTPUT (INPUT 1, 2) 25 terminal (Shared computer RGB and component signals output terminal for INPUT 1 and 2) Terminal... vent 52 24 AUDIO (INPUT 25 3, 4) terminal (Shared for INPUT 3 and 4) 25 INPUT 4 terminal Terminal for controlling the projector using a computer. 27 LAN terminal Terminal for connecting video equipment. 52 Exhaust vent 46 Speaker Rear adjustment 31 foot Kensington Security 27 ...
XG-MB67X Operation Manual
Page 18
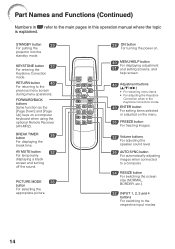
... input modes. 14 Part Names and Functions (Continued) Numbers in Z refer to the previous menu screen during menu operations. STANDBY button 29 For putting the projector into the standby mode. AV MUTE button 32 For temporarily displaying a black screen and turning off the sound. PICTURE MODE 36 button For selecting the...
... input modes. 14 Part Names and Functions (Continued) Numbers in Z refer to the previous menu screen during menu operations. STANDBY button 29 For putting the projector into the standby mode. AV MUTE button 32 For temporarily displaying a black screen and turning off the sound. PICTURE MODE 36 button For selecting the...
XG-MB67X Operation Manual
Page 19
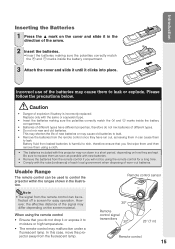
...moisture or high temperature. • The remote control may cause old batteries to leak or explode. Be sure to replace them to control the projector within the ranges shown in the illustration. Remote control sensor 30° Remote control signal transmitters 30° 23n (7 m) Remote control 15 ... signal may differ depending on how they have different properties, therefore do not drop it or expose it clicks into place. In this projector may cause them using the remote control • Ensure that you do not mix batteries of different types have run down in can...
...moisture or high temperature. • The remote control may cause old batteries to leak or explode. Be sure to replace them to control the projector within the ranges shown in the illustration. Remote control sensor 30° Remote control signal transmitters 30° 23n (7 m) Remote control 15 ... signal may differ depending on how they have different properties, therefore do not drop it or expose it clicks into place. In this projector may cause them using the remote control • Ensure that you do not mix batteries of different types have run down in can...
XG-MB67X Operation Manual
Page 20
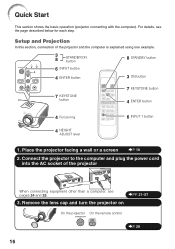
...Start This section shows the basic operation (projector connecting with the computer). For details, see pages 24 and 25. _PP. 21-27 3. Remove the lens cap and turn the projector on On the projector On the remote control _P. 28 16 Connect the projector to the computer and plug the power cord... into the AC socket of the projector and the computer is explained using one example. 3 8 STANDBY/ON button...
...Start This section shows the basic operation (projector connecting with the computer). For details, see pages 24 and 25. _PP. 21-27 3. Remove the lens cap and turn the projector on On the projector On the remote control _P. 28 16 Connect the projector to the computer and plug the power cord... into the AC socket of the projector and the computer is explained using one example. 3 8 STANDBY/ON button...
XG-MB67X Operation Manual
Page 21
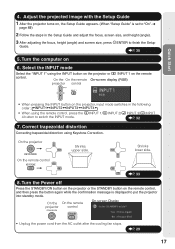
..."INPUT 1" using Keystone Correction. Adjust the projected image with the Setup Guide 1 After the projector turns on the remote control. Correct trapezoidal distortion Correcting trapezoidal distortion using the INPUT button on the projector or C INPUT 1 on , the Setup Guide appears. (When "Setup Guide" is displayed... adjusting the focus, height (angle) and screen size, press TENTER to switch the INPUT mode. _P. 32 7. On the On the remote projector control On-screen Display • Unplug the power cord from the AC outlet after the cooling fan stops. _P. 29 17 n page 45)...
..."INPUT 1" using Keystone Correction. Adjust the projected image with the Setup Guide 1 After the projector turns on the remote control. Correct trapezoidal distortion Correcting trapezoidal distortion using the INPUT button on the projector or C INPUT 1 on , the Setup Guide appears. (When "Setup Guide" is displayed... adjusting the focus, height (angle) and screen size, press TENTER to switch the INPUT mode. _P. 32 7. On the On the remote projector control On-screen Display • Unplug the power cord from the AC outlet after the cooling fan stops. _P. 29 17 n page 45)...

XG-MB67X Operation Manual
Page 22
... Front" in "PRJ Mode". See page 45 for use the optional Sharp ceiling-mount bracket for this function. 18 Setting up the Projector Setting up the Projector For optimal image quality, position the projector perpendicular to page 20 for additional information concerning "Screen Size and Projection ... setup Side View Screen H Lens center L Note • Refer to the screen with the projector's feet flat and level. Before mounting the projector, contact your nearest Sharp Authorized Projector Dealer or Service Center to obtain the recommended ceiling-mount bracket (sold separately). • AN-...
... Front" in "PRJ Mode". See page 45 for use the optional Sharp ceiling-mount bracket for this function. 18 Setting up the Projector Setting up the Projector For optimal image quality, position the projector perpendicular to page 20 for additional information concerning "Screen Size and Projection ... setup Side View Screen H Lens center L Note • Refer to the screen with the projector's feet flat and level. Before mounting the projector, contact your nearest Sharp Authorized Projector Dealer or Service Center to obtain the recommended ceiling-mount bracket (sold separately). • AN-...

XG-MB67X Operation Manual
Page 23
...;"60" 6'1(02."1-7m'1-129".4'7m("2-).191m'1-"3.41m1)'(53."5-1m3-'34".0 m2)2'(17.00"m-2-68'5.1"3m4)'(310"-.43m9'8-"12.1 m) Projection Distance 19 Projection (PRJ) Mode The projector can use . (You can set the PRJ mode in the diagram below. See page 45.) I Table mounted, front projection I Ceiling mounted, front projection Setup Menu...
...;"60" 6'1(02."1-7m'1-129".4'7m("2-).191m'1-"3.41m1)'(53."5-1m3-'34".0 m2)2'(17.00"m-2-68'5.1"3m4)'(310"-.43m9'8-"12.1 m) Projection Distance 19 Projection (PRJ) Mode The projector can use . (You can set the PRJ mode in the diagram below. See page 45.) I Table mounted, front projection I Ceiling mounted, front projection Setup Menu...

XG-MB67X Operation Manual
Page 24
... the lens center to the bottom of the image (cm/in) S: Adjustable range of error in the values in ) See page 44. Setting up the Projector (Continued) Screen Size and Projection Distance NORMAL Mode (4:3) Picture (Screen) size Diag. [χ] Width Height Projection distance [L] Distance from the lens center Minimum [L1] Maximum...
... the lens center to the bottom of the image (cm/in) S: Adjustable range of error in the values in ) See page 44. Setting up the Projector (Continued) Screen Size and Projection Distance NORMAL Mode (4:3) Picture (Screen) size Diag. [χ] Width Height Projection distance [L] Distance from the lens center Minimum [L1] Maximum...

XG-MB67X Operation Manual
Page 25
... terminal Connecting to an amplifier or other audio equipment with compo- Use an audio cable with ø3.5 mm minijack plug to connect to control the projector. (See page 26.) LAN terminal (10 BASE-T/100 BASE-TX) Connecting the computer or the hub using a LAN cable. (See page 27.) INPUT 4 terminal Connecting...
... terminal Connecting to an amplifier or other audio equipment with compo- Use an audio cable with ø3.5 mm minijack plug to connect to control the projector. (See page 26.) LAN terminal (10 BASE-T/100 BASE-TX) Connecting the computer or the hub using a LAN cable. (See page 27.) INPUT 4 terminal Connecting...


