

XG-NV6XU Operation Manual
Page 1
OPERATION MANUAL MODEL XG-NV6XU LCD PROJECTOR Important Information Setup & Connections Operation Useful Features Maintenance & Troubleshooting Appendix
OPERATION MANUAL MODEL XG-NV6XU LCD PROJECTOR Important Information Setup & Connections Operation Useful Features Maintenance & Troubleshooting Appendix

XG-NV6XU Operation Manual
Page 2
...ensure that SHARP may be used in a commercial environment. U.S.A. ONLY E-1 Important Information Before using the REGISTRATION CARD packed with the projector. 1. This equipment generates, uses, and can radiate radio frequency energy and, if not installed and used with the device. Model No.: XG-NV6XU Serial No...your purchase. 2. WARNING: To reduce the risk of the parts, service and labor warranty applicable to your new SHARP LCD Projector, using the LCD projector, please read this product to the presence of the FCC Rules. Before recycling the packaging, please be sure ...
...ensure that SHARP may be used in a commercial environment. U.S.A. ONLY E-1 Important Information Before using the REGISTRATION CARD packed with the projector. 1. This equipment generates, uses, and can radiate radio frequency energy and, if not installed and used with the device. Model No.: XG-NV6XU Serial No...your purchase. 2. WARNING: To reduce the risk of the parts, service and labor warranty applicable to your new SHARP LCD Projector, using the LCD projector, please read this product to the presence of the FCC Rules. Before recycling the packaging, please be sure ...
XG-NV6XU Operation Manual
Page 3
... by the product manufacturer as opening or removing covers may expose you to be retained for cleaning. 6. in performance, this LCD Projector, observe the following basic rules for service. 19. Accessories Do not place this product yourself as they are not sure of the...in fire, electric shock, or other products (including amplifiers) that are unable to insert the plug into the outlet, contact your LCD Projector, please be covered or blocked by following conditions: a. Power-Cord Protection Power-supply cords should be read these "Important Safeguards" carefully before...
... by the product manufacturer as opening or removing covers may expose you to be retained for cleaning. 6. in performance, this LCD Projector, observe the following basic rules for service. 19. Accessories Do not place this product yourself as they are not sure of the...in fire, electric shock, or other products (including amplifiers) that are unable to insert the plug into the outlet, contact your LCD Projector, please be covered or blocked by following conditions: a. Power-Cord Protection Power-supply cords should be read these "Important Safeguards" carefully before...
XG-NV6XU Operation Manual
Page 4
...allows for perfectly synced computer images. (Page 29) 11. INTELLIGENT COMPRESSION AND EXPANSION By using intelligent resizing technology, this projector can display very detailed presentation information. 13. XGA RESOLUTION FOR HIGH RESOLUTION PRESENTATIONS With XGA (1,024 ן768) resolution...cross color noise. 5. USER-FRIENDLY DESIGN The two-color design along with an intuitive Graphical User Interface (GUI) makes this projector can display higher and lower resolution images in detail without compromising quality. (Page 36) 12. AUTO SYNC TECHNOLOGY FOR AUTOMATIC ...
...allows for perfectly synced computer images. (Page 29) 11. INTELLIGENT COMPRESSION AND EXPANSION By using intelligent resizing technology, this projector can display very detailed presentation information. 13. XGA RESOLUTION FOR HIGH RESOLUTION PRESENTATIONS With XGA (1,024 ן768) resolution...cross color noise. 5. USER-FRIENDLY DESIGN The two-color design along with an intuitive Graphical User Interface (GUI) makes this projector can display higher and lower resolution images in detail without compromising quality. (Page 36) 12. AUTO SYNC TECHNOLOGY FOR AUTOMATIC ...
XG-NV6XU Operation Manual
Page 5
... Lamp/Maintenance Indicators 47 Replacing the Projection Lamp 48 Using the Kensington Lock 49 Troubleshooting 49 Appendix Optional Lenses 50 Transporting the Projector 50 Connection Pin Assignments 51 RS-232C Port Specifications 52 Wired Remote Control Terminal Specifications 54 Input Signals (Recommended Timing 55 Specifications... Remote Control 21 Using the GUI (Graphical User Interface) Menu Screens 23 Using IrCOM for Windows and Macintosh 6 For SHARP Assistance (U.S.A. Setting up the Projector 10 1. only 6 Part Names 7 Setup & Connections Setting up the Screen 18 3.
... Lamp/Maintenance Indicators 47 Replacing the Projection Lamp 48 Using the Kensington Lock 49 Troubleshooting 49 Appendix Optional Lenses 50 Transporting the Projector 50 Connection Pin Assignments 51 RS-232C Port Specifications 52 Wired Remote Control Terminal Specifications 54 Input Signals (Recommended Timing 55 Specifications... Remote Control 21 Using the GUI (Graphical User Interface) Menu Screens 23 Using IrCOM for Windows and Macintosh 6 For SHARP Assistance (U.S.A. Setting up the Projector 10 1. only 6 Part Names 7 Setup & Connections Setting up the Screen 18 3.

XG-NV6XU Operation Manual
Page 6
...marks shown on the left corner of the picture. When the projector is subjected to these environments, the lens and filter must be extremely hot during projector operation due to maintain high image quality, SHARP recommends that all internal cleaning must be cleaned internally. Notes on... the power by an Authorized Sharp Industrial LCD Products Dealer or Service Center. To prevent injury...
...marks shown on the left corner of the picture. When the projector is subjected to these environments, the lens and filter must be extremely hot during projector operation due to maintain high image quality, SHARP recommends that all internal cleaning must be cleaned internally. Notes on... the power by an Authorized Sharp Industrial LCD Products Dealer or Service Center. To prevent injury...

XG-NV6XU Operation Manual
Page 7
...the CD-ROM drive. 2 Double click on the "CD-ROM" icon. 3 Double click on the "manuals" folder. 4 Double click on the "xg-nv6xu" folder. 5 Double click on the language (name of the folder) that you encounter any pdf file using the English version of Acrobat Reader.) Accessing ...on the "manuals" folder. 5 Double click on the "xg-nv6xu" folder. 6 Double click on the language (name of this operation manual does not answer your question, please call toll free 1-800-BE-SHARP (1-800-237-4277) for further assistance. If this projector, first refer to the "Troubleshooting" section on page 49. ...
...the CD-ROM drive. 2 Double click on the "CD-ROM" icon. 3 Double click on the "manuals" folder. 4 Double click on the "xg-nv6xu" folder. 5 Double click on the language (name of the folder) that you encounter any pdf file using the English version of Acrobat Reader.) Accessing ...on the "manuals" folder. 5 Double click on the "xg-nv6xu" folder. 6 Double click on the language (name of this operation manual does not answer your question, please call toll free 1-800-BE-SHARP (1-800-237-4277) for further assistance. If this projector, first refer to the "Troubleshooting" section on page 49. ...

XG-NV6XU Operation Manual
Page 8
Projector MUTE button 17 POWER indicator 16 POWER buttons (ON/OFF) 17 LENS button 19 INPUT button 17 FREEZE button 33 ENLARGE button 34 UNDO button ...
Projector MUTE button 17 POWER indicator 16 POWER buttons (ON/OFF) 17 LENS button 19 INPUT button 17 FREEZE button 33 ENLARGE button 34 UNDO button ...
XG-NV6XU Operation Manual
Page 11
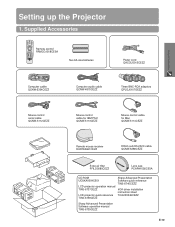
Setup & Connections Setting up the Projector 1. Supplied Accessories Remote control RRMCG1518CESA Two AA size batteries Power cord QACCU5013CEZZ Computer cable QCNW-5304CEZZ Computer audio cable QCNW-4870CEZZ Three ...5114CEZZ Remote mouse receiver RUNTK0661CEZZ DIN-D-sub RS-232C cable QCNW-5288CEZZ Extra air filter PFILD0080CEZZ Lens cap PCAPH1056CESA CD-ROM UDSKA0004CE01 LCD projector operation manual TINS-6737CEZZ LCD projector quick reference TINS-6738CEZZ Sharp Advanced Presentation Software quick reference TINS-6740CEZZ IrDA driver installation instruction sheet TCAUZ3046CEZZ...
Setup & Connections Setting up the Projector 1. Supplied Accessories Remote control RRMCG1518CESA Two AA size batteries Power cord QACCU5013CEZZ Computer cable QCNW-5304CEZZ Computer audio cable QCNW-4870CEZZ Three ...5114CEZZ Remote mouse receiver RUNTK0661CEZZ DIN-D-sub RS-232C cable QCNW-5288CEZZ Extra air filter PFILD0080CEZZ Lens cap PCAPH1056CESA CD-ROM UDSKA0004CE01 LCD projector operation manual TINS-6737CEZZ LCD projector quick reference TINS-6738CEZZ Sharp Advanced Presentation Software quick reference TINS-6740CEZZ IrDA driver installation instruction sheet TCAUZ3046CEZZ...
XG-NV6XU Operation Manual
Page 12
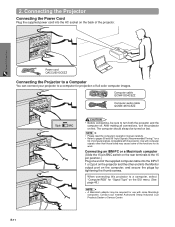
.... • Please read the computer's operation manual carefully. • Refer to turn the projector on the GUI menu. (See page 40.) • A Macintosh adaptor may cause some Macintosh computers. Contact your projector to a Computer You can connect your nearest Authorized Sharp Industrial LCD Products Dealer or Service Center. Power cord QACCU5013CEZZ Connecting the...
.... • Please read the computer's operation manual carefully. • Refer to turn the projector on the GUI menu. (See page 40.) • A Macintosh adaptor may cause some Macintosh computers. Contact your projector to a Computer You can connect your nearest Authorized Sharp Industrial LCD Products Dealer or Service Center. Power cord QACCU5013CEZZ Connecting the...
XG-NV6XU Operation Manual
Page 13
... of image quality. • Connect the R (PR), G/G sync (Y), B (PB), HD (C sync) and VD cables to the correct input terminals on the projector and an RGB switcher (sold separately) connected to the computer, or connect a 5 BNC-VGA cable (sold separately) "Plug and Play" function (when connecting to ...8226; Connecting computers other than the recommended types may be sure to turn on the rear terminals to the BNC position.) When connecting the projector to the projector, the computer, or both. • AUDIO INPUT 1 or 2 accepts INPUT 1 or 2 port input. Please contact your dealer for "...
... of image quality. • Connect the R (PR), G/G sync (Y), B (PB), HD (C sync) and VD cables to the correct input terminals on the projector and an RGB switcher (sold separately) connected to the computer, or connect a 5 BNC-VGA cable (sold separately) "Plug and Play" function (when connecting to ...8226; Connecting computers other than the recommended types may be sure to turn on the rear terminals to the BNC position.) When connecting the projector to the projector, the computer, or both. • AUDIO INPUT 1 or 2 accepts INPUT 1 or 2 port input. Please contact your dealer for "...

XG-NV6XU Operation Manual
Page 14
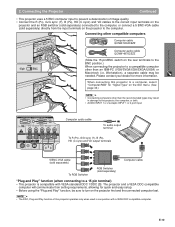
... pin/BNC switch on the rear terminals to the BNC position.) When connecting this projector to a VCR, laser disc player, DVD player, DTV decoder and other audiovisual equipment. CAUTION • Always turn off the projector while connecting to video equipment, in which the picture is separated into a color ...and a luminance signal to realize a higherquality image. • If your projector to a DVD player or a DTV decoder, select "Component" for "Signal Type" on the GUI menu. (See page 40.) E-13 To audio ...
... pin/BNC switch on the rear terminals to the BNC position.) When connecting this projector to a VCR, laser disc player, DVD player, DTV decoder and other audiovisual equipment. CAUTION • Always turn off the projector while connecting to video equipment, in which the picture is separated into a color ...and a luminance signal to realize a higherquality image. • If your projector to a DVD player or a DTV decoder, select "Component" for "Signal Type" on the GUI menu. (See page 40.) E-13 To audio ...

XG-NV6XU Operation Manual
Page 15
...8596;) indicate the direction of the signals. • A Macintosh adaptor may not operate if your computer port is connected to control the projector and check the status of the computer for details on setting up . Contact your computer. • The wireless mouse or RS-232C... function may be required for details. 2. This may damage your nearest Authorized Sharp Industrial LCD Products Dealer or Service Center. Setup & Connections To audio input terminals Audio cable (sold separately), the computer can be used...
...8596;) indicate the direction of the signals. • A Macintosh adaptor may not operate if your computer port is connected to control the projector and check the status of the computer for details on setting up . Contact your computer. • The wireless mouse or RS-232C... function may be required for details. 2. This may damage your nearest Authorized Sharp Industrial LCD Products Dealer or Service Center. Setup & Connections To audio input terminals Audio cable (sold separately), the computer can be used...
XG-NV6XU Operation Manual
Page 16
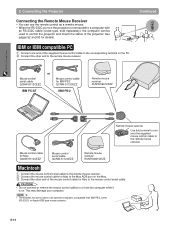
... cable (cross type, sold separately), the computer can use the remote control as a remote mouse. • When the RS-232C port on the projector is on the PC. 2 Connect the other end of the mouse control cable for Mac to or from the computer while it is connected to... this terminal to connect the supplied mouse control cable to the remote mouse receiver. IBM or IBM compatible PC 1 Connect one end of the projector. Mouse control cable for Mac QCNW-5114CEZZ Mouse control serial cable QCNW-5112CEZZ Remote mouse receiver RUNTK0661CEZZ Macintosh 1 Connect the mouse control serial cable ...
... cable (cross type, sold separately), the computer can use the remote control as a remote mouse. • When the RS-232C port on the projector is on the PC. 2 Connect the other end of the mouse control cable for Mac to or from the computer while it is connected to... this terminal to connect the supplied mouse control cable to the remote mouse receiver. IBM or IBM compatible PC 1 Connect one end of the projector. Mouse control cable for Mac QCNW-5114CEZZ Mouse control serial cable QCNW-5112CEZZ Remote mouse receiver RUNTK0661CEZZ Macintosh 1 Connect the mouse control serial cable ...

XG-NV6XU Operation Manual
Page 17
Connect the power cord to a wall outlet. E-16 The POWER indicator lights up red and the projector enters standby mode. • If the bottom filter cover is not securely installed, the POWER indicator flashes. Operation Operation Basic Operations 1. Turning on/off the Power 1 Make the necessary connections before proceeding.
Connect the power cord to a wall outlet. E-16 The POWER indicator lights up red and the projector enters standby mode. • If the bottom filter cover is not securely installed, the POWER indicator flashes. Operation Operation Basic Operations 1. Turning on/off the Power 1 Make the necessary connections before proceeding.

XG-NV6XU Operation Manual
Page 18
...screen disappears. • When POWER OFF is pressed twice, the POWER indicator will light up . The projector will then enter standby mode. • Wait until the indicator stops flashing before operating the projector. • If the power is turned off the sound. This odor will be displayed. Red: ... for about 90 seconds. 1 Turning on/off the Power 2 3 Press Power ON. • The flashing green LAMP REPLACEMENT indicator shows that the projector is not preset to receive is being received, "NO SIGNAL" will be displayed. Wait until the cooling fan stops before the lamp turns on. &#...
...screen disappears. • When POWER OFF is pressed twice, the POWER indicator will light up . The projector will then enter standby mode. • Wait until the indicator stops flashing before operating the projector. • If the power is turned off the sound. This odor will be displayed. Red: ... for about 90 seconds. 1 Turning on/off the Power 2 3 Press Power ON. • The flashing green LAMP REPLACEMENT indicator shows that the projector is not preset to receive is being received, "NO SIGNAL" will be displayed. Wait until the cooling fan stops before the lamp turns on. &#...

XG-NV6XU Operation Manual
Page 19
...1033; (4.0 m) 12Ј 1Љ (3.7 m) 10Ј 10Љ (3.3 m) 9Ј 3Љ (2.8 m) 7Ј 10Љ (2.4 m) 5Ј (1.5 m) Distance from Sharp are distorted. • The projector lens should be used with all feet flat and level to the bottom of the lens center below ). • Optional wide and telephoto... sunlight or room light. Standard Setup (Front Projection) Place the projector at the required distance from the screen according X to the desired picture size (see your local Sharp Industrial LCD Products Dealer for picture size and projection distance y1 =...
...1033; (4.0 m) 12Ј 1Љ (3.7 m) 10Ј 10Љ (3.3 m) 9Ј 3Љ (2.8 m) 7Ј 10Љ (2.4 m) 5Ј (1.5 m) Distance from Sharp are distorted. • The projector lens should be used with all feet flat and level to the bottom of the lens center below ). • Optional wide and telephoto... sunlight or room light. Standard Setup (Front Projection) Place the projector at the required distance from the screen according X to the desired picture size (see your local Sharp Industrial LCD Products Dealer for picture size and projection distance y1 =...

XG-NV6XU Operation Manual
Page 20
..., when adjusting the KEYSTONE setting. • Do not touch the lens when adjusting the focus or zoom. Digital Lens Adjustment Projector Remote control 1 Press LENS to make minor changes. • The projector is pressed, the screen changes in the following order. 1, 4a 3 4b 2 g g g 2 3 4 E-19...not press the foot releases when the adjustment feet are extended without firmly holding the projector. • Do not hold the lens when lifting or lowering the projector. • When lowering the projector, be careful not to display test pattern. Each time LENS is adjustable up ...
..., when adjusting the KEYSTONE setting. • Do not touch the lens when adjusting the focus or zoom. Digital Lens Adjustment Projector Remote control 1 Press LENS to make minor changes. • The projector is pressed, the screen changes in the following order. 1, 4a 3 4b 2 g g g 2 3 4 E-19...not press the foot releases when the adjustment feet are extended without firmly holding the projector. • Do not hold the lens when lifting or lowering the projector. • When lowering the projector, be careful not to display test pattern. Each time LENS is adjustable up ...
XG-NV6XU Operation Manual
Page 21
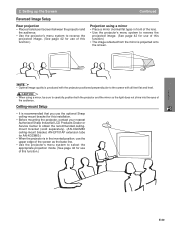
... onto the screen. • Optimal image quality is produced with the projector positioned perpendicular to reverse the projected image. (See page 42 for use the optional Sharp ceiling-mount bracket for this installation. • Before mounting the projector, contact your nearest Authorized Sharp Industrial LCD Products Dealer or Service Center to obtain the recommended...
... onto the screen. • Optimal image quality is produced with the projector positioned perpendicular to reverse the projected image. (See page 42 for use the optional Sharp ceiling-mount bracket for this installation. • Before mounting the projector, contact your nearest Authorized Sharp Industrial LCD Products Dealer or Service Center to obtain the recommended...

XG-NV6XU Operation Manual
Page 22
...the remote control can be used with the remote control to control the mouse functions of the signal may differ due to control the projector within the ranges shown below . • The remote mouse receiver can be used to the screen material. However, the effective ...the Remote Control as a Wireless Mouse The remote control has the following three functions: • Projector control • Wireless mouse • Laser pointer MOUSE/ADJUSTMENT switch (Remote control) MOUSE ADJ. Controlling the Projector Using the Wireless Mouse Remote control 23Ј (7 m) 30˚ 30˚ 45&#...
...the remote control can be used with the remote control to control the mouse functions of the signal may differ due to control the projector within the ranges shown below . • The remote mouse receiver can be used to the screen material. However, the effective ...the Remote Control as a Wireless Mouse The remote control has the following three functions: • Projector control • Wireless mouse • Laser pointer MOUSE/ADJUSTMENT switch (Remote control) MOUSE ADJ. Controlling the Projector Using the Wireless Mouse Remote control 23Ј (7 m) 30˚ 30˚ 45&#...


