
XG-NV6XU Operation Manual
Page 4
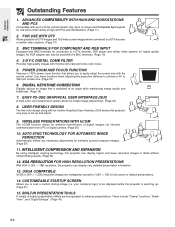
...two-color design along with the remote control. INTELLIGENT COMPRESSION AND EXPANSION By using intelligent resizing technology, this projector very easy to a DTV decoder or similar video systems. (Page 13) 3. Important Information Outstanding Features 1. EASY-TO-USE GRAPHICAL USER INTERFACE (GUI) ... utilities are intelligently resized to easily adjust the screen size with an intuitive Graphical User Interface (GUI) makes this projector can display higher and lower resolution images in detail without compromising quality. (Page 36) 12. CUSTOMIZABLE STARTUP SCREEN ...
...two-color design along with the remote control. INTELLIGENT COMPRESSION AND EXPANSION By using intelligent resizing technology, this projector very easy to a DTV decoder or similar video systems. (Page 13) 3. Important Information Outstanding Features 1. EASY-TO-USE GRAPHICAL USER INTERFACE (GUI) ... utilities are intelligently resized to easily adjust the screen size with an intuitive Graphical User Interface (GUI) makes this projector can display higher and lower resolution images in detail without compromising quality. (Page 36) 12. CUSTOMIZABLE STARTUP SCREEN ...
XG-NV6XU Operation Manual
Page 5
... 3 Contents 4 Usage Guidelines 5 How to Access the PDF Operation Manuals (for Wireless Presentations ......... 25 Selecting the On-screen Display Language ... 26 Selecting the Video Input System Mode (VIDEO mode only 26 Picture Adjustments 27 Audio Adjustments 28 Computer Image Adjustments 29 Auto Sync Adjustment 30 Auto Sync Display Function 30 Saving and... 2. Operating the Wireless Mouse from the Remote Control 21 Using the GUI (Graphical User Interface) Menu Screens 23 Using IrCOM for Windows and Macintosh 6 For SHARP Assistance (U.S.A. Setting up the Projector 10 1.
... 3 Contents 4 Usage Guidelines 5 How to Access the PDF Operation Manuals (for Wireless Presentations ......... 25 Selecting the On-screen Display Language ... 26 Selecting the Video Input System Mode (VIDEO mode only 26 Picture Adjustments 27 Audio Adjustments 28 Computer Image Adjustments 29 Auto Sync Adjustment 30 Auto Sync Display Function 30 Saving and... 2. Operating the Wireless Mouse from the Remote Control 21 Using the GUI (Graphical User Interface) Menu Screens 23 Using IrCOM for Windows and Macintosh 6 For SHARP Assistance (U.S.A. Setting up the Projector 10 1.

XG-NV6XU Operation Manual
Page 8
Projector MUTE button 17 POWER indicator 16 POWER buttons (ON/OFF) 17 LENS button ... View AUDIO INPUT 1 terminal (3.5 mm stereo minijack) 11 INPUT 1 port (HD 15) 11 15 pin/BNC switch 11 VIDEO INPUT terminal: RCA 13 AUDIO INPUT terminals: RCA 13 RS-232C port (9-pin mini-DIN) 14 WIRED REMOTE control input terminal... B (PB), HD (C sync), VD) OUTPUT port (HD 15) 14 AUDIO OUTPUT terminal (3.5 mm stereo minijack) 11 AC socket 13 S-VIDEO INPUT terminal: 4 pin mini DIN Important Information Part Names Numbers next to the part names refer to the main pages in this manual where the...
Projector MUTE button 17 POWER indicator 16 POWER buttons (ON/OFF) 17 LENS button ... View AUDIO INPUT 1 terminal (3.5 mm stereo minijack) 11 INPUT 1 port (HD 15) 11 15 pin/BNC switch 11 VIDEO INPUT terminal: RCA 13 AUDIO INPUT terminals: RCA 13 RS-232C port (9-pin mini-DIN) 14 WIRED REMOTE control input terminal... B (PB), HD (C sync), VD) OUTPUT port (HD 15) 14 AUDIO OUTPUT terminal (3.5 mm stereo minijack) 11 AC socket 13 S-VIDEO INPUT terminal: 4 pin mini DIN Important Information Part Names Numbers next to the part names refer to the main pages in this manual where the...

XG-NV6XU Operation Manual
Page 14
...on the rear terminals to the BNC position.) When connecting this projector to a VCR, laser disc player, DVD player, DTV decoder and other audiovisual equipment The S-VIDEO INPUT terminal uses a video signal system in which the picture is separated into a color...Connections 2. Connecting the Projector Continued Connecting the Projector to Video Equipment You can connect your video equipment does not have an S-video output terminal, use the conventional video output terminal. To audio output terminals Audio cable (sold separately) To video output terminal Video cable (sold separately) ...
...on the rear terminals to the BNC position.) When connecting this projector to a VCR, laser disc player, DVD player, DTV decoder and other audiovisual equipment The S-VIDEO INPUT terminal uses a video signal system in which the picture is separated into a color...Connections 2. Connecting the Projector Continued Connecting the Projector to Video Equipment You can connect your video equipment does not have an S-video output terminal, use the conventional video output terminal. To audio output terminals Audio cable (sold separately) To video output terminal Video cable (sold separately) ...

XG-NV6XU Operation Manual
Page 18
... displayed. Wait until the power off the Power 2 3 Press Power ON. • The flashing green LAMP REPLACEMENT indicator shows that the projector is not preset to temporarily turn the sound back on , the LAMP REPLACEMENT indicator lights indicating the status of the lamp. EXAMPLE INPUT ...1 Mode INPUT 2 Mode Continued 4 5 2, 6 3 VIDEO Mode Operation 4 • When no signal is ready. When the power is on . 6 E-17 Press POWER OFF. Green: Lamp is being received, "...
... displayed. Wait until the power off the Power 2 3 Press Power ON. • The flashing green LAMP REPLACEMENT indicator shows that the projector is not preset to temporarily turn the sound back on , the LAMP REPLACEMENT indicator lights indicating the status of the lamp. EXAMPLE INPUT ...1 Mode INPUT 2 Mode Continued 4 5 2, 6 3 VIDEO Mode Operation 4 • When no signal is ready. When the power is on . 6 E-17 Press POWER OFF. Green: Lamp is being received, "...

XG-NV6XU Operation Manual
Page 24
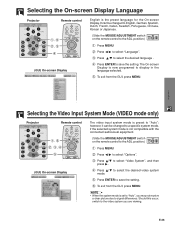
Using the GUI (Graphical User Interface) Menu Screens Projector Remote control Operation 1, 7 2, 3, 5 6 4 This projector has two sets of menu screens (INPUT/VIDEO) that allow you to the ADJ. INPUT (COMPUTER/RGB) mode 1 ß 2 © (GUI) On-screen Display VIDEO mode 1 ß 2 © ∂ 3 ƒ ß 5 © 4 ß 2 © &#....) 1 Press MENU to display the INPUT or VIDEO mode menu bar. 2 Press ß/© to select an adjustment menu on the remote control to adjust the image and various projector settings. These menu screens can be operated from the...
Using the GUI (Graphical User Interface) Menu Screens Projector Remote control Operation 1, 7 2, 3, 5 6 4 This projector has two sets of menu screens (INPUT/VIDEO) that allow you to the ADJ. INPUT (COMPUTER/RGB) mode 1 ß 2 © (GUI) On-screen Display VIDEO mode 1 ß 2 © ∂ 3 ƒ ß 5 © 4 ß 2 © &#....) 1 Press MENU to display the INPUT or VIDEO mode menu bar. 2 Press ß/© to select an adjustment menu on the remote control to adjust the image and various projector settings. These menu screens can be operated from the...
XG-NV6XU Operation Manual
Page 27
... the setting. 6 To exit from the GUI, press MENU. on the remote control to the ADJ. Operation Selecting the Video Input System Mode (VIDEO mode only) Projector Remote control 1, 6 2, 3, 4 5 (GUI) On-screen Display The video input system mode is the preset language for the On-screen Display. It can be changed to a specific system...
... the setting. 6 To exit from the GUI, press MENU. on the remote control to the ADJ. Operation Selecting the Video Input System Mode (VIDEO mode only) Projector Remote control 1, 6 2, 3, 4 5 (GUI) On-screen Display The video input system mode is the preset language for the On-screen Display. It can be changed to a specific system...

XG-NV6XU Operation Manual
Page 28
... the "INPUT 1", "INPUT 2" and "VIDEO" modes. • For COMPONENT input in INPUT mode. (Slide the MOUSE/ADJUSTMENT switch MOUSE ADJ. Operation E-27 on the "Picture" menu screen and press ENTER. • The adjustments can adjust the projector's picture to your preferences with the following picture... more brightness For less color intensity For more color intensity Skin tones become purplish Skin tones become greenish For less sharpness For more sharpness For weaker red For stronger red For weaker blue For stronger blue All image adjustment items are returned to the ADJ...
... the "INPUT 1", "INPUT 2" and "VIDEO" modes. • For COMPONENT input in INPUT mode. (Slide the MOUSE/ADJUSTMENT switch MOUSE ADJ. Operation E-27 on the "Picture" menu screen and press ENTER. • The adjustments can adjust the projector's picture to your preferences with the following picture... more brightness For less color intensity For more color intensity Skin tones become purplish Skin tones become greenish For less sharpness For more sharpness For weaker red For stronger red For weaker blue For stronger blue All image adjustment items are returned to the ADJ...
XG-NV6XU Operation Manual
Page 34
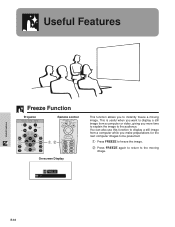
This is useful when you want to display a still image from a computer while you make preparations for the next computer images to be presented. 1 Press FREEZE to freeze the image. 2 Press FREEZE again to return to the moving image. Useful Features Useful Features Freeze Function Projector Remote control 1, 2 On-screen Display This function allows you more time to explain the image to the audience. You can also use this function to display a still image from a computer or video, giving you to instantly freeze a moving image. E-33
This is useful when you want to display a still image from a computer while you make preparations for the next computer images to be presented. 1 Press FREEZE to freeze the image. 2 Press FREEZE again to return to the moving image. Useful Features Useful Features Freeze Function Projector Remote control 1, 2 On-screen Display This function allows you more time to explain the image to the audience. You can also use this function to display a still image from a computer or video, giving you to instantly freeze a moving image. E-33

XG-NV6XU Operation Manual
Page 40
...) On-screen Display • It is recommended that the lamp be replaced after approximately 2,000 hours of a video signal. Checking the Lamp Usage Time Projector Remote control 1 2 This function allows you to select either an interlaced display or a progressive display of usage.... replacement. Useful Features E-39 position.) 1 Press MENU. 2 Press ß/© to select "Options". 3 Press ∂/ƒ to select "I /P Conversion Projector Remote control 1, 6 2, 3, 4 5 (GUI) On-screen Display This function allows you to the ADJ. on the remote control to select "Options". The...
...) On-screen Display • It is recommended that the lamp be replaced after approximately 2,000 hours of a video signal. Checking the Lamp Usage Time Projector Remote control 1 2 This function allows you to select either an interlaced display or a progressive display of usage.... replacement. Useful Features E-39 position.) 1 Press MENU. 2 Press ß/© to select "Options". 3 Press ∂/ƒ to select "I /P Conversion Projector Remote control 1, 6 2, 3, 4 5 (GUI) On-screen Display This function allows you to the ADJ. on the remote control to select "Options". The...
XG-NV6XU Operation Manual
Page 41
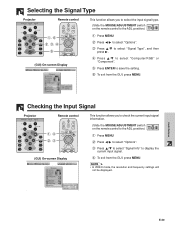
... 4 Press ∂/ƒ to select "Computer/RGB" or "Component". 5 Press ENTER to the ADJ. Useful Features E-40 Checking the Input Signal Projector Remote control 1, 4 2, 3 (GUI) On-screen Display This function allows you to check the current input signal information. (Slide the MOUSE/ADJUSTMENT ...switch MOUSE ADJ. on the remote control to save the setting. 6 To exit from the GUI, press MENU. • In VIDEO mode, the resolution and frequency settings will not be displayed. position.) 1 Press MENU. 2 Press ß/© to select "Options". 3 Press ...
... 4 Press ∂/ƒ to select "Computer/RGB" or "Component". 5 Press ENTER to the ADJ. Useful Features E-40 Checking the Input Signal Projector Remote control 1, 4 2, 3 (GUI) On-screen Display This function allows you to check the current input signal information. (Slide the MOUSE/ADJUSTMENT ...switch MOUSE ADJ. on the remote control to save the setting. 6 To exit from the GUI, press MENU. • In VIDEO mode, the resolution and frequency settings will not be displayed. position.) 1 Press MENU. 2 Press ß/© to select "Options". 3 Press ...

XG-NV6XU Operation Manual
Page 53
...to RS-232C standard. Computer RABR _מ1 0 → ← Projector OK CONTROL ITEM AUTO POWER OFF POWER SETTING INPUT SWITCHING INPUT CHECK LENS ADJUSTMENT COMMAND PARAMETER... C1 C2 C3 C4 P1 P2 P3 P4 CONTROL CONTENTS A P O W _ _ _ 0 AUTO POWER OFF A P O W _ _ _ 1 AUTO POWER ON P O W R _ _ _ 0 POWER OFF (STANDBY) P O W R _ _ _ 1 POWER ON I V E D _ _ _ 1 VIDEO I R G B _ _ _ 1 INPUT1 I R G B _ _ _ 2 INPUT2 I C O M _ _ _ 1 IrCOM1 I C O M _ _ _ 2 IrCOM2 I C H K _ _ _ 0 INPUT CHECK L N F O _ * * * LENS FOCUS (מ30 - ם...
...to RS-232C standard. Computer RABR _מ1 0 → ← Projector OK CONTROL ITEM AUTO POWER OFF POWER SETTING INPUT SWITCHING INPUT CHECK LENS ADJUSTMENT COMMAND PARAMETER... C1 C2 C3 C4 P1 P2 P3 P4 CONTROL CONTENTS A P O W _ _ _ 0 AUTO POWER OFF A P O W _ _ _ 1 AUTO POWER ON P O W R _ _ _ 0 POWER OFF (STANDBY) P O W R _ _ _ 1 POWER ON I V E D _ _ _ 1 VIDEO I R G B _ _ _ 1 INPUT1 I R G B _ _ _ 2 INPUT2 I C O M _ _ _ 1 IrCOM1 I C O M _ _ _ 2 IrCOM2 I C H K _ _ _ 0 INPUT CHECK L N F O _ * * * LENS FOCUS (מ30 - ם...
XG-NV6XU Operation Manual
Page 56
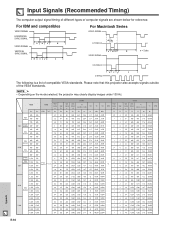
... 2,160 9.4 4.4 106.250 229.500 1 3 46 1,200 1,250 11.8 85.000 E-55 Appendix Please note that this projector also accepts signals outside of computer signals are shown below for reference. Input Signals (Recommended Timing) The computer output signal timing of ... standards. • Depending on the mode selected, the projector may clearly display images under 130 Hz. For IBM and compatibles VIDEO SIGNAL HORIZONTAL SYNC SIGNAL a bc d VIDEO SIGNAL VERTICAL SYNC SIGNAL w xy z For Macintosh Series VIDEO SIGNAL e C-SYNC(H) a bc d VIDEO SIGNAL e = 2 dot C-SYNC(V) w xy z ...
... 2,160 9.4 4.4 106.250 229.500 1 3 46 1,200 1,250 11.8 85.000 E-55 Appendix Please note that this projector also accepts signals outside of computer signals are shown below for reference. Input Signals (Recommended Timing) The computer output signal timing of ... standards. • Depending on the mode selected, the projector may clearly display images under 130 Hz. For IBM and compatibles VIDEO SIGNAL HORIZONTAL SYNC SIGNAL a bc d VIDEO SIGNAL VERTICAL SYNC SIGNAL w xy z For Macintosh Series VIDEO SIGNAL e C-SYNC(H) a bc d VIDEO SIGNAL e = 2 dot C-SYNC(V) w xy z ...

XG-NV6XU Operation Manual
Page 57
... (CRT/LCD) mode. Appendix E-56 Input Signals (Recommended Timing) HSYNC VSYNC MODE VIDEO FRONT BACK VIDEO 1H FRONT BACK VIDEO 1V PORCH SYNC PORCH PERIOD (abcd) ...31.469 - COMPONENT - - - - - - - 44.955 - - - - - - - 59.940 - - - - - - 59.740 1080I 1,920 1,080 - - - - - - - 33.716 - - - - - - - 59.940 • This projector may not be blocked. Should this occur, turn off the LCD display on the screen. • When receiving 1,600 ן1,200 VESA format...
... (CRT/LCD) mode. Appendix E-56 Input Signals (Recommended Timing) HSYNC VSYNC MODE VIDEO FRONT BACK VIDEO 1H FRONT BACK VIDEO 1V PORCH SYNC PORCH PERIOD (abcd) ...31.469 - COMPONENT - - - - - - - 44.955 - - - - - - - 59.940 - - - - - - 59.740 1080I 1,920 1,080 - - - - - - - 33.716 - - - - - - - 59.940 • This projector may not be blocked. Should this occur, turn off the LCD display on the screen. • When receiving 1,600 ן1,200 VESA format...
XG-NV6XU Operation Manual
Page 58
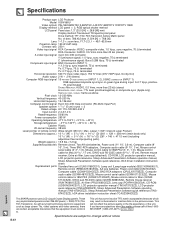
... (PCAPH1056CESA), CD-ROM (UDSKA0004CE01), LCD projector operation manual (TINS-6737CEZZ), LCD projector quick reference (TINS-6738CEZZ), Sharp Advanced Presentation Software operation manual (TINS-6739CEZZ), Sharp Advanced Presentation Software quick reference (TINS6740CEZZ), IrDA driver installation instruction sheet (TCAUZ3046CEZZ) This SHARP projector uses LCD (Liquid Crystal Display) panels. Specifications Product type LCD Projector Model XG-NV6XU Video system PAL/SECAM/NTSC 3.58...
... (PCAPH1056CESA), CD-ROM (UDSKA0004CE01), LCD projector operation manual (TINS-6737CEZZ), LCD projector quick reference (TINS-6738CEZZ), Sharp Advanced Presentation Software operation manual (TINS-6739CEZZ), Sharp Advanced Presentation Software quick reference (TINS6740CEZZ), IrDA driver installation instruction sheet (TCAUZ3046CEZZ) This SHARP projector uses LCD (Liquid Crystal Display) panels. Specifications Product type LCD Projector Model XG-NV6XU Video system PAL/SECAM/NTSC 3.58...

XG-NV6XU Operation Manual
Page 64
... displays horizontal flicker. Freeze Function to transmit still images from the computer by using the RS-232C ports on green Video signal mode of lower and higher resolution images to use with various image signal modes. IrCOM Function to freeze a moving...: 3, and project it in a 4 : 3 ratio. When phase level is being input. Presentation tools Helpful tools used to control the projector from a computer, hand-held PC or digital still camera via infrared communication for "Wireless Presentations". RS-232C Function to emphasize keypoints throughout a presentation...
... displays horizontal flicker. Freeze Function to transmit still images from the computer by using the RS-232C ports on green Video signal mode of lower and higher resolution images to use with various image signal modes. IrCOM Function to freeze a moving...: 3, and project it in a 4 : 3 ratio. When phase level is being input. Presentation tools Helpful tools used to control the projector from a computer, hand-held PC or digital still camera via infrared communication for "Wireless Presentations". RS-232C Function to emphasize keypoints throughout a presentation...

Quick Reference Guide
Page 1
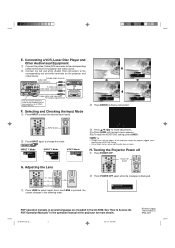
... output terminal (sold separately) While this terminal to connect the supplied mouse control cable to the corresponding terminals on the projector and video source. AUTO SYNC button Three BNC-RCA adaptors Component cable (sold separately) To analog component output terminals DTV decoder or... manual.) XG-NV6XU/QR (E) 1 99.11.8, 2:05 PM When inputting these signals through the aforementioned terminals, you can input COMPUTER/RGB and COMPONENT signals through the 15-pin D-sub terminals (INPUT 1 and 2 ports) and BNC terminals (INPUT 1 terminals), the projector cannot distinguish...
... output terminal (sold separately) While this terminal to connect the supplied mouse control cable to the corresponding terminals on the projector and video source. AUTO SYNC button Three BNC-RCA adaptors Component cable (sold separately) To analog component output terminals DTV decoder or... manual.) XG-NV6XU/QR (E) 1 99.11.8, 2:05 PM When inputting these signals through the aforementioned terminals, you can input COMPUTER/RGB and COMPONENT signals through the 15-pin D-sub terminals (INPUT 1 and 2 ports) and BNC terminals (INPUT 1 terminals), the projector cannot distinguish...
Quick Reference Guide
Page 2
...in the CD-ROM. Each time LENS is displayed. Adjusting the Lens 3 Press to the corresponding red and white terminals on the projector and video source. XG-NV6XU/QR (E) 2 99.11.8, 2:05 PM Printed in the operation manual of the displayed image may appear jagged, when adjusting the ... the KEYSTONE setting, press UNDO. • Straight lines and the edges of the projector for more details. H. Connecting a VCR, Laser Disc Player and Other Audiovisual Equipment 1 Connect the yellow (Video) RCA connector to Access the PDF Operation Manuals" in Japan TINS-6738CEZZ 9P06-JWG ...
...in the CD-ROM. Each time LENS is displayed. Adjusting the Lens 3 Press to the corresponding red and white terminals on the projector and video source. XG-NV6XU/QR (E) 2 99.11.8, 2:05 PM Printed in the operation manual of the displayed image may appear jagged, when adjusting the ... the KEYSTONE setting, press UNDO. • Straight lines and the edges of the projector for more details. H. Connecting a VCR, Laser Disc Player and Other Audiovisual Equipment 1 Connect the yellow (Video) RCA connector to Access the PDF Operation Manuals" in Japan TINS-6738CEZZ 9P06-JWG ...


