
XG-V10WU Operation Manual
Page 30
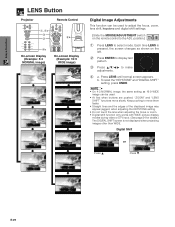
...:9 WIDE image can be used to adjust the focus, zoom, lens shift, keystone and digital shift settings. (Slide the MOUSE/ADJUSTMENT switch MOUSE ADJ. To reset the "KEYSTONE" and "DIGITAL SHIFT" setting, press UNDO. • On 4:3 NORMAL image, the same setting as shown on the remote control to the ADJ. or...
...:9 WIDE image can be used to adjust the focus, zoom, lens shift, keystone and digital shift settings. (Slide the MOUSE/ADJUSTMENT switch MOUSE ADJ. To reset the "KEYSTONE" and "DIGITAL SHIFT" setting, press UNDO. • On 4:3 NORMAL image, the same setting as shown on the remote control to the ADJ. or...

XG-V10WU Operation Manual
Page 42
... Info" is active and the other menus are displayed in the tree charts above are for example purposes only. • "Color", "Tint", and "Sharp" appear only when Component input is active and the other menus are displayed in gray. • Only the items highlighted in gray. Password Optional Board...Bars Items on the INPUT 1, 2 or 3 Mode Menu Bar Main menu Picture Fine Sync Audio Options Sub menu Contrast Bright Color Tint Sharp Red Blue CLR Temp Reset מ30 ם30 מ30 ם30 מ30 &#...
... Info" is active and the other menus are displayed in the tree charts above are for example purposes only. • "Color", "Tint", and "Sharp" appear only when Component input is active and the other menus are displayed in gray. • Only the items highlighted in gray. Password Optional Board...Bars Items on the INPUT 1, 2 or 3 Mode Menu Bar Main menu Picture Fine Sync Audio Options Sub menu Contrast Bright Color Tint Sharp Red Blue CLR Temp Reset מ30 ם30 מ30 ם30 מ30 &#...

XG-V10WU Operation Manual
Page 43
...8236;30 ם30 Blue מ30 ם30 CLR Temp מ3 ם3 Reset Signal Type Progressive Mode Audio Options Balance מ30 ם30 Treble מ30 ם30 ...2D Progressive 3D Progressive Film Mode Normal Level A Level B Auto PAL (50/60Hz) SECAM NTSC4.43 NTSC3.58 PAL-M PAL-N Sharp Custom Blue None Sharp Custom None Display Off Standby Off Display On Main menu Options Sub menu Lamp Timer Lamp Mode PRJ Mode Stack Setting Keylock Level Set...
...8236;30 ם30 Blue מ30 ם30 CLR Temp מ3 ם3 Reset Signal Type Progressive Mode Audio Options Balance מ30 ם30 Treble מ30 ם30 ...2D Progressive 3D Progressive Film Mode Normal Level A Level B Auto PAL (50/60Hz) SECAM NTSC4.43 NTSC3.58 PAL-M PAL-N Sharp Custom Blue None Sharp Custom None Display Off Standby Off Display On Main menu Options Sub menu Lamp Timer Lamp Mode PRJ Mode Stack Setting Keylock Level Set...
XG-V10WU Operation Manual
Page 44
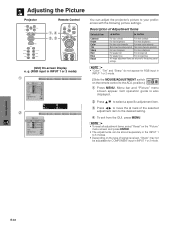
... selected adjustment item to the desired setting. 4 To exit from the GUI, press MENU. • To reset all adjustment items, select "Reset" on the type of Adjustment Items Selected item Contrast Bright Color Tint Sharp Red Blue Reset ß button © button For less contrast For more contrast For less brightness For more brightness...
... selected adjustment item to the desired setting. 4 To exit from the GUI, press MENU. • To reset all adjustment items, select "Reset" on the type of Adjustment Items Selected item Contrast Bright Color Tint Sharp Red Blue Reset ß button © button For less contrast For more contrast For less brightness For more brightness...
XG-V10WU Operation Manual
Page 47
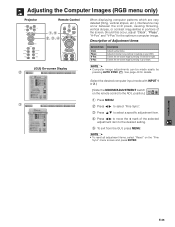
.... Adjusts horizontal noise (similar to tracking on the remote control to the desired setting. 5 To exit from the GUI, press MENU. • To reset all adjustment items, select "Reset" on the "Fine Sync" menu screen and press ENTER. position.) 1 Press MENU. 2 Press ß/© to select "Fine Sync". 3 Press ∂/ƒ to...
.... Adjusts horizontal noise (similar to tracking on the remote control to the desired setting. 5 To exit from the GUI, press MENU. • To reset all adjustment items, select "Reset" on the "Fine Sync" menu screen and press ENTER. position.) 1 Press MENU. 2 Press ß/© to select "Fine Sync". 3 Press ∂/ƒ to...

XG-V10WU Operation Manual
Page 51
...; button © button Increased audio from the left Increased audio from the GUI, press MENU. • To reset all adjustment items, select "Reset" on the remote control to the ADJ. Basic Operation E-50 Adjusting the Sound Projector Remote Control 1, 5 2, 3, 4 1.2.3 4.5.6 (GUI) On-screen Display 2 3 This projector's audio is factory ...
...; button © button Increased audio from the left Increased audio from the GUI, press MENU. • To reset all adjustment items, select "Reset" on the remote control to the ADJ. Basic Operation E-50 Adjusting the Sound Projector Remote Control 1, 5 2, 3, 4 1.2.3 4.5.6 (GUI) On-screen Display 2 3 This projector's audio is factory ...
XG-V10WU Operation Manual
Page 73
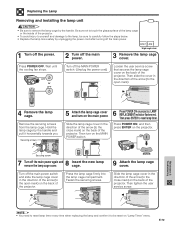
... cover in the direction of the arrow (to the close mark) on the back of the projector. Maintenance & Troubleshooting • You need to reset lamp timer every time when replacing the lamp and confirm it horizontally towards you. E-72 Press POWER OFF. Then slide the cover in the direction... of the projector. • To avoid injury to yourself and damage to the lamp, be reset on "Lamp Timer" menu. Then press ENTER to the open mark). 4 Remove the lamp cage. Wait until the cooling fan stops. LAMP REPLACEMENT ...
... cover in the direction of the arrow (to the close mark) on the back of the projector. Maintenance & Troubleshooting • You need to reset lamp timer every time when replacing the lamp and confirm it horizontally towards you. E-72 Press POWER OFF. Then slide the cover in the direction... of the projector. • To avoid injury to yourself and damage to the lamp, be reset on "Lamp Timer" menu. Then press ENTER to the open mark). 4 Remove the lamp cage. Wait until the cooling fan stops. LAMP REPLACEMENT ...
XG-V10WU Operation Manual
Page 74
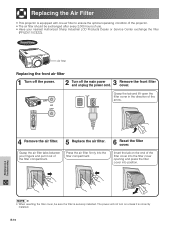
Remove the front filter cover. Grasp the air filter tabs between your nearest Authorized Sharp Industrial LCD Products Dealer or Service Center exchange the filter (PFILD0110CEZZ). Front View Air filter Replacing the front air filter 1 Turn off the power. 2 3... of the filter cover into the filter cover opening and press the filter cover into the filter compartment. 6 Reset the filter cover. Replace the air filter. Maintenance & Troubleshooting • When resetting the filter cover, be sure the filter is equipped with one air filter to ensure the optimal operating condition ...
Remove the front filter cover. Grasp the air filter tabs between your nearest Authorized Sharp Industrial LCD Products Dealer or Service Center exchange the filter (PFILD0110CEZZ). Front View Air filter Replacing the front air filter 1 Turn off the power. 2 3... of the filter cover into the filter cover opening and press the filter cover into the filter compartment. 6 Reset the filter cover. Replace the air filter. Maintenance & Troubleshooting • When resetting the filter cover, be sure the filter is equipped with one air filter to ensure the optimal operating condition ...

XG-V10WU Operation Manual
Page 83
... (מ30 - ם30) BASS (מ30 - ם30) AUDIO DISPLAY AUDIO ADJUSTMENT RESET PICT IN PICT (SMALL) : BOTTOM RIGHT PICT IN PICT (SMALL) : BOTTOM LEFT PICT IN PICT (SMALL) : UPPER RIGHT PICT IN ...SYSTEM SELECTION : NTSC3.58 VIDEO SYSTEM SELECTION : PAL_M VIDEO SYSTEM SELECTION : PAL_N BACKGROUND SELECTION : SHARP BACKGROUND SELECTION : CUSTOM BACKGROUND SELECTION : BLUE BACKGROUND SELECTION : NONE STARTUP IMAGE SELECTION : SHARP STARTUP IMAGE SELECTION : CUSTOM STARTUP IMAGE SELECTION : NONE MONITOR OUT OFF MONITOR OUT ON AUTO ...
... (מ30 - ם30) BASS (מ30 - ם30) AUDIO DISPLAY AUDIO ADJUSTMENT RESET PICT IN PICT (SMALL) : BOTTOM RIGHT PICT IN PICT (SMALL) : BOTTOM LEFT PICT IN PICT (SMALL) : UPPER RIGHT PICT IN ...SYSTEM SELECTION : NTSC3.58 VIDEO SYSTEM SELECTION : PAL_M VIDEO SYSTEM SELECTION : PAL_N BACKGROUND SELECTION : SHARP BACKGROUND SELECTION : CUSTOM BACKGROUND SELECTION : BLUE BACKGROUND SELECTION : NONE STARTUP IMAGE SELECTION : SHARP STARTUP IMAGE SELECTION : CUSTOM STARTUP IMAGE SELECTION : NONE MONITOR OUT OFF MONITOR OUT ON AUTO ...


