

XL-MP130 Operation Manual
Page 5
...a cassette tape 28 - 29 Tape Recording Recording on page 12. registered mark. 0312 Contents XL-MP130 Page General Information Precautions 6 Controls and indicators 7 - 9 Preparation for Use System connections 10 - 12 Remote control 13 Basic Operation General control 14 Setting the clock 15 Important... Instruction CD or MP3/WMA disc Playback Listening to a CD or MP3/WMA disc 16 - 18 Advanced CD or MP3/WMA disc playback 19 ...
...a cassette tape 28 - 29 Tape Recording Recording on page 12. registered mark. 0312 Contents XL-MP130 Page General Information Precautions 6 Controls and indicators 7 - 9 Preparation for Use System connections 10 - 12 Remote control 13 Basic Operation General control 14 Setting the clock 15 Important... Instruction CD or MP3/WMA disc Playback Listening to a CD or MP3/WMA disc 16 - 18 Advanced CD or MP3/WMA disc playback 19 ...

XL-MP130 Operation Manual
Page 6
...power plug by the head when removing it from direct sunlight, strong magnetic fields, excessive dust, humidity and electronic/electrical equipment (home computers, facsimiles, etc.) which generate electrical noise. SHARP will not be the same as pulling the cord can damage internal wires. Using this product with the volume control setting up high... unit for any damage resulting from use of the equipment. 4" (10 cm) 4" (10 cm) 4" (10 cm) POWER/ CD XL-MP130 MICRO COMPONENT SYSTEM Use the unit on a firm, level surface free from vibration. 4" (10 cm) Keep the unit away from the AC...
...power plug by the head when removing it from direct sunlight, strong magnetic fields, excessive dust, humidity and electronic/electrical equipment (home computers, facsimiles, etc.) which generate electrical noise. SHARP will not be the same as pulling the cord can damage internal wires. Using this product with the volume control setting up high... unit for any damage resulting from use of the equipment. 4" (10 cm) 4" (10 cm) 4" (10 cm) POWER/ CD XL-MP130 MICRO COMPONENT SYSTEM Use the unit on a firm, level surface free from vibration. 4" (10 cm) Keep the unit away from the AC...

XL-MP130 Operation Manual
Page 7
Disc Number Select Buttons 16 10. CD Button 16 17. Disc Track Up or Fast Forward, Tape Fast Forward, Tuner Preset Up, Time Up Button 15, 18, 27,...Rewind, Tuner Preset Down, Time Down Button 15, 18, 27, 29 19. Disc Play or Repeat, Tape Play Button 16, 20, 28 23. Power On/Stand-by Button 14 4. Tape Record Pause Button 30, 31 6. Tape Button 28 18. Timer Indicator 33 3. Extra Bass/Demo Mode Button ...7 General Information Volume Control 14 13. Clock/Timer Button 15, 32, 35 5. Disc Direct Play Button 19 11. Controls and indicators CD XL-MP130 Front panel Reference page 1.
Disc Number Select Buttons 16 10. CD Button 16 17. Disc Track Up or Fast Forward, Tape Fast Forward, Tuner Preset Up, Time Up Button 15, 18, 27,...Rewind, Tuner Preset Down, Time Down Button 15, 18, 27, 29 19. Disc Play or Repeat, Tape Play Button 16, 20, 28 23. Power On/Stand-by Button 14 4. Tape Record Pause Button 30, 31 6. Tape Button 28 18. Timer Indicator 33 3. Extra Bass/Demo Mode Button ...7 General Information Volume Control 14 13. Clock/Timer Button 15, 32, 35 5. Disc Direct Play Button 19 11. Controls and indicators CD XL-MP130 Front panel Reference page 1.

XL-MP130 Operation Manual
Page 9
... Button 26 11 10. MP3/WMA Navigation Mode Select Button 23 6 12 23. Enter Button 22 25. XL-MP130 General Information Remote control 1 Reference page 1. Extra Bass Button 14 2 14 18 7. Power On/Stand-by Button 14 8. Cursor Buttons 22 8 13 4. Tape Button 28 20 11. Disc Clear/Dimmer...Down Button 15, 18, 27, 29 28. Disc Number Select Buttons 16 7 3. Remote Control Transmitter 13 2. Equalizer Mode Select Button 14 9 C D 6. CD Button 16 10 15 19 9. Volume Up and Down Buttons 14 16 21 13. Memory Button 15, 21, 25, 27, 32, 35 4 18. Tape...
... Button 26 11 10. MP3/WMA Navigation Mode Select Button 23 6 12 23. Enter Button 22 25. XL-MP130 General Information Remote control 1 Reference page 1. Extra Bass Button 14 2 14 18 7. Power On/Stand-by Button 14 8. Cursor Buttons 22 8 13 4. Tape Button 28 20 11. Disc Clear/Dimmer...Down Button 15, 18, 27, 29 28. Disc Number Select Buttons 16 7 3. Remote Control Transmitter 13 2. Equalizer Mode Select Button 14 9 C D 6. CD Button 16 10 15 19 9. Volume Up and Down Buttons 14 16 21 13. Memory Button 15, 21, 25, 27, 32, 35 4 18. Tape...

XL-MP130 Operation Manual
Page 16
...the display may not be playable due to a CD or MP3/WMA disc This system can play back a standard CD, CD-R/RW in sound quality. WMA is activated. This system supports MPEG 1 Layer 3, MPEG 2 Layer 3, and VBR files. Auto power off function: In the stop mode of CD, MP3 or WMA operation, the main unit ...mode after the unit reads information on them. Auto power on function: When you press any of the following buttons, the unit turns on and playback of the last function starts (CD,TAPE,TUNER,VIDEO/AUX). CD or MP3/WMA disc Playback XL-MP130 Listening to the state of the disc or the device...
...the display may not be playable due to a CD or MP3/WMA disc This system can play back a standard CD, CD-R/RW in sound quality. WMA is activated. This system supports MPEG 1 Layer 3, MPEG 2 Layer 3, and VBR files. Auto power off function: In the stop mode of CD, MP3 or WMA operation, the main unit ...mode after the unit reads information on them. Auto power on function: When you press any of the following buttons, the unit turns on and playback of the last function starts (CD,TAPE,TUNER,VIDEO/AUX). CD or MP3/WMA disc Playback XL-MP130 Listening to the state of the disc or the device...

XL-MP130 Operation Manual
Page 17
...3 Press the 1 button and within 5 seconds, press the OPEN/CLOSE button to enter the power stand-by following steps 3 - 5. 7 Press the / button to the next tray with force, "ER-CD20" will begin from the TV or radio. XL-MP130 CD or MP3/WMA disc Playback 1 Press the ON/STAND-BY button to turn the... power on again. Be sure to place 3" (8 cm) disc in one of the disc information, it is restored. When...
...3 Press the 1 button and within 5 seconds, press the OPEN/CLOSE button to enter the power stand-by following steps 3 - 5. 7 Press the / button to the next tray with force, "ER-CD20" will begin from the TV or radio. XL-MP130 CD or MP3/WMA disc Playback 1 Press the ON/STAND-BY button to turn the... power on again. Be sure to place 3" (8 cm) disc in one of the disc information, it is restored. When...

XL-MP130 Operation Manual
Page 18
...END" will appear on the display. When the end of the track is reached during fast forward, the next track will be paused. CD or MP3/WMA disc Playback Stop Pause Track up /track down is possible only within individual discs. Fast forward/fast reverse is possible only...only) While a disc is pressed, the display will enter the playback mode. Each time the button is playing, press the DISPLAY button. XL-MP130 Listening to a CD or MP3/WMA disc (continued) Various disc functions Function Play Main unit Remote control Operation Press in the stop mode, press the / ...
...END" will appear on the display. When the end of the track is reached during fast forward, the next track will be paused. CD or MP3/WMA disc Playback Stop Pause Track up /track down is possible only within individual discs. Fast forward/fast reverse is possible only...only) While a disc is pressed, the display will enter the playback mode. Each time the button is playing, press the DISPLAY button. XL-MP130 Listening to a CD or MP3/WMA disc (continued) Various disc functions Function Play Main unit Remote control Operation Press in the stop mode, press the / ...

XL-MP130 Operation Manual
Page 19
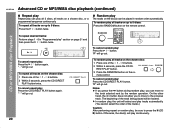
... not possible. During random play, direct search is selected, playback will not start the desired track on the disc cannot be played. Advanced CD or MP3/WMA disc playback XL-MP130 To specify a disc to play You can be selected. Direct track search By using the direct search buttons, the desired tracks on...
... not possible. During random play, direct search is selected, playback will not start the desired track on the disc cannot be played. Advanced CD or MP3/WMA disc playback XL-MP130 To specify a disc to play You can be selected. Direct track search By using the direct search buttons, the desired tracks on...
XL-MP130 Operation Manual
Page 20
... the track selected next by the random operation. The beginning of the tracks.) Caution: After performing repeat or random play, be sure to press the (CD ) button. " " will be played in "Programmed play" section on the remote control. To repeat all tracks on the chosen disc: 1 Press one ... all 5 discs, all tracks on the disc(s) can be located. To cancel random play : Press the CD DIRECT PLAY button. To cancel random play : Press the / button. XL-MP130 Advanced CD or MP3/WMA disc playback (continued) Repeat play Repeat play can move to the previous track. Random play...
... the track selected next by the random operation. The beginning of the tracks.) Caution: After performing repeat or random play, be sure to press the (CD ) button. " " will be played in "Programmed play" section on the remote control. To repeat all tracks on the chosen disc: 1 Press one ... all 5 discs, all tracks on the disc(s) can be located. To cancel random play : Press the CD DIRECT PLAY button. To cancel random play : Press the / button. XL-MP130 Advanced CD or MP3/WMA disc playback (continued) Repeat play Repeat play can move to the previous track. Random play...

XL-MP130 Operation Manual
Page 21
... start playback. Even if you press the ON/STAND-BY button to enter the stand-by mode or change the function from CD to add tracks. XL-MP130 CD or MP3/WMA disc Playback Programmed play You can choose up to 32 selections for other tracks. To cancel the programmed play ..., the program is not possible. Selected disc number Selected track number You can also select a track by pressing the CLEAR/DIMMER button. 6 Press the (CD ) button. Each time the button is pressed, one of the original program. Notes: When a disc with the last track programmed. During the program operation...
... start playback. Even if you press the ON/STAND-BY button to enter the stand-by mode or change the function from CD to add tracks. XL-MP130 CD or MP3/WMA disc Playback Programmed play You can choose up to 32 selections for other tracks. To cancel the programmed play ..., the program is not possible. Selected disc number Selected track number You can also select a track by pressing the CLEAR/DIMMER button. 6 Press the (CD ) button. Each time the button is pressed, one of the original program. Notes: When a disc with the last track programmed. During the program operation...

XL-MP130 Operation Manual
Page 22
XL-MP130 MP3/WMA navigation (only for folder names, and up to 48 characters for MP3/WMA files) CD or MP3/WMA disc Playback MP3/WMA navigation: You can search and play files by folder or title 1/2/3 within one MP3/WMA disc (see ...
XL-MP130 MP3/WMA navigation (only for folder names, and up to 48 characters for MP3/WMA files) CD or MP3/WMA disc Playback MP3/WMA navigation: You can search and play files by folder or title 1/2/3 within one MP3/WMA disc (see ...
XL-MP130 Operation Manual
Page 23
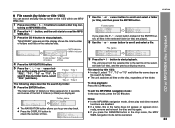
...and names of files. 9 Press the / button to select "FOL", "T-1", "T-2" or "T-3". The unit searches all files in the stop mode, press the CD button. The unit plays from the selected file to scroll and select a folder (or title), and then press the ENTER button. MP3 indicator WMA indicator... 7 Use the or cursor button to the last file in the selected folder (or title), and the previous display returns. XL-MP130 File search (by folder or title 1/2/3) You can search and play and direct search functions are displayed. taining an MP3/WMA disc. 2 Press...
...and names of files. 9 Press the / button to select "FOL", "T-1", "T-2" or "T-3". The unit searches all files in the stop mode, press the CD button. The unit plays from the selected file to scroll and select a folder (or title), and then press the ENTER button. MP3 indicator WMA indicator... 7 Use the or cursor button to the last file in the selected folder (or title), and the previous display returns. XL-MP130 File search (by folder or title 1/2/3) You can search and play and direct search functions are displayed. taining an MP3/WMA disc. 2 Press...

XL-MP130 Operation Manual
Page 24
... the display. Alphabet types change as you do not appear properly. For example, press "2" four times to select "FOL", "T-1", "T-2" or "T-3". XL-MP130 MP3/WMA navigation (only for MP3/WMA files) (continued) Character search (for folder or title 1/2/3) By entering a name, you can... 4 GHI 5 JKL 6 MNO 7 PQRS 8 TUV 9 WXYZ 0 tered characters. : indicates a space. 24 The unit searches for 2 seconds. The display will flash). CD or MP3/WMA disc Playback 1 Perform steps 1 - 3 in "File search (by folder name, select "FOL" (will be used for editing characters. 1st row: String ...
... the display. Alphabet types change as you do not appear properly. For example, press "2" four times to select "FOL", "T-1", "T-2" or "T-3". XL-MP130 MP3/WMA navigation (only for MP3/WMA files) (continued) Character search (for folder or title 1/2/3) By entering a name, you can... 4 GHI 5 JKL 6 MNO 7 PQRS 8 TUV 9 WXYZ 0 tered characters. : indicates a space. 24 The unit searches for 2 seconds. The display will flash). CD or MP3/WMA disc Playback 1 Perform steps 1 - 3 in "File search (by folder name, select "FOL" (will be used for editing characters. 1st row: String ...
XL-MP130 Operation Manual
Page 25
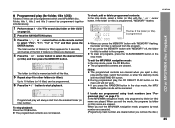
XL-MP130 CD or MP3/WMA disc Playback Programmed play (for 2 seconds, and names of the first 2 folders (or titles) are displayed. 4 Press the or cursor button to select the desired folder (or title) and then press the MEMORY button. To check, add or delete programmed contents: In the stop mode, press the CD...: In the stop mode, select a folder (or title) with the or cursor button. The programmed contents are not cleared. Programmed play , the CD DIRECT PLAY button on the remote control to 10 folders (or 10 titles) can be programmed. 6 Press the / button to the program. If ...
XL-MP130 CD or MP3/WMA disc Playback Programmed play (for 2 seconds, and names of the first 2 folders (or titles) are displayed. 4 Press the or cursor button to select the desired folder (or title) and then press the MEMORY button. To check, add or delete programmed contents: In the stop mode, press the CD...: In the stop mode, select a folder (or title) with the or cursor button. The programmed contents are not cleared. Programmed play , the CD DIRECT PLAY button on the remote control to 10 folders (or 10 titles) can be programmed. 6 Press the / button to the program. If ...

XL-MP130 Operation Manual
Page 26
... on the main unit: The unit turns on and playback of the following buttons, the unit turns on. Radio Auto power on function: When you press any of the last function starts (CD,TAPE,TUNER,VIDEO/AUX). To receive an FM stereo transmission: Press the TUNER (BAND) button to monaural, and the... (BAND) button (main unit and remote control): The unit turns on and the "TUNER" function is in stereo. XL-MP130 Listening to the radio Tuning 1 Press the ON/STAND-BY button to turn the power on. 2 Press the TUNER (BAND) button repeatedly to select the desired frequency band (FM or AM). 3 Press the...
... on the main unit: The unit turns on and playback of the following buttons, the unit turns on. Radio Auto power on function: When you press any of the last function starts (CD,TAPE,TUNER,VIDEO/AUX). To receive an FM stereo transmission: Press the TUNER (BAND) button to monaural, and the... (BAND) button (main unit and remote control): The unit turns on and the "TUNER" function is in stereo. XL-MP130 Listening to the radio Tuning 1 Press the ON/STAND-BY button to turn the power on. 2 Press the TUNER (BAND) button repeatedly to select the desired frequency band (FM or AM). 3 Press the...

XL-MP130 Operation Manual
Page 28
... function: When you . 5 Press the / ( ) button. Auto power off function: In the stop mode of inactivity. Before loading a tape into the cas- ing the area marked " PUSH EJECT". 4 Load a cassette into the cassette ... and the "TAPE" function is activated. TAPE button on the remote control: The unit turns on and playback starts (regardless of the last function starts (CD,TAPE,TUNER,VIDEO/AUX). Tape Playback XL-MP130 Listening to turn the power on .
... function: When you . 5 Press the / ( ) button. Auto power off function: In the stop mode of inactivity. Before loading a tape into the cas- ing the area marked " PUSH EJECT". 4 Load a cassette into the cassette ... and the "TAPE" function is activated. TAPE button on the remote control: The unit turns on and playback starts (regardless of the last function starts (CD,TAPE,TUNER,VIDEO/AUX). Tape Playback XL-MP130 Listening to turn the power on .

XL-MP130 Operation Manual
Page 30
... be paused. 5 Press one of the tape is started from a CD or MP3/WMA disc You can record the desired disc using the CD DIRECT PLAY button. 1 Press the ON/STAND-BY button to turn the power on. 2 Press the CD button. 3 Load a cassette into the cassette compartment with the side... to start approximately 7 seconds after the tape starts. Recording is reached, the disc and the cassette will stop. 30 Tape Recording XL-MP130 Recording on a cassette tape (continued) ...
... be paused. 5 Press one of the tape is started from a CD or MP3/WMA disc You can record the desired disc using the CD DIRECT PLAY button. 1 Press the ON/STAND-BY button to turn the power on. 2 Press the CD button. 3 Load a cassette into the cassette compartment with the side... to start approximately 7 seconds after the tape starts. Recording is reached, the disc and the cassette will stop. 30 Tape Recording XL-MP130 Recording on a cassette tape (continued) ...

XL-MP130 Operation Manual
Page 31
XL-MP130 Recording from the radio". 31 To stop recording: Press the (TAPE ) button. To interrupt recording: Press the button. Erasing recorded tapes 1 Press the TAPE button. 2 Follow steps 2 - 4 in "Recording from the radio 1 Tune in "Recording from a CD or MP3/WMA disc" on page 30. 2 Within 5 seconds... past the leader of the tape, on facing you hear a whistling noise while recording an AM station, move the AM loop antenna. Recording from several CDs continuously: 1 Perform steps 1 - 5 in to the desired station (see page 21). 2 Press the button. 3 Press the / ( ) button...
XL-MP130 Recording from the radio". 31 To stop recording: Press the (TAPE ) button. To interrupt recording: Press the button. Erasing recorded tapes 1 Press the TAPE button. 2 Follow steps 2 - 4 in "Recording from the radio 1 Tune in "Recording from a CD or MP3/WMA disc" on page 30. 2 Within 5 seconds... past the leader of the tape, on facing you hear a whistling noise while recording an AM station, move the AM loop antenna. Recording from several CDs continuously: 1 Perform steps 1 - 5 in to the desired station (see page 21). 2 Press the button. 3 Press the / ( ) button...
XL-MP130 Operation Manual
Page 32
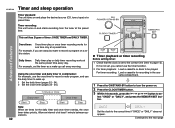
... button to turn the power on. 2 Press the CLOCK/TIMER button. 3 Within 10 seconds, press the or button to be played. For timer recording: Load a cassette for the daily timer and once timer overlap, the once timer takes priority. If it is set , you are away but - XL-MP130 Timer and sleep operation... Timer playback: The unit turns on and plays the desired source (CD, tuner, tape) at a preset time.
... button to turn the power on. 2 Press the CLOCK/TIMER button. 3 Within 10 seconds, press the or button to be played. For timer recording: Load a cassette for the daily timer and once timer overlap, the once timer takes priority. If it is set , you are away but - XL-MP130 Timer and sleep operation... Timer playback: The unit turns on and plays the desired source (CD, tuner, tape) at a preset time.

XL-MP130 Operation Manual
Page 33
... Continued to se- To select the timer recording source: TUNER. When you select the tuner, select a station by mode. XL-MP130 4 Within 10 seconds, press the or button to the next page 33 Do not turn the volume up and the unit ... ready for timer playback or timer recording. button, and then To select the timer playback source: CD, TUNER or TAPE. The "TIMER" indicator lights up too high. 11Press the ON/STAND-BY button to select "PLAY" or "REC", and press the MEMORY/..."ONCE SET" or "DAILY SET", and press the MEMORY/ SET button. 5 Press the or button to enter the power stand-
... Continued to se- To select the timer recording source: TUNER. When you select the tuner, select a station by mode. XL-MP130 4 Within 10 seconds, press the or button to the next page 33 Do not turn the volume up and the unit ... ready for timer playback or timer recording. button, and then To select the timer playback source: CD, TUNER or TAPE. The "TIMER" indicator lights up too high. 11Press the ON/STAND-BY button to select "PLAY" or "REC", and press the MEMORY/..."ONCE SET" or "DAILY SET", and press the MEMORY/ SET button. 5 Press the or button to enter the power stand-


