

XR-1S , XR-1X Operation Manual
Page 1
Introduction Quick Start Setup Connections MULTIMEDIA PROJECTOR MODEL XR-1X XR-1S OPERATION MANUAL (The picture shown above is of the XR-1S.) Basic Operation Useful Features Appendix
Introduction Quick Start Setup Connections MULTIMEDIA PROJECTOR MODEL XR-1X XR-1S OPERATION MANUAL (The picture shown above is of the XR-1S.) Basic Operation Useful Features Appendix
XR-1S , XR-1X Operation Manual
Page 2
IMPORTANT For your assistance in reporting the loss or theft of your Projector, please record the Model and Serial Number located on the bottom of "Supplied accessories" on the pin face of in a safe manner. To fit an ... to the terminal which is coloured brown must be sure that you have checked the contents of the carton thoroughly against the list of the projector and retain this information. IF YOU HAVE ANY DOUBT, CONSULT A QUALIFIED ELECTRICIAN. DANGER: The fuse from the cut-off plug should the cut off plug...
IMPORTANT For your assistance in reporting the loss or theft of your Projector, please record the Model and Serial Number located on the bottom of "Supplied accessories" on the pin face of in a safe manner. To fit an ... to the terminal which is coloured brown must be sure that you have checked the contents of the carton thoroughly against the list of the projector and retain this information. IF YOU HAVE ANY DOUBT, CONSULT A QUALIFIED ELECTRICIAN. DANGER: The fuse from the cut-off plug should the cut off plug...

XR-1S , XR-1X Operation Manual
Page 5
...to the presence of uninsulated "dangerous voltage" within the product's enclosure that you will be required to your new SHARP Projector, using the projector, please read this equipment. The lightning flash with arrowhead symbol, within a triangle is operated in the literature accompanying ...Class A digital device, pursuant to operate this operation manual carefully. Introduction Before using the REGISTRATION CARD packed with the projector. 1. WARNING: FCC Regulations state that children do not expose this equipment not expressly approved by the manufacturer could void...
...to the presence of uninsulated "dangerous voltage" within the product's enclosure that you will be required to your new SHARP Projector, using the projector, please read this equipment. The lightning flash with arrowhead symbol, within a triangle is operated in the literature accompanying ...Class A digital device, pursuant to operate this operation manual carefully. Introduction Before using the REGISTRATION CARD packed with the projector. 1. WARNING: FCC Regulations state that children do not expose this equipment not expressly approved by the manufacturer could void...
XR-1S , XR-1X Operation Manual
Page 6
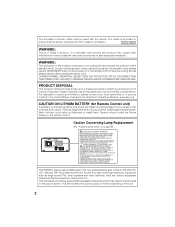
... REMPLACEMENT DE LA LAMPE. LAMPE A HAUTE PRESSION : RISQUE D'EXPLOSION. This SHARP projector uses a DMD panel. This very sophisticated panel contains 786,432 (XR1X) / 480,000 (XR-1S) pixels micromirrors. As with any high technology electronic equipment such as large screen TVs, video systems and video cameras, there are located in which may be required to...
... REMPLACEMENT DE LA LAMPE. LAMPE A HAUTE PRESSION : RISQUE D'EXPLOSION. This SHARP projector uses a DMD panel. This very sophisticated panel contains 786,432 (XR1X) / 480,000 (XR-1S) pixels micromirrors. As with any high technology electronic equipment such as large screen TVs, video systems and video cameras, there are located in which may be required to...

XR-1S , XR-1X Operation Manual
Page 7
...Adjustments) Example: Adjusting "Bright". • This operation can also be operated to Read this Operation Manual ■ The specifications of the XR-1X are simplified for explanation, and may differ slightly from those of explanation. • In this operation manual, the illustration and the screen... The menu can connect and operate both models in this step On-screen display Info ........Indicates safeguards for using the buttons on the projector. 1 Press BMENU. • The "Picture" menu screen for the selected input mode is displayed. Adjustment buttons (W/Y/V/X) MENU/HELP ...
...Adjustments) Example: Adjusting "Bright". • This operation can also be operated to Read this Operation Manual ■ The specifications of the XR-1X are simplified for explanation, and may differ slightly from those of explanation. • In this operation manual, the illustration and the screen... The menu can connect and operate both models in this step On-screen display Info ........Indicates safeguards for using the buttons on the projector. 1 Press BMENU. • The "Picture" menu screen for the selected input mode is displayed. Adjustment buttons (W/Y/V/X) MENU/HELP ...

XR-1S , XR-1X Operation Manual
Page 8
... Screen Size and Projection Distance (XR-1X 19 Screen Size and Projection Distance (XR-1S 20 Connections Connections 21 Samples of Cables for Connection .... 22 Connecting to a Computer 23 Connecting to Video Equipment ......... 24 Connecting the Power Cord 25 Using Basic Operation Turning the Projector On/Off 26 Turning the Projector on 26 Turning the Power...
... Screen Size and Projection Distance (XR-1X 19 Screen Size and Projection Distance (XR-1S 20 Connections Connections 21 Samples of Cables for Connection .... 22 Connecting to a Computer 23 Connecting to Video Equipment ......... 24 Connecting the Power Cord 25 Using Basic Operation Turning the Projector On/Off 26 Turning the Projector on 26 Turning the Power...

XR-1S , XR-1X Operation Manual
Page 12
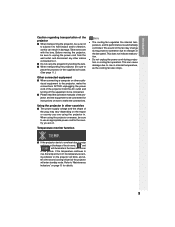
.... Caution concerning the lamp unit ■ Potential hazard of the projector ■ For minimal servicing and to maintain high image quality, SHARP recommends that it carefully to avoid personal injury caused by a Sharp Authorized Projector Dealer or Service Center. See "Replacing the Lamp" on a... case of the lens. Caution regarding placing of the unit. Be sure to occasionally rest your nearest Sharp Authorized Projector Dealer or Service Center for a while. Place the projector where the intake and exhaust vents are not obstructed. ■ If the cooling fan becomes obstructed, ...
.... Caution concerning the lamp unit ■ Potential hazard of the projector ■ For minimal servicing and to maintain high image quality, SHARP recommends that it carefully to avoid personal injury caused by a Sharp Authorized Projector Dealer or Service Center. See "Replacing the Lamp" on a... case of the lens. Caution regarding placing of the unit. Be sure to occasionally rest your nearest Sharp Authorized Projector Dealer or Service Center for a while. Place the projector where the intake and exhaust vents are not obstructed. ■ If the cooling fan becomes obstructed, ...
XR-1S , XR-1X Operation Manual
Page 13
... any other cables connected to it to hard impact and/or vibration, as the cooling fan also stops. When using the projector in. Before moving the projector, be sure to unplug the power cord from the AC outlet and turning off the equipment to be connected. ■ Please...regulates the internal temperature, and its performance is automatically controlled. This does not indicate malfunction. • Do not unplug the power cord during projector operation due to rise in internal temperature, as this can result in the fan speed. This can cause damage due to changes in damage...
... any other cables connected to it to hard impact and/or vibration, as the cooling fan also stops. When using the projector in. Before moving the projector, be sure to unplug the power cord from the AC outlet and turning off the equipment to be connected. ■ Please...regulates the internal temperature, and its performance is automatically controlled. This does not indicate malfunction. • Do not unplug the power cord during projector operation due to rise in internal temperature, as this can result in the fan speed. This can cause damage due to changes in damage...
XR-1S , XR-1X Operation Manual
Page 14
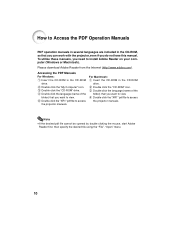
... click the "My Computer" icon. 3 Double click the "CD-ROM" drive. 4 Double click the language (name of the folder) that you can work with the projector, even if you do not have this manual. Note • If the desired pdf file cannot be opened by double clicking the mouse, start Adobe... "CD-ROM" icon. 3 Double click the language (name of the folder) that you want to view. 4 Double click the "XR1" pdf file to access the projector manuals. To utilize these manuals, you need to install Adobe Reader on your computer (Windows or Macintosh). Please download Adobe Reader from the Internet (http...
... click the "My Computer" icon. 3 Double click the "CD-ROM" drive. 4 Double click the language (name of the folder) that you can work with the projector, even if you do not have this manual. Note • If the desired pdf file cannot be opened by double clicking the mouse, start Adobe... "CD-ROM" icon. 3 Double click the language (name of the folder) that you want to view. 4 Double click the "XR1" pdf file to access the projector manuals. To utilize these manuals, you need to install Adobe Reader on your computer (Windows or Macintosh). Please download Adobe Reader from the Internet (http...

XR-1S , XR-1X Operation Manual
Page 15
...using the supplied cable ties. When transporting the projector, prepare a bag for storing and carrying the projector. • Shipping the projector in the soft case as a parcel, be... damage to the projector. Please check with enough shock absorbing material to avoid any damage. If you send the projector in the carrying case... (6' (1.8 m)) QCNWGA047WJPZ Cable tieK2 UBNDTA015WJZZ • For the RGB/USB cable • For the power cord • Projector manual CD-ROM UDSKAA045WJN1 • Operation manual (this manual) (3) (4) For U.S., Canada, etc. (6' (1.8 m)) QACCDA029WJPZ For...
...using the supplied cable ties. When transporting the projector, prepare a bag for storing and carrying the projector. • Shipping the projector in the soft case as a parcel, be... damage to the projector. Please check with enough shock absorbing material to avoid any damage. If you send the projector in the carrying case... (6' (1.8 m)) QCNWGA047WJPZ Cable tieK2 UBNDTA015WJZZ • For the RGB/USB cable • For the power cord • Projector manual CD-ROM UDSKAA045WJN1 • Operation manual (this manual) (3) (4) For U.S., Canada, etc. (6' (1.8 m)) QACCDA029WJPZ For...

XR-1S , XR-1X Operation Manual
Page 16
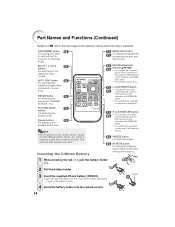
...where the topic is explained. ENTER button 36 For setting items selected or adjusted on and putting the projector into standby mode. Indicators on the Projector ON/STANDBY button Lamp indicator Temperature warning indicator FOCUS/ZOOM indicator HEIGHT ADJUST indicator 12 Red on Green on... 27.) "2 HEIGHT ADJUST" is highlighted on the Setup Guide. (See page 27.) Zoom knob 28 For enlarging/ reducing the picture. Projector Top View Lamp indicator 54 ON/STANDBY button 26 For turning the power 54 on the menu. Adjustment buttons 36 (W/Y/V/X) For selecting menu items...
...where the topic is explained. ENTER button 36 For setting items selected or adjusted on and putting the projector into standby mode. Indicators on the Projector ON/STANDBY button Lamp indicator Temperature warning indicator FOCUS/ZOOM indicator HEIGHT ADJUST indicator 12 Red on Green on... 27.) "2 HEIGHT ADJUST" is highlighted on the Setup Guide. (See page 27.) Zoom knob 28 For enlarging/ reducing the picture. Projector Top View Lamp indicator 54 ON/STANDBY button 26 For turning the power 54 on the menu. Adjustment buttons 36 (W/Y/V/X) For selecting menu items...

XR-1S , XR-1X Operation Manual
Page 17
...52 Exhaust vent Kensington Security Standard connector 28 Rear adjustment foot Remote control 15 sensor Using the Kensington Lock • This projector has a Kensington Security Standard connector for instructions on the computer for using the supplied remote control as the computer mouse.... 24 INPUT 2 terminal Terminal for connecting video equipment with a Kensington MicroSaver Security System. Introduction Numbers in this operation manual where the topic is explained. USB terminal 33...
...52 Exhaust vent Kensington Security Standard connector 28 Rear adjustment foot Remote control 15 sensor Using the Kensington Lock • This projector has a Kensington Security Standard connector for instructions on the computer for using the supplied remote control as the computer mouse.... 24 INPUT 2 terminal Terminal for connecting video equipment with a Kensington MicroSaver Security System. Introduction Numbers in this operation manual where the topic is explained. USB terminal 33...
XR-1S , XR-1X Operation Manual
Page 18
...For displaying adjustment and setting screens, and help screen. 33 36 MOUSE/Adjustment buttons (P/R/O/Q) • For moving the computer cursor when connecting the projector USB terminal to the computer with RGB/ USB cable. • For selecting menu items. 33 L CLICK/ENTER button • For the Left... click when 36 connecting the projector USB terminal to the respective input modes. RESIZE button 30 For switching the screen size (NORMAL, BORDER, etc.). Note • All the ...
...For displaying adjustment and setting screens, and help screen. 33 36 MOUSE/Adjustment buttons (P/R/O/Q) • For moving the computer cursor when connecting the projector USB terminal to the computer with RGB/ USB cable. • For selecting menu items. 33 L CLICK/ENTER button • For the Left... click when 36 connecting the projector USB terminal to the respective input modes. RESIZE button 30 For switching the screen size (NORMAL, BORDER, etc.). Note • All the ...

XR-1S , XR-1X Operation Manual
Page 19
..., the effective distance of the signal may present a risk of fire of chemical burn if mistreated. Replacement of in this case, move the projector away from the fluorescent lamp. Note • The signal from children. Front view 30° Remote control sensor 30° Remote control signal...battery compartment clean, and then insert a new battery. When using the remote control • Be sure not to drop, expose to control the projector within the ranges shown in your community. 15 Do not disassemble and do not dispose of lithium battery • Replace with the type CR2025 only...
..., the effective distance of the signal may present a risk of fire of chemical burn if mistreated. Replacement of in this case, move the projector away from the fluorescent lamp. Note • The signal from children. Front view 30° Remote control sensor 30° Remote control signal...battery compartment clean, and then insert a new battery. When using the remote control • Be sure not to drop, expose to control the projector within the ranges shown in your community. 15 Do not disassemble and do not dispose of lithium battery • Replace with the type CR2025 only...

XR-1S , XR-1X Operation Manual
Page 20
... the remote control _P. 26 16 Press the ON/STANDBY button to the computer and plug the power cord into the AC socket of the projector and the computer is explained using one example. 5 INPUT button 4 ENTER button 3 ON/STANDBY 6 button 3 ON/STANDBY 6 button 4 HEIGHT ADJUST ...For details, see pages 24 and 25. _PP. 21-25 3. Quick Start This section shows the basic operation (projector connecting with the computer). Setup and Projection In this section, connection of the projector When connecting equipment other than the computer, see the page described below for each step.
... the remote control _P. 26 16 Press the ON/STANDBY button to the computer and plug the power cord into the AC socket of the projector and the computer is explained using one example. 5 INPUT button 4 ENTER button 3 ON/STANDBY 6 button 3 ON/STANDBY 6 button 4 HEIGHT ADJUST ...For details, see pages 24 and 25. _PP. 21-25 3. Quick Start This section shows the basic operation (projector connecting with the computer). Setup and Projection In this section, connection of the projector When connecting equipment other than the computer, see the page described below for each step.

XR-1S , XR-1X Operation Manual
Page 21
... 26 17 Adjust the projected image with the Setup Guide 1 After the projector turns on the remote control. On the On the remote On-screen display (RGB) projector control • When pressing the INPUT button on the projector, input mode switches in zoom out 5 After adjusting the focus, height ... running, the Adjustment buttons blinks. (When "Guide LEDs" is set to "On". n page 45) 3 Angle (See page 28.) • Adjust the projector angle using the HEIGHT ADJUST button. • Refer to the Setup Guide screen to adjust the focus, angle and zoom. • Press TENTER to switch...
... 26 17 Adjust the projected image with the Setup Guide 1 After the projector turns on the remote control. On the On the remote On-screen display (RGB) projector control • When pressing the INPUT button on the projector, input mode switches in zoom out 5 After adjusting the focus, height ... running, the Adjustment buttons blinks. (When "Guide LEDs" is set to "On". n page 45) 3 Angle (See page 28.) • Adjust the projector angle using the HEIGHT ADJUST button. • Refer to the Setup Guide screen to adjust the focus, angle and zoom. • Press TENTER to switch...
XR-1S , XR-1X Operation Manual
Page 22
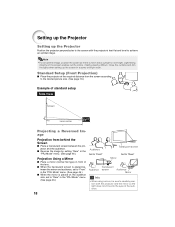
... Mirror Info • When using a mirror, be sure to achieve an optimal image. Standard Setup (Front Projection) ■ Place the projector at the required distance from the screen according to the desired picture size. (See page 19.) Example of standard setup Side View Screen H... Lens center L Projecting a Reversed Image Projection from behind the Screen ■ Place a translucent screen between the projector and the audience. ■ Reverse the image by setting "Rear" in the "PRJ Mode" menu. (See page 46.) Projection Using a Mirror ■...
... Mirror Info • When using a mirror, be sure to achieve an optimal image. Standard Setup (Front Projection) ■ Place the projector at the required distance from the screen according to the desired picture size. (See page 19.) Example of standard setup Side View Screen H... Lens center L Projecting a Reversed Image Projection from behind the Screen ■ Place a translucent screen between the projector and the audience. ■ Reverse the image by setting "Rear" in the "PRJ Mode" menu. (See page 46.) Projection Using a Mirror ■...

XR-1S , XR-1X Operation Manual
Page 24
Setting up the Projector (Continued) Screen Size and Projection Distance (XR-1S) NORMAL Mode (4:3) Picture (Screen) size Diag. [χ] Width Height Projection distance [L] Minimum [L1] Maximum [L2] 280Љ (711 cm) 569 cm (224Љ) 427 ...
Setting up the Projector (Continued) Screen Size and Projection Distance (XR-1S) NORMAL Mode (4:3) Picture (Screen) size Diag. [χ] Width Height Projection distance [L] Minimum [L1] Maximum [L2] 280Љ (711 cm) 569 cm (224Љ) 427 ...

XR-1S , XR-1X Operation Manual
Page 26
... adapter (com- Equipment Computer Input Signal RGB video Cable RGB/USB cable (supplied) Terminal on the projector INPUT1 Audio-visual equipment ø3.5 mm stereo audio cable Computer audio Component video 3 RCA (Component) to 15-pin D-sub cable (optional, AN-C3CP) S-video cable (commercially available) S-video AUDIO INPUT INPUT1 INPUT2 Video Video cable (commercially available) INPUT3 ø3.5 mm...
... adapter (com- Equipment Computer Input Signal RGB video Cable RGB/USB cable (supplied) Terminal on the projector INPUT1 Audio-visual equipment ø3.5 mm stereo audio cable Computer audio Component video 3 RCA (Component) to 15-pin D-sub cable (optional, AN-C3CP) S-video cable (commercially available) S-video AUDIO INPUT INPUT1 INPUT2 Video Video cable (commercially available) INPUT3 ø3.5 mm...

XR-1S , XR-1X Operation Manual
Page 27
...compatible with a VESA DDC compatible computer. 23 Use with computer signals other devices. The projector and a VESA DDC compatible computer will communicate their setting requirements, allowing for use the remote control as Sharp service part QCNWGA038WJPZ) RGB/USB Cable * When using the ø3.5 mm mono audio ... for switching the computer signal output settings. Connecting to a Computer Before connecting, be sure to unplug the power cord of the projector from the AC outlet and turn off the devices to be projected unless the signal output setting of the computer is switched to ...
...compatible with a VESA DDC compatible computer. 23 Use with computer signals other devices. The projector and a VESA DDC compatible computer will communicate their setting requirements, allowing for use the remote control as Sharp service part QCNWGA038WJPZ) RGB/USB Cable * When using the ø3.5 mm mono audio ... for switching the computer signal output settings. Connecting to a Computer Before connecting, be sure to unplug the power cord of the projector from the AC outlet and turn off the devices to be projected unless the signal output setting of the computer is switched to ...


