

XV-Z20000 Operation Manual
Page 4
... and Command Settings 52 Setup Setting Up the Projector 14 Setting Up the Projector 14 Standard Setup (Front Projection 14 Projection (PRJ) Mode 15 Ceiling-mount Setup 15 Picture (Screen) Size and Projection Distance...... 16 Connections Samples of Cables for Connection 17 Connecting to Video Equipment 18 Connecting to a Computer 23...
... and Command Settings 52 Setup Setting Up the Projector 14 Setting Up the Projector 14 Standard Setup (Front Projection 14 Projection (PRJ) Mode 15 Ceiling-mount Setup 15 Picture (Screen) Size and Projection Distance...... 16 Connections Samples of Cables for Connection 17 Connecting to Video Equipment 18 Connecting to a Computer 23...
XV-Z20000 Operation Manual
Page 6
...stoves, or other hazards. 20. Heat This product should be placed in a built-in the operating instructions should be mounted to . 11. Do not use a mounting accessory recommended by a qualified technician to restore the product to lightning and power-line surges. 15. When...long periods of power supply to assure your electrician. in performance, this indicates a need for ventilation to rain or water. Any mounting of plugs. This product should be retained for example, near a swimming pool; Grounding or Polarization This product is damaged. Do not...
...stoves, or other hazards. 20. Heat This product should be placed in a built-in the operating instructions should be mounted to . 11. Do not use a mounting accessory recommended by a qualified technician to restore the product to lightning and power-line surges. 15. When...long periods of power supply to assure your electrician. in performance, this indicates a need for ventilation to rain or water. Any mounting of plugs. This product should be retained for example, near a swimming pool; Grounding or Polarization This product is damaged. Do not...

XV-Z20000 Operation Manual
Page 9
... When the projector is explained. Attaching the Terminal Cover Align the hook on , this operation manual where the topic is used on a desktop, high mounted or ceiling mounted, attach the terminal cover (supplied) to hide the connecting cables. PUSH! 3 3 1 2 1 Remove the rubber cap attached on the menu. ... (SIDE BAR, SMART STRETCH, etc.). 27 INPUT button For displaying the Input list. 26 STANDBY button For putting the projector into the mounting groove on . Part Names and Functions Numbers in refer to the main pages in this indicator will illuminate red. 25, 46 Lamp indicator...
... When the projector is explained. Attaching the Terminal Cover Align the hook on , this operation manual where the topic is used on a desktop, high mounted or ceiling mounted, attach the terminal cover (supplied) to hide the connecting cables. PUSH! 3 3 1 2 1 Remove the rubber cap attached on the menu. ... (SIDE BAR, SMART STRETCH, etc.). 27 INPUT button For displaying the Input list. 26 STANDBY button For putting the projector into the mounting groove on . Part Names and Functions Numbers in refer to the main pages in this indicator will illuminate red. 25, 46 Lamp indicator...
XV-Z20000 Operation Manual
Page 16
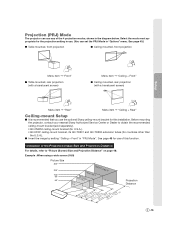
...this installation. Projection (PRJ) Mode The projector can set the PRJ Mode in "Options" menu. See page 45 for use the optional Sharp ceiling-mount bracket for this function. Select the mode most appropriate for countries other than the U.S.A.). ■ Invert the image by setting "Ceiling ...+ Front" in the diagram below. Before mounting the projector, contact your nearest Sharp Authorized Service Center or Dealer to "Picture (Screen) Size and Projection Distance" on page 16. See page 45.) &#...
...this installation. Projection (PRJ) Mode The projector can set the PRJ Mode in "Options" menu. See page 45 for use the optional Sharp ceiling-mount bracket for this function. Select the mode most appropriate for countries other than the U.S.A.). ■ Invert the image by setting "Ceiling ...+ Front" in the diagram below. Before mounting the projector, contact your nearest Sharp Authorized Service Center or Dealer to "Picture (Screen) Size and Projection Distance" on page 16. See page 45.) &#...

XV-Z20000 Operation Manual
Page 66
button 44 RS-232C 45 RS-232C Port 44 RS-232C terminal 24 Saturation 37 Sharp 36 SIDE BAR 30 Signal Info 41 Signal Type 44 SMART STRETCH 30 SMART ZOOM 31 Special Modes 41 STANDBY button 26 STRETCH 30 Subtitle ... Power Off 45 Auto Sync 41 AUTO SYNC button 41 Background 44 Batteries 11 Black Level 43 Bright 36 BRIGHT button 29 BrilliantColorTM 38 Ceiling-mount setup 15 CINEMA ZOOM 31 Clock 41 CLR Temp (Color Temperature 36 C.M.S 37 Color 36 Color Space 44 COMPONENT/RGB 1 terminal 20, 21 COMPONENT/RGB...
button 44 RS-232C 45 RS-232C Port 44 RS-232C terminal 24 Saturation 37 Sharp 36 SIDE BAR 30 Signal Info 41 Signal Type 44 SMART STRETCH 30 SMART ZOOM 31 Special Modes 41 STANDBY button 26 STRETCH 30 Subtitle ... Power Off 45 Auto Sync 41 AUTO SYNC button 41 Background 44 Batteries 11 Black Level 43 Bright 36 BRIGHT button 29 BrilliantColorTM 38 Ceiling-mount setup 15 CINEMA ZOOM 31 Clock 41 CLR Temp (Color Temperature 36 C.M.S 37 Color 36 Color Space 44 COMPONENT/RGB 1 terminal 20, 21 COMPONENT/RGB...

