

XV-Z20000 Operation Manual
Page 2
... record the Serial Number located on the bottom of the projector and retain this product to rain or moisture. Model No.: XV-Z20000/DT-5000 Serial No.: WARNING: High brightness light source. The lightning flash with arrowhead symbol, within an equilateral triangle, is intended to alert...: To reduce the risk of fire or electric shock, do not stare directly into standby mode always use the STANDBY button on the projector or the STANDBY button on page 4. DO NOT REMOVE SCREWS EXCEPT SPECIFIED USER SERVICE SCREW. Ensure the cooling fan has stopped before disconnecting the power...
... record the Serial Number located on the bottom of the projector and retain this product to rain or moisture. Model No.: XV-Z20000/DT-5000 Serial No.: WARNING: High brightness light source. The lightning flash with arrowhead symbol, within an equilateral triangle, is intended to alert...: To reduce the risk of fire or electric shock, do not stare directly into standby mode always use the STANDBY button on the projector or the STANDBY button on page 4. DO NOT REMOVE SCREWS EXCEPT SPECIFIED USER SERVICE SCREW. Ensure the cooling fan has stopped before disconnecting the power...

XV-Z20000 Operation Manual
Page 3
...can be determined by one or more of America, the Electronic Industries Alliance: www.eiae.org. ONLY Declaration of conformity SHARP PROJECTOR, MODEL XV-Z20000/DT-5000 This device complies with any interference received, including interference that to provide reasonable protection against harmful interference in accordance... different from that may be regulated due to . Caution Concerning Lamp Replacement See "Regarding the Lamp" on the picture screen. This SHARP projector uses a DLP® chip. in the United States and/or other countries. • HDMI, the HDMI logo and High-De...
...can be determined by one or more of America, the Electronic Industries Alliance: www.eiae.org. ONLY Declaration of conformity SHARP PROJECTOR, MODEL XV-Z20000/DT-5000 This device complies with any interference received, including interference that to provide reasonable protection against harmful interference in accordance... different from that may be regulated due to . Caution Concerning Lamp Replacement See "Regarding the Lamp" on the picture screen. This SHARP projector uses a DLP® chip. in the United States and/or other countries. • HDMI, the HDMI logo and High-De...

XV-Z20000 Operation Manual
Page 4
...the Lamp Timer 50 Connecting Pin Assignments 51 RS-232C Specifications and Command Settings 52 Setup Setting Up the Projector 14 Setting Up the Projector 14 Standard Setup (Front Projection 14 Projection (PRJ) Mode 15 Ceiling-mount Setup 15 Picture (Screen) Size and ...Projection Distance...... 16 Connections Samples of Cables for Connection 17 Connecting to Video Equipment 18 Connecting to a Computer 23 Controlling the Projector by a Computer ....24 Selecting the Film Mode 38 Reducing Image Noise (DNR 38 Mosquito Noise Reduction (MNR 38 Adjusting the Unveil ...
...the Lamp Timer 50 Connecting Pin Assignments 51 RS-232C Specifications and Command Settings 52 Setup Setting Up the Projector 14 Setting Up the Projector 14 Standard Setup (Front Projection 14 Projection (PRJ) Mode 15 Ceiling-mount Setup 15 Picture (Screen) Size and ...Projection Distance...... 16 Connections Samples of Cables for Connection 17 Connecting to Video Equipment 18 Connecting to a Computer 23 Controlling the Projector by a Computer ....24 Selecting the Film Mode 38 Reducing Image Noise (DNR 38 Mosquito Noise Reduction (MNR 38 Adjusting the Unveil ...
XV-Z20000 Operation Manual
Page 5
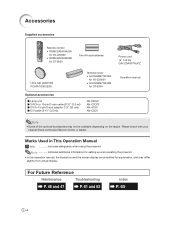
Note Indicates additional information for setting up and operating the projector. • In this operation manual, the illustration and the screen display are simplified for DT-5000 Optional accessories ■ Lamp ...Note • Some of the optional accessories may differ slightly from actual display. Please check with your nearest Sharp Authorized Service Center or Dealer. Accessories Supplied accessories Remote control • RRMCGA500WJSA for XV-Z20000 • RRMCGA500WJSB for DT-5000 Two AA size batteries Power cord (6' (1.8 m)) QACCDA007WJPZ Lens cap (attached)...
Note Indicates additional information for setting up and operating the projector. • In this operation manual, the illustration and the screen display are simplified for DT-5000 Optional accessories ■ Lamp ...Note • Some of the optional accessories may differ slightly from actual display. Please check with your nearest Sharp Authorized Service Center or Dealer. Accessories Supplied accessories Remote control • RRMCGA500WJSA for XV-Z20000 • RRMCGA500WJSB for DT-5000 Two AA size batteries Power cord (6' (1.8 m)) QACCDA007WJPZ Lens cap (attached)...

XV-Z20000 Operation Manual
Page 7
... any other cables connected to it. ■ Do not carry the projector by a Sharp Authorized Service Center or Dealer. Avoid locations with extremes of temperature. ■ The operating temperature of the projector is from the vent may affect the cabinet color or cause deformation of...adjustment foot. Light falling directly on a level site within the adjustment range (±5 degrees) of the projector ■ For minimal servicing and to maintain high image quality, SHARP recommends that this can result in direct sunlight or room light. This does not indicate a malfunction. (See...
... any other cables connected to it. ■ Do not carry the projector by a Sharp Authorized Service Center or Dealer. Avoid locations with extremes of temperature. ■ The operating temperature of the projector is from the vent may affect the cabinet color or cause deformation of...adjustment foot. Light falling directly on a level site within the adjustment range (±5 degrees) of the projector ■ For minimal servicing and to maintain high image quality, SHARP recommends that this can result in direct sunlight or room light. This does not indicate a malfunction. (See...
XV-Z20000 Operation Manual
Page 8
...problems or blockage of the air vents, " " and " " will enter standby mode. tors/Maintenance" on the projector will blink, and after a 90-second cooling-off period the projector will illuminate in internal temperature, as the cooling fan also stops. -7 The sound of the picture. This can ...the temperature warning indicator on page 46 for details. This does not indicate malfunction. • Do not unplug the power cord during projector operation due to rise in the lower left corner of the fan may change during projection or cooling fan operation. If the temperature ...
...problems or blockage of the air vents, " " and " " will enter standby mode. tors/Maintenance" on the projector will blink, and after a 90-second cooling-off period the projector will illuminate in internal temperature, as the cooling fan also stops. -7 The sound of the picture. This can ...the temperature warning indicator on page 46 for details. This does not indicate malfunction. • Do not unplug the power cord during projector operation due to rise in the lower left corner of the fan may change during projection or cooling fan operation. If the temperature ...

XV-Z20000 Operation Manual
Page 9
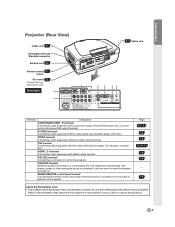
...indicator Illuminates blue, indicating normal function. Insert the terminal cover into the standby mode. 25 ON button For turning the power on the projector and attach the hooks. -8 Zoom knob 27 Focus ring 27 Adjustment foot 28 Lens cap Pressing the two tabs, you can remove/...Temperature warning indicator When the internal temperature rises, this operation manual where the topic is in the hook at the back of the projector. Projector MENU button 34 For displaying adjustment and setting screens. Attaching the Terminal Cover Align the hook on the menu. Replace the lamp when...
...indicator Illuminates blue, indicating normal function. Insert the terminal cover into the standby mode. 25 ON button For turning the power on the projector and attach the hooks. -8 Zoom knob 27 Focus ring 27 Adjustment foot 28 Lens cap Pressing the two tabs, you can remove/...Temperature warning indicator When the internal temperature rises, this operation manual where the topic is in the hook at the back of the projector. Projector MENU button 34 For displaying adjustment and setting screens. Attaching the Terminal Cover Align the hook on the menu. Replace the lamp when...
XV-Z20000 Operation Manual
Page 10
...with HDMI output terminal. RS-232C terminal Connecting a computer to the information that came with analog RGB output terminal. TRIGGER terminal When the projector is turned on , a control signal (DC 12V) outputs from this terminal. WIRED REMOTE control input terminal Connecting the remote control via a...video equipment with component output terminal (DVD player, etc.) or a computer with the system for use it can be turned on when the projector is turned on . If an electric screen or other compatible device is placed out of the reach of remote control signals. Refer to control...
...with HDMI output terminal. RS-232C terminal Connecting a computer to the information that came with analog RGB output terminal. TRIGGER terminal When the projector is turned on , a control signal (DC 12V) outputs from this terminal. WIRED REMOTE control input terminal Connecting the remote control via a...video equipment with component output terminal (DVD player, etc.) or a computer with the system for use it can be turned on when the projector is turned on . If an electric screen or other compatible device is placed out of the reach of remote control signals. Refer to control...

XV-Z20000 Operation Manual
Page 11
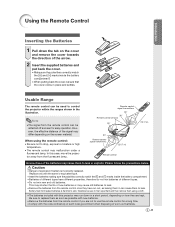
... the appropriate picture to the range or positioning of the projector, connect a ø3.5 mm minijack cable (commercially available) from the WIRED R/C JACK on the top of the projector. Connecting the Remote Control to the Projector When the remote control cannot be used due to best ...the topic is explained. Remote Control Remote control signal 11 transmitters WIRED R/C JACK For controlling the projector by connecting the remote control to the main pages in refer to the projector. RGB/COMP. RETURN button 34 For undoing an operation. button 44 For switching to a computer...
... the appropriate picture to the range or positioning of the projector, connect a ø3.5 mm minijack cable (commercially available) from the WIRED R/C JACK on the top of the projector. Connecting the Remote Control to the Projector When the remote control cannot be used due to best ...the topic is explained. Remote Control Remote control signal 11 transmitters WIRED R/C JACK For controlling the projector by connecting the remote control to the main pages in refer to the projector. RGB/COMP. RETURN button 34 For undoing an operation. button 44 For switching to a computer...
XV-Z20000 Operation Manual
Page 12
... when disposing of worn-out batteries. -11 This may shorten the life of the batteries may run out, as possible with this case, move the projector away from the remote control if you are kept. Battery fluid from the remote control once they are not to use of new batteries...
... when disposing of worn-out batteries. -11 This may shorten the life of the batteries may run out, as possible with this case, move the projector away from the remote control if you are kept. Battery fluid from the remote control once they are not to use of new batteries...
XV-Z20000 Operation Manual
Page 13
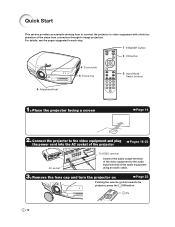
... the video equipment and plug the power cord into the AC socket of the projector Pages 18-25 AC socket To VIDEO terminal Connect the audio output terminal of the audio equipment using an audio cable. 3. For details, see the .... 7 STANDBY button 3 ON button 6 Zoom knob 6 Focus ring 5 Input Mode Select buttons 6 Adjustment feet 1. Place the projector facing a screen Page 14 2. ON -12 Quick Start This section provides an example showing how to connect the projector to video equipment with a brief explanation of the steps from connection through to the audio input...
... the video equipment and plug the power cord into the AC socket of the projector Pages 18-25 AC socket To VIDEO terminal Connect the audio output terminal of the audio equipment using an audio cable. 3. For details, see the .... 7 STANDBY button 3 ON button 6 Zoom knob 6 Focus ring 5 Input Mode Select buttons 6 Adjustment feet 1. Place the projector facing a screen Page 14 2. ON -12 Quick Start This section provides an example showing how to connect the projector to video equipment with a brief explanation of the steps from connection through to the audio input...

XV-Z20000 Operation Manual
Page 14
... shift dial Focus ring Foot releases 7. Select the input mode Press the VIDEO button on the remote control to switch the Input mode. 6. The projector angle is adjusted by using the adjustment feet. STANDBY On-screen display • Unplug the power cord from the AC outlet after the cooling fan... stops. -13 Page 27 VIDEO • Press on the remote control to put the projector into standby mode. Turn the power off Page 26 Press STANDBY on and start playback Playback 5. As for the Input mode. Turn the video ...
... shift dial Focus ring Foot releases 7. Select the input mode Press the VIDEO button on the remote control to switch the Input mode. 6. The projector angle is adjusted by using the adjustment feet. STANDBY On-screen display • Unplug the power cord from the AC outlet after the cooling fan... stops. -13 Page 27 VIDEO • Press on the remote control to put the projector into standby mode. Turn the power off Page 26 Press STANDBY on and start playback Playback 5. As for the Input mode. Turn the video ...
XV-Z20000 Operation Manual
Page 15
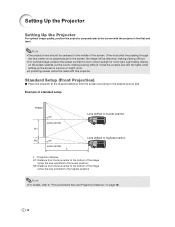
Setting Up the Projector Setting Up the Projector For optimal image quality, position the projector perpendicular to the screen with this projector. Note • The projector lens should be used with the projector's feet flat the required distance from the screen according to the desired picture size. Close ...dim the lights when setting up the screen in direct sunlight or room light. Standard Setup (Front Projection) ■ Place the projector at and level. If the horizontal line passing through the lens center is not perpendicular to the bottom of the screen. Light falling...
Setting Up the Projector Setting Up the Projector For optimal image quality, position the projector perpendicular to the screen with this projector. Note • The projector lens should be used with the projector's feet flat the required distance from the screen according to the desired picture size. Close ...dim the lights when setting up the screen in direct sunlight or room light. Standard Setup (Front Projection) ■ Place the projector at and level. If the horizontal line passing through the lens center is not perpendicular to the bottom of the screen. Light falling...
XV-Z20000 Operation Manual
Page 16
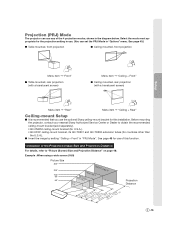
...item ➞ "Rear" Menu item ➞ "Ceiling + Rear" Ceiling-mount Setup ■ It is recommended that you use the optional Sharp ceiling-mount bracket for this function. See page 45 for use any of the Projection Image Size and Projection Distance For details, refer to obtain...AN-TK201 and AN-TK202 extension tubes (for the projection setting in use. (You can use of this installation. Before mounting the projector, contact your nearest Sharp Authorized Service Center or Dealer to "Picture (Screen) Size and Projection Distance" on page 16. Example : When using a wide ...
...item ➞ "Rear" Menu item ➞ "Ceiling + Rear" Ceiling-mount Setup ■ It is recommended that you use the optional Sharp ceiling-mount bracket for this function. See page 45 for use any of the Projection Image Size and Projection Distance For details, refer to obtain...AN-TK201 and AN-TK202 extension tubes (for the projection setting in use. (You can use of this installation. Before mounting the projector, contact your nearest Sharp Authorized Service Center or Dealer to "Picture (Screen) Size and Projection Distance" on page 16. Example : When using a wide ...
XV-Z20000 Operation Manual
Page 17
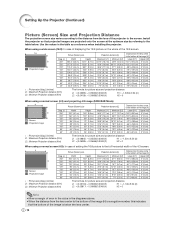
...)/0.3048 (ft) H1 = -1.143x/2.54 (in) H2 = 0 Note • Allow a margin of error in the value in the table as a reference when installing the projector. Use the values in the diagrams above. • When the distance from the lens center to the table below the lens center. -16 Install the... projected images are projected onto the screen at the optimum size by referring to the bottom of the image (H) is below . Setting Up the Projector (Continued) Picture (Screen) Size and Projection Distance The projection screen size varies according to the distance from the lens of the image is a ...
...)/0.3048 (ft) H1 = -1.143x/2.54 (in) H2 = 0 Note • Allow a margin of error in the value in the table as a reference when installing the projector. Use the values in the diagrams above. • When the distance from the lens center to the table below the lens center. -16 Install the... projected images are projected onto the screen at the optimum size by referring to the bottom of the image (H) is below . Setting Up the Projector (Continued) Picture (Screen) Size and Projection Distance The projection screen size varies according to the distance from the lens of the image is a ...
XV-Z20000 Operation Manual
Page 18
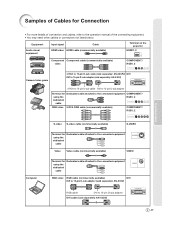
... 15-pin D-sub adaptor (sold separately: AN-C3DV) -17 Equipment Audio-visual equipment Input signal Cable HDMI video HDMI cable (commercially available) Terminal on the projector HDMI1, 2 Component Component cable (commercially available) video COMPONENT/ RGB1, 2 Camera/video game 3 RCA to 15-pin D-sub cable (sold separately: AN-C3CP2) DVI DVI to...
... 15-pin D-sub adaptor (sold separately: AN-C3DV) -17 Equipment Audio-visual equipment Input signal Cable HDMI video HDMI cable (commercially available) Terminal on the projector HDMI1, 2 Component Component cable (commercially available) video COMPONENT/ RGB1, 2 Camera/video game 3 RCA to 15-pin D-sub cable (sold separately: AN-C3CP2) DVI DVI to...

XV-Z20000 Operation Manual
Page 19
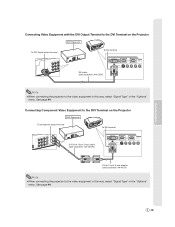
... picture may result in a malfunction. Connecting to Video Equipment Before connecting, be sure to unplug the power cord of the projector from the AC outlet and turn on the Projector HDMI is a new specialized interface capable of delivering a video and audio signal to the terminal using just one cable. &#... connections, turn off the devices to be enjoyed. Connecting Equipment with the HDMI Output Terminal to the DVI Terminal on the Projector HDMI-compatible device To HDMI output terminal To DVI terminal DVI to HDMI cable (commercially available) Note • When connecting the...
... picture may result in a malfunction. Connecting to Video Equipment Before connecting, be sure to unplug the power cord of the projector from the AC outlet and turn on the Projector HDMI is a new specialized interface capable of delivering a video and audio signal to the terminal using just one cable. &#... connections, turn off the devices to be enjoyed. Connecting Equipment with the HDMI Output Terminal to the DVI Terminal on the Projector HDMI-compatible device To HDMI output terminal To DVI terminal DVI to HDMI cable (commercially available) Note • When connecting the...
XV-Z20000 Operation Manual
Page 20
Connections Connecting Video Equipment with the DVI Output Terminal to the DVI Terminal on the Projector DVD Player,etc. See page 44. Connecting Component Video Equipment to the DVI Terminal on the Projector DVD Player,etc. To component output terminal To DVI terminal 3 RCA to 15-pin D-sub cable ...(sold separately: AN-C3CP2) DVI to 15-pin D-sub adaptor (sold separately: AN-C3DV) Note • When connecting the projector to the video equipment in this way, select "Signal Type" in the "Options" menu. See page 44. -19 To DVI Digital output terminal To...
Connections Connecting Video Equipment with the DVI Output Terminal to the DVI Terminal on the Projector DVD Player,etc. See page 44. Connecting Component Video Equipment to the DVI Terminal on the Projector DVD Player,etc. To component output terminal To DVI terminal 3 RCA to 15-pin D-sub cable ...(sold separately: AN-C3CP2) DVI to 15-pin D-sub adaptor (sold separately: AN-C3DV) Note • When connecting the projector to the video equipment in this way, select "Signal Type" in the "Options" menu. See page 44. -19 To DVI Digital output terminal To...
XV-Z20000 Operation Manual
Page 21
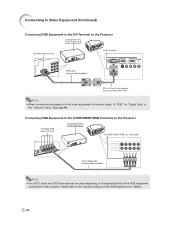
...terminals may be used depending on the specifications of the RGB equipment for "Signal Type" in this projector. Connecting RGB Equipment to the DVI Terminal on the Projector DVD Player,etc. Please refer to the video equipment in the "Options" menu. See page 44. Connecting ...to Video Equipment (Continued) Connecting RGB Equipment to the COMPONENT/RGB Terminals on the Projector To analog RGB output terminal DVD Player,etc. RGB" for details. -20 To RGB output terminal To DVI terminal RGB cable (commercially available...
...terminals may be used depending on the specifications of the RGB equipment for "Signal Type" in this projector. Connecting RGB Equipment to the DVI Terminal on the Projector DVD Player,etc. Please refer to the video equipment in the "Options" menu. See page 44. Connecting ...to Video Equipment (Continued) Connecting RGB Equipment to the COMPONENT/RGB Terminals on the Projector To analog RGB output terminal DVD Player,etc. RGB" for details. -20 To RGB output terminal To DVI terminal RGB cable (commercially available...
XV-Z20000 Operation Manual
Page 22
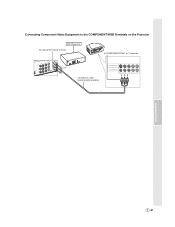
To component output terminal To COMPONENT/RGB 1 or 2 terminals Component cable (commercially available) Connections -21 Connecting Component Video Equipment to the COMPONENT/RGB Terminals on the Projector DVD Player,etc.
To component output terminal To COMPONENT/RGB 1 or 2 terminals Component cable (commercially available) Connections -21 Connecting Component Video Equipment to the COMPONENT/RGB Terminals on the Projector DVD Player,etc.


