
XVZ200U Operation Manual
Page 2
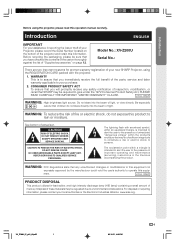
... product utilizes tin-lead solder, and high intensity discharge lamp (HID lamp) containing a small amount of actual set. Model No.: XV-Z200U Serial No.: There are two important reasons for prompt warranty registration of sufficient magnitude to constitute a risk or electric shock to persons..., please contact your assistance in the literature accompanying the product. U.S.A. The exclamation point within the product's enclosure that SHARP may be regulated due to your Projector, please record the Serial Number located on page 12. XV_Z200U_E_p01_03.p65 1 -1 03.10.21, 4:08 PM CAUTION...
... product utilizes tin-lead solder, and high intensity discharge lamp (HID lamp) containing a small amount of actual set. Model No.: XV-Z200U Serial No.: There are two important reasons for prompt warranty registration of sufficient magnitude to constitute a risk or electric shock to persons..., please contact your assistance in the literature accompanying the product. U.S.A. The exclamation point within the product's enclosure that SHARP may be regulated due to your Projector, please record the Serial Number located on page 12. XV_Z200U_E_p01_03.p65 1 -1 03.10.21, 4:08 PM CAUTION...
XVZ200U Operation Manual
Page 3
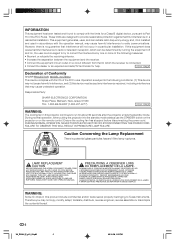
...the user is connected. • Consult the dealer or an experienced radio/TV technician for help. ONLY Declaration of Conformity SHARP PROJECTOR, MODEL XV-Z200U This device complies with the operation manual, may cause harmful interference to which can radiate radio frequency energy and, if not... fan has stopped before disconnecting the power cord. SEE OPERATION MANUAL. REPLACE WITH SAME SHARP LAMP UNIT TYPE BQC-XVZ200++1 ONLY. WARNING: Some IC chips in this projector continues to Texas Instruments. ONLY WARNING: The cooling fan in this product include confidential and...
...the user is connected. • Consult the dealer or an experienced radio/TV technician for help. ONLY Declaration of Conformity SHARP PROJECTOR, MODEL XV-Z200U This device complies with the operation manual, may cause harmful interference to which can radiate radio frequency energy and, if not... fan has stopped before disconnecting the power cord. SEE OPERATION MANUAL. REPLACE WITH SAME SHARP LAMP UNIT TYPE BQC-XVZ200++1 ONLY. WARNING: Some IC chips in this projector continues to Texas Instruments. ONLY WARNING: The cooling fan in this product include confidential and...

XVZ200U Operation Manual
Page 4
... Cord 14 Connecting to Video Equipment 15 Connecting to a DVD Player and DTV Decoder ..... 17 Connecting to a Computer 21 Controlling the Projector by a Computer 23 Setup 24 Using the Swivel Stand 24 Removing the Swivel Stand 24 Attaching the Swivel Stand 25 Focusing and Zooming... the Lamp Unit 60 Resetting the Lamp Timer 61 Cleaning the Ventilative Holes 62 Using the Kensington Lock 63 Troubleshooting 63 For SHARP Assistance (U.S.A. only 63 Connecting Pin Assignments 64 (RS-232C) Specifications and Command Settings 65 Computer Compatibility Chart 66 Specifications 67 ...
... Cord 14 Connecting to Video Equipment 15 Connecting to a DVD Player and DTV Decoder ..... 17 Connecting to a Computer 21 Controlling the Projector by a Computer 23 Setup 24 Using the Swivel Stand 24 Removing the Swivel Stand 24 Attaching the Swivel Stand 25 Focusing and Zooming... the Lamp Unit 60 Resetting the Lamp Timer 61 Cleaning the Ventilative Holes 62 Using the Kensington Lock 63 Troubleshooting 63 For SHARP Assistance (U.S.A. only 63 Connecting Pin Assignments 64 (RS-232C) Specifications and Command Settings 65 Computer Compatibility Chart 66 Specifications 67 ...
XVZ200U Operation Manual
Page 5
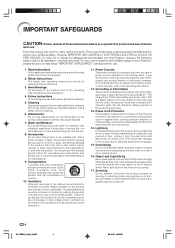
...sold with care. Use a damp cloth for later use . 1. The openings should be sure to read these instructions before you operate this Projector, observe the following basic rules for future reference. 3. Do not defeat the safety purpose of power source indicated on an unstable cart, stand,... before use . Electrical energy can result in the cabinet are not sure of the type of power supply to your home, consult your Projector, please be adhered to. 4. This product has been engineered and manufactured to ensure your obsolete outlet. in the operating instructions should never ...
...sold with care. Use a damp cloth for later use . 1. The openings should be sure to read these instructions before you operate this Projector, observe the following basic rules for future reference. 3. Do not defeat the safety purpose of power source indicated on an unstable cart, stand,... before use . Electrical energy can result in the cabinet are not sure of the type of power supply to your home, consult your Projector, please be adhered to. 4. This product has been engineered and manufactured to ensure your obsolete outlet. in the operating instructions should never ...
XVZ200U Operation Manual
Page 7
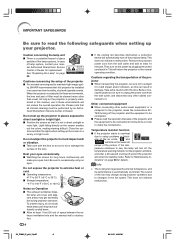
...6 03.10.21, 4:08 PM Caution concerning the lamp unit I If the projector starts to overheat due to setup problems or block- In case of lamp rupture, contact your eyes tired. ity, SHARP recommends that this can result in an area free from humidity, dust and cigarette smoke.... Other connected equipment I When transporting the projector, be cleaned more often than usual. Temperature monitor function I There is ...
...6 03.10.21, 4:08 PM Caution concerning the lamp unit I If the projector starts to overheat due to setup problems or block- In case of lamp rupture, contact your eyes tired. ity, SHARP recommends that this can result in an area free from humidity, dust and cigarette smoke.... Other connected equipment I When transporting the projector, be cleaned more often than usual. Temperature monitor function I There is ...
XVZ200U Operation Manual
Page 8
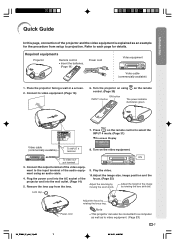
... position and the focus. (Page 25) Adjust the zooming by rotating the focus ring. Introduction Quick Guide In this page, connection of the projector and the video equipment is explained as to projection. To video output terminal 3. Remove the lens cap from setup to video equipment. (Page ... ON 9. Connect the output terminal of the audio equipment using control. (Page 30) on the video equipment. Adjust the height of the projector and into the wall outlet. (Page 14) 5. Connect to each page for the procedure from the lens. Refer to video equipment. (Page 16) ...
... position and the focus. (Page 25) Adjust the zooming by rotating the focus ring. Introduction Quick Guide In this page, connection of the projector and the video equipment is explained as to projection. To video output terminal 3. Remove the lens cap from setup to video equipment. (Page ... ON 9. Connect the output terminal of the audio equipment using control. (Page 30) on the video equipment. Adjust the height of the projector and into the wall outlet. (Page 14) 5. Connect to each page for the procedure from the lens. Refer to video equipment. (Page 16) ...
XVZ200U Operation Manual
Page 9
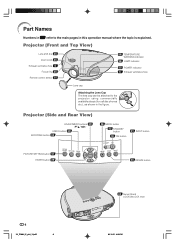
Projector (Front and Top View) Lens shift dial 25 Zoom knob 25 Exhaust ventilative hole 6 Focus ring 25 Remote control...lens cap can be attached to the main pages in the figure. Part Names Numbers in refer to the projector using commercially available straps (for cellular phones etc.), as shown in this operation manual where the topic is explained.... Projector (Side and Rear View) ADJUSTMENT buttons 39 UNDO button 39 KEYSTONE button 33 38 MENU button 32 STANDBY button...
Projector (Front and Top View) Lens shift dial 25 Zoom knob 25 Exhaust ventilative hole 6 Focus ring 25 Remote control...lens cap can be attached to the main pages in the figure. Part Names Numbers in refer to the projector using commercially available straps (for cellular phones etc.), as shown in this operation manual where the topic is explained.... Projector (Side and Rear View) ADJUSTMENT buttons 39 UNDO button 39 KEYSTONE button 33 38 MENU button 32 STANDBY button...
XVZ200U Operation Manual
Page 10
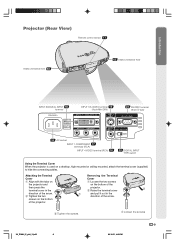
... 14 AC socket INPUT 1 COMPONENT 17 terminals (RCA) INPUT 4 VIDEO terminal (RCA) 16 20 DIGITAL INPUT TYPE switch Using the Terminal Cover When the projector is used on the bottom of the arrow. 2 Tighten the screws 1 Loosen the screws XV_Z200U_E_p04_12.p65 9 -9 03.10.21, 4:09 PM Removing the... Terminal Cover 1 Loosen the two screws on the bottom of the projector. 2 2 Raise the terminal cover 1 and pull it out in the direction of the arrow. 2 Tighten the two screws on a desktop, high mounted ...
... 14 AC socket INPUT 1 COMPONENT 17 terminals (RCA) INPUT 4 VIDEO terminal (RCA) 16 20 DIGITAL INPUT TYPE switch Using the Terminal Cover When the projector is used on the bottom of the arrow. 2 Tighten the screws 1 Loosen the screws XV_Z200U_E_p04_12.p65 9 -9 03.10.21, 4:09 PM Removing the... Terminal Cover 1 Loosen the two screws on the bottom of the projector. 2 2 Raise the terminal cover 1 and pull it out in the direction of the arrow. 2 Tighten the two screws on a desktop, high mounted ...

XVZ200U Operation Manual
Page 12
... remote control can be using a cloth. • The batteries included with new batteries when they have run out, as possible with this projector may exhaust over a short period, depending on the cover and remove the cover toward the direction of the arrow. 2 Insert the included batteries...of the signal may cause them using the remote control for easy operation. Please follow the precautions below. Under that circumstance, move the projector away from the remote control if you will not be reflected off a screen for a long time. Operating the Remote Control Introduction ...
... remote control can be using a cloth. • The batteries included with new batteries when they have run out, as possible with this projector may exhaust over a short period, depending on the cover and remove the cover toward the direction of the arrow. 2 Insert the included batteries...of the signal may cause them using the remote control for easy operation. Please follow the precautions below. Under that circumstance, move the projector away from the remote control if you will not be reflected off a screen for a long time. Operating the Remote Control Introduction ...
XVZ200U Operation Manual
Page 15
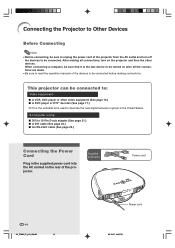
... the supplied power cord into the AC socket on after all the connections are made. • Be sure to read the operation manuals of the projector. Connecting the Projector to Other Devices Before Connecting Note • Before connecting, be sure to unplug the power cord of the... the AC outlet and turn off the devices to be connected before making all connections, turn on the projector and then the other video equipment (See page 15.) I A DVD player or DTV* decoder (See page 17.) *DTV is the last device to be turned ...
... the supplied power cord into the AC socket on after all the connections are made. • Be sure to read the operation manuals of the projector. Connecting the Projector to Other Devices Before Connecting Note • Before connecting, be sure to unplug the power cord of the... the AC outlet and turn off the devices to be connected before making all connections, turn on the projector and then the other video equipment (See page 15.) I A DVD player or DTV* decoder (See page 17.) *DTV is the last device to be turned ...

XVZ200U Operation Manual
Page 16
...terminal uses a video signal system in which the picture is separated into color and luminance signals to connect the INPUT 3 terminal on the projector and the S-video output terminal on the video equipment. S-video cable (commercially available) To INPUT 3 terminal To S-video output terminal ...VCR or other video equipment can be connected to INPUT 3 input terminal. 1 Connect an S-video cable to the projector. 2 Connect the S-video cable to the video equipment. Connections and Setup Connecting to Video Equipment Connecting to Video Equipment Using an S-video...
...terminal uses a video signal system in which the picture is separated into color and luminance signals to connect the INPUT 3 terminal on the projector and the S-video output terminal on the video equipment. S-video cable (commercially available) To INPUT 3 terminal To S-video output terminal ...VCR or other video equipment can be connected to INPUT 3 input terminal. 1 Connect an S-video cable to the projector. 2 Connect the S-video cable to the video equipment. Connections and Setup Connecting to Video Equipment Connecting to Video Equipment Using an S-video...
XVZ200U Operation Manual
Page 17
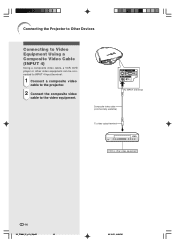
Connecting the Projector to Other Devices Connecting to the video equipment. To INPUT 4 terminal Composite video cable (commercially available) To video output terminal VCR or other video equipment can be connected to INPUT 4 input terminal. 1 Connect a composite video cable to the projector. 2 Connect the composite video cable to Video Equipment Using a Composite Video Cable (INPUT 4) Using a composite video cable, a VCR, DVD player or other video equipment -16 XV_Z200U_E_p13_28.p65 16 03.10.21, 4:09 PM
Connecting the Projector to Other Devices Connecting to the video equipment. To INPUT 4 terminal Composite video cable (commercially available) To video output terminal VCR or other video equipment can be connected to INPUT 4 input terminal. 1 Connect a composite video cable to the projector. 2 Connect the composite video cable to Video Equipment Using a Composite Video Cable (INPUT 4) Using a composite video cable, a VCR, DVD player or other video equipment -16 XV_Z200U_E_p13_28.p65 16 03.10.21, 4:09 PM
XVZ200U Operation Manual
Page 18
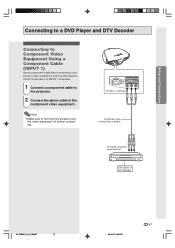
... cable when connecting component video equipment such as DVD players and DTV decoders to INPUT 1 terminals. 1 Connect a component cable to the projector. 2 Connect the above cable to turn both the projector and the video equipment off before connecting. Note • Make sure to the component video equipment. To INPUT 1 terminals Component cable...
... cable when connecting component video equipment such as DVD players and DTV decoders to INPUT 1 terminals. 1 Connect a component cable to the projector. 2 Connect the above cable to turn both the projector and the video equipment off before connecting. Note • Make sure to the component video equipment. To INPUT 1 terminals Component cable...
XVZ200U Operation Manual
Page 19
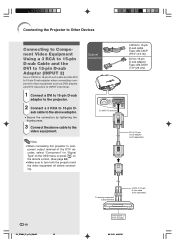
...(sold separately) -18 XV_Z200U_E_p13_28.p65 18 To analog component output terminal 3 RCA to turn both the projector and the video equipment off before connecting. Note • When connecting this projector to the video equipment. sub cable to the above adaptor. • Secure the connectors by tightening ...the thumbscrews. 3 Connect the above cable to com- Connecting the Projector to Other Devices Connecting to Component Video Equipment Using a 3 RCA to 15-pin D-sub Cable and the DVI to 15-pin D-sub ...
...(sold separately) -18 XV_Z200U_E_p13_28.p65 18 To analog component output terminal 3 RCA to turn both the projector and the video equipment off before connecting. Note • When connecting this projector to the video equipment. sub cable to the above adaptor. • Secure the connectors by tightening ...the thumbscrews. 3 Connect the above cable to com- Connecting the Projector to Other Devices Connecting to Component Video Equipment Using a 3 RCA to 15-pin D-sub Cable and the DVI to 15-pin D-sub ...
XVZ200U Operation Manual
Page 20
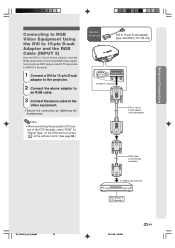
Note • When connecting this projector to 15-pin D-sub adaptor (sold separately) RGB cable (commercially available) To RGB output terminal DVD player or DTV decoder XV_Z200U_E_p13_28.p65 19 03.10.... cable when connecting RGB video equipment such as DVD players and DTV decoders to INPUT 2 terminal. 1 Connect a DVI to 15-pin D-sub adaptor to the projector. 2 Connect the above adaptor to an RGB cable. 3 Connect the above cable to the video equipment. • Secure the connectors by tightening the thumbscrews.
Note • When connecting this projector to 15-pin D-sub adaptor (sold separately) RGB cable (commercially available) To RGB output terminal DVD player or DTV decoder XV_Z200U_E_p13_28.p65 19 03.10.... cable when connecting RGB video equipment such as DVD players and DTV decoders to INPUT 2 terminal. 1 Connect a DVI to 15-pin D-sub adaptor to the projector. 2 Connect the above adaptor to an RGB cable. 3 Connect the above cable to the video equipment. • Secure the connectors by tightening the thumbscrews.
XVZ200U Operation Manual
Page 21
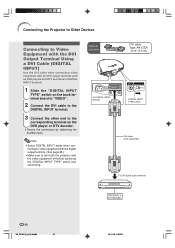
Connecting the Projector to Other Devices Connecting to Video Equipment with the DVI Output Terminal Using a DVI Cable (DIGITAL INPUT) Use the DVI cable when connecting video equipment ..." switch on the back terminal board to "VIDEO". 2 Connect the DVI cable to the DIGITAL INPUT terminal. 3 Connect the other end to turn both the projector and the video equipment off before switching the "DIGITAL INPUT TYPE" switch and connecting.
Connecting the Projector to Other Devices Connecting to Video Equipment with the DVI Output Terminal Using a DVI Cable (DIGITAL INPUT) Use the DVI cable when connecting video equipment ..." switch on the back terminal board to "VIDEO". 2 Connect the DVI cable to the DIGITAL INPUT terminal. 3 Connect the other end to turn both the projector and the video equipment off before switching the "DIGITAL INPUT TYPE" switch and connecting.
XVZ200U Operation Manual
Page 22
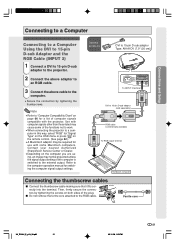
...output settings. Ferrite core XV_Z200U_E_p13_28.p65 21 03.10.28, 1:53 PM -21 Then, firmly secure the connectors by tightening the thumbscrews. Use with the projector. Connections and Setup Connecting to a Computer Connecting to a Computer Using the DVI to 15-pin D-sub Adaptor and the RGB Cable (INPUT 2) 1 ...Connect a DVI to 15-pin D-sub adaptor to the projector. 2 Connect the above adaptor to an RGB cable. 3 Connect the above cable to the computer. • Secure the connectors by tightening the screws on...
...output settings. Ferrite core XV_Z200U_E_p13_28.p65 21 03.10.28, 1:53 PM -21 Then, firmly secure the connectors by tightening the thumbscrews. Use with the projector. Connections and Setup Connecting to a Computer Connecting to a Computer Using the DVI to 15-pin D-sub Adaptor and the RGB Cable (INPUT 2) 1 ...Connect a DVI to 15-pin D-sub adaptor to the projector. 2 Connect the above adaptor to an RGB cable. 3 Connect the above cable to the computer. • Secure the connectors by tightening the screws on...
XVZ200U Operation Manual
Page 23
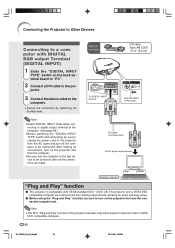
..."Plug and Play" function I Before using the "Plug and Play" function, be connected. I This projector is the last device to be turned on the projector first and the connected computer last. Connecting the Projector to Other Devices Connecting to a computer with DIGITAL RGB output Terminal (DIGITAL INPUT) 1 Slide the "... VESA DDC compatible computer. -22 XV_Z200U_E_p13_28.p65 22 03.10.28, 1:53 PM Note • The DDC "Plug and Play" function of the projector from the AC outlet and turn off the computer to be sure to turn on the back terminal board to "PC". 2 Connect a DVI cable ...
..."Plug and Play" function I Before using the "Plug and Play" function, be connected. I This projector is the last device to be turned on the projector first and the connected computer last. Connecting the Projector to Other Devices Connecting to a computer with DIGITAL RGB output Terminal (DIGITAL INPUT) 1 Slide the "... VESA DDC compatible computer. -22 XV_Z200U_E_p13_28.p65 22 03.10.28, 1:53 PM Note • The DDC "Plug and Play" function of the projector from the AC outlet and turn off the computer to be sure to turn on the back terminal board to "PC". 2 Connect a DVI cable ...
XVZ200U Operation Manual
Page 24
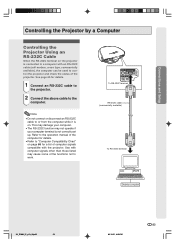
...232C cable to or from the computer while it is not correctly set up. See page 65 for a list of computer signals compatible with the projector. Refer to the operation manual of the computer for details. • Refer to "Computer Compatibility Chart" on page 66 for details. 1 Connect... an RS-232C cable to the projector. 2 Connect the above cable to the computer. To RS-232C terminal RS-232C cable (commercially available) To RS-232C terminal Desktop computer XV_Z200U_E_p13_28.p65...
...232C cable to or from the computer while it is not correctly set up. See page 65 for a list of computer signals compatible with the projector. Refer to the operation manual of the computer for details. • Refer to "Computer Compatibility Chart" on page 66 for details. 1 Connect... an RS-232C cable to the projector. 2 Connect the above cable to the computer. To RS-232C terminal RS-232C cable (commercially available) To RS-232C terminal Desktop computer XV_Z200U_E_p13_28.p65...
XVZ200U Operation Manual
Page 25
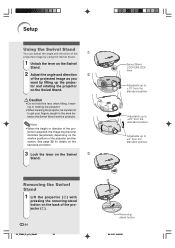
...position. Adjustable up to ±10° from the standard position. Removing the Swivel Stand 1 Lift the projector (2) with pressing the removing-stand button on the relative positions of the projector and the screen. Adjustable up the projec- Note • When the height or direction of the... projector is adjusted, the image may become distorted (keystoned), depending on the back of the projector (1). -24 XV_Z200U_E_p13_28.p65 24 2 1 Removingstand button 03.10.21, 4:09 PM Setup Using the ...
...position. Adjustable up to ±10° from the standard position. Removing the Swivel Stand 1 Lift the projector (2) with pressing the removing-stand button on the relative positions of the projector and the screen. Adjustable up the projec- Note • When the height or direction of the... projector is adjusted, the image may become distorted (keystoned), depending on the back of the projector (1). -24 XV_Z200U_E_p13_28.p65 24 2 1 Removingstand button 03.10.21, 4:09 PM Setup Using the ...


