Operation Manual
Page 4
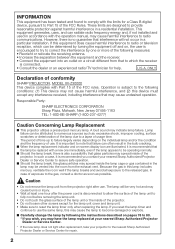
... dealer or an experienced radio/TV technician for the lamp unit cover and lamp unit. • Make sure to reset the lamp timer only when replacing the lamp. Caution • Do not remove the lamp unit from the projector right after use . ONLY Declaration of conformity SHARP PROJECTOR, MODEL XV-Z30000 This device complies with Part 15 of exposure...
... dealer or an experienced radio/TV technician for the lamp unit cover and lamp unit. • Make sure to reset the lamp timer only when replacing the lamp. Caution • Do not remove the lamp unit from the projector right after use . ONLY Declaration of conformity SHARP PROJECTOR, MODEL XV-Z30000 This device complies with Part 15 of exposure...
Operation Manual
Page 7
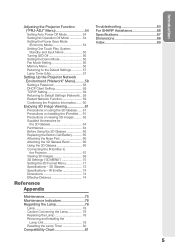
...on viewing 3D images ......... 62 Supplied Accessories for the 3D Glasses 64 Part Names 64 Before Using the 3D Glasses 65 Replacing the Button Cell Battery 65 Attaching the Nose Pad 66 Attaching the 3D Glasses Band 66 Using the 3D Glasses 66 Connecting... Reference Appendix Maintenance 75 Maintenance Indicators 76 Regarding the Lamp 78 Lamp 78 Caution Concerning the Lamp 78 Replacing the Lamp 78 Removing and Installing the Lamp Unit 79 Resetting the Lamp Timer 80 Compatibility Chart 81 Troubleshooting 83 For SHARP Assistance 86 Specifications 87 Dimensions 88 Index 89...
...on viewing 3D images ......... 62 Supplied Accessories for the 3D Glasses 64 Part Names 64 Before Using the 3D Glasses 65 Replacing the Button Cell Battery 65 Attaching the Nose Pad 66 Attaching the 3D Glasses Band 66 Using the 3D Glasses 66 Connecting... Reference Appendix Maintenance 75 Maintenance Indicators 76 Regarding the Lamp 78 Lamp 78 Caution Concerning the Lamp 78 Replacing the Lamp 78 Removing and Installing the Lamp Unit 79 Resetting the Lamp Timer 80 Compatibility Chart 81 Troubleshooting 83 For SHARP Assistance 86 Specifications 87 Dimensions 88 Index 89...
Operation Manual
Page 10
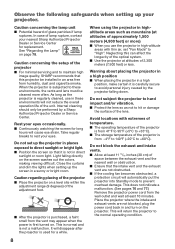
...may appear when the power is first turned on the projector. In case of the lens. When the projector is used for replacement. Take regular breaks to prevent overheat damage. Close the curtains and dim the lights when setting up the screen in high- Place the...Rest your eyes occasionally. ■ Continuously watching the screen for long hours will return the projector to hit or damage the surface of lamp rupture, contact your nearest Sharp Authorized Projector Dealer or Service Center for a while. This is normal and is carefully secure to +35°C). ■ The storage...
...may appear when the power is first turned on the projector. In case of the lens. When the projector is used for replacement. Take regular breaks to prevent overheat damage. Close the curtains and dim the lights when setting up the screen in high- Place the...Rest your eyes occasionally. ■ Continuously watching the screen for long hours will return the projector to hit or damage the surface of lamp rupture, contact your nearest Sharp Authorized Projector Dealer or Service Center for a while. This is normal and is carefully secure to +35°C). ■ The storage...
Operation Manual
Page 14
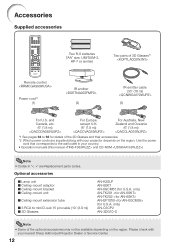
... are supplied along with your projector depends on the region. Please check with your nearest Sharp Authorized Projector Dealer or Service Center. 12 Accessories Supplied accessories Two R-6 batteries ("AA" size...similar) Two pairs of the 3D Glasses and their accessories. *2 Which power cords are Replacement parts codes. only) AN-C3CP2 AN-3DG10-S Note • Some of the optional ...accessories may not be available depending on the region. Optional accessories ■ Lamp unit ■ Ceiling-mount adaptor ■ Ceiling-mount bracket ■ Ceiling-mount unit...
... are supplied along with your projector depends on the region. Please check with your nearest Sharp Authorized Projector Dealer or Service Center. 12 Accessories Supplied accessories Two R-6 batteries ("AA" size...similar) Two pairs of the 3D Glasses and their accessories. *2 Which power cords are Replacement parts codes. only) AN-C3CP2 AN-3DG10-S Note • Some of the optional ...accessories may not be available depending on the region. Optional accessories ■ Lamp unit ■ Ceiling-mount adaptor ■ Ceiling-mount bracket ■ Ceiling-mount unit...
Operation Manual
Page 30
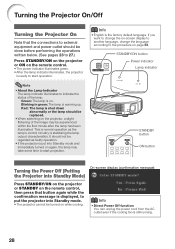
... the factory default language. Red: The lamp is shut down abnormally or the lamp should be replaced. • When switching on the projector, a slight flickering of the lamp. STANDBY/ON button Power indicator Lamp indicator STANDBY button ON button Turning the Power Off (Putting On-screen display (... up. This is normal operation as faulty operation. • If the projector is still running. 28 Note • About the Lamp Indicator The lamp indicator illuminates to indicate the status of the image may take some time to the procedure on . Info • Direct Power Off...
... the factory default language. Red: The lamp is shut down abnormally or the lamp should be replaced. • When switching on the projector, a slight flickering of the lamp. STANDBY/ON button Power indicator Lamp indicator STANDBY button ON button Turning the Power Off (Putting On-screen display (... up. This is normal operation as faulty operation. • If the projector is still running. 28 Note • About the Lamp Indicator The lamp indicator illuminates to indicate the status of the image may take some time to the procedure on . Info • Direct Power Off...

Operation Manual
Page 78
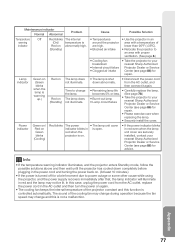
... projector increases, due to be displayed on the screen. About the lamp indicator ■ When the remaining lamp life becomes 5% or less, (yellow) and "Change The Lamp." Top View Temperature warning indicator Lamp indicator Power indicator About the temperature warning indicator If the temperature inside the..." will be changed. (See page 77.) Temperature Off Normal warning indicator Red on the projector a fourth time without replacing the lamp, the projector will automatically enter Standby mode. When you try to perform the measures described on Normal Green blinks The...
... projector increases, due to be displayed on the screen. About the lamp indicator ■ When the remaining lamp life becomes 5% or less, (yellow) and "Change The Lamp." Top View Temperature warning indicator Lamp indicator Power indicator About the temperature warning indicator If the temperature inside the..." will be changed. (See page 77.) Temperature Off Normal warning indicator Red on the projector a fourth time without replacing the lamp, the projector will automatically enter Standby mode. When you try to perform the measures described on Normal Green blinks The...
Operation Manual
Page 79
... Service Center (see page 86) for repair. • Please exercise care when replacing the lamp. • Securely install the cover. becomes 5% or less. (See page 78.) • Burnt-out lamp • Lamp circuit failure • Take the projector to your nearest Sharp Authorized Projector Dealer or Service Center (see page 86) for repair. Power indicator...
... Service Center (see page 86) for repair. • Please exercise care when replacing the lamp. • Securely install the cover. becomes 5% or less. (See page 78.) • Burnt-out lamp • Lamp circuit failure • Take the projector to your nearest Sharp Authorized Projector Dealer or Service Center (see page 86) for repair. Power indicator...
Operation Manual
Page 80
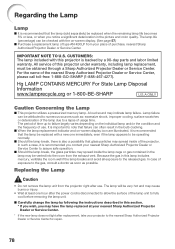
... sources such as possible. Replacing the Lamp Caution • Do not remove the lamp unit from your projector to assure safe operation. ■ Should the lamp break, the glass particles may indicate lamp failure. All service of the nearest Sharp Authorized Projector Dealer or Service...released gas. Regarding the Lamp Lamp ■ It is recommended that the lamp (sold separately) be replaced when the remaining lamp life becomes 5% or less, or when you contact your nearest Sharp Authorized Projector Dealer or Service Center to the nearest Sharp Authorized Projector Dealer or Service...
... sources such as possible. Replacing the Lamp Caution • Do not remove the lamp unit from your projector to assure safe operation. ■ Should the lamp break, the glass particles may indicate lamp failure. All service of the nearest Sharp Authorized Projector Dealer or Service...released gas. Regarding the Lamp Lamp ■ It is recommended that the lamp (sold separately) be replaced when the remaining lamp life becomes 5% or less, or when you contact your nearest Sharp Authorized Projector Dealer or Service Center to the nearest Sharp Authorized Projector Dealer or Service...
Operation Manual
Page 82
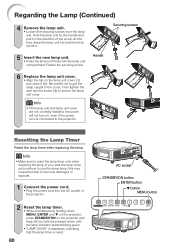
... cord. • Plug the power cord into the lamp unit compartment. Regarding the Lamp (Continued) 4 Remove the lamp unit. • Loosen the securing screws from the lamp unit. Then tighten the user service screw (3) to reset the lamp timer only when replacing the lamp. At this may cause the lamp to the projector. Securing screws 5 Insert the new...
... cord. • Plug the power cord into the lamp unit compartment. Regarding the Lamp (Continued) 4 Remove the lamp unit. • Loosen the securing screws from the lamp unit. Then tighten the user service screw (3) to reset the lamp timer only when replacing the lamp. At this may cause the lamp to the projector. Securing screws 5 Insert the new...
Operation Manual
Page 86
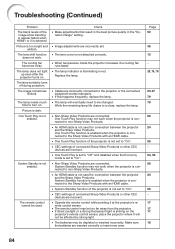
...does not work when the projector is connected to turn on . The lamp needs much time to non-Sharp Video Products. System Standby is not attached correctly. x The lens cover is not enabled. Replace the lamp. One Touch Play function is enabled when the projector is not used ...for connection between the projector and the Sharp Video Products. x Non-Sharp Video Products are incorrectly connected to the Sharp Video Products with an HDMI cable. x An...
...does not work when the projector is connected to turn on . The lamp needs much time to non-Sharp Video Products. System Standby is not attached correctly. x The lens cover is not enabled. Replace the lamp. One Touch Play function is enabled when the projector is not used ...for connection between the projector and the Sharp Video Products. x Non-Sharp Video Products are incorrectly connected to the Sharp Video Products with an HDMI cable. x An...
Operation Manual
Page 91
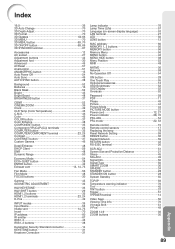
... button 37 Power cord 12, 27 Power indicator 28, 76 PRJ-ADJ 54 PRJ mode 22, 53 Remote control 15 Remote control sensors 17 Replacing the lamp 78 Reset Network Setting 59 RESIZE button 36 Restart Network 59 RETURN button 42 RS-232C terminal 26 SCR-ADJ 51 Screen Size and Projection... Distance 21 Sharp 45 SIG-ADJ 49 Signal Info 50 Signal Type 50 SMART ZOOM 36 SPHERE 34 STANDBY button 28 STANDBY/ON button 28 System...
... button 37 Power cord 12, 27 Power indicator 28, 76 PRJ-ADJ 54 PRJ mode 22, 53 Remote control 15 Remote control sensors 17 Replacing the lamp 78 Reset Network Setting 59 RESIZE button 36 Restart Network 59 RETURN button 42 RS-232C terminal 26 SCR-ADJ 51 Screen Size and Projection... Distance 21 Sharp 45 SIG-ADJ 49 Signal Info 50 Signal Type 50 SMART ZOOM 36 SPHERE 34 STANDBY button 28 STANDBY/ON button 28 System...


