
XVZ90U Operation Manual
Page 2
... is to give under the 1972 Consumer Product Safety Act, PLEASE READ CAREFULLY THE IMPORTANT "LIMITED WARRANTY" CLAUSE. Model No.: XV-Z90U Serial No.: There are two important reasons for prompt warranty registration of light. DO NOT REMOVE SCREWS EXCEPT SPECIFIED USER SERVICE SCREWS...expressly approved by the manufacturer could void the user's authority to your new SHARP Projector, using the projector, please read this equip- ment. CONSUMER PRODUCT SAFETY ACT To ensure that SHARP may be required to assure that any safety notification of important operating and ...
... is to give under the 1972 Consumer Product Safety Act, PLEASE READ CAREFULLY THE IMPORTANT "LIMITED WARRANTY" CLAUSE. Model No.: XV-Z90U Serial No.: There are two important reasons for prompt warranty registration of light. DO NOT REMOVE SCREWS EXCEPT SPECIFIED USER SERVICE SCREWS...expressly approved by the manufacturer could void the user's authority to your new SHARP Projector, using the projector, please read this equip- ment. CONSUMER PRODUCT SAFETY ACT To ensure that SHARP may be required to assure that any safety notification of important operating and ...
XVZ90U Operation Manual
Page 3
... Texas Instruments. ONLY WARNING: The cooling fan in a particular installation. DURING NORMAL OPERATION, NEVER TURN THE PROJECTOR OFF BY DISCONNECTING THE POWER CORD. REPLACE WITH SAME SHARP LAMP UNIT TYPE BQC-XVZ90+++1 ONLY. UV RADIATION : CAN CAUSE EYE DAMAGE. HANDLE WITH CARE. XVZ90U(E)#... and used in accordance with the operation manual, may cause harmful interference to radio communications. U.S.A. ONLY Declaration of Conformity SHARP PROJECTOR, MODEL XV-Z90U This device complies with the limits for help. ALLOW 1 HOUR TO COOL BEFORE REPLACING THE LAMP. TURN OFF LAMP ...
... Texas Instruments. ONLY WARNING: The cooling fan in a particular installation. DURING NORMAL OPERATION, NEVER TURN THE PROJECTOR OFF BY DISCONNECTING THE POWER CORD. REPLACE WITH SAME SHARP LAMP UNIT TYPE BQC-XVZ90+++1 ONLY. UV RADIATION : CAN CAUSE EYE DAMAGE. HANDLE WITH CARE. XVZ90U(E)#... and used in accordance with the operation manual, may cause harmful interference to radio communications. U.S.A. ONLY Declaration of Conformity SHARP PROJECTOR, MODEL XV-Z90U This device complies with the limits for help. ALLOW 1 HOUR TO COOL BEFORE REPLACING THE LAMP. TURN OFF LAMP ...

XVZ90U Operation Manual
Page 4
Cleaning Unplug this Projector, observe the following basic rules for ventilation to ensure reliable operation of other sources, refer to normal operation. Attachments Do not use attachments not recommended ... a bookcase or rack unless proper ventilation is left unattended and unused for this product, ask the service technician to perform safety checks to ensure your Projector, please be walked on an unstable cart, stand, tripod, bracket, or table. This is damaged. Heat This product should not be situated away from the...
Cleaning Unplug this Projector, observe the following basic rules for ventilation to ensure reliable operation of other sources, refer to normal operation. Attachments Do not use attachments not recommended ... a bookcase or rack unless proper ventilation is left unattended and unused for this product, ask the service technician to perform safety checks to ensure your Projector, please be walked on an unstable cart, stand, tripod, bracket, or table. This is damaged. Heat This product should not be situated away from the...
XVZ90U Operation Manual
Page 5
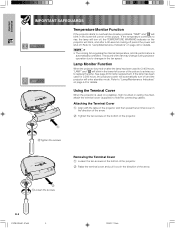
.... Be especially careful that children do not touch these environments will return the projector to the normal operating condition. ALLOW 1 HOUR TO COOL BEFORE REPLACING THE LAMP. NE REMPLACER QUE PAR UNE LAMPE SHARP DE TYPE BQC-XVZ90+++1. A MANIPULER AVEC PRECAUTION, SE REPORTER AU MODE D'...EMPLOI. 95˚F (+35˚C) 41˚F (+5˚C) Cautions Concerning the Setup of the Projector For minimal servicing and to maintain high image quality, SHARP recommends that all internal cleaning must be installed in . To prevent injury, do not stare directly into the...
.... Be especially careful that children do not touch these environments will return the projector to the normal operating condition. ALLOW 1 HOUR TO COOL BEFORE REPLACING THE LAMP. NE REMPLACER QUE PAR UNE LAMPE SHARP DE TYPE BQC-XVZ90+++1. A MANIPULER AVEC PRECAUTION, SE REPORTER AU MODE D'...EMPLOI. 95˚F (+35˚C) 41˚F (+5˚C) Cautions Concerning the Setup of the Projector For minimal servicing and to maintain high image quality, SHARP recommends that all internal cleaning must be installed in . To prevent injury, do not stare directly into the...
XVZ90U Operation Manual
Page 6
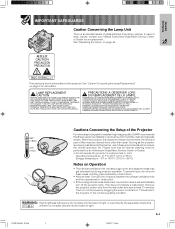
...indicator on a desktop, high mounted or ceiling mounted, attach the terminal cover (supplied) to hide the connecting cables. Lamp Monitor Function When the projector is turned on page 44 for details. • The cooling fan regulates the internal temperature, and its performance is used for 2,400 hours,... the Terminal Cover 1 Loosen the two screws on page 44 for lamp replacement. Attaching the Terminal Cover 1 Align with the tabs on the projector and then press the terminal cover in the fan speed. The sound of the arrow. 2 1Loosen the screws E-5 XVZ90U(E)#p01_07.p65 5 20...
...indicator on a desktop, high mounted or ceiling mounted, attach the terminal cover (supplied) to hide the connecting cables. Lamp Monitor Function When the projector is turned on page 44 for details. • The cooling fan regulates the internal temperature, and its performance is used for 2,400 hours,... the Terminal Cover 1 Loosen the two screws on page 44 for lamp replacement. Attaching the Terminal Cover 1 Align with the tabs on the projector and then press the terminal cover in the fan speed. The sound of the arrow. 2 1Loosen the screws E-5 XVZ90U(E)#p01_07.p65 5 20...
XVZ90U Operation Manual
Page 8
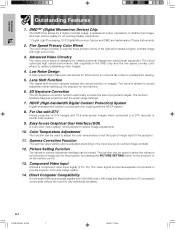
...trademarks of image input to suit the type of Texas Instruments. 2. The function can be used to adjust the color temperature to the projector. 11. The video signal is input as separate components to minimize fan noise for simple image adjustments. 10. Advanced Video Circuitry The ...signals from VGA (640 dots × 480 lines) and Macintosh (from audiovisual equipment. The function allows for simple adjustment when setting up the projector for a higher contrast image. Picture Setting Function The values in the DMD chip and the five speed primary color wheel, to a DTV ...
...trademarks of image input to suit the type of Texas Instruments. 2. The function can be used to adjust the color temperature to the projector. 11. The video signal is input as separate components to minimize fan noise for simple image adjustments. 10. Advanced Video Circuitry The ...signals from VGA (640 dots × 480 lines) and Macintosh (from audiovisual equipment. The function allows for simple adjustment when setting up the projector for a higher contrast image. Picture Setting Function The values in the DMD chip and the five speed primary color wheel, to a DTV ...
XVZ90U Operation Manual
Page 9
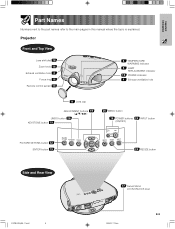
Important Information Part Names Numbers next to the part names refer to the main pages in this manual where the topic is explained. Projector Front and Top View Lens shift dial 18 Zoom knob 16 Exhaust ventilative hole 4 Focus ring 16 Remote control sensor 15 5 TEMPERATURE WARNING indicator 5 LAMP ...
Important Information Part Names Numbers next to the part names refer to the main pages in this manual where the topic is explained. Projector Front and Top View Lens shift dial 18 Zoom knob 16 Exhaust ventilative hole 4 Focus ring 16 Remote control sensor 15 5 TEMPERATURE WARNING indicator 5 LAMP ...

XVZ90U Operation Manual
Page 10
Important Information Part Names Numbers next to the part names refer to the lens. Projector Side and Rear View Remote control sensor 15 Intake ventilative hole 49 49 Intake ventilative hole INPUT 2 DVI digital port 13 INPUT 3 S-VIDEO terminal 13 (4-... the Lens Cap After putting the lens cap strap on the lens cap, pass the other end of the strap through the hole under the projector, next to the main pages in this manual where the topic is explained. E-9 XVZ90U(E)#p08_11.pm6 9 20/8/02, 7:19 pm
Important Information Part Names Numbers next to the part names refer to the lens. Projector Side and Rear View Remote control sensor 15 Intake ventilative hole 49 49 Intake ventilative hole INPUT 2 DVI digital port 13 INPUT 3 S-VIDEO terminal 13 (4-... the Lens Cap After putting the lens cap strap on the lens cap, pass the other end of the strap through the hole under the projector, next to the main pages in this manual where the topic is explained. E-9 XVZ90U(E)#p08_11.pm6 9 20/8/02, 7:19 pm

XVZ90U Operation Manual
Page 13
... available) to the INPUT 3 S-VIDEO terminal, or one end of the video cable (commercially available) to the INPUT 4 VIDEO terminal on the projector. 2 Connect the other video equipment. * DTV is not equipped with audio input terminals, commercially available audio equipment or your own equipment (such as... the power cord again. However, if the projetor was turned off by disconnecting the power cord or by a power failure, the projector will enter the standby mode as you may use the composite video output terminal. Setup & Connections Connections Power Supply Connecting the Power ...
... available) to the INPUT 3 S-VIDEO terminal, or one end of the video cable (commercially available) to the INPUT 4 VIDEO terminal on the projector. 2 Connect the other video equipment. * DTV is not equipped with audio input terminals, commercially available audio equipment or your own equipment (such as... the power cord again. However, if the projetor was turned off by disconnecting the power cord or by a power failure, the projector will enter the standby mode as you may use the composite video output terminal. Setup & Connections Connections Power Supply Connecting the Power ...

XVZ90U Operation Manual
Page 14
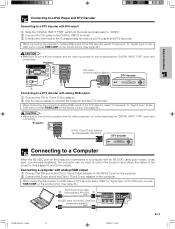
... DVD player and DTV decoder with Component output (for INPUT 1) 1 Connect each RCA connector of a component cable to the corresponding RCA INPUT 1 terminals on the projector. 2 Connect the other end of the DTV decoder, select "Component" for INPUT 2) 1 Connect the 3 RCA to 15-pin D-Sub cable using the DVI... DVD Player and DTV Decoder Connecting to a DVD player and DTV decorder with component output (for "Signal Type" on a DVD player or DTV decoder. Projector E-13 DVI to 15-pin D-sub adaptor (sold separately AN-C3CP) DVD player or DTV decoder 20/8/02, 7:21 pm CAUTION • Make sure...
... DVD player and DTV decoder with Component output (for INPUT 1) 1 Connect each RCA connector of a component cable to the corresponding RCA INPUT 1 terminals on the projector. 2 Connect the other end of the DTV decoder, select "Component" for INPUT 2) 1 Connect the 3 RCA to 15-pin D-Sub cable using the DVI... DVD Player and DTV Decoder Connecting to a DVD player and DTV decorder with component output (for "Signal Type" on a DVD player or DTV decoder. Projector E-13 DVI to 15-pin D-sub adaptor (sold separately AN-C3CP) DVD player or DTV decoder 20/8/02, 7:21 pm CAUTION • Make sure...
XVZ90U Operation Manual
Page 15
..." for "Signal Type" on the OSD menu or press RGB/COMP. on the OSD menu or press RGB/COMP. When connecting this projector to analog RGB output of the projector. Connecting a computer with analog RGB output 1 Connect the DVI end of the DVI to 15-pin D-sub adapter to the INPUT 2 port... end of the DTV decoder, select "Component" for "Signal Type" on the remote control. (See page 36.) CAUTION • Make sure to turn both the projector and the video equipment off , before switching the "DIGITAL INPUT TYPE" swich and connecting. on the remote control. (See page 36.) DVI to D-sub 15...
..." for "Signal Type" on the OSD menu or press RGB/COMP. on the OSD menu or press RGB/COMP. When connecting this projector to analog RGB output of the projector. Connecting a computer with analog RGB output 1 Connect the DVI end of the DVI to 15-pin D-sub adapter to the INPUT 2 port... end of the DTV decoder, select "Component" for "Signal Type" on the remote control. (See page 36.) CAUTION • Make sure to turn both the projector and the video equipment off , before switching the "DIGITAL INPUT TYPE" swich and connecting. on the remote control. (See page 36.) DVI to D-sub 15...

XVZ90U Operation Manual
Page 16
...Operating the Remote Control Remote Control 23Ј (7 m) 30˚ 45˚ 30˚ The remote control can be used to control the projector within the range shown on page 54 for easy operation. However, the effective distance of the signal may damage your computer. • Refer to... seconds and off by pressing LIGHT. Contact your computer port is on for use with some Macintosh computers. If you want to turn both the projector and the video equipment off, before switching the "DIGITAL INPUT TYPE" swich and connecting. 3 DVI cable (commercially available) 2 1 Connect an RS-...
...Operating the Remote Control Remote Control 23Ј (7 m) 30˚ 45˚ 30˚ The remote control can be used to control the projector within the range shown on page 54 for easy operation. However, the effective distance of the signal may damage your computer. • Refer to... seconds and off by pressing LIGHT. Contact your computer port is on for use with some Macintosh computers. If you want to turn both the projector and the video equipment off, before switching the "DIGITAL INPUT TYPE" swich and connecting. 3 DVI cable (commercially available) 2 1 Connect an RS-...

XVZ90U Operation Manual
Page 17
...lamp. When the power is displayed. Press POWER OFF. • Press POWER OFF again while the confirmation message is on . • After the projector is pressed twice, the POWER indicator will illuminate in red and the cooling fan will appear. • If you accidentally pressed POWER OFF and do... the lamp turns on , the LAMP REPLACEMENT indicator illuminates, indicating the status of the lamp. The projector will soon disappear with use. Wait until the cooling fan stops running before operating the projector. • If the power is turned off the power, wait until the image on , the ...
...lamp. When the power is displayed. Press POWER OFF. • Press POWER OFF again while the confirmation message is on . • After the projector is pressed twice, the POWER indicator will illuminate in red and the cooling fan will appear. • If you accidentally pressed POWER OFF and do... the lamp turns on , the LAMP REPLACEMENT indicator illuminates, indicating the status of the lamp. The projector will soon disappear with use. Wait until the cooling fan stops running before operating the projector. • If the power is turned off the power, wait until the image on , the ...

XVZ90U Operation Manual
Page 18
...177; 10° from the stadard position. Adjustable up the projector and rotating the projector on the Swivel 2 Stand. 3 Lock the lever on the Swivel Stand. Removingstand button Press the projector down the button (2), place the projector onto the Swivel Stand (3) to get your fingers caught in the... to the Swivel Stand. 1 3 2 CAUTION • Do not hold the lens when lifting, lowering or rotating the projector. • When lowering the projector, be careful not to attach. Setup & Connections Setting Up the Screen Using the Swivel Stand 1 You can adjust the angle...
...177; 10° from the stadard position. Adjustable up the projector and rotating the projector on the Swivel 2 Stand. 3 Lock the lever on the Swivel Stand. Removingstand button Press the projector down the button (2), place the projector onto the Swivel Stand (3) to get your fingers caught in the... to the Swivel Stand. 1 3 2 CAUTION • Do not hold the lens when lifting, lowering or rotating the projector. • When lowering the projector, be careful not to attach. Setup & Connections Setting Up the Screen Using the Swivel Stand 1 You can adjust the angle...
XVZ90U Operation Manual
Page 19
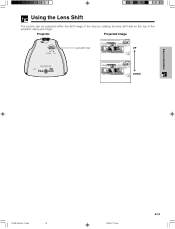
Projector Projected Image Lens shift dial UP DOWN UP DOWN Setup & Connections XVZ90U(E)#p15_21.p65 18 20/8/02, 7:22 pm E-18 Using the Lens Shift The picture can be adjusted within the shift range of the lens by rotating the lens shift dial on the top of the projector using your finger.
Projector Projected Image Lens shift dial UP DOWN UP DOWN Setup & Connections XVZ90U(E)#p15_21.p65 18 20/8/02, 7:22 pm E-18 Using the Lens Shift The picture can be adjusted within the shift range of the lens by rotating the lens shift dial on the top of the projector using your finger.
XVZ90U Operation Manual
Page 20
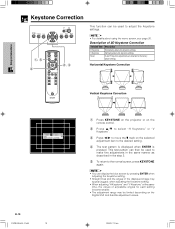
Horizontal Keystone Correction Vertical Keystone Correction E-19 XVZ90U(E)#p15_21.p65 19 1 Press KEYSTONE on the projector or on the remote control. 2 Press / to select "H Keystone" or "V Keystone". 3 Press / to move the mark on the Digital Shift and Subtitle adjustment values. 20/8/...
Horizontal Keystone Correction Vertical Keystone Correction E-19 XVZ90U(E)#p15_21.p65 19 1 Press KEYSTONE on the projector or on the remote control. 2 Press / to select "H Keystone" or "V Keystone". 3 Press / to move the mark on the Digital Shift and Subtitle adjustment values. 20/8/...

XVZ90U Operation Manual
Page 21
... correction function onto the screen. E-20 20/8/02, 7:22 pm Setup & Connections Placement of the Projected Image Using the Keystone Correction : Screen area Place the projector at a position other than the top position. • The aspect ratio of the projected image also shifts slightly when the "H Keystone" and "V Keystone" functions are... Swivel Stand. (See pages 16 and 17.) 4 Adjust the Keystone function so that allows images to be projected onto the screen by referring to the projector with the test pattern by adjusting the zoom function and the Swivel Stand.
... correction function onto the screen. E-20 20/8/02, 7:22 pm Setup & Connections Placement of the Projected Image Using the Keystone Correction : Screen area Place the projector at a position other than the top position. • The aspect ratio of the projected image also shifts slightly when the "H Keystone" and "V Keystone" functions are... Swivel Stand. (See pages 16 and 17.) 4 Adjust the Keystone function so that allows images to be projected onto the screen by referring to the projector with the test pattern by adjusting the zoom function and the Swivel Stand.
XVZ90U Operation Manual
Page 22
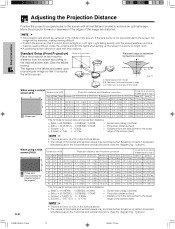
...it occupies the entire screen. C.C'. Move the projector forward or backward if the edges of the image are distorted. • The projector lens should be centered in the middle of the screen Place the projector at the required x distance from the screen according... wide screen (16:9) 16 9 : Picture area : Area covered by Keystone correction v C. V B. Placement range as determined by the projection panel of the projector* Screen size (16:9) Projection distance and Keystone correction Diag. (x) Width Height Maximum (y1) Maximum horizontal placement range (h) 200" 174" 98" - 150" ...
...it occupies the entire screen. C.C'. Move the projector forward or backward if the edges of the image are distorted. • The projector lens should be centered in the middle of the screen Place the projector at the required x distance from the screen according... wide screen (16:9) 16 9 : Picture area : Area covered by Keystone correction v C. V B. Placement range as determined by the projection panel of the projector* Screen size (16:9) Projection distance and Keystone correction Diag. (x) Width Height Maximum (y1) Maximum horizontal placement range (h) 200" 174" 98" - 150" ...

XVZ90U Operation Manual
Page 23
Tilting or angling the projector will reduce the effectiveness of the screen as the base line, and exchange the lower and ...= Standard (0) point Lower lens shift position (Desktop setup) Upper and Lower Lens Shift Position (Ceiling Mount) When the projector is produced with the projector positioned perpendicular to the screen with a lens shift function that lets you adjust the projection height. • Adjust it ...shift function. Setup & Connections Adjusting the Projection Distance Upper and Lower Lens Shift Position • This projector is equipped with all feet flat and level.
Tilting or angling the projector will reduce the effectiveness of the screen as the base line, and exchange the lower and ...= Standard (0) point Lower lens shift position (Desktop setup) Upper and Lower Lens Shift Position (Ceiling Mount) When the projector is produced with the projector positioned perpendicular to the screen with a lens shift function that lets you adjust the projection height. • Adjust it ...shift function. Setup & Connections Adjusting the Projection Distance Upper and Lower Lens Shift Position • This projector is equipped with all feet flat and level.

XVZ90U Operation Manual
Page 24
... the screen as the base line. • Use the projector's menu screen to select the appropriate projection mode. (See page 42 for use the optional Sharp ceiling-mount bracket for this installation. • Before mounting the projector, remove the Swivel Stand. (See page 17 for removing ...and attaching the Swivel Stand.) • Before mounting the projector, contact your nearest Authorized SharpVision Service Center or...
... the screen as the base line. • Use the projector's menu screen to select the appropriate projection mode. (See page 42 for use the optional Sharp ceiling-mount bracket for this installation. • Before mounting the projector, remove the Swivel Stand. (See page 17 for removing ...and attaching the Swivel Stand.) • Before mounting the projector, contact your nearest Authorized SharpVision Service Center or...


