Instruction Manual
Page 2
... oxygen is intended for their safety. 21. Switch the sewing machine off ("O") position, then remove plug from the electric outlet immediately after using and before using this manual. This appliance is not working properly, if it to SINGER or a service agent to ensure that is damaged, it... to the off ("O") when making any other user servicing adjustments mentioned in the needle area, such as described in this sewing machine. DANGER - To reduce the risk of lint, ...
... oxygen is intended for their safety. 21. Switch the sewing machine off ("O") position, then remove plug from the electric outlet immediately after using and before using this manual. This appliance is not working properly, if it to SINGER or a service agent to ensure that is damaged, it... to the off ("O") when making any other user servicing adjustments mentioned in the needle area, such as described in this sewing machine. DANGER - To reduce the risk of lint, ...
Instruction Manual
Page 6
... Adjusting Presser Foot Pressure...8 Accessories...10 Threading the Machine Winding the Bobbin...12 Inserting the Bobbin ...14 Threading the Upper Thread...16 Automatic Needle Threader ...18 Raising the Bobbin Thread ...20 Thread Tension ...22 Sewing How to Choose Your Pattern...24 Three Needle Position... Dial ...26 Stitch Width Dial & Stitch Length Dial ...28 Sewing Straight Stitch...30 Reverse Sewing/ Removing the Work/ Cutting the Thread ...32 Choosing Stretch Stitch...
... Adjusting Presser Foot Pressure...8 Accessories...10 Threading the Machine Winding the Bobbin...12 Inserting the Bobbin ...14 Threading the Upper Thread...16 Automatic Needle Threader ...18 Raising the Bobbin Thread ...20 Thread Tension ...22 Sewing How to Choose Your Pattern...24 Three Needle Position... Dial ...26 Stitch Width Dial & Stitch Length Dial ...28 Sewing Straight Stitch...30 Reverse Sewing/ Removing the Work/ Cutting the Thread ...32 Choosing Stretch Stitch...

Instruction Manual
Page 9
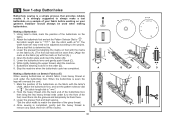
Automatic threader 15. Presser foot pressure adjustment 1 9 3. Thread take-up lever 2 10 4. Needle plate cover 8. Bobbin stopper 11. EN Principal Parts of the Machine 1. Reverse sewing lever 11 3 5. Stitch length dial 13. Stitch width dial 7 12. Pattern selector dial 8 14. One step buttonhole lever 14 15 2 Thread tension dial 2. Presser foot 4 12 7. Thread cutter 6. Three needle position dial 6 10. Removable extension table/ accessory storage 5 13 9.
Automatic threader 15. Presser foot pressure adjustment 1 9 3. Thread take-up lever 2 10 4. Needle plate cover 8. Bobbin stopper 11. EN Principal Parts of the Machine 1. Reverse sewing lever 11 3 5. Stitch length dial 13. Stitch width dial 7 12. Pattern selector dial 8 14. One step buttonhole lever 14 15 2 Thread tension dial 2. Presser foot 4 12 7. Thread cutter 6. Three needle position dial 6 10. Removable extension table/ accessory storage 5 13 9.

Instruction Manual
Page 13
...Conductor intended to " l " for power and light. Sewing light Press main switch (A) to be grounded b 2 6 A 3 If it does not fit fully in the outlet, reverse the plug. Polarized attachment plug b. Unplug power cord when machine is not in use . Foot control The foot control ...pedal regulates the sewing speed. (3) Attention: Consult a qualified electrician if in doubt of electric shock, this plug is intended to fit...
...Conductor intended to " l " for power and light. Sewing light Press main switch (A) to be grounded b 2 6 A 3 If it does not fit fully in the outlet, reverse the plug. Polarized attachment plug b. Unplug power cord when machine is not in use . Foot control The foot control ...pedal regulates the sewing speed. (3) Attention: Consult a qualified electrician if in doubt of electric shock, this plug is intended to fit...
Instruction Manual
Page 15
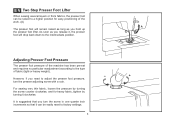
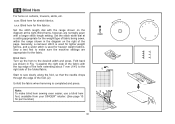
.... However, if you turn the presser adjusting screw with a coin. For sewing very thin fabric, loosen the pressure by turning the screw counter clockwise, and for easy positioning of fabric (light-or-heavy weight). It is suggested that you need to adjust the presser foot pressure,... turn the screw in one quarter inch increments so that it , the presser foot will remain raised as long as you hold up the presser foot lifter. Adjusting Presser Foot Pressure The presser foot pressure of the machine...
.... However, if you turn the presser adjusting screw with a coin. For sewing very thin fabric, loosen the pressure by turning the screw counter clockwise, and for easy positioning of fabric (light-or-heavy weight). It is suggested that you need to adjust the presser foot pressure,... turn the screw in one quarter inch increments so that it , the presser foot will remain raised as long as you hold up the presser foot lifter. Adjusting Presser Foot Pressure The presser foot pressure of the machine...

Instruction Manual
Page 17
Edge/ quilting guide g. Pack of needles h. they are not supplied with this machine; Hemmer foot q. Gathering foot u. Zipper foot c. Seam ripper/ brush f. Auxiliary Spool Pin l. Quilting/ straight stitch foot t. Darning/ embroidery foot v. All purpose foot b. Bobbin (3x) j. Twin... are , however, available for purchase from your authorized retailer.) n. Overcasting foot p. Buttonhole foot d. L-screwdriver k. Spool pin felt m. Blind hem foot s. Spool holders (2x) i. Button sewing foot e. Even Feed foot w. EN Accessories Standard accessories (1) a.
Edge/ quilting guide g. Pack of needles h. they are not supplied with this machine; Hemmer foot q. Gathering foot u. Zipper foot c. Seam ripper/ brush f. Auxiliary Spool Pin l. Quilting/ straight stitch foot t. Darning/ embroidery foot v. All purpose foot b. Bobbin (3x) j. Twin... are , however, available for purchase from your authorized retailer.) n. Overcasting foot p. Buttonhole foot d. L-screwdriver k. Spool pin felt m. Blind hem foot s. Spool holders (2x) i. Button sewing foot e. Even Feed foot w. EN Accessories Standard accessories (1) a.
Instruction Manual
Page 19
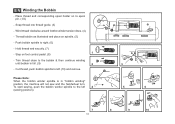
... winding until bobbin is in "bobbin winding" position, the machine will not sew and the handwheel turn. Hold thread end securily. (7) 1 - Trim thread close to right. (6) - Please Note: When the bobbin winder spindle is full. (9) 2 - To start sewing, push the bobbin winder spindle to left 4 (sewing position). 3 5 6 7 8 9 10 12 Thread bobbin as illustrated and...
... winding until bobbin is in "bobbin winding" position, the machine will not sew and the handwheel turn. Hold thread end securily. (7) 1 - Trim thread close to right. (6) - Please Note: When the bobbin winder spindle is full. (9) 2 - To start sewing, push the bobbin winder spindle to left 4 (sewing position). 3 5 6 7 8 9 10 12 Thread bobbin as illustrated and...
Instruction Manual
Page 29
..., this is an indication that the upper machine tension is no single tension setting appropriate for straight stitch construction sewing. - 90% of your fabric. - C D 22 Correct thread tension is important for straight stitch sewing. - For all decorative sewing you do not need to lower number....small amount of the upper thread appears on the bottom side of all stitch functions, thread or fabric. - For zig zag and decorative sewing stitch functions, thread tension should generally be between "3" and "5". To reduce the tension, turn the dial to higher number. A. D....
..., this is an indication that the upper machine tension is no single tension setting appropriate for straight stitch construction sewing. - 90% of your fabric. - C D 22 Correct thread tension is important for straight stitch sewing. - For all decorative sewing you do not need to lower number....small amount of the upper thread appears on the bottom side of all stitch functions, thread or fabric. - For zig zag and decorative sewing stitch functions, thread tension should generally be between "3" and "5". To reduce the tension, turn the dial to higher number. A. D....

Instruction Manual
Page 31
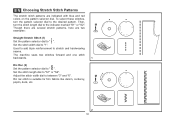
... make the stitching closer. Set the Stitch Length Dial (d) to Choose Your Pattern The diagram on this page display the stitch patterns available on the machine. Reverse sewing lever b. EN How to 1. Set the Three Needle Position Dial (b) to the Center. - Stitch width dial d. For top row stitches F, G, and H follow these steps...
... make the stitching closer. Set the Stitch Length Dial (d) to Choose Your Pattern The diagram on this page display the stitch patterns available on the machine. Reverse sewing lever b. EN How to 1. Set the Three Needle Position Dial (b) to the Center. - Stitch width dial d. For top row stitches F, G, and H follow these steps...
Instruction Manual
Page 37
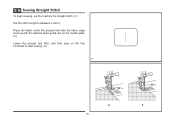
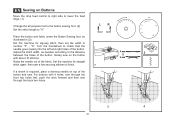
Place the fabric under the presser foot with the fabric edge lined up with the desired seam guide line on the needle plate. (2) Lower the presser foot lifter, and then step on the foot controller to between 2 and 3. EN Sewing Straight Stitch To begin sewing, set the machine for straight stitch. (1) Set the stitch length to start sewing. (3) 1 2 3 30
Place the fabric under the presser foot with the fabric edge lined up with the desired seam guide line on the needle plate. (2) Lower the presser foot lifter, and then step on the foot controller to between 2 and 3. EN Sewing Straight Stitch To begin sewing, set the machine for straight stitch. (1) Set the stitch length to start sewing. (3) 1 2 3 30

Instruction Manual
Page 39
... plate and into thread cutter (B). Pull threads down to the side of a seam, press down the reverse sewing lever (A). Sew a few reverse stitches. Guide the threads to cut. (3) 32 B 3 A Release the lever and the machine will sew forward again. (1) Removing the Work Turn the handwheel toward you (counterclockwise) to bring the thread take up...
... plate and into thread cutter (B). Pull threads down to the side of a seam, press down the reverse sewing lever (A). Sew a few reverse stitches. Guide the threads to cut. (3) 32 B 3 A Release the lever and the machine will sew forward again. (1) Removing the Work Turn the handwheel toward you (counterclockwise) to bring the thread take up...
Instruction Manual
Page 41
... Choosing Stretch Stitch Patterns The stretch stitch patterns are two examples: Straight Stretch Stitch (1) Set the pattern selector dial to stretch and hardwearing seams. The machine sews two stitches forward and one stitch backwards. To select these stitches, turn the stitch length dial to the desired pattern.
... Choosing Stretch Stitch Patterns The stretch stitch patterns are two examples: Straight Stretch Stitch (1) Set the pattern selector dial to stretch and hardwearing seams. The machine sews two stitches forward and one stitch backwards. To select these stitches, turn the stitch length dial to the desired pattern.
Instruction Manual
Page 43
Blind hems, however, are appropriate for the fabric. Sew a test first to make blind hem sewing even easier, use a blind hem foot, available from your SINGER® retailer. (See page 10 for the weight/type of fabric being sewn, within the range shown in Fig. 1) against the right side of... the fabric with a longer stitch length setting. Fold back (as shown in the diagram on curtains, trousers, skirts, etc. Note: 2 To make sure the machine...
Blind hems, however, are appropriate for the fabric. Sew a test first to make blind hem sewing even easier, use a blind hem foot, available from your SINGER® retailer. (See page 10 for the weight/type of fabric being sewn, within the range shown in Fig. 1) against the right side of... the fabric with a longer stitch length setting. Fold back (as shown in the diagram on curtains, trousers, skirts, etc. Note: 2 To make sure the machine...
Instruction Manual
Page 45
... provides reliable results. a b A PUSH B C Making a Buttonhole on Stretch Fabrics (E) When sewing buttonholes on the fabric with the mark on the foot (b).) 4. Lower the presser foot and start the machine. 7. Set stitch length dial to " ". Lower the presser foot aligning the marks on foot ...with the marks on the fabric (A). (The front bar tack will overcast the cord. 1. EN Sew 1-step Buttonholes Buttonhole sewing is completed, gently pull the heavy thread to E remove...
... provides reliable results. a b A PUSH B C Making a Buttonhole on Stretch Fabrics (E) When sewing buttonholes on the fabric with the mark on the foot (b).) 4. Lower the presser foot and start the machine. 7. Set stitch length dial to " ". Lower the presser foot aligning the marks on foot ...with the marks on the fabric (A). (The front bar tack will overcast the cord. 1. EN Sew 1-step Buttonholes Buttonhole sewing is completed, gently pull the heavy thread to E remove...
Instruction Manual
Page 49
...that the needle goes cleanly into the left and right holes of the fabric. ba b Raise the needle out of the button. "6". Set the machine for zig-zag stitch, then set the width to finish. 1 If a shank is required, place a darning needle on top of the button. Set... the machine for straight stitch again, then sew a few securing stitches to number "3" - Slowly sew on the button with 4 holes, sew through the front two holes first, push the work forward and then sew through the back two holes. 3 4 42 Adjust the stitch width...
...that the needle goes cleanly into the left and right holes of the fabric. ba b Raise the needle out of the button. "6". Set the machine for zig-zag stitch, then set the width to finish. 1 If a shank is required, place a darning needle on top of the button. Set... the machine for straight stitch again, then sew a few securing stitches to number "3" - Slowly sew on the button with 4 holes, sew through the front two holes first, push the work forward and then sew through the back two holes. 3 4 42 Adjust the stitch width...
Instruction Manual
Page 62
... bobbin case, thread and insert correctly. 3. The needle is noisy The machine jams 1. Thread is caught in the hook, because upper tension is not correctly inserted. 3. Do not pull on the fabric while sewing, let the feed dogs pull the fabric under the foot. 1. The needle... is not threaded correctly. Replace the needle. Rethread the machine. 2. Choose a needle to suit the thread and fabric. 4. Insert the needle...
... bobbin case, thread and insert correctly. 3. The needle is noisy The machine jams 1. Thread is caught in the hook, because upper tension is not correctly inserted. 3. Do not pull on the fabric while sewing, let the feed dogs pull the fabric under the foot. 1. The needle... is not threaded correctly. Replace the needle. Rethread the machine. 2. Choose a needle to suit the thread and fabric. 4. Insert the needle...


