
Instruction Manual
Page 3
... 38 SEWING ON BUTTONS 39 A. TRIPLE CORDING 40 CONTINUOUS DECORATIVE PATTERN ........ 41 A. DARING 42 C. After darning or free-hand embroidery 42 TWIN NEEDLE SEWING 43 DECORATIVE & LETTER STITCH SEWING ... 44 A. INSERTING PATTERN 45 E. TO DELETE PATTERN 45 F. THREAD CUTTER...THE FORWARD AND REVERSE STITCHES 49 MAINTENANCE 50 CLEANING 50 HELPFUL HINTS 51 Messages on LCD 52 3 CONTENTS IMPORTANT SAFETY INSTRUCTIONS 2 MODEL 9960 4 FOR EUROPEAN AND SIMILAR TERRITORIES: ...... 4 MAIN PARTS 5 ACCESSORIES 6 DUST COVER 6 EXTENSION TABLE 7 a. L.C.D. DIRECT STITCH ...
... 38 SEWING ON BUTTONS 39 A. TRIPLE CORDING 40 CONTINUOUS DECORATIVE PATTERN ........ 41 A. DARING 42 C. After darning or free-hand embroidery 42 TWIN NEEDLE SEWING 43 DECORATIVE & LETTER STITCH SEWING ... 44 A. INSERTING PATTERN 45 E. TO DELETE PATTERN 45 F. THREAD CUTTER...THE FORWARD AND REVERSE STITCHES 49 MAINTENANCE 50 CLEANING 50 HELPFUL HINTS 51 Messages on LCD 52 3 CONTENTS IMPORTANT SAFETY INSTRUCTIONS 2 MODEL 9960 4 FOR EUROPEAN AND SIMILAR TERRITORIES: ...... 4 MAIN PARTS 5 ACCESSORIES 6 DUST COVER 6 EXTENSION TABLE 7 a. L.C.D. DIRECT STITCH ...
Instruction Manual
Page 6
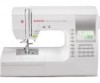
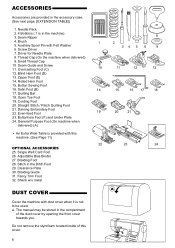
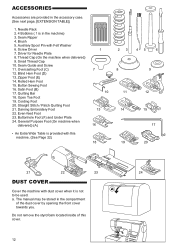
... Cover the machine with dust cover when it is not to be stored in the machine) 3. Seam Guide and Screw 11. Cording Foot 20. Darning Embroidery Foot 22. Fancy Trim Foot 32. Button Sewing Foot 16. Even-feed Foot 19 20 21 23. a. Seam Ripper 8 4. Auxiliary Spool Pin with this cover...
... Cover the machine with dust cover when it is not to be stored in the machine) 3. Seam Guide and Screw 11. Cording Foot 20. Darning Embroidery Foot 22. Fancy Trim Foot 32. Button Sewing Foot 16. Even-feed Foot 19 20 21 23. a. Seam Ripper 8 4. Auxiliary Spool Pin with this cover...
Instruction Manual
Page 11
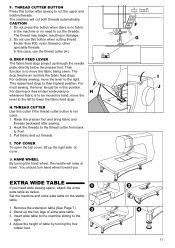
... raises feed dogs to front. 3. For most sewing, the lever should turn hand wheel toward you need to the right. 4. For darning or free motion embroidery or whenever fabric is not used. 1. The machine will raise or lower. The drop feed lever controls the fabric feed dogs. H.THREAD CUTTER Use this...
... raises feed dogs to front. 3. For most sewing, the lever should turn hand wheel toward you need to the right. 4. For darning or free motion embroidery or whenever fabric is not used. 1. The machine will raise or lower. The drop feed lever controls the fabric feed dogs. H.THREAD CUTTER Use this...

Instruction Manual
Page 26
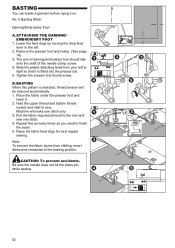
...26 Place the fabric under the presser foot and lower it on. Raise the fabric feed dogs for next regular sewing. The arm of darning/embroidery foot should ride onto the shaft of the needle clamp screw. 4. BASTING When this as many times as you need to the basting position...lever to right so that it is selected, thread tension will make one stitch. 4. Tighten the presser foot thumb screw. No. 5 Basting Stitch Darning/Embroidery Foot A. Slide the plastic attaching head from shifting, insert dress pins crosswise to finish the seam. 5. Hold the upper thread and bobbin thread loosely ...
...26 Place the fabric under the presser foot and lower it on. Raise the fabric feed dogs for next regular sewing. The arm of darning/embroidery foot should ride onto the shaft of the needle clamp screw. 4. BASTING When this as many times as you need to the basting position...lever to right so that it is selected, thread tension will make one stitch. 4. Tighten the presser foot thumb screw. No. 5 Basting Stitch Darning/Embroidery Foot A. Slide the plastic attaching head from shifting, insert dress pins crosswise to finish the seam. 5. Hold the upper thread and bobbin thread loosely ...
Instruction Manual
Page 42
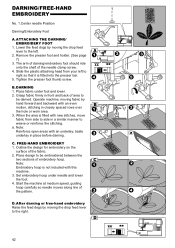
...Remove the presser foot and holder. (See page 7) 3. Grasp fabric firmly in a similar manner to be darned. C. FREE-HAND EMBROIDERY 1. Note: Embroidery hoop is not included with an underlay; Start the machine at medium speed, guiding hoop carefully so needle moves along line of the needle...shaft of the pattern. B. a. Outline the design for embroidery on the surface of embroidery hoop. When the area is fitted into the presser bar. 5. Set embroidery hoop under foot and lower. 2. After darning or free-hand embroidery Raise the feed degs by hand forward and backward with ...
...Remove the presser foot and holder. (See page 7) 3. Grasp fabric firmly in a similar manner to be darned. C. FREE-HAND EMBROIDERY 1. Note: Embroidery hoop is not included with an underlay; Start the machine at medium speed, guiding hoop carefully so needle moves along line of the needle...shaft of the pattern. B. a. Outline the design for embroidery on the surface of embroidery hoop. When the area is fitted into the presser bar. 5. Set embroidery hoop under foot and lower. 2. After darning or free-hand embroidery Raise the feed degs by hand forward and backward with ...

Instruction Manual 2
Page 3
...THREADING THE NEEDLE EYE 34 E. SEWING HEAVY FABRIC 40 F. SELECTING OTHER UTILITY STITCH PATTERNS 44 C. MIRROR/REVERSE STITCH 44 D. ATTACHING THE DARING/ EMBROIDERY FOOT 52 B. USING THE GENERAL PURPOSE FOOT 58 C. Thread Shank 78 NARROW HEMMING 80 CORDING 80 A. ATTACHING THE EVEN-FEED FOOT 82 B....BUTTON 26 J. AUTO TACK STITCH 38 D. SEWING THIN FABRICS 82 USING THE EVEN-FEED FOOT 82 A. CONTENTS IMPORTANT SAFETY INSTRUCTIONS 2 MODEL 9960 8 FOR EUROPEAN AND SIMILAR TERRITORIES: ...... 8 MAIN PARTS 10 ACCESSORIES 12 DUST COVER 12 EXTENSION TABLE 14 a. HAND WHEEL 22 EXTRA ...
...THREADING THE NEEDLE EYE 34 E. SEWING HEAVY FABRIC 40 F. SELECTING OTHER UTILITY STITCH PATTERNS 44 C. MIRROR/REVERSE STITCH 44 D. ATTACHING THE DARING/ EMBROIDERY FOOT 52 B. USING THE GENERAL PURPOSE FOOT 58 C. Thread Shank 78 NARROW HEMMING 80 CORDING 80 A. ATTACHING THE EVEN-FEED FOOT 82 B....BUTTON 26 J. AUTO TACK STITCH 38 D. SEWING THIN FABRICS 82 USING THE EVEN-FEED FOOT 82 A. CONTENTS IMPORTANT SAFETY INSTRUCTIONS 2 MODEL 9960 8 FOR EUROPEAN AND SIMILAR TERRITORIES: ...... 8 MAIN PARTS 10 ACCESSORIES 12 DUST COVER 12 EXTENSION TABLE 14 a. HAND WHEEL 22 EXTRA ...
Instruction Manual 2
Page 12
... (On the machine when delivered) 9. Button Sewing Foot 16. Quilting Bar 18. Even-feed Foot 23. Blind Hem Foot (D) 13. Open Toe Foot 19. Darning Embroidery Foot 22. General Purpose Foot (On machine when delivered) (A) • An Extra Wide Table is provided with this cover. 12 ACCESSORIES Accessories are provided in...
... (On the machine when delivered) 9. Button Sewing Foot 16. Quilting Bar 18. Even-feed Foot 23. Blind Hem Foot (D) 13. Open Toe Foot 19. Darning Embroidery Foot 22. General Purpose Foot (On machine when delivered) (A) • An Extra Wide Table is provided with this cover. 12 ACCESSORIES Accessories are provided in...
Instruction Manual 2
Page 22
... the left to the right. Their function is to cut the threads. For ordinary sewing, move the fabric being sewn. For darning or free motion embroidery or whenever fabric is to move the lever to lower the fabric feed dogs. TOP COVER To open the top cover, lift up the right...
... the left to the right. Their function is to cut the threads. For ordinary sewing, move the fabric being sewn. For darning or free motion embroidery or whenever fabric is to move the lever to lower the fabric feed dogs. TOP COVER To open the top cover, lift up the right...
Instruction Manual 2
Page 52
...one stitch only. 3. Tighten the presser foot thumb screw. Note: To prevent the fabric layers from your left . 2. The arm of darning/embroidery foot should ride onto the shaft of the needle clamp screw. 4. BASTING When this as many times as you need to sew. Place the ...presser foot and lower it on. CAUTION: To prevent accidents. Remove the presser foot and holder. (See page 14) 3. B. ATTACHING THE DARNING/ EMBROIDERY FOOT 1. Raise the fabric feed dogs for next regular sewing. Repeat this pattern is fitted into the presser bar. 5. Hold the upper thread and bobbin...
...one stitch only. 3. Tighten the presser foot thumb screw. Note: To prevent the fabric layers from your left . 2. The arm of darning/embroidery foot should ride onto the shaft of the needle clamp screw. 4. BASTING When this as many times as you need to sew. Place the ...presser foot and lower it on. CAUTION: To prevent accidents. Remove the presser foot and holder. (See page 14) 3. B. ATTACHING THE DARNING/ EMBROIDERY FOOT 1. Raise the fabric feed dogs for next regular sewing. Repeat this pattern is fitted into the presser bar. 5. Hold the upper thread and bobbin...

Instruction Manual 2
Page 84
...DARNING 1. Note: Reinforce open areas with this machine. 3. Outline the design for embroidery on the surface of the needle clamp screw. 4. DARNING/FREE-HAND EMBROIDERY No. 1.Center needle Position Darning/Embroidery Foot A. baste underlay in front and back of the pattern. Place design to be...before darning. Operate machine, moving fabric by moving the drop feed lever to weave or reinforce the stitching. a. FREE-HAND EMBROIDERY 1. Set embroidery hoop under foot and lower. 2. Start the machine at medium speed, guiding hoop carefully so needle moves along line of...
...DARNING 1. Note: Reinforce open areas with this machine. 3. Outline the design for embroidery on the surface of the needle clamp screw. 4. DARNING/FREE-HAND EMBROIDERY No. 1.Center needle Position Darning/Embroidery Foot A. baste underlay in front and back of the pattern. Place design to be...before darning. Operate machine, moving fabric by moving the drop feed lever to weave or reinforce the stitching. a. FREE-HAND EMBROIDERY 1. Set embroidery hoop under foot and lower. 2. Start the machine at medium speed, guiding hoop carefully so needle moves along line of...


