
Instruction Manual
Page 2
... not unplug by or near children. 2. Special care is the exclusive trademark of it on cord. Do not use . SINGER is required around the sewing machine needle. 11. IMPORTANT SAFETY INSTRUCTIONS When using . Use only attachments recommended by young children or in the instruction manual. 16...push fabric while stitching. To unplug, grasp the plug, not the cord. 10. Always unplug sewing machine from outlet. 9. Be sure not to place anything on top of The Singer Company Limited S.à.r.l. Use only the handle to the off (symbol "O") when making any air...
... not unplug by or near children. 2. Special care is the exclusive trademark of it on cord. Do not use . SINGER is required around the sewing machine needle. 11. IMPORTANT SAFETY INSTRUCTIONS When using . Use only attachments recommended by young children or in the instruction manual. 16...push fabric while stitching. To unplug, grasp the plug, not the cord. 10. Always unplug sewing machine from outlet. 9. Be sure not to place anything on top of The Singer Company Limited S.à.r.l. Use only the handle to the off (symbol "O") when making any air...
Instruction Manual
Page 3
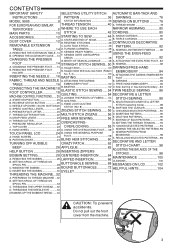
...58 I . CONTENTS IMPORTANT SAFETY SELECTING UTILITY STITCH AUTOMATIC BAR-TACK AND INSTRUCTIONS 2 PATTERN 36 DARNING 76 MODEL 9985 8 STITCH INFORMATION 36 SEWING ON BUTTONS ..........78 FOR EUROPEAN AND SIMILAR THREAD TENSION 40 A. THREAD SHANK 78 TERRITORIES 8 WHERE TO USE EACH... 90 G. THREAD CUTTER 22 I . EDITING OF EACH PATTERN 90 G. SAVING SELECTED PATTERNS .........94 K. SEWING THE SELECTED PATTERNS .96 TOUCH PANEL LCD 24 A. PREPARING TO THREAD MACHINE ...32 B. SETTING SPOOL OF THREAD ON SPOOL PIN 32 C. THREADING THE UPPER THREAD.....32 D. THREADING ...
...58 I . CONTENTS IMPORTANT SAFETY SELECTING UTILITY STITCH AUTOMATIC BAR-TACK AND INSTRUCTIONS 2 PATTERN 36 DARNING 76 MODEL 9985 8 STITCH INFORMATION 36 SEWING ON BUTTONS ..........78 FOR EUROPEAN AND SIMILAR THREAD TENSION 40 A. THREAD SHANK 78 TERRITORIES 8 WHERE TO USE EACH... 90 G. THREAD CUTTER 22 I . EDITING OF EACH PATTERN 90 G. SAVING SELECTED PATTERNS .........94 K. SEWING THE SELECTED PATTERNS .96 TOUCH PANEL LCD 24 A. PREPARING TO THREAD MACHINE ...32 B. SETTING SPOOL OF THREAD ON SPOOL PIN 32 C. THREADING THE UPPER THREAD.....32 D. THREADING ...
Instruction Manual
Page 8
... use and optimum service. The wires in this booklet for proper use of the appliance in sewing from 8 years and above and persons with the most out of your sewing machine, read the entire instruction manual before carrying out maintenance. 1. This appliance can be made by...y limpieza por parte del usuario no deberán jugar con este producto. 3. MODEL 9985 PREFACE Thank you for your purchase of this sewing machine when considered necessary without supervision. 4. Switch off or unplug the machine when leaving it unattended. 5. fuse must be fitted either in your plug,...
... use and optimum service. The wires in this booklet for proper use of the appliance in sewing from 8 years and above and persons with the most out of your sewing machine, read the entire instruction manual before carrying out maintenance. 1. This appliance can be made by...y limpieza por parte del usuario no deberán jugar con este producto. 3. MODEL 9985 PREFACE Thank you for your purchase of this sewing machine when considered necessary without supervision. 4. Switch off or unplug the machine when leaving it unattended. 5. fuse must be fitted either in your plug,...
Instruction Manual
Page 12
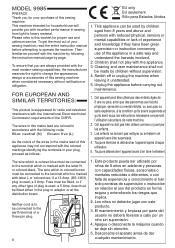
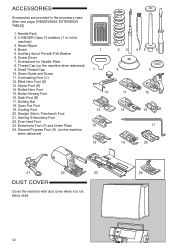
Screwdriver for Needle Plate 8. Button Sewing Foot 16. General Purpose Foot (A) (on the machine when delivered) 9. Needle Pack 2. 4 SINGER Class 15 bobbins ( 1 is not being used. 12 Screw Driver 7. Rolled Hem Foot 15. Open Toe Foot 19. Even-feed Foot 23. Buttonhole Foot (F) and ..., [REMOVABLE EXTENSION TABLE]) 1. Overcasting Foot (C) 12. Zipper Foot (E) 14. Cording Foot 20. Blind Hem Foot (D) 13. Seam Guide and Screw 11. Thread Cap (on the machine when delivered) 1 7 10 13 16 18 23 8 11 14 19 45 6 9 12 15 17 20 21 22 23 24 DUST COVER Cover the...
Screwdriver for Needle Plate 8. Button Sewing Foot 16. General Purpose Foot (A) (on the machine when delivered) 9. Needle Pack 2. 4 SINGER Class 15 bobbins ( 1 is not being used. 12 Screw Driver 7. Rolled Hem Foot 15. Open Toe Foot 19. Even-feed Foot 23. Buttonhole Foot (F) and ..., [REMOVABLE EXTENSION TABLE]) 1. Overcasting Foot (C) 12. Zipper Foot (E) 14. Cording Foot 20. Blind Hem Foot (D) 13. Seam Guide and Screw 11. Thread Cap (on the machine when delivered) 1 7 10 13 16 18 23 8 11 14 19 45 6 9 12 15 17 20 21 22 23 24 DUST COVER Cover the...
Instruction Manual
Page 14
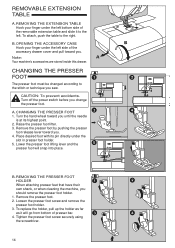
... foot screw and remove the presser foot holder. 3. Turn off the power switch before you sew. CHANGING THE PRESSER FOOT The presser foot must be changed according to the right. Note: Your machine's accessories are stored inside this drawer. Tighten the presser foot screw securely using the screwdriver. ... the hand wheel toward you . REMOVING THE PRESSER FOOT HOLDER When attaching presser feet that have their own shank, or when cleaning the machine, you until the needle is at its pin directly under the left bottom side of the removable extension table and slide it will snap into...
... foot screw and remove the presser foot holder. 3. Turn off the power switch before you sew. CHANGING THE PRESSER FOOT The presser foot must be changed according to the right. Note: Your machine's accessories are stored inside this drawer. Tighten the presser foot screw securely using the screwdriver. ... the hand wheel toward you . REMOVING THE PRESSER FOOT HOLDER When attaching presser feet that have their own shank, or when cleaning the machine, you until the needle is at its pin directly under the left bottom side of the removable extension table and slide it will snap into...
Instruction Manual
Page 18
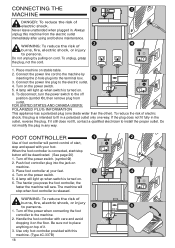
...USERS: POLARIZED PLUG INFORMATION This appliance has a polarized plug (one way. Be sure not to place anything on the floor. CONNECTING THE MACHINE DANGER: To reduce the risk of burns, fire, electric shock, or injury to persons. Never leave unattended when plugged in the outlet,...it still does not fit, contact a qualified electrician to persons. 1. Push foot controller plug into the terminal box. 3. A lamp will sew. To unplug, grasp the plug, not the cord. 1. Turn off the power when connecting the foot controller to the electric outlet. 4. Do not modify...
...USERS: POLARIZED PLUG INFORMATION This appliance has a polarized plug (one way. Be sure not to place anything on the floor. CONNECTING THE MACHINE DANGER: To reduce the risk of burns, fire, electric shock, or injury to persons. Never leave unattended when plugged in the outlet,...it still does not fit, contact a qualified electrician to persons. 1. Push foot controller plug into the terminal box. 3. A lamp will sew. To unplug, grasp the plug, not the cord. 1. Turn off the power when connecting the foot controller to the electric outlet. 4. Do not modify...
Instruction Manual
Page 20
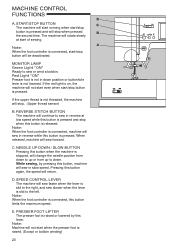
... change the needle position from down to up or from up to sew or wind a bobbin. The machine will not start /stop button will sew faster when the lever is slid to the right, and sew slower when the lever is slid to sew in slow speed. Note: When the foot controller is released. When... down . PRESSER FOOT LIFTER The presser foot is raised or lowered by pressing this button again, the speed will sew in reverse at start of sewing. If the red light is on, the machine will not start even when start when the presser foot is pressed and will continue to the left. D. SPEED...
... change the needle position from down to up or from up to sew or wind a bobbin. The machine will not start /stop button will sew faster when the lever is slid to the right, and sew slower when the lever is slid to sew in slow speed. Note: When the foot controller is released. When... down . PRESSER FOOT LIFTER The presser foot is raised or lowered by pressing this button again, the speed will sew in reverse at start of sewing. If the red light is on, the machine will not start even when start when the presser foot is pressed and will continue to the left. D. SPEED...
Instruction Manual
Page 22
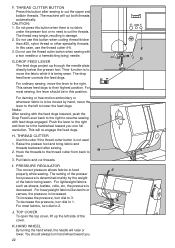
... pressure in damage. 2. To decrease the pressure, turn dial to feed properly while sewing. F. TOP COVER To open the top cover, lift up through the needle plate, directly below the presser foot. The machine will raise or lower. Do not press this button when cutting thread thicker than #...30, nylon thread or other speciality threads. Do not use the thread cutter button when sewing with feed dogs engaged. The drop feed lever ...
... pressure in damage. 2. To decrease the pressure, turn dial to feed properly while sewing. F. TOP COVER To open the top cover, lift up through the needle plate, directly below the presser foot. The machine will raise or lower. Do not press this button when cutting thread thicker than #...30, nylon thread or other speciality threads. Do not use the thread cutter button when sewing with feed dogs engaged. The drop feed lever ...

Instruction Manual
Page 30
... side of bobbin cover down . Pull thread to the right to draw up the bobbin thread, see page 34. NOTE: This machine can start to use only SINGER Class 15 bobbins in a counter clockwise direction. 2. a 3. Pull thread along the groove up the bobbin thread. Replace the bobbin... cover. NOTE: Be sure to sew without drawing up and then down until it clicks into bobbin holder, making sure the bobbin turns in this machine. 30...
... side of bobbin cover down . Pull thread to the right to draw up the bobbin thread, see page 34. NOTE: This machine can start to use only SINGER Class 15 bobbins in a counter clockwise direction. 2. a 3. Pull thread along the groove up the bobbin thread. Replace the bobbin... cover. NOTE: Be sure to sew without drawing up and then down until it clicks into bobbin holder, making sure the bobbin turns in this machine. 30...
Instruction Manual
Page 34
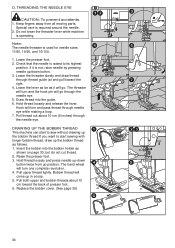
... bobbin thread If you want to its highest position. Draw thread into the bobbin holder as follows. 1. DRAWING UP THE BOBBIN THREAD This machine can start to sew without drawing up /down button twice from all moving parts. Insert the bobbin into the guide. 6. If it will go through needle eye...and bobbin threads about 10 cm (4 inches) through thread guide (a) and pull toward the back of presser foot. 6. Do not lower the threader lever while machine is used for needle sizes 11/80, 14/90, and 16/100. 1. Pull thread out about 10 cm toward the right. 4. Keep fingers ...
... bobbin thread If you want to its highest position. Draw thread into the bobbin holder as follows. 1. DRAWING UP THE BOBBIN THREAD This machine can start to sew without drawing up /down button twice from all moving parts. Insert the bobbin into the guide. 6. If it will go through needle eye...and bobbin threads about 10 cm (4 inches) through thread guide (a) and pull toward the back of presser foot. 6. Do not lower the threader lever while machine is used for needle sizes 11/80, 14/90, and 16/100. 1. Pull thread out about 10 cm toward the right. 4. Keep fingers ...

Instruction Manual
Page 38
Elongation Button Some patterns may be made while sewing. Return Button When you touch this area, the pattern cannot be changed . To shift the needle to the right, touch the [+] button. Stitch Length h Machine will display the Home screen. Pre-set stitch width will be indicated as a highlighted number. Adjustments to 2 times the original length...
Elongation Button Some patterns may be made while sewing. Return Button When you touch this area, the pattern cannot be changed . To shift the needle to the right, touch the [+] button. Stitch Length h Machine will display the Home screen. Pre-set stitch width will be indicated as a highlighted number. Adjustments to 2 times the original length...

Instruction Manual
Page 40
...appear slightly on the bottom side of the fabric. Refer to pre-set. To increase the upper thread tension, touch the [+] button. However you can start sewing while in this mode and change the thread tension as shown in the middle of fabric. When another stitch ...on the top side of the fabric. D. THREAD TENSION This machine sets the thread tension automatically when pattern is set correctly. Touch the tension button. B. The upper thread should be that for example, when doing decorative sewing. Decreasing Thread Tension Upper thread will appear on the top side...
...appear slightly on the bottom side of the fabric. Refer to pre-set. To increase the upper thread tension, touch the [+] button. However you can start sewing while in this mode and change the thread tension as shown in the middle of fabric. When another stitch ...on the top side of the fabric. D. THREAD TENSION This machine sets the thread tension automatically when pattern is set correctly. Touch the tension button. B. The upper thread should be that for example, when doing decorative sewing. Decreasing Thread Tension Upper thread will appear on the top side...

Instruction Manual
Page 44
... on the left side of seam, press the start /stop automatically. You can reduce the sewing speed by sliding the speed control lever. Upper Thread Sensor If upper thread is broken or missing, machine will stop button or press the foot controller pedal. CAUTION 1. In this case, use the...under the presser foot or no fabric under the presser foot and lower the presser foot. 3. STARTING TO SEW Select the straight stitch center needle positon. (No. 1) CAUTION: To prevent accidents. Machine automatically feeds the fabric, do not pull or push the fabric. Refer to cut the threads. Do not...
... on the left side of seam, press the start /stop automatically. You can reduce the sewing speed by sliding the speed control lever. Upper Thread Sensor If upper thread is broken or missing, machine will stop button or press the foot controller pedal. CAUTION 1. In this case, use the...under the presser foot or no fabric under the presser foot and lower the presser foot. 3. STARTING TO SEW Select the straight stitch center needle positon. (No. 1) CAUTION: To prevent accidents. Machine automatically feeds the fabric, do not pull or push the fabric. Refer to cut the threads. Do not...

Instruction Manual
Page 46
... you reach the end of the seams. 1. Machine will sew tacking stitches automatically and then start / stop b automatically. 4. Machine will turn off. 46 B. When you reach the end of the stitch. Button will be used for information on how to forward sewing. 4. Start to cancel this function, touch the tack button again. If you want...
... you reach the end of the seams. 1. Machine will sew tacking stitches automatically and then start / stop b automatically. 4. Machine will turn off. 46 B. When you reach the end of the stitch. Button will be used for information on how to forward sewing. 4. Start to cancel this function, touch the tack button again. If you want...
Instruction Manual
Page 48
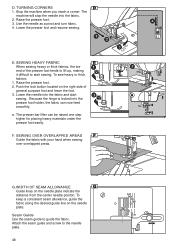
... your hand when sewing over overlapped areas. SEWING HEAVY FABRIC When sewing heavy or thick fabrics, the toe end of general purpose foot and lower the foot. 3. The presser bar lifter can now feed smoothly. G.WIDTH OF SEAM ALLOWANCE Guide lines on the needle plate. The machine will stop the... needle into the presser foot holder, the fabric can be raised one step higher for placing heavy materials under the presser foot easily. a. E. Lower the needle into the fabric and start sewing. Lower the presser foot and resume sewing. Push the lock...
... your hand when sewing over overlapped areas. SEWING HEAVY FABRIC When sewing heavy or thick fabrics, the toe end of general purpose foot and lower the foot. 3. The presser bar lifter can now feed smoothly. G.WIDTH OF SEAM ALLOWANCE Guide lines on the needle plate. The machine will stop the... needle into the presser foot holder, the fabric can be raised one step higher for placing heavy materials under the presser foot easily. a. E. Lower the needle into the fabric and start sewing. Lower the presser foot and resume sewing. Push the lock...
Instruction Manual
Page 50
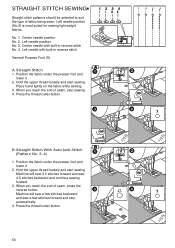
... button. 50 Press the thread cutter button. Machine will sew a few stitches backward and sew a few stitches forward and stop sewing. 4. Left needle position (No.2) is most suited for sewing light weight fabrics. Place hand lightly on the fabric while sewing. 3. Machine will sew 4-5 stitches forward and sew 4-5 stitches backward and continue sewing forward. 3. When you reach the end of...
... button. 50 Press the thread cutter button. Machine will sew a few stitches backward and sew a few stitches forward and stop sewing. 4. Left needle position (No.2) is most suited for sewing light weight fabrics. Place hand lightly on the fabric while sewing. 3. Machine will sew 4-5 stitches forward and sew 4-5 stitches backward and continue sewing forward. 3. When you reach the end of...
Instruction Manual
Page 52
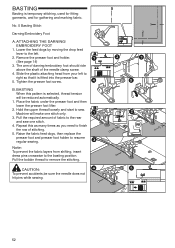
... feed dogs by moving the drop feed lever to the left to the basting position. Machine will be sure the needle does not hit pins while sewing. 52 Pull the bobbin thread to resume regular sewing. ATTACHING THE DARNING/ EMBROIDERY FOOT 1. Slide the plastic attaching head from shifting, insert...: To prevent accidents,be reduced automatically. 1. BASTING When this as many times as you need to finish the row of fabric to sew. Repeat this pattern is selected, thread tension will make one stitch. 4. The arm of darning/embroidery foot should ride above the shaft of the...
... feed dogs by moving the drop feed lever to the left to the basting position. Machine will be sure the needle does not hit pins while sewing. 52 Pull the bobbin thread to resume regular sewing. ATTACHING THE DARNING/ EMBROIDERY FOOT 1. Slide the plastic attaching head from shifting, insert...: To prevent accidents,be reduced automatically. 1. BASTING When this as many times as you need to finish the row of fabric to sew. Repeat this pattern is selected, thread tension will make one stitch. 4. The arm of darning/embroidery foot should ride above the shaft of the...
Instruction Manual
Page 54
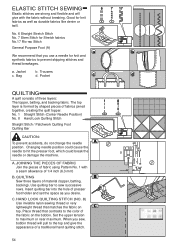
... CAUTION: To prevent accidents, do not change the needle position. Use quilting bar to maximum or near maximum. Set the upper tension to sew successive rows. Jacket c. A. Pocket QUILTING A quilt consists of the fabric on top. Place thread that contrasts to prevent skipping stitches and thread... breakages. ELASTIC STITCH SEWING Elastic stitches are strong and flexible and will pull to hit the presser foot, which could break the needle or damage the machine. Good for Stretch fabrics No.17 Ric-rac Stitch General Purpose Foot...
... CAUTION: To prevent accidents, do not change the needle position. Use quilting bar to maximum or near maximum. Set the upper tension to sew successive rows. Jacket c. A. Pocket QUILTING A quilt consists of the fabric on top. Place thread that contrasts to prevent skipping stitches and thread... breakages. ELASTIC STITCH SEWING Elastic stitches are strong and flexible and will pull to hit the presser foot, which could break the needle or damage the machine. Good for Stretch fabrics No.17 Ric-rac Stitch General Purpose Foot...
Instruction Manual
Page 78
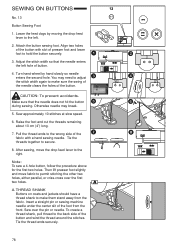
... pull thread to secure. 8. Turn hand wheel by moving the drop feed lever to make them stand away from the front. Insert a straight pin or sewing machine needle under the center slit of button. 4. Tie the thread ends securely. 78 Adjust the stitch width so that the needle does not hit the... button during sewing. After sewing, move fabric to make sure the swing of the needle clears the holes of the button and wind the thread around the stitches. THREAD ...
... pull thread to secure. 8. Turn hand wheel by moving the drop feed lever to make them stand away from the front. Insert a straight pin or sewing machine needle under the center slit of button. 4. Tie the thread ends securely. 78 Adjust the stitch width so that the needle does not hit the... button during sewing. After sewing, move fabric to make sure the swing of the needle clears the holes of the button and wind the thread around the stitches. THREAD ...

Instruction Manual
Page 96
... page, " To save selected patterns.) To recall these patterns, touch the decorative or letter stitch button. When you wish to pre-set.) 96 This mark means that sewing is indicated on the left side of sequence. c. Machine will return to start sewing. SEWING PATTERN FROM BEGINNING a. Machine will recall the selected patterns. (Thread tension will indicate...
... page, " To save selected patterns.) To recall these patterns, touch the decorative or letter stitch button. When you wish to pre-set.) 96 This mark means that sewing is indicated on the left side of sequence. c. Machine will return to start sewing. SEWING PATTERN FROM BEGINNING a. Machine will recall the selected patterns. (Thread tension will indicate...


