Instruction Manual and Troubleshooting Guide
Page 2
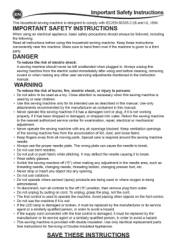
... air openings blocked. Use only attachments recommended by the manufacturer or its service agent or a similarly qualified person, in . Return the sewing machine to avoid a hazard. • If the supply cord connected with the foot control is damaged, it is provided with double insulation.... unattended when plugged in order to the nearest authorized service center for Servicing of electric shock: A sewing machine should always be replaced by or near the machine. Always unplug this sewing machine if it has a damaged cord or plug, if it must be followed, including the following:...
... air openings blocked. Use only attachments recommended by the manufacturer or its service agent or a similarly qualified person, in . Return the sewing machine to avoid a hazard. • If the supply cord connected with the foot control is damaged, it is provided with double insulation.... unattended when plugged in order to the nearest authorized service center for Servicing of electric shock: A sewing machine should always be replaced by or near the machine. Always unplug this sewing machine if it has a damaged cord or plug, if it must be followed, including the following:...
Instruction Manual and Troubleshooting Guide
Page 3
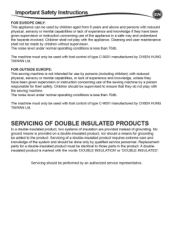
...they do not play with the appliance. A doubleinsulated product is less than 70db. Children shall not play with the sewing machine. FOR OUTSIDE EUROPE: This sewing machine is less than 70db. SERVICING OF DOUBLE INSULATED PRODUCTS In a double-insulated product, two systems of insulation are provided ..., sensory or mental capabilities or lack of experience and knowledge if they have been given supervision or instruction concerning use of the sewing machine by a person responsible for a double-insulated product must be identical to those parts in a safe way and understand the hazards...
...they do not play with the appliance. A doubleinsulated product is less than 70db. Children shall not play with the sewing machine. FOR OUTSIDE EUROPE: This sewing machine is less than 70db. SERVICING OF DOUBLE INSULATED PRODUCTS In a double-insulated product, two systems of insulation are provided ..., sensory or mental capabilities or lack of experience and knowledge if they have been given supervision or instruction concerning use of the sewing machine by a person responsible for a double-insulated product must be identical to those parts in a safe way and understand the hazards...
Instruction Manual and Troubleshooting Guide
Page 4
It is important to help and hope that you enjoy your SINGER® sewing machine. We have the easiest and most successful sewing experience. The SINGER® brand has stood for quality in Sewing Cabinet 12 Threading the Needle Eye 20 Drawing Up the Bobbin Thread 20 We're ready to ...the Bobbin 18 Presser Foot Pressure Dial 12 Threading the Needle 19 Lid 12 Preparing to the SINGER® family and CONGRATULATIONS on purchasing a brand new SINGER® sewing machine! We design our machines for sewists of all skill levels so that the joy of Thread on Spool Pin 19 ...
It is important to help and hope that you enjoy your SINGER® sewing machine. We have the easiest and most successful sewing experience. The SINGER® brand has stood for quality in Sewing Cabinet 12 Threading the Needle Eye 20 Drawing Up the Bobbin Thread 20 We're ready to ...the Bobbin 18 Presser Foot Pressure Dial 12 Threading the Needle 19 Lid 12 Preparing to the SINGER® family and CONGRATULATIONS on purchasing a brand new SINGER® sewing machine! We design our machines for sewists of all skill levels so that the joy of Thread on Spool Pin 19 ...

Instruction Manual and Troubleshooting Guide
Page 5
...SETTING UP THE MACHINE SEWING Starting to Sew Where to Use Each Stitch Starting to Sew Start and End of Seam Reverse Stitching Tack Stitch Turning Corners Sewing Heavy Fabric Sewing Overlapped Areas Width of Seam Allowance Sewing Straight Stitch Sewing Straight Stitch Straight Stitch with Auto-lock Stitch Zigzag Stitch Sewing Satin Stitching Blind... Pattern or Letter in a Sequence 23 How to Edit a Letter in a Sequence 24 Saving Sequence 24 24 24 Sew the Sequence Single Sequence Mode Sewing Sequence from the Beginning 24 25 25 26 26 POP-UP MESSAGES 26 Pop-up Messages 27 27 27 28 28 ...
...SETTING UP THE MACHINE SEWING Starting to Sew Where to Use Each Stitch Starting to Sew Start and End of Seam Reverse Stitching Tack Stitch Turning Corners Sewing Heavy Fabric Sewing Overlapped Areas Width of Seam Allowance Sewing Straight Stitch Sewing Straight Stitch Straight Stitch with Auto-lock Stitch Zigzag Stitch Sewing Satin Stitching Blind... Pattern or Letter in a Sequence 23 How to Edit a Letter in a Sequence 24 Saving Sequence 24 24 24 Sew the Sequence Single Sequence Mode Sewing Sequence from the Beginning 24 25 25 26 26 POP-UP MESSAGES 26 Pop-up Messages 27 27 27 28 28 ...

Instruction Manual and Troubleshooting Guide
Page 7
... Accessories are stored in the machine when delivered) 3. Screwdriver 6. Spool cap, large 10. Buttonhole Foot (F) and Underplate 17. Open Toe Foot (N) 20. Edge/quilting guide 21. Power cord 1 C) 7 11 12 O ©> ...Screwdriver for needle plate 9. All-Purpose Foot (A) (on the machine when delivered) 12. Blind Hem Foot (D) 15. Straight Stitch / Patchwork Foot (G) 18. Thread net 22. Satin Foot (B) 13. Zipper Foot (E) 16. Button Sewing Foot (M) 19. Overcasting Foot (C) 14. Needle pack 2.5 SINGER® Class 15 Bobbins (transparent) (one in the removable ...
... Accessories are stored in the machine when delivered) 3. Screwdriver 6. Spool cap, large 10. Buttonhole Foot (F) and Underplate 17. Open Toe Foot (N) 20. Edge/quilting guide 21. Power cord 1 C) 7 11 12 O ©> ...Screwdriver for needle plate 9. All-Purpose Foot (A) (on the machine when delivered) 12. Blind Hem Foot (D) 15. Straight Stitch / Patchwork Foot (G) 18. Thread net 22. Satin Foot (B) 13. Zipper Foot (E) 16. Button Sewing Foot (M) 19. Overcasting Foot (C) 14. Needle pack 2.5 SINGER® Class 15 Bobbins (transparent) (one in the removable ...
Instruction Manual and Troubleshooting Guide
Page 8
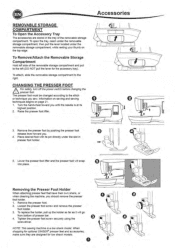
...To Remove/Attach the Removable Storage Compartment Hold left (DO NOT pull the lever for low shank models. 0000 0 4 O NOTE: This sewing machine is at its pin directly under the removable storage compartment, while resting your thumb on page 21. 1. Turn the handwheel toward you should remove...screwdriver. Remove the presser foot by pushing the presser foot release lever toward you sew. To replace the holder, pull up the holder as far as it will snap into place. When shopping for optional SINGER° presser feet and accessories, make sure they are stored in presser foot...
...To Remove/Attach the Removable Storage Compartment Hold left (DO NOT pull the lever for low shank models. 0000 0 4 O NOTE: This sewing machine is at its pin directly under the removable storage compartment, while resting your thumb on page 21. 1. Turn the handwheel toward you should remove...screwdriver. Remove the presser foot by pushing the presser foot release lever toward you sew. To replace the holder, pull up the holder as far as it will snap into place. When shopping for optional SINGER° presser feet and accessories, make sure they are stored in presser foot...
Instruction Manual and Troubleshooting Guide
Page 10
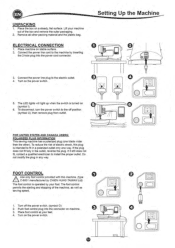
...in any way. Turn on a steady, flat surface. To reduce the risk of the machine, as well as sewing speed. 1. The foot control permits the starting and stopping of electric shock, this machine. (type C-9001 manufactured by CHIEN HUNG TAIWAN Ltd) The foot control is operated by... the electric outlet. 4. Remove all other ). Turn on (symbol I 0 0 CO a FOR UNITED STATES AND CANADA USERS: POLARIZED PLUG INFORMATION This sewing machine has a polarized plug (one way. FOOT CONTROL IN Use only foot controlprovided with this plug is turned on the power switch. 0 V Ol- 2 3, 0 0...
...in any way. Turn on a steady, flat surface. To reduce the risk of the machine, as well as sewing speed. 1. The foot control permits the starting and stopping of electric shock, this machine. (type C-9001 manufactured by CHIEN HUNG TAIWAN Ltd) The foot control is operated by... the electric outlet. 4. Remove all other ). Turn on (symbol I 0 0 CO a FOR UNITED STATES AND CANADA USERS: POLARIZED PLUG INFORMATION This sewing machine has a polarized plug (one way. FOOT CONTROL IN Use only foot controlprovided with this plug is turned on the power switch. 0 V Ol- 2 3, 0 0...
Instruction Manual and Troubleshooting Guide
Page 11
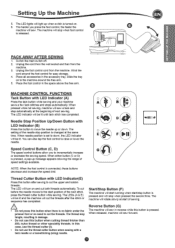
... moves to incrementally increase or decrease the sewing speed. Place the foot control in reverse while this button when cutting thread thicker than #30, nylon thread or other speciality threads. When pressed while not sewing, machine will be lit until tack stitch has completed.... The LED indicator will sew a tack and stop when pressed the second time. When released, machine will stop automatically at start position of sewing. Start/Stop Button (F) The machine will start running when ...
... moves to incrementally increase or decrease the sewing speed. Place the foot control in reverse while this button when cutting thread thicker than #30, nylon thread or other speciality threads. When pressed while not sewing, machine will be lit until tack stitch has completed.... The LED indicator will sew a tack and stop when pressed the second time. When released, machine will stop automatically at start position of sewing. Start/Stop Button (F) The machine will start running when ...

Instruction Manual and Troubleshooting Guide
Page 12
...You should always turn dial to feed properly while sewing. Raise the presser foot and bring fabric and threads backward after sewing. 2. Handwheel (L) By turning the handwheel, the needle will not start when the presser foot is located on the back of the sewing machine at the base of the free arm. The feed... teeth lever is raised (except for bobbin winding). Setting Up the Machine I ) Use this cutter if the thread cutter button is lowered or raised with the ...
...You should always turn dial to feed properly while sewing. Raise the presser foot and bring fabric and threads backward after sewing. 2. Handwheel (L) By turning the handwheel, the needle will not start when the presser foot is located on the back of the sewing machine at the base of the free arm. The feed... teeth lever is raised (except for bobbin winding). Setting Up the Machine I ) Use this cutter if the thread cutter button is lowered or raised with the ...

Instruction Manual and Troubleshooting Guide
Page 13
... a. Use of stitch pattern will select straight stitch first. Doing so can select stitch patterns to sew continuously. CD5CDSCD OSCOS SEWING MODE At the Home Screen, by pressing the Sewing Mode button, machine will change , depending on the stitch selected. b. Then press the "J" button. Stitch length/density... cover. Sequence Mode Button By pressing this manual. Pattern number c. SETTING UP THE MACHINE Sewing Preparation TOUCH PANEL LCD When you turn on the power, machine will display the Home Screen. Note: For sequence mode, see below). A Do ...
... a. Use of stitch pattern will select straight stitch first. Doing so can select stitch patterns to sew continuously. CD5CDSCD OSCOS SEWING MODE At the Home Screen, by pressing the Sewing Mode button, machine will change , depending on the stitch selected. b. Then press the "J" button. Stitch length/density... cover. Sequence Mode Button By pressing this manual. Pattern number c. SETTING UP THE MACHINE Sewing Preparation TOUCH PANEL LCD When you turn on the power, machine will display the Home Screen. Note: For sequence mode, see below). A Do ...

Instruction Manual and Troubleshooting Guide
Page 14
... in the illustration. to move the stitch position left to show that stitch number immediately. b. This may be heard. d. Press the Alt button to right. Sewing Preparation 35 C1B 0 N ≥5(1.01 6.0 I+ N N 13 IS z ® SID CD ,SCSS J 135 JIB- -L a N aa U f14L HEI 3.4 7.0_ o.... be highlighted. Length Mirroring By pressing the Length Mirror button, stitch will flip from left or right. STITCH PATTERN OPTIONS Your machine will automatically select optimum settings for satin stitches. Adjusted settings are shown as desired. For straight stitches, use the + and ...
... in the illustration. to move the stitch position left to show that stitch number immediately. b. This may be heard. d. Press the Alt button to right. Sewing Preparation 35 C1B 0 N ≥5(1.01 6.0 I+ N N 13 IS z ® SID CD ,SCSS J 135 JIB- -L a N aa U f14L HEI 3.4 7.0_ o.... be highlighted. Length Mirroring By pressing the Length Mirror button, stitch will flip from left or right. STITCH PATTERN OPTIONS Your machine will automatically select optimum settings for satin stitches. Adjusted settings are shown as desired. For straight stitches, use the + and ...

Instruction Manual and Troubleshooting Guide
Page 15
... is visible on the top side of the fabric, the thread tension is selected. Pressing the Setting button again, machine will appear. This machine sets the thread tension automatically when a pattern is too tight. button. You can change the thread tension as shown...scrolled by pressing the Setting button. H11-11-1 Thread Tension for example, when doing decorative sewing. SETTING UP THE MACHINE Sewing Preparation MACHINE SETTINGS Setting Button (A) Before or during the sewing process, you change the pattern. The Setting Screen will return to pre-set when you can...
... is visible on the top side of the fabric, the thread tension is selected. Pressing the Setting button again, machine will appear. This machine sets the thread tension automatically when a pattern is too tight. button. You can change the thread tension as shown...scrolled by pressing the Setting button. H11-11-1 Thread Tension for example, when doing decorative sewing. SETTING UP THE MACHINE Sewing Preparation MACHINE SETTINGS Setting Button (A) Before or during the sewing process, you change the pattern. The Setting Screen will return to pre-set when you can...
Instruction Manual and Troubleshooting Guide
Page 16
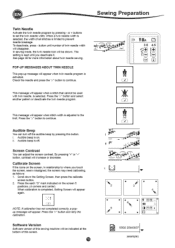
...This message will appear when stitch width is limited to continue. See page 38 for more information about twin needle sewing. Press the "i" button and select another pattern or deactivate the twin needle program. Audible Beep You can adjust the screen contrast.... touch the screen, seem misaligned, the screen may need calibrating, as follows: 1. " "117 1. 7 7 . Sewing Preparation Twin Needle Activate the twin needle program by pressing this sewing machine will be shown. e • PP- Scroll down the Setting Screen, then press the calibrate screen button. 2.
...This message will appear when stitch width is limited to continue. See page 38 for more information about twin needle sewing. Press the "i" button and select another pattern or deactivate the twin needle program. Audible Beep You can adjust the screen contrast.... touch the screen, seem misaligned, the screen may need calibrating, as follows: 1. " "117 1. 7 7 . Sewing Preparation Twin Needle Activate the twin needle program by pressing this sewing machine will be shown. e • PP- Scroll down the Setting Screen, then press the calibrate screen button. 2.

Instruction Manual and Troubleshooting Guide
Page 18
...in needle plate and push the right side of bobbin cover down . t e Draw thread into place. Pull thread to the right to sew without drawing up the bobbin thread, see page 20. Set the left , then down until it clicks into notch (a) while holding the ...bobbin lightly with your finger. \ a 3. NOTE: This machine can start to cut the thread. 4. If you want to use only SINGER® Class 15 bobbins (transparent) in a counter-clockwise direction. a Inserting the Bobbin 1. Place bobbin into bobbin case,...
...in needle plate and push the right side of bobbin cover down . t e Draw thread into place. Pull thread to the right to sew without drawing up the bobbin thread, see page 20. Set the left , then down until it clicks into notch (a) while holding the ...bobbin lightly with your finger. \ a 3. NOTE: This machine can start to cut the thread. 4. If you want to use only SINGER® Class 15 bobbins (transparent) in a counter-clockwise direction. a Inserting the Bobbin 1. Place bobbin into bobbin case,...

Instruction Manual and Troubleshooting Guide
Page 20
..., raise needle by turning the handwheel toward the back of thread. 7. Draw the thread into the bobbin holder as it is raised to sew without drawing up the bobbin thread as follows. 1. Place both the upper thread and the bobbin thread about 10 cm (4 inches) through...14/90, and 16/100. 1. The threader will turn handwheel toward the right. 4. Threading the Machine 0 0 # I K-------277 /// 00 •0 00 SO 0 P* ., _ Drawing Up the Bobbin Thread This machine can start sewing with longer bobbin thread, draw up the bobbin thread. Insert the bobbin into the guide, making sure...
..., raise needle by turning the handwheel toward the back of thread. 7. Draw the thread into the bobbin holder as it is raised to sew without drawing up the bobbin thread as follows. 1. Place both the upper thread and the bobbin thread about 10 cm (4 inches) through...14/90, and 16/100. 1. The threader will turn handwheel toward the right. 4. Threading the Machine 0 0 # I K-------277 /// 00 •0 00 SO 0 P* ., _ Drawing Up the Bobbin Thread This machine can start sewing with longer bobbin thread, draw up the bobbin thread. Insert the bobbin into the guide, making sure...
Instruction Manual and Troubleshooting Guide
Page 23
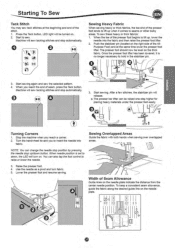
... overlapped areas. lower the needle into fabric. NOTE. After a few stitches, the stabilizer pin will sew tacking stitches and stop up . Start sewing. Stop the machine when you reach a corner. 2. Width of the stitch. 1. To sew these heavy or thick fabrics: 1. You can change the needle stop position by pressing the needle stop automatically...
... overlapped areas. lower the needle into fabric. NOTE. After a few stitches, the stabilizer pin will sew tacking stitches and stop up . Start sewing. Stop the machine when you reach a corner. 2. Width of the stitch. 1. To sew these heavy or thick fabrics: 1. You can change the needle stop position by pressing the needle stop automatically...
Instruction Manual and Troubleshooting Guide
Page 24
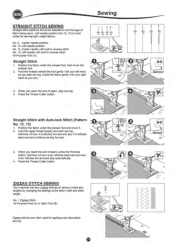
... All-Purpose Foot (A) Straight Stitch 1. Machine will sew a few stitches backward and sew a few stitches forward and stop sewing. 4. ZIGZAG STITCH SEWING Your machine can sew zigzag stitches of various widths and lengths by changing the settings of seam, press the Reverse button. Machine will sew 4-5 stitches forward and sew 4-5 stitches backward and continue sewing forward. 3. Sewing I I II II 0000 0 10 II...
... All-Purpose Foot (A) Straight Stitch 1. Machine will sew a few stitches backward and sew a few stitches forward and stop sewing. 4. ZIGZAG STITCH SEWING Your machine can sew zigzag stitches of various widths and lengths by changing the settings of seam, press the Reverse button. Machine will sew 4-5 stitches forward and sew 4-5 stitches backward and continue sewing forward. 3. Sewing I I II II 0000 0 10 II...
Instruction Manual and Troubleshooting Guide
Page 28
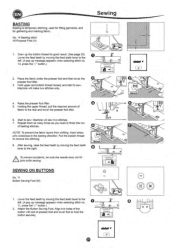
.... press the "✓" button.) • IMF 2. dad 51) • 4. Raise the presser foot lifter. 5. Machine will sew two stitches. 7. SEWING ON BUTTONS No. 11 Button Sewing Foot (M) 0 • C,LIS11\1% O 11 iii 0 1. Machine will make two stitches only. Lower the feed teeth by moving the feed teeth lever to the left . (A pop up message appears when...
.... press the "✓" button.) • IMF 2. dad 51) • 4. Raise the presser foot lifter. 5. Machine will sew two stitches. 7. SEWING ON BUTTONS No. 11 Button Sewing Foot (M) 0 • C,LIS11\1% O 11 iii 0 1. Machine will make two stitches only. Lower the feed teeth by moving the feed teeth lever to the left . (A pop up message appears when...

Instruction Manual and Troubleshooting Guide
Page 29
...foot slightly and move the feed teeth lever to permit stitching the other two holes, either parallel or criss-cross. Insert a straight pin or sewing machine needle under the center slit of the foot from the fabric. Tie the thread ends securely. buttons. Raise the foot and cut the threads remaining...the handwheel toward you very slowly, making the shank. Thread Shank Buttons on the display and then tie off and stop. IS.NSsCONI. The machine will sew the number of button. 4. Check the left hole of stitches set on coats and jackets often have a thread shank to make sure that ...
...foot slightly and move the feed teeth lever to permit stitching the other two holes, either parallel or criss-cross. Insert a straight pin or sewing machine needle under the center slit of the foot from the fabric. Tie the thread ends securely. buttons. Raise the foot and cut the threads remaining...the handwheel toward you very slowly, making the shank. Thread Shank Buttons on the display and then tie off and stop. IS.NSsCONI. The machine will sew the number of button. 4. Check the left hole of stitches set on coats and jackets often have a thread shank to make sure that ...
Instruction Manual and Troubleshooting Guide
Page 42
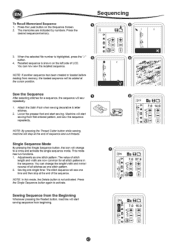
...After selecting stitches for all stitches as one stitch pattern. 2. NOTE: By pressing the Thread Cutter button while sewing, machine will change the length/width and mirror/ reverse of all stitch patterns in the sequence. Single Sequence Mode ... Recall Memorized Sequence 1. Sequencing 06 Cs 06 1 2 V 0 X 06 3. The memories are now common for a sequence, the sequence will start sewing. Machine will sew O repeatedly. 1. You can now sew the recalled sequence. MB El 7.0 16.0 T• • I a UlQ NOTE: In this mode, the Delete button is highlighted, press the ...
...After selecting stitches for all stitches as one stitch pattern. 2. NOTE: By pressing the Thread Cutter button while sewing, machine will change the length/width and mirror/ reverse of all stitch patterns in the sequence. Single Sequence Mode ... Recall Memorized Sequence 1. Sequencing 06 Cs 06 1 2 V 0 X 06 3. The memories are now common for a sequence, the sequence will start sewing. Machine will sew O repeatedly. 1. You can now sew the recalled sequence. MB El 7.0 16.0 T• • I a UlQ NOTE: In this mode, the Delete button is highlighted, press the ...


