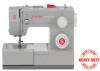

User Manual
Page 23
... counterclockwise (towards you turn the handwheel away from you as this movement pass thread from front to spool. (2) - Start by not doing so several sewing problems could result. - Note: For safety, it is strongly suggested you ). 5 16 2 3 4 6 7 8 Trim thread to the spool.
... counterclockwise (towards you turn the handwheel away from you as this movement pass thread from front to spool. (2) - Start by not doing so several sewing problems could result. - Note: For safety, it is strongly suggested you ). 5 16 2 3 4 6 7 8 Trim thread to the spool.

User Manual
Page 60
... far up as follows: A. Loosen the needle clamp screw and tighten again after an average of 16 hours of wear and causing problems. For best sewing results always use SINGER® needles. Attention: Turn power switch to off ("O") before inserting or removing 1 the needle. Blunt needles Replace your needle after inserting the...
... far up as follows: A. Loosen the needle clamp screw and tighten again after an average of 16 hours of wear and causing problems. For best sewing results always use SINGER® needles. Attention: Turn power switch to off ("O") before inserting or removing 1 the needle. Blunt needles Replace your needle after inserting the...
User Manual
Page 62
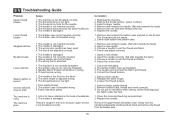
... on the hook or needle bar. 2. Insert the needle correctly. (flat side towards the back) 5. Remove the upper thread and bobbin case. EN Troubleshooting Guide Problem Upper thread breaks Lower thread breaks Cause 1. The needle is too tight. 1. Choose a needle to suit the thread and fabric. 4. The needle is not threaded...
... on the hook or needle bar. 2. Insert the needle correctly. (flat side towards the back) 5. Remove the upper thread and bobbin case. EN Troubleshooting Guide Problem Upper thread breaks Lower thread breaks Cause 1. The needle is too tight. 1. Choose a needle to suit the thread and fabric. 4. The needle is not threaded...

