User Manual
Page 24
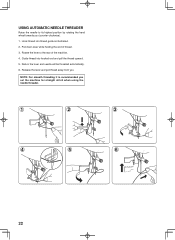
Return the lever and needle will be threaded automatically. 6. Release the lever and pull thread away from you set the machine for straight stitch when using the needle threader. 1 2 3 4 5 6 22 NOTE: For smooth threading it is recommended you . Rotate the lever to its ...highest position by rotating the hand wheel towards you (counter-clockwise). 1. Hook thread into hooked end and pull the thread upward. 5. Guide thread into thread guide as illustrated. 2. Pull down lever while holding the end of the machine. 4. USING AUTOMATIC NEEDLE THREADER Raise the needle to the...
Return the lever and needle will be threaded automatically. 6. Release the lever and pull thread away from you set the machine for straight stitch when using the needle threader. 1 2 3 4 5 6 22 NOTE: For smooth threading it is recommended you . Rotate the lever to its ...highest position by rotating the hand wheel towards you (counter-clockwise). 1. Hook thread into hooked end and pull the thread upward. 5. Guide thread into thread guide as illustrated. 2. Pull down lever while holding the end of the machine. 4. USING AUTOMATIC NEEDLE THREADER Raise the needle to the...

User Manual
Page 32
... Boutons d'ajustement manuel de la longueur du point Ajuste manual botones para largo de puntada Manual adjustment buttons for straight stitch according to pattern number reference guide. STITCH LENGTH AND STITCH WIDTH/NEEDLE POSITION ADJUSTMENT BUTTONS Your sewing machine will produce your preference pushing manual adjustment buttons. Both left digit and right button to...
... Boutons d'ajustement manuel de la longueur du point Ajuste manual botones para largo de puntada Manual adjustment buttons for straight stitch according to pattern number reference guide. STITCH LENGTH AND STITCH WIDTH/NEEDLE POSITION ADJUSTMENT BUTTONS Your sewing machine will produce your preference pushing manual adjustment buttons. Both left digit and right button to...
User Manual
Page 44
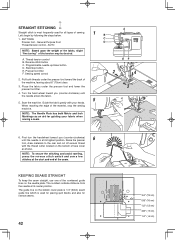
... until the needle is used for all types of the numbered guide lines on the needle plate. The guide line on the bottom of the tension may be desired. Reverse stitch button C. Sewing speed control EF 2 4 2. Guide the fabric gently with the thread cutter located on the bobbin cover... plate is 1/4" (6mm) seam guide line which is at its highest position. Raise the presser 6 foot, draw ...
... until the needle is used for all types of the numbered guide lines on the needle plate. The guide line on the bottom of the tension may be desired. Reverse stitch button C. Sewing speed control EF 2 4 2. Guide the fabric gently with the thread cutter located on the bobbin cover... plate is 1/4" (6mm) seam guide line which is at its highest position. Raise the presser 6 foot, draw ...
User Manual
Page 50
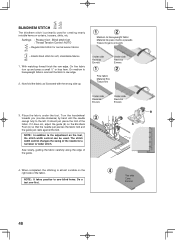
...In addition to the adjustment on the Blindhem Foot (A) so that the needle just pierces the fabric fold and the guide just rests against the fold. The stitch width control changes the swing of the needle for creating nearly invisible hems on the right side of the fabric. Settings... : Presser foot - If it does not, adjust the guide (B) on the foot, the stitch width control can be used for a narrower or wider stitch. Elastic blind stitch for normal woven fabrics 1 2 Medium to heavyweight fabrics overcast the fabric's raw edge. 2. Under ...
...In addition to the adjustment on the Blindhem Foot (A) so that the needle just pierces the fabric fold and the guide just rests against the fold. The stitch width control changes the swing of the needle for creating nearly invisible hems on the right side of the fabric. Settings... : Presser foot - If it does not, adjust the guide (B) on the foot, the stitch width control can be used for a narrower or wider stitch. Elastic blind stitch for normal woven fabrics 1 2 Medium to heavyweight fabrics overcast the fabric's raw edge. 2. Under ...
User Manual
Page 78
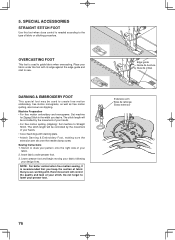
... your hands. • For free motion quilting (stippling): Set machine to Straight Stitch. OVERCASTING FOOT This foot is used to sew. Insert fabric under the foot with its edge against the edge guide and start to create free motion embroidery, free motion monograms, as well as free... Extension arm Bras de rallonge Brazo extensor 76 NOTE: For better control when free motion sewing, it is needed according to guide fabric when overcasting. The stitch length will control the quality and look of fabric that you hoop the section of your fabric. 2. SPECIAL ACCESSORIES STRAIGHT...
... your hands. • For free motion quilting (stippling): Set machine to Straight Stitch. OVERCASTING FOOT This foot is used to sew. Insert fabric under the foot with its edge against the edge guide and start to create free motion embroidery, free motion monograms, as well as free... Extension arm Bras de rallonge Brazo extensor 76 NOTE: For better control when free motion sewing, it is needed according to guide fabric when overcasting. The stitch length will control the quality and look of fabric that you hoop the section of your fabric. 2. SPECIAL ACCESSORIES STRAIGHT...
User Manual
Page 80
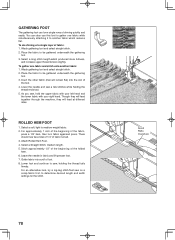
...Attach Rolled Hem Foot. 4. Leave the needle in fabric and lift presser foot. 7. Guide fabric into the slot of foot. 8. Attach gathering foot and select straight stitch. 2. Attach gathering foot and select straight stitch. 2. Insert the other fabric (that will feed at different rates. As you sew, ...hold the upper fabric with your left hand and the lower fabric with your right hand. Select a soft, light to medium weight fabric. 2. Stitch approximately 1/2" of the beginning of the fabric, press a 1/8" hem, then turn fabric againand press. For approximately 1 inch of the beginning ...
...Attach Rolled Hem Foot. 4. Leave the needle in fabric and lift presser foot. 7. Guide fabric into the slot of foot. 8. Attach gathering foot and select straight stitch. 2. Attach gathering foot and select straight stitch. 2. Insert the other fabric (that will feed at different rates. As you sew, ...hold the upper fabric with your left hand and the lower fabric with your right hand. Select a soft, light to medium weight fabric. 2. Stitch approximately 1/2" of the beginning of the fabric, press a 1/8" hem, then turn fabric againand press. For approximately 1 inch of the beginning ...
User Manual
Page 82
... Machine does not sew. * Power switch is too tight. - STITCHING PROBLEMS Machine skips stitches. * Needle is not all the way up into the needle clamp (see page 26 - 27). * Twin needle is bent or blunt. - Guide it gently. * Needle size is not correct for thread and fabric...17). Needle thread breaks. * Machine is not threaded correctly (see page 20 - 21). * Top thread tension is not raised when sewing stitch patterns. - Lower presser foot. * Stitch length is not lowered - Disengage bobbin winder (see page 28 - 29). * Needle is not threaded correctly (see page 20 - 21)....
... Machine does not sew. * Power switch is too tight. - STITCHING PROBLEMS Machine skips stitches. * Needle is not all the way up into the needle clamp (see page 26 - 27). * Twin needle is bent or blunt. - Guide it gently. * Needle size is not correct for thread and fabric...17). Needle thread breaks. * Machine is not threaded correctly (see page 20 - 21). * Top thread tension is not raised when sewing stitch patterns. - Lower presser foot. * Stitch length is not lowered - Disengage bobbin winder (see page 28 - 29). * Needle is not threaded correctly (see page 20 - 21)....


