Instruction Manual
Page 3
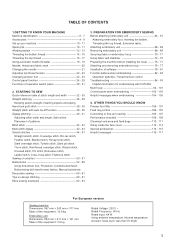
... to -sew fabrics, Manual buttonhole Decorative sewing 60 - 61 Tips on a button 50 - 51 Buttonholes 52 - 59 Using buttonhole foot, Procedure, Corded buttonholes Buttonholing with FUTURA Multi hoop 94 - 101 Control panel when embroidering 102 - 103 Helpful messages when embroidering 104 - 105 4. PREPARATION FOR EMBROIDERY SEWING Before attaching embroidery unit 64...
... to -sew fabrics, Manual buttonhole Decorative sewing 60 - 61 Tips on a button 50 - 51 Buttonholes 52 - 59 Using buttonhole foot, Procedure, Corded buttonholes Buttonholing with FUTURA Multi hoop 94 - 101 Control panel when embroidering 102 - 103 Helpful messages when embroidering 104 - 105 4. PREPARATION FOR EMBROIDERY SEWING Before attaching embroidery unit 64...

Instruction Manual
Page 8
... and underplate 17. The Satin Foot (14) is first necessary to the CD insert for needle plate 10. Bobbins 21. To install the FUTURA software, refer to install the FUTURA software. Spool pin felt discs 5. Button sewing foot 1 16. Scissors 22. Auxiliary spool pin 4. ACCESSORIES FOR SEWING MACHINE 1. Needles 2. Spool pin cap...
... and underplate 17. The Satin Foot (14) is first necessary to the CD insert for needle plate 10. Bobbins 21. To install the FUTURA software, refer to install the FUTURA software. Spool pin felt discs 5. Button sewing foot 1 16. Scissors 22. Auxiliary spool pin 4. ACCESSORIES FOR SEWING MACHINE 1. Needles 2. Spool pin cap...

Instruction Manual
Page 78
This procedure is highly recommended to use the selected default directory. Click on "Next" to move on to continue. 78 The FUTURA software comes on your PC. It is refered to as "installation procedure". After some seconds the step-by going to the "Start" option of ...the directory where the software should be installed. In most personal computers the default drive setting for a CD-ROM drive is "D:" Please insert the FUTURA CD-ROM into the CD-ROM disc receiver in order to successfully install FUTURA on a CD-ROM disc. After reading and agreeing with the Welcome window.
This procedure is highly recommended to use the selected default directory. Click on "Next" to move on to continue. 78 The FUTURA software comes on your PC. It is refered to as "installation procedure". After some seconds the step-by going to the "Start" option of ...the directory where the software should be installed. In most personal computers the default drive setting for a CD-ROM drive is "D:" Please insert the FUTURA CD-ROM into the CD-ROM disc receiver in order to successfully install FUTURA on a CD-ROM disc. After reading and agreeing with the Welcome window.

Instruction Manual
Page 80
... the given directory on "Next" to select the Program Folder where the shortcut for the software will prompt you to open the FUTURA software. The installation procedure is . CORRECT START-UP PROCEDURE WHEN EMBROIDERING The following steps must be stored. Turn on your sewing machine...plan to work with the installation. It will get a "Transmission Pending" error message. If the installation utility identifies a lack of the FUTURA software files to your embroidery unit. 3. Attach the hoop that you will finish when it has reached to confirm all required actions and ...
... the given directory on "Next" to select the Program Folder where the shortcut for the software will prompt you to open the FUTURA software. The installation procedure is . CORRECT START-UP PROCEDURE WHEN EMBROIDERING The following steps must be stored. Turn on your sewing machine...plan to work with the installation. It will get a "Transmission Pending" error message. If the installation utility identifies a lack of the FUTURA software files to your embroidery unit. 3. Attach the hoop that you will finish when it has reached to confirm all required actions and ...

Instruction Manual
Page 88
...(see 16 - 17 "Threading the Top Thread".) Placing the small net that the thread is supplied with the accessories over . 2. The FUTURA software will move back one stitch at a time. It does have a limitation of the stitching is not in the thread tension. Embroidering ...properly. After resizing a design, the density of re-sizing up to re-calculate the stitches correctly. 88 HELPFUL INFORMATION FOR EMBROIDERING WITH FUTURA 1. Restart the embroidery machine and continue embroidering. Reverse stitch button Interrupteur couture arrière interruptor de puntadas hacia atrás 3....
...(see 16 - 17 "Threading the Top Thread".) Placing the small net that the thread is supplied with the accessories over . 2. The FUTURA software will move back one stitch at a time. It does have a limitation of the stitching is not in the thread tension. Embroidering ...properly. After resizing a design, the density of re-sizing up to re-calculate the stitches correctly. 88 HELPFUL INFORMATION FOR EMBROIDERING WITH FUTURA 1. Restart the embroidery machine and continue embroidering. Reverse stitch button Interrupteur couture arrière interruptor de puntadas hacia atrás 3....

Instruction Manual
Page 90
.... The value is usually the standard density used for Lettering. Why does a design sometimes split up 'divided' into several blocks. When sizing designs in the FUTURA software you have brought them into very small segments? To select additional areas, hold down the CONTROL key and left click on your keyboard. 7. One...
.... The value is usually the standard density used for Lettering. Why does a design sometimes split up 'divided' into several blocks. When sizing designs in the FUTURA software you have brought them into very small segments? To select additional areas, hold down the CONTROL key and left click on your keyboard. 7. One...

Instruction Manual
Page 94
... of the design lines up to the accuracy of the final outcome of the cross lines. Multi-Hoop Multi-Hooping is a special feature in the FUTURA software that will allow embroidery data which is slightly askew, this system will compensate for it and sew accordingly.
... of the design lines up to the accuracy of the final outcome of the cross lines. Multi-Hoop Multi-Hooping is a special feature in the FUTURA software that will allow embroidery data which is slightly askew, this system will compensate for it and sew accordingly.

Instruction Manual
Page 102
... a color block. CONTROL PANEL WHEN EMBROIDERING When embroidering, the dials on the control panel are used to that position. After transferring desired design(s) to your FUTURA sewing and embroidery machine, the display shows number of current color block and total number of color blocks as described on the display. Turn the...
... a color block. CONTROL PANEL WHEN EMBROIDERING When embroidering, the dials on the control panel are used to that position. After transferring desired design(s) to your FUTURA sewing and embroidery machine, the display shows number of current color block and total number of color blocks as described on the display. Turn the...


