Instruction Manual
Page 3
... the machine before installing the hoop -------- 76 - 77 Attaching and removing embroidery hoop 76 - 77 Installation of patterns Blind stitch 42 - 43 Multi-stitch zigzag 42 - 43 Stretch stitches 44 - 51 Straight stretch stitch, Overedge stitch, Ric-rac stitch, Feather stitch, Blanket stitch, Honeycomb stitch, Slant overedge stitch, Turkish stitch, Slant pin stitch, Thorn stitch, Reinforced overedge stitch, Wizard stitch, Crossed stitch, Pin stitch, Entredeux stitch, Ladder stitch, Criss-cross stitch, Fishbone stitch Sewing...
... the machine before installing the hoop -------- 76 - 77 Attaching and removing embroidery hoop 76 - 77 Installation of patterns Blind stitch 42 - 43 Multi-stitch zigzag 42 - 43 Stretch stitches 44 - 51 Straight stretch stitch, Overedge stitch, Ric-rac stitch, Feather stitch, Blanket stitch, Honeycomb stitch, Slant overedge stitch, Turkish stitch, Slant pin stitch, Thorn stitch, Reinforced overedge stitch, Wizard stitch, Crossed stitch, Pin stitch, Entredeux stitch, Ladder stitch, Criss-cross stitch, Fishbone stitch Sewing...

Instruction Manual
Page 24
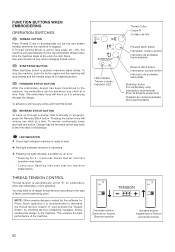
...machine without the embroidery unit attached, straight stitch number 00, is selected. DIRECT SELECTION BUTTONS Frequently used stitches are available by the direct selection buttons. Simply press a button to enter Program Mode. For regular sewing, the LCD display shows the number of the selected stitch, an image of the stitch, and stitch width and stitch... length settings. PROGRAM MODE BUTTON Press this button to select that stitch. 3. CONTROL PANEL ...
...machine without the embroidery unit attached, straight stitch number 00, is selected. DIRECT SELECTION BUTTONS Frequently used stitches are available by the direct selection buttons. Simply press a button to enter Program Mode. For regular sewing, the LCD display shows the number of the selected stitch, an image of the stitch, and stitch width and stitch... length settings. PROGRAM MODE BUTTON Press this button to select that stitch. 3. CONTROL PANEL ...
Instruction Manual
Page 82
...", by checking the box in progress, press the Reverse Stitch button. NOTE: When sewing designs created by the software for embroidery, when the embroidery unit is stopped. Use auto thread cut only when changing thread colors. To stop the machine, push the button again and the machine will move as it is advancing through a design that...
...", by checking the box in progress, press the Reverse Stitch button. NOTE: When sewing designs created by the software for embroidery, when the embroidery unit is stopped. Use auto thread cut only when changing thread colors. To stop the machine, push the button again and the machine will move as it is advancing through a design that...

Instruction Manual
Page 94
...the center of the fabric. 2. Multi-Hoop Multi-Hooping is a special feature in the FUTURA software that will allow embroidery data which is larger than a single embroidery hoop to be sent to the machine to stitch out, while making it easy to the other . Using a very fine-lined water soluble... up to stitch out the design. 1. This embroidery data may be used to set the fabric into the hoop and will therefore sew the design to each part of the embroidery. Multi-Hoop utilizes a system where three alignment points (A, B, and C) are input, they inform the machine exactly as ...
...the center of the fabric. 2. Multi-Hoop Multi-Hooping is a special feature in the FUTURA software that will allow embroidery data which is larger than a single embroidery hoop to be sent to the machine to stitch out, while making it easy to the other . Using a very fine-lined water soluble... up to stitch out the design. 1. This embroidery data may be used to set the fabric into the hoop and will therefore sew the design to each part of the embroidery. Multi-Hoop utilizes a system where three alignment points (A, B, and C) are input, they inform the machine exactly as ...

Instruction Manual
Page 102
...reached desired color block, press OK. When having reached desired position in selected color block. Example: If a color block contains 150 stitches, each step corresponds to that position. STEP BETWEEN COLOR BLOCKS To step between the transferred color blocks, press the center of the lower... display indicate the approximate current position in the color block. The hoop moves to 15 stitches. GO TO APPROXIMATE STITCH POSITION WITHIN A COLOR BLOCK To go to your FUTURA sewing and embroidery machine, the display shows number of current color block and total number of color blocks as ...
...reached desired color block, press OK. When having reached desired position in selected color block. Example: If a color block contains 150 stitches, each step corresponds to that position. STEP BETWEEN COLOR BLOCKS To step between the transferred color blocks, press the center of the lower... display indicate the approximate current position in the color block. The hoop moves to 15 stitches. GO TO APPROXIMATE STITCH POSITION WITHIN A COLOR BLOCK To go to your FUTURA sewing and embroidery machine, the display shows number of current color block and total number of color blocks as ...


