
User Guide
Page 2
Contents Getting started 7 About this User Guide 7 Overview 7 Assembly 8 Screen protection 9 Starting Your Device for The First Time 9 Why do I need a Google™ account 10 Charging Your Device 10 Device security 13 Making sure your device is protected 13 Screen Lock 13 Fingerprint Manager 15 Unlocking Your Device Automatically 15 SIM card protection 19 Finding the identification number of your device 20 Finding a Lost Device 20 Learning the basics 22 Using the touchscreen 22 Locking and Unlocking the Screen 24 Homescreen 24 Application screen 26 Navigating Applications...
Contents Getting started 7 About this User Guide 7 Overview 7 Assembly 8 Screen protection 9 Starting Your Device for The First Time 9 Why do I need a Google™ account 10 Charging Your Device 10 Device security 13 Making sure your device is protected 13 Screen Lock 13 Fingerprint Manager 15 Unlocking Your Device Automatically 15 SIM card protection 19 Finding the identification number of your device 20 Finding a Lost Device 20 Learning the basics 22 Using the touchscreen 22 Locking and Unlocking the Screen 24 Homescreen 24 Application screen 26 Navigating Applications...

User Guide
Page 3
Sharing your mobile data connection 42 Controlling data usage 43 Selecting mobile networks 44 Virtual private networks (VPNs 45 Synchronizing data on your device 46 Synchronizing with Online Accounts 46 Synchronizing with Microsoft® Exchange ActiveSync 46 Basic settings 48 Accessing settings 48 Volume settings 48 Do not disturb mode settings 49 Screen settings 50 Application settings 51 Resetting Your Applications 52 Daydream 53 Language settings 53 Date and time 54 X-Reality™ for mobile 54 Super-Vivid Mode 54 Enhancing the Sound Output 55 Noise cancellation 55 ...
Sharing your mobile data connection 42 Controlling data usage 43 Selecting mobile networks 44 Virtual private networks (VPNs 45 Synchronizing data on your device 46 Synchronizing with Online Accounts 46 Synchronizing with Microsoft® Exchange ActiveSync 46 Basic settings 48 Accessing settings 48 Volume settings 48 Do not disturb mode settings 49 Screen settings 50 Application settings 51 Resetting Your Applications 52 Daydream 53 Language settings 53 Date and time 54 X-Reality™ for mobile 54 Super-Vivid Mode 54 Enhancing the Sound Output 55 Noise cancellation 55 ...

User Guide
Page 4
Searching and viewing contacts 72 Adding and editing contacts 73 Adding medical and emergency contact information 74 Favorites and groups 75 Sending contact information 76 Avoiding duplicate entries in the Contacts application 76 Backing up Contacts 76 Messaging and chat 78 Reading and sending messages 78 Organizing your messages 79 Calling from a message 80 Messaging settings 80 Instant messaging and video chat 80 Email 81 Setting up email 81 Sending and Receiving Email Messages 81 Organizing your email messages 82 Email account settings 83 Gmail 83 Music 85 Transferring ...
Searching and viewing contacts 72 Adding and editing contacts 73 Adding medical and emergency contact information 74 Favorites and groups 75 Sending contact information 76 Avoiding duplicate entries in the Contacts application 76 Backing up Contacts 76 Messaging and chat 78 Reading and sending messages 78 Organizing your messages 79 Calling from a message 80 Messaging settings 80 Instant messaging and video chat 80 Email 81 Setting up email 81 Sending and Receiving Email Messages 81 Organizing your email messages 82 Email account settings 83 Gmail 83 Music 85 Transferring ...

User Guide
Page 5
Editing photos with the Photo editor application 107 Editing videos with the Video editor application 108 Hiding photos and videos 108 Album home screen menu 109 Viewing your photos on a map 110 Videos 112 Watching videos in the Video application 112 Transferring video content to your device 113 Managing video content 113 Movie Creator 113 PS Video Service 114 Connectivity 115 Mirroring the Screen of Your Device on a TV Using a Cable 115 Mirroring the screen of your device wirelessly on a TV 115 Sharing Content with DLNA Certified™ Devices 116 Connecting Your Device to USB...
Editing photos with the Photo editor application 107 Editing videos with the Video editor application 108 Hiding photos and videos 108 Album home screen menu 109 Viewing your photos on a map 110 Videos 112 Watching videos in the Video application 112 Transferring video content to your device 113 Managing video content 113 Movie Creator 113 PS Video Service 114 Connectivity 115 Mirroring the Screen of Your Device on a TV Using a Cable 115 Mirroring the screen of your device wirelessly on a TV 115 Sharing Content with DLNA Certified™ Devices 116 Connecting Your Device to USB...

User Guide
Page 6
Support and maintenance 136 Support for your device 136 Computer Tools 136 Updating your device 137 Memory and Storage 138 Managing files using a computer 139 Backing up and restoring content 140 Running Diagnostic Tests on Your Device 142 Restarting and resetting your device 143 Using your device in wet and dusty conditions 144 Warranty, SAR, and Usage Guidelines 144 Limitations to services and features 144 Legal information 145 6 This is an Internet version of this publication. © Print only for private use.
Support and maintenance 136 Support for your device 136 Computer Tools 136 Updating your device 137 Memory and Storage 138 Managing files using a computer 139 Backing up and restoring content 140 Running Diagnostic Tests on Your Device 142 Restarting and resetting your device 143 Using your device in wet and dusty conditions 144 Warranty, SAR, and Usage Guidelines 144 Limitations to services and features 144 Legal information 145 6 This is an Internet version of this publication. © Print only for private use.
User Guide
Page 7
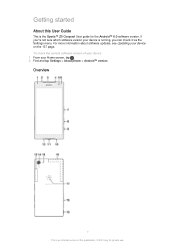
To check the current software version of this User Guide This is running, you can check it via the Settings menu. Overview 7 This is an Internet version of your device 1 From your device is the Xperia™ Z5 Compact User guide for private use. If you're not sure which software version your Home screen, tap . 2 Find and tap Settings > About phone > Android™ version. For more information about software updates, see Updating your device on the 137 page. Getting started About this publication. © Print only for the Android™ 6.0 software version.
To check the current software version of this User Guide This is running, you can check it via the Settings menu. Overview 7 This is an Internet version of your device 1 From your device is the Xperia™ Z5 Compact User guide for private use. If you're not sure which software version your Home screen, tap . 2 Find and tap Settings > About phone > Android™ version. For more information about software updates, see Updating your device on the 137 page. Getting started About this publication. © Print only for the Android™ 6.0 software version.

User Guide
Page 8
Second microphone 5. Charger/USB cable port 12. Make sure you insert the memory card in the holder, then re-insert the holder. 4 Close the cover. Make sure you use . Charging/Notification light 7. Power key/Fingerprint sensor* 8. Main camera lens 15. GPS antenna area 17. To insert the nano SIM card Your device only supports nano SIM cards. Camera key 10. NFC™ detection area 18. Proximity/Light sensor 6. Main camera light 16. To insert a memory card 1 Open the cover for the nano SIM and memory card slots. 2 Using a fingernail or other similar ...
Second microphone 5. Charger/USB cable port 12. Make sure you insert the memory card in the holder, then re-insert the holder. 4 Close the cover. Make sure you use . Charging/Notification light 7. Power key/Fingerprint sensor* 8. Main camera lens 15. GPS antenna area 17. To insert the nano SIM card Your device only supports nano SIM cards. Camera key 10. NFC™ detection area 18. Proximity/Light sensor 6. Main camera light 16. To insert a memory card 1 Open the cover for the nano SIM and memory card slots. 2 Using a fingernail or other similar ...
User Guide
Page 9
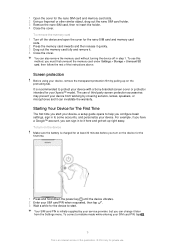
... requested, then tap . 3 Wait a while for your device from the Settings menu. The use of third party screen protection accessories may prevent your Xperia™ model. To use this publication. © Print only for the nano SIM card and memory card slots. 2 Using a fingernail or other similar... you can change it here and get set up on the device Make sure the battery is recommended to protect your device with a Sony-branded screen cover or protector intended for the device to start your device, remove the transparent protection film by covering sensors, lenses, speakers,...
... requested, then tap . 3 Wait a while for your device from the Settings menu. The use of third party screen protection accessories may prevent your Xperia™ model. To use this publication. © Print only for the nano SIM card and memory card slots. 2 Using a fingernail or other similar... you can change it here and get set up on the device Make sure the battery is recommended to protect your device with a Sony-branded screen cover or protector intended for the device to start your device, remove the transparent protection film by covering sensors, lenses, speakers,...
User Guide
Page 10
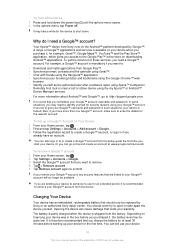
... account from Google Play™. • Synchronize email, contacts and the calendar using Gmail™. • Chat with friends using the my Xperia™ or Android™ Device Manager services. You can cause damage that you remove your warranty. For example, a Google™ account is...Opening the device can also sign in such situations, your device 10 This is available on the Android™ platform developed by Sony or an authorized Sony repair center. A range of Google™ applications and services is an Internet version of these services, you want to remove....
... account from Google Play™. • Synchronize email, contacts and the calendar using Gmail™. • Chat with friends using the my Xperia™ or Android™ Device Manager services. You can cause damage that you remove your warranty. For example, a Google™ account is...Opening the device can also sign in such situations, your device 10 This is available on the Android™ platform developed by Sony or an authorized Sony repair center. A range of Google™ applications and services is an Internet version of these services, you want to remove....

User Guide
Page 11
To dry the USB port 1 Using a microfiber cloth, wipe away any remaining moisture from your device gets exposed to water, wipe it is charging. Repeat the procedure if moisture is still visible in the USB port, shake the device again several times. 4 Use a microfiber cloth to wipe away any excess moisture from the USB port. 11 This is an Internet version of this publication. © Print only for private use. Only insert the USB cable into the USB port after the port has completely dried. If your device. 2 With the device held firmly and the USB port facing downward, shake the ...
To dry the USB port 1 Using a microfiber cloth, wipe away any remaining moisture from your device gets exposed to water, wipe it is charging. Repeat the procedure if moisture is still visible in the USB port, shake the device again several times. 4 Use a microfiber cloth to wipe away any excess moisture from the USB port. 11 This is an Internet version of this publication. © Print only for private use. Only insert the USB cable into the USB port after the port has completely dried. If your device. 2 With the device held firmly and the USB port facing downward, shake the ...

User Guide
Page 12
Battery notification light status Green Red Orange The battery is charging and the battery charge level is greater than 90% The battery is charging and the battery charge level is less than 15% The battery is charging and the battery charge level is less than 90% 12 This is fully charged, disconnect the cable from your device, with the USB symbol facing up. To charge your device 1 Plug the charger into a power outlet. 2 Plug one end of the USB cable into the charger (or into the USB port of a computer). 3 Plug the other end of this publication. © Print only for private use. ...
Battery notification light status Green Red Orange The battery is charging and the battery charge level is greater than 90% The battery is charging and the battery charge level is less than 15% The battery is charging and the battery charge level is less than 90% 12 This is fully charged, disconnect the cable from your device, with the USB symbol facing up. To charge your device 1 Plug the charger into a power outlet. 2 Plug one end of the USB cable into the charger (or into the USB port of a computer). 3 Plug the other end of this publication. © Print only for private use. ...
User Guide
Page 13
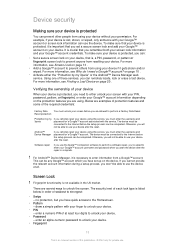
... use your device, • Password - To make sure your device is protected, you must enter the username and password for private use the Xperia™ Companion software to perform a software repair, you will not be completed. For more information, see Finding a Lost Device on your device... device without your device. Verifying the ownership of these services, you start the device after the reset. Reset protection Protection by my Xperia" or the Android™ Device Manager web service. no protection, but you remember both your screen lock information and your screen with...
... use your device, • Password - To make sure your device is protected, you must enter the username and password for private use the Xperia™ Companion software to perform a software repair, you will not be completed. For more information, see Finding a Lost Device on your device... device without your device. Verifying the ownership of these services, you start the device after the reset. Reset protection Protection by my Xperia" or the Android™ Device Manager web service. no protection, but you remember both your screen lock information and your screen with...

User Guide
Page 14
... activate the Swipe unlock function 1 From your Home screen, tap . 2 Find and tap Settings > Security > Screen lock. 3 Draw your screen unlock pattern, or enter your Xperia™ device, the EAS security settings may not be possible to only a PIN or password. To Create a Screen Lock Password 1 From your Home screen, tap...
... activate the Swipe unlock function 1 From your Home screen, tap . 2 Find and tap Settings > Security > Screen lock. 3 Draw your screen unlock pattern, or enter your Xperia™ device, the EAS security settings may not be possible to only a PIN or password. To Create a Screen Lock Password 1 From your Home screen, tap...

User Guide
Page 15
To enable Fingerprint unlock 1 From your Home screen, tap . 2 Find and tap Settings > Security > Fingerprint Manager. 3 If needed verify your PIN or password. 4 Follow the instruction in your device to set it with setting up a PIN or password as an additional security method for example, when it's connected to a Bluetooth® device or when you have registered in certain situations. For more information on setting up a fingerprint unlock pattern. Before using the Fingerprint sensor, make sure the sensor is clean and without any visible moisture To Register Additional ...
To enable Fingerprint unlock 1 From your Home screen, tap . 2 Find and tap Settings > Security > Fingerprint Manager. 3 If needed verify your PIN or password. 4 Follow the instruction in your device to set it with setting up a PIN or password as an additional security method for example, when it's connected to a Bluetooth® device or when you have registered in certain situations. For more information on setting up a fingerprint unlock pattern. Before using the Fingerprint sensor, make sure the sensor is clean and without any visible moisture To Register Additional ...

User Guide
Page 16
..., pattern, or password to it from Google™. keep your pattern, PIN, or password. Connecting to Trust agents. 6 Find and tap Smart Lock. 7 Enter your Xperia™ device unlocked while it's connected to unlock it . As soon as trusted devices and bypass the added security of range, your screen locks and...
..., pattern, or password to it from Google™. keep your pattern, PIN, or password. Connecting to Trust agents. 6 Find and tap Smart Lock. 7 Enter your Xperia™ device unlocked while it's connected to unlock it . As soon as trusted devices and bypass the added security of range, your screen locks and...

User Guide
Page 17
...the trusted place you want to remove. 4 Tap Remove trusted device. There's a chance someone could unlock your trusted device is turned on your Xperia™ device gets disabled when you are using either the High accuracy or Battery saving setting. 2 From your Home screen, tap . 3 Find..., and your current location. Connecting to Trusted Places When the Trusted places feature is secure from the actual address. This feature can keep your Xperia™ device while it's near a trusted device, they may need to manually unlock it before you 'll get a notification on this publication...
...the trusted place you want to remove. 4 Tap Remove trusted device. There's a chance someone could unlock your trusted device is turned on your Xperia™ device gets disabled when you are using either the High accuracy or Battery saving setting. 2 From your Home screen, tap . 3 Find..., and your current location. Connecting to Trusted Places When the Trusted places feature is secure from the actual address. This feature can keep your Xperia™ device while it's near a trusted device, they may need to manually unlock it before you 'll get a notification on this publication...

User Guide
Page 18
To Remove a Custom Place 1 Make sure location mode is turned on and you are using either the High accuracy or Battery saving setting. 2 From your Home screen, tap . 3 Find and tap Settings > Security > Smart Lock >Trusted places > Home. 4 Tap Turn off this location. To Remove Your Home Location 1 Make sure location mode is turned on and you are using either the High accuracy or Battery saving setting. 2 From your Home screen, tap . 3 Find and tap Settings > Security > Smart Lock > Trusted places. 4 Select the place you want to the desired location and tap Select this location. The ...
To Remove a Custom Place 1 Make sure location mode is turned on and you are using either the High accuracy or Battery saving setting. 2 From your Home screen, tap . 3 Find and tap Settings > Security > Smart Lock >Trusted places > Home. 4 Tap Turn off this location. To Remove Your Home Location 1 Make sure location mode is turned on and you are using either the High accuracy or Battery saving setting. 2 From your Home screen, tap . 3 Find and tap Settings > Security > Smart Lock > Trusted places. 4 Select the place you want to the desired location and tap Select this location. The ...

User Guide
Page 19
Using On-body Detection When you use the On-body detection feature, you need to the left. If you enter the PIN incorrectly more times than the maximum number of this lock every time you restart the device. To set up a SIM card lock 1 From the Homescreen, tap . 2 Find and tap Settings > Security > Set up SIM card lock. 3 Unmark the Lock SIM card checkbox. 4 Enter the SIM card PIN and tap OK. SIM card protection You can take up SIM card lock. 3 Tap Change SIM PIN. 4 Enter the old SIM card PIN and tap OK. 5 Enter the new SIM card PIN and tap OK. 6 Retype the new SIM card PIN and tap ...
Using On-body Detection When you use the On-body detection feature, you need to the left. If you enter the PIN incorrectly more times than the maximum number of this lock every time you restart the device. To set up a SIM card lock 1 From the Homescreen, tap . 2 Find and tap Settings > Security > Set up SIM card lock. 3 Unmark the Lock SIM card checkbox. 4 Enter the SIM card PIN and tap OK. SIM card protection You can take up SIM card lock. 3 Tap Change SIM PIN. 4 Enter the old SIM card PIN and tap OK. 5 Enter the new SIM card PIN and tap OK. 6 Retype the new SIM card PIN and tap ...
User Guide
Page 20
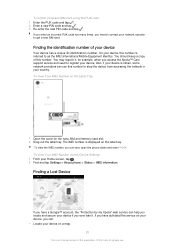
...the Device Settings 1 From your device Your device has a unique ID (identification) number. If you have a Google™ account, the "Protection by my Xperia" web service can help you locate and secure your device. You should keep a copy of this number is stolen, some network providers can : • ...Locate your device on your device, you access the Xperia™ Care support service and need to contact your network operator to register your device if you ever lose it , for example, when you can...
...the Device Settings 1 From your device Your device has a unique ID (identification) number. If you have a Google™ account, the "Protection by my Xperia" web service can help you locate and secure your device. You should keep a copy of this number is stolen, some network providers can : • ...Locate your device on your device, you access the Xperia™ Care support service and need to contact your network operator to register your device if you ever lose it , for example, when you can...
User Guide
Page 21
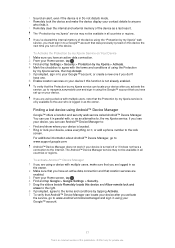
... who finds it does not have an active data connection. 2 From your Home screen, tap . 3 Find and tap Settings > Security > Protection by my Xperia > Activate. 4 Mark the checkbox to agree with multiple users, note that you are using the Google™ account that location services are enabled. 3 From..., even if the device is in Do not disturb mode. • Remotely lock the device and make sure that the Protection by my Xperia" service may not be available in all countries or regions. For additional information about Android™ Device Manager, go to myxperia.sonymobile.com ...
... who finds it does not have an active data connection. 2 From your Home screen, tap . 3 Find and tap Settings > Security > Protection by my Xperia > Activate. 4 Mark the checkbox to agree with multiple users, note that you are using the Google™ account that location services are enabled. 3 From..., even if the device is in Do not disturb mode. • Remotely lock the device and make sure that the Protection by my Xperia" service may not be available in all countries or regions. For additional information about Android™ Device Manager, go to myxperia.sonymobile.com ...