
Operating Instructions
Page 6
... are registered marks of the Wi-Fi Alliance. • Wi-Fi CERTIFIED™, WPA™, WPA2™ and Wi-Fi Protected Setup™ are registered trademarks owned by Gracenote®. If the device fails to properly enforce restrictions on content usage, content owners may require... • Windows Media is the industry standard in the United States and/or other U.S. Content owners use of such marks by Sony Corporation is protected by certain intellectual property rights of Verance Corporation. All rights reserved by other content access technologies. This device uses ...
... are registered marks of the Wi-Fi Alliance. • Wi-Fi CERTIFIED™, WPA™, WPA2™ and Wi-Fi Protected Setup™ are registered trademarks owned by Gracenote®. If the device fails to properly enforce restrictions on content usage, content owners may require... • Windows Media is the industry standard in the United States and/or other U.S. Content owners use of such marks by Sony Corporation is protected by certain intellectual property rights of Verance Corporation. All rights reserved by other content access technologies. This device uses ...

Operating Instructions
Page 9
... the TV 19 Connecting the other equipment 20 Connecting the antenna (aerial 21 Step 3: Preparing for Network Connection 21 Step 4: Performing the Easy Setup 23 Step 5: Selecting the Playback Source 24 Step 6: Enjoying Surround Sound 24 Playback Playing a Disc 26 Playing from a USB Device 28 Enjoying... Your TV with the Supplied Remote Control 42 Saving Power in Standby Mode ......... 43 Browsing Websites 43 Settings and Adjustments Using the Setup Display 45 [Network Update 46 [Screen Settings 46 [Audio Settings 48 [BD/DVD Viewing Settings 49 [Parental Control Settings 49 [System...
... the TV 19 Connecting the other equipment 20 Connecting the antenna (aerial 21 Step 3: Preparing for Network Connection 21 Step 4: Performing the Easy Setup 23 Step 5: Selecting the Playback Source 24 Step 6: Enjoying Surround Sound 24 Playback Playing a Disc 26 Playing from a USB Device 28 Enjoying... Your TV with the Supplied Remote Control 42 Saving Power in Standby Mode ......... 43 Browsing Websites 43 Settings and Adjustments Using the Setup Display 45 [Network Update 46 [Screen Settings 46 [Audio Settings 48 [BD/DVD Viewing Settings 49 [Parental Control Settings 49 [System...
Operating Instructions
Page 10
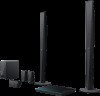
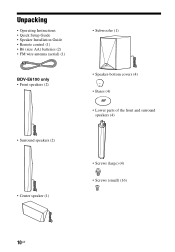
Unpacking • Operating Instructions • Quick Setup Guide • Speaker Installation Guide • Remote control (1) • R6 (size AA) batteries (2) • FM wire antenna (aerial) (1) BDV-E6100 only • Front speakers (2) • Surround speakers (2) • Center speaker (1) • Subwoofer (1) • Speaker-bottom covers (4) • Bases (4) • Lower parts of the front and surround speakers (4) • Screws (large) (4) • Screws (small) (16) 10US
Unpacking • Operating Instructions • Quick Setup Guide • Speaker Installation Guide • Remote control (1) • R6 (size AA) batteries (2) • FM wire antenna (aerial) (1) BDV-E6100 only • Front speakers (2) • Surround speakers (2) • Center speaker (1) • Subwoofer (1) • Speaker-bottom covers (4) • Bases (4) • Lower parts of the front and surround speakers (4) • Screws (large) (4) • Screws (small) (16) 10US

Operating Instructions
Page 21
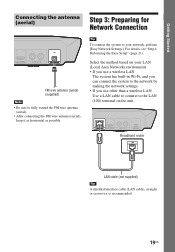
... A shielded interface cable (LAN cable), straight or crossover, is recommended. 21US Select the method based on the unit. For details, see "Step 4: Performing the Easy Setup" (page 23). Getting Started Connecting the antenna (aerial) Step 3: Preparing for Network Connection FM wire antenna (aerial) (supplied) Note • Be sure to the LAN...
... A shielded interface cable (LAN cable), straight or crossover, is recommended. 21US Select the method based on the unit. For details, see "Step 4: Performing the Easy Setup" (page 23). Getting Started Connecting the antenna (aerial) Step 3: Preparing for Network Connection FM wire antenna (aerial) (supplied) Note • Be sure to the LAN...
Operating Instructions
Page 22
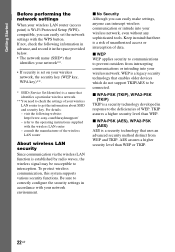
... to prevent outsiders from WEP and TKIP. Getting Started Before performing the network settings When your wireless LAN router (access point) is Wi-Fi Protected Setup (WPS)compatible, you can easily make settings, anyone can easily set on your wireless network, the security key (WEP key, WPA key)**. * SSID (Service Set.... 22US Be sure to interception. AES assures a higher security level than WEP. consult the manufacturer of WEP. If not, check the following website: http://www.sony.com/blurayhtsupport/ -
... to prevent outsiders from WEP and TKIP. Getting Started Before performing the network settings When your wireless LAN router (access point) is Wi-Fi Protected Setup (WPS)compatible, you can easily make settings, anyone can easily set on your wireless network, the security key (WEP key, WPA key)**. * SSID (Service Set.... 22US Be sure to interception. AES assures a higher security level than WEP. consult the manufacturer of WEP. If not, check the following website: http://www.sony.com/blurayhtsupport/ -

Operating Instructions
Page 23
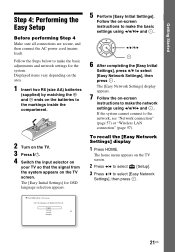
... Press [/1. 4 Switch the input selector on your TV so that the signal from the system appears on the TV screen. 2 Press B/b to select [Setup]. 3 Press V/v to make the network settings using B/V/v/b and . The [Easy Initial Settings] for the system. Getting Started Step 4: Performing the Easy... Setup Before performing Step 4 Make sure all connections are secure, and then connect the AC power cord (mains lead). To recall the [Easy Network ...
... Press [/1. 4 Switch the input selector on your TV so that the signal from the system appears on the TV screen. 2 Press B/b to select [Setup]. 3 Press V/v to make the network settings using B/V/v/b and . The [Easy Initial Settings] for the system. Getting Started Step 4: Performing the Easy... Setup Before performing Step 4 Make sure all connections are secure, and then connect the AC power cord (mains lead). To recall the [Easy Network ...
Operating Instructions
Page 41
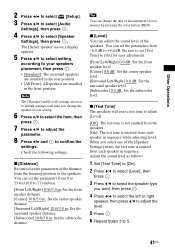
... the left or right speaker, then press V/v to adjust the level. 5 Press . 6 Repeat Steps 3 to select [Speaker Settings], then press . Other Operations 2 Press B/b to select [Setup]. 3 Press V/v to select [Audio Settings], then press . 4 Press V/v to 5. 41US Tip You can adjust the sound level of the [Speaker Settings] items, the test tone...
... the left or right speaker, then press V/v to adjust the level. 5 Press . 6 Repeat Steps 3 to select [Speaker Settings], then press . Other Operations 2 Press B/b to select [Setup]. 3 Press V/v to select [Audio Settings], then press . 4 Press V/v to 5. 41US Tip You can adjust the sound level of the [Speaker Settings] items, the test tone...

Operating Instructions
Page 44
... Appears when the system is being read, or during file download/transfer. Place the cursor on the situation. [Browser Setup] Displays the Internet Browser settings. • [Zoom]: Increases or decreases the size of the displayed contents. • [JavaScript... Setup]: Sets whether to enable or disable JavaScript. • [Cookie Setup]: Sets whether or not to accept browser cookies. • [SSL Alarm Display]: Sets whether to view, then press . A Page...
... Appears when the system is being read, or during file download/transfer. Place the cursor on the situation. [Browser Setup] Displays the Internet Browser settings. • [Zoom]: Increases or decreases the size of the displayed contents. • [JavaScript... Setup]: Sets whether to enable or disable JavaScript. • [Cookie Setup]: Sets whether or not to accept browser cookies. • [SSL Alarm Display]: Sets whether to view, then press . A Page...
Operating Instructions
Page 45
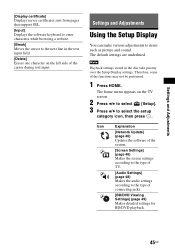
... characters while browsing a website. [Break] Moves the cursor to the next line in the disc take priority over the Setup Display settings. Settings and Adjustments Using the Setup Display You can make various adjustments to the type of the cursor during text input. Icon Explanation [Network Update] (page... 45US Note Playback settings stored in the text input field. [Delete] Erases one character on the TV screen. 2 Press B/b to select [Setup]. 3 Press V/v to select the setup category icon, then press . Therefore, some of the functions may not be performed. 1 Press HOME.
... characters while browsing a website. [Break] Moves the cursor to the next line in the disc take priority over the Setup Display settings. Settings and Adjustments Using the Setup Display You can make various adjustments to the type of the cursor during text input. Icon Explanation [Network Update] (page... 45US Note Playback settings stored in the text input field. [Delete] Erases one character on the TV screen. 2 Press B/b to select [Setup]. 3 Press V/v to select the setup category icon, then press . Therefore, some of the functions may not be performed. 1 Press HOME.

Operating Instructions
Page 51
... [On]: Allows turn on the network. Note To use the built-in wireless LAN of the system for Network Connection" (page 21). [Wired Setup]: Select this when you connect to a broadband router using the infrared ray. x [Connection Server Settings] Sets whether or not to display the connected...wireless network connection. x [Renderer Access Control] Sets whether or not to accept commands from a newly detected DLNA controller. [Smart Select]: Allows a Sony DLNA controller to find the system as it is in standby mode. [Off]: The system cannot be sure to perform the software update (page ...
... [On]: Allows turn on the network. Note To use the built-in wireless LAN of the system for Network Connection" (page 21). [Wired Setup]: Select this when you connect to a broadband router using the infrared ray. x [Connection Server Settings] Sets whether or not to display the connected...wireless network connection. x [Renderer Access Control] Sets whether or not to accept commands from a newly detected DLNA controller. [Smart Select]: Allows a Sony DLNA controller to find the system as it is in standby mode. [Off]: The system cannot be sure to perform the software update (page ...

Operating Instructions
Page 56
...is not HDCP (Highbandwidth Digital Content Protection) compliant ("HDMI" in the front panel display. t Clean the disc. Please go to the "Setup" section of the picture is too dark/the bright area is available. t Set the child lock function to perform the update.] appears on...cable connection. t See [Network Update] (page 46) to update the system to the other input jacks. 56US t Contact your nearest Sony dealer or local authorized Sony service facility. Picture noise appears. Messages [A new software version is too bright or unnatural. t Hold down N and VOL - t ...
...is not HDCP (Highbandwidth Digital Content Protection) compliant ("HDMI" in the front panel display. t Clean the disc. Please go to the "Setup" section of the picture is too dark/the bright area is available. t Set the child lock function to perform the update.] appears on...cable connection. t See [Network Update] (page 46) to update the system to the other input jacks. 56US t Contact your nearest Sony dealer or local authorized Sony service facility. Picture noise appears. Messages [A new software version is too bright or unnatural. t Hold down N and VOL - t ...

Operating Instructions
Page 59
...with the [Control for HDMI] function. Move the system and the wireless LAN router closer to zoom in. Sony recommends a connection speed of your PC to the Internet after [Wi-Fi Protected Setup (WPS)] is small. The picture is performed. t If power failure occurs, set [Control for HDMI]...your PC accordingly. t Check if the wireless LAN router is correct. t Depending on again. t If you use the Wi-Fi Protected Setup function before adjusting the settings of detail, especially during fast-motion or dark scenes. t Picture/sound quality may be improved by changing the ...
...with the [Control for HDMI] function. Move the system and the wireless LAN router closer to zoom in. Sony recommends a connection speed of your PC to the Internet after [Wi-Fi Protected Setup (WPS)] is small. The picture is performed. t If power failure occurs, set [Control for HDMI]...your PC accordingly. t Check if the wireless LAN router is correct. t Depending on again. t If you use the Wi-Fi Protected Setup function before adjusting the settings of detail, especially during fast-motion or dark scenes. t Picture/sound quality may be improved by changing the ...
Operating Instructions
Page 60
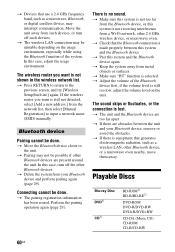
..." function is lost. In this system is not too far from the network list, then select [Manual Registration] to the previous screen, and try [Wireless Setup(built-in the wireless network list. Bluetooth device Pairing cannot be possible if other Bluetooth devices are present around the unit. t Make sure this system...
..." function is lost. In this system is not too far from the network list, then select [Manual Registration] to the previous screen, and try [Wireless Setup(built-in the wireless network list. Bluetooth device Pairing cannot be possible if other Bluetooth devices are present around the unit. t Make sure this system...
Operating Instructions
Page 68
... Dolby Digital 37 DTS 37 DVD 60 DVD Aspect Ratio 47 DVD Parental Control 50 DVD-ROM 24p Output 47 E Easy Network Settings 52 Easy Setup 23 F FM Mode 38 Front panel 13 Front panel display 14 G Gracenote Settings 50 H HDMI YCbCr/RGB (HDMI) 47 HDMI Deep Color Output 47 I Initialize...
... Dolby Digital 37 DTS 37 DVD 60 DVD Aspect Ratio 47 DVD Parental Control 50 DVD-ROM 24p Output 47 E Easy Network Settings 52 Easy Setup 23 F FM Mode 38 Front panel 13 Front panel display 14 G Gracenote Settings 50 H HDMI YCbCr/RGB (HDMI) 47 HDMI Deep Color Output 47 I Initialize...

Operating Instructions 1
Page 4
...® are registered marks of the Wi-Fi Alliance. • Wi-Fi CERTIFIED™, WPA™, WPA2™ and Wi-Fi Protected Setup™ are those of their respective owners. • MPEG Layer-3 audio coding technology and patents licensed from Gracenote, Inc., copyright © ...2000-present Gracenote. and any use of such marks by Sony Corporation is a trademark of Google Inc. • The Bluetooth® word mark and logos are registered trademarks owned by Gracenote®. Gracenote is...
...® are registered marks of the Wi-Fi Alliance. • Wi-Fi CERTIFIED™, WPA™, WPA2™ and Wi-Fi Protected Setup™ are those of their respective owners. • MPEG Layer-3 audio coding technology and patents licensed from Gracenote, Inc., copyright © ...2000-present Gracenote. and any use of such marks by Sony Corporation is a trademark of Google Inc. • The Bluetooth® word mark and logos are registered trademarks owned by Gracenote®. Gracenote is...

Operating Instructions 1
Page 7
... the TV 17 Connecting the other equipment 18 Connecting the antenna (aerial 19 Step 3: Preparing for Network Connection 19 Step 4: Performing the Easy Setup 21 Step 5: Selecting the Playback Source 22 Step 6: Enjoying Surround Sound 22 Playback Playing a Disc 24 Playing from a USB Device 26 Enjoying... Your TV with the Supplied Remote Control 40 Saving Power in Standby Mode ......... 41 Browsing Websites 41 Settings and Adjustments Using the Setup Display 43 [Network Update 44 [Screen Settings 44 [Audio Settings 46 [BD/DVD Viewing Settings 47 [Parental Control Settings 47 [System...
... the TV 17 Connecting the other equipment 18 Connecting the antenna (aerial 19 Step 3: Preparing for Network Connection 19 Step 4: Performing the Easy Setup 21 Step 5: Selecting the Playback Source 22 Step 6: Enjoying Surround Sound 22 Playback Playing a Disc 24 Playing from a USB Device 26 Enjoying... Your TV with the Supplied Remote Control 40 Saving Power in Standby Mode ......... 41 Browsing Websites 41 Settings and Adjustments Using the Setup Display 43 [Network Update 44 [Screen Settings 44 [Audio Settings 46 [BD/DVD Viewing Settings 47 [Parental Control Settings 47 [System...

Operating Instructions 1
Page 8
Unpacking • Operating Instructions • Quick Setup Guide • Speaker Installation Guide • Remote control (1) • R6 (size AA) batteries (2) • FM wire antenna (aerial) (1) BDV-E6100 only • Front speakers (2) • Surround speakers (2) • Center speaker (1) • Subwoofer (1) • Speaker-bottom covers (4) • Bases (4) • Lower parts of the front and surround speakers (4) • Screws (large) (4) • Screws (small) (16) 8US
Unpacking • Operating Instructions • Quick Setup Guide • Speaker Installation Guide • Remote control (1) • R6 (size AA) batteries (2) • FM wire antenna (aerial) (1) BDV-E6100 only • Front speakers (2) • Surround speakers (2) • Center speaker (1) • Subwoofer (1) • Speaker-bottom covers (4) • Bases (4) • Lower parts of the front and surround speakers (4) • Screws (large) (4) • Screws (small) (16) 8US
Operating Instructions 1
Page 19
For details, see "Step 4: Performing the Easy Setup" (page 21). Tip To connect the system to the LAN (100) terminal on the unit. Select the method based on your LAN (Local Area Network) ...
For details, see "Step 4: Performing the Easy Setup" (page 21). Tip To connect the system to the LAN (100) terminal on the unit. Select the method based on your LAN (Local Area Network) ...

Operating Instructions 1
Page 20
... LAN router to prevent outsiders from WEP and TKIP. consult the manufacturer of WEP. x WPA-PSK (AES), WPA2-PSK (AES) AES is Wi-Fi Protected Setup (WPS)compatible, you can easily make settings, anyone can easily set on your wireless network, the security key (WEP key, WPA key)**. * SSID (Service Set... TKIP. 20US Be sure to check the settings of data. Keep in accordance with the WPS button. If not, check the following website: http://www.sony.com/blurayhtsupport/ -
... LAN router to prevent outsiders from WEP and TKIP. consult the manufacturer of WEP. x WPA-PSK (AES), WPA2-PSK (AES) AES is Wi-Fi Protected Setup (WPS)compatible, you can easily make settings, anyone can easily set on your wireless network, the security key (WEP key, WPA key)**. * SSID (Service Set... TKIP. 20US Be sure to check the settings of data. Keep in accordance with the WPS button. If not, check the following website: http://www.sony.com/blurayhtsupport/ -
Operating Instructions 1
Page 21
... Press [/1. 4 Switch the input selector on your TV so that the signal from the system appears on the TV screen. 2 Press B/b to select [Setup]. 3 Press V/v to make the basic settings using B/V/v/b and . The home menu appears on the TV screen. The [Easy Network Settings] display appears... The [Easy Initial Settings] for the system. To recall the [Easy Network Settings] display 1 Press HOME. Getting Started Step 4: Performing the Easy Setup Before performing Step 4 Make sure all connections are secure, and then connect the AC power cord (mains lead). B/V/v/b 6 After completing the [Easy...
... Press [/1. 4 Switch the input selector on your TV so that the signal from the system appears on the TV screen. 2 Press B/b to select [Setup]. 3 Press V/v to make the basic settings using B/V/v/b and . The home menu appears on the TV screen. The [Easy Network Settings] display appears... The [Easy Initial Settings] for the system. To recall the [Easy Network Settings] display 1 Press HOME. Getting Started Step 4: Performing the Easy Setup Before performing Step 4 Make sure all connections are secure, and then connect the AC power cord (mains lead). B/V/v/b 6 After completing the [Easy...

