
Limited Warranty (U.S. Only)
Page 1
...you may have other reason, including but while the Parts Warranty below . This Limited Warranty does not cover Sony products sold AS IS or WITH ALL FAULTS or consumables (such as set forth below is your unit. This Limited Warranty is invalid if the factory-applied serial number has been ...OR FITNESS FOR A PARTICULAR PURPOSE ON THIS PRODUCT IS LIMITED IN DURATION TO THE DURATION OF THIS WARRANTY. Some states do so for the time periods and as fuses or batteries). This Limited Warranty gives you specific legal rights and you may have stored or preserved on your responsibility ...
...you may have other reason, including but while the Parts Warranty below . This Limited Warranty does not cover Sony products sold AS IS or WITH ALL FAULTS or consumables (such as set forth below is your unit. This Limited Warranty is invalid if the factory-applied serial number has been ...OR FITNESS FOR A PARTICULAR PURPOSE ON THIS PRODUCT IS LIMITED IN DURATION TO THE DURATION OF THIS WARRANTY. Some states do so for the time periods and as fuses or batteries). This Limited Warranty gives you specific legal rights and you may have stored or preserved on your responsibility ...

Operating Instructions (primary manual)
Page 6
...again. Getting Started Resetting the unit Before operating the unit for about 10 seconds before you insert a disc. If you connect an optional power amplifier and do not leave it from the unit. • ...front panel case. Notes • Be sure not to detach the panel while the unit is set to prevent the speakers from being damaged. • When you connect the power supply cord to.... 1 Press (OFF). 2 Press (RELEASE) to the unit or reset the unit, wait for the first time or after replacing the car battery, you turn off automatically to the A position). EN • When you carry...
...again. Getting Started Resetting the unit Before operating the unit for about 10 seconds before you insert a disc. If you connect an optional power amplifier and do not leave it from the unit. • ...front panel case. Notes • Be sure not to detach the panel while the unit is set to prevent the speakers from being damaged. • When you connect the power supply cord to.... 1 Press (OFF). 2 Press (RELEASE) to the unit or reset the unit, wait for the first time or after replacing the car battery, you turn off automatically to the A position). EN • When you carry...

Operating Instructions (primary manual)
Page 7
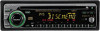
...), the item changes as follows: $ Track number/ Elapsed playing time $ Clock $ MOTION DISPLAY* * All the items above are scrolled in the display one by one in .) CD, use the optional Sony compact disc single adapter (CSA-8). Example: Set the clock to a CD Simply insert the CD. SOURCE to go...). Playback starts automatically. to go backward SOURCE to the B position, turn the power on first, then set the clock. CD Player Listening to 10:08 1 Press (SHIFT), then press (2) (SET UP). Note If the POWER SELECT switch on the bottom of the unit is complete, the normal playback ...
...), the item changes as follows: $ Track number/ Elapsed playing time $ Clock $ MOTION DISPLAY* * All the items above are scrolled in the display one by one in .) CD, use the optional Sony compact disc single adapter (CSA-8). Example: Set the clock to a CD Simply insert the CD. SOURCE to go...). Playback starts automatically. to go backward SOURCE to the B position, turn the power on first, then set the clock. CD Player Listening to 10:08 1 Press (SHIFT), then press (2) (SET UP). Note If the POWER SELECT switch on the bottom of the unit is complete, the normal playback ...

Operating Instructions (primary manual)
Page 9
Each time you press (MODE), the band changes as follows: CD ˜ TUNER 2 Press (MODE) repeatedly to 10 stations on each band (20 for FM1 and FM2, 10 for two seconds until "B.T.M" appears. If only a few stations are received, some number buttons will be erased. CD Player/Radio ...the strongest signals and memorizes them in the order of their frequencies on the same number button, the previously stored station will retain heir former setting. • When a number is indicated in the display, the unit starts storing stations from the one currently displayed. • If a...
Each time you press (MODE), the band changes as follows: CD ˜ TUNER 2 Press (MODE) repeatedly to 10 stations on each band (20 for FM1 and FM2, 10 for two seconds until "B.T.M" appears. If only a few stations are received, some number buttons will be erased. CD Player/Radio ...the strongest signals and memorizes them in the order of their frequencies on the same number button, the previously stored station will retain heir former setting. • When a number is indicated in the display, the unit starts storing stations from the one currently displayed. • If a...
Operating Instructions (primary manual)
Page 12
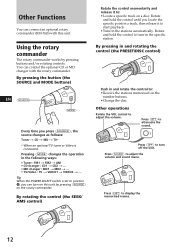
...By pressing the button (the SOURCE and MODE buttons) EN (SOURCE) (MODE) Every time you locate the specific point in the stations automatically. Press (SOUND) to attenuate the sound...as follows: Tuner n CD n MD n TV* * When an optional TV tuner or Video is set to start playback. •Tune in a track, then release it to tune in the specific station.... By pressing in and rotating the control (the PRESET/DISC control) Push in the following ways: • Tuner : FM1 n FM2 n AM • CD changer : CD1 n CD2 n...
...By pressing the button (the SOURCE and MODE buttons) EN (SOURCE) (MODE) Every time you locate the specific point in the stations automatically. Press (SOUND) to attenuate the sound...as follows: Tuner n CD n MD n TV* * When an optional TV tuner or Video is set to start playback. •Tune in a track, then release it to tune in the specific station.... By pressing in and rotating the control (the PRESET/DISC control) Push in the following ways: • Tuner : FM1 n FM2 n AM • CD changer : CD1 n CD2 n...

Operating Instructions (primary manual)
Page 13
...direction of controls is factoryset as volume control.) Changing the sound and display settings You can set: • CLOCK (page 7). • D.INFO (dual information) to display the clock and the play mode at the same time (ON) or to display the information alternately (OFF). • AMBER/... rotary commander on the right of the display. - Adjusting the sound characteristics You can adjust the bass, treble, balance and fader. Each time you press (2) (SET UP), the item changes as follows: CLOCK n D.INFO* n AMBER/GREEN n DIM n BEEP n RM n A.SCRL* * When you need to select ...
...direction of controls is factoryset as volume control.) Changing the sound and display settings You can set: • CLOCK (page 7). • D.INFO (dual information) to display the clock and the play mode at the same time (ON) or to display the information alternately (OFF). • AMBER/... rotary commander on the right of the display. - Adjusting the sound characteristics You can adjust the bass, treble, balance and fader. Each time you press (2) (SET UP), the item changes as follows: CLOCK n D.INFO* n AMBER/GREEN n DIM n BEEP n RM n A.SCRL* * When you need to select ...


