
Operating Instructions
Page 4
... in operation is a recording method that enables you to ISO96601) Level 1/Level 2, Joliet or Multi Session2) • A disc that conforms to add data using the remote, but the same operations can have up to use this manual • The instructions in to 10 sessions. Other discs cannot be performed using the...
... in operation is a recording method that enables you to ISO96601) Level 1/Level 2, Joliet or Multi Session2) • A disc that conforms to add data using the remote, but the same operations can have up to use this manual • The instructions in to 10 sessions. Other discs cannot be performed using the...

Operating Instructions
Page 7
... components. 3 For models with a voltage selector, set VOLTAGE SELECTOR to a wall outlet. Inserting two R6 (size AA) batteries into the remote Extend the FM lead antenna horizontally AM ANTENNA FCMOA7X5IAL North American models: Connect using the white side Other models: Connect using the brown side Note...the plug does not fit the wall socket, detach the supplied plug adaptor (only for a long period of the apparatus. Tip When the remote no longer operates the system, replace both batteries with an adaptor). To turn on your system's VOLTAGE SELECTOR for available settings Note If you...
... components. 3 For models with a voltage selector, set VOLTAGE SELECTOR to a wall outlet. Inserting two R6 (size AA) batteries into the remote Extend the FM lead antenna horizontally AM ANTENNA FCMOA7X5IAL North American models: Connect using the white side Other models: Connect using the brown side Note...the plug does not fit the wall socket, detach the supplied plug adaptor (only for a long period of the apparatus. Tip When the remote no longer operates the system, replace both batteries with an adaptor). To turn on your system's VOLTAGE SELECTOR for available settings Note If you...
Operating Instructions
Page 8
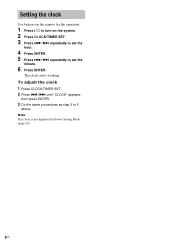
To adjust the clock 1 Press CLOCK/TIMER SET. 2 Press ./> until "CLOCK" appears, then press ENTER. 3 Do the same procedures as step 3 to set the minute. 6 Press ENTER. The clock starts working. Note The clock is not displayed in Power Saving Mode (page 20). 8GB Setting the clock Use buttons on the remote for the operation. 1 Press ?/1 to turn on the system. 2 Press CLOCK/TIMER SET. 3 Press ./> repeatedly to set the hour. 4 Press ENTER. 5 Press ./> repeatedly to 6 above.
To adjust the clock 1 Press CLOCK/TIMER SET. 2 Press ./> until "CLOCK" appears, then press ENTER. 3 Do the same procedures as step 3 to set the minute. 6 Press ENTER. The clock starts working. Note The clock is not displayed in Power Saving Mode (page 20). 8GB Setting the clock Use buttons on the remote for the operation. 1 Press ?/1 to turn on the system. 2 Press CLOCK/TIMER SET. 3 Press ./> repeatedly to set the hour. 4 Press ENTER. 5 Press ./> repeatedly to 6 above.

Operating Instructions
Page 10
... the next MP3 audio track to start playback of discs recorded in complex configurations such as many albums or non-MP3 audio tracks on the remote repeatedly during playback. • Some time may differ from the actual time in the order that disc. Press REPEAT on the disc, it at the...
... the next MP3 audio track to start playback of discs recorded in complex configurations such as many albums or non-MP3 audio tracks on the remote repeatedly during playback. • Some time may differ from the actual time in the order that disc. Press REPEAT on the disc, it at the...
Operating Instructions
Page 11
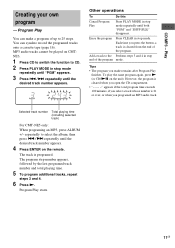
.... repeatedly to CD. 2 Press PLAY MODE in stop mode repeatedly until "PGM" appears. 3 Press ./> repeatedly until the desired track number appears. 4 Press ENTER on the remote. To play the same program again, press N (or CD/NX on CMTNE3. 1 Press CD to switch the function to select the album, then press ./> repeatedly...
.... repeatedly to CD. 2 Press PLAY MODE in stop mode repeatedly until "PGM" appears. 3 Press ./> repeatedly until the desired track number appears. 4 Press ENTER on the remote. To play the same program again, press N (or CD/NX on CMTNE3. 1 Press CD to switch the function to select the album, then press ./> repeatedly...
Operating Instructions
Page 17
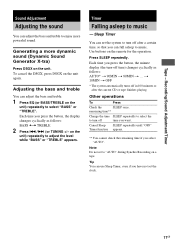
...) repeatedly to adjust the level while "BASS" or "TREBLE" appears. Tip You can fall asleep to music - To cancel the DSGX, press DSGX on the remote for the operation. Use buttons on the unit again. Generating a more powerful sound. Cancel Sleep SLEEP repeatedly until "OFF" Timer function appears. ** You cannot check...
...) repeatedly to adjust the level while "BASS" or "TREBLE" appears. Tip You can fall asleep to music - To cancel the DSGX, press DSGX on the remote for the operation. Use buttons on the unit again. Generating a more powerful sound. Cancel Sleep SLEEP repeatedly until "OFF" Timer function appears. ** You cannot check...

Operating Instructions
Page 18
Use buttons on the remote for Play Timer. • You cannot activate Play Timer and Rec Timer at the same time. 18GB Start over from the time the system turns ...
Use buttons on the remote for Play Timer. • You cannot activate Play Timer and Rec Timer at the same time. 18GB Start over from the time the system turns ...

Operating Instructions
Page 19
... system turns on until "REC" appears, then press ENTER. "ON TIME" appears and the hour indication flashes. 4 Set the time to a preset station" on the remote for the operation. 1 Tune in the preset radio station (see "Listening to start recording. Use buttons on page 13). 2 Press CLOCK/TIMER SET. 3 Press ./> repeatedly...
... system turns on until "REC" appears, then press ENTER. "ON TIME" appears and the hour indication flashes. 4 Set the time to a preset station" on the remote for the operation. 1 Tune in the preset radio station (see "Listening to start recording. Use buttons on page 13). 2 Press CLOCK/TIMER SET. 3 Press ./> repeatedly...

Operating Instructions
Page 22
... set to the power line. The timer does not function. • Press CLOCK/TIMER SELECT on the unit) to the system. • Point the remote at the system's sensor. • Replace the batteries (R6/size AA). • Locate the system away from one channel, or the left and right...cords are correctly and firmly connected. 2 Find your system has a voltage selector, is no sound. • Press VOLUME + on the remote repeatedly (or turn on for your nearest Sony dealer. Sound comes from the fluorescent light. Play does not start. • Eject the disc and check whether a disc is set ...
... set to the power line. The timer does not function. • Press CLOCK/TIMER SELECT on the unit) to the system. • Point the remote at the system's sensor. • Replace the batteries (R6/size AA). • Locate the system away from one channel, or the left and right...cords are correctly and firmly connected. 2 Find your system has a voltage selector, is no sound. • Press VOLUME + on the remote repeatedly (or turn on for your nearest Sony dealer. Sound comes from the fluorescent light. Play does not start. • Eject the disc and check whether a disc is set ...

Operating Instructions
Page 29
... W 65 W Dimensions (w/h/d) Approx. 164 × 230.5 × 263 mm incl. projecting parts and controls Mass CMT-NE3: CMT-NE5: Approx. 3.7 kg Approx. 3.9 kg Supplied accessories Remote Commander (1) R6 (size AA) batteries (2) AM loop antenna (1) FM lead antenna (1) Design and specifications are subject to change without notice.
... W 65 W Dimensions (w/h/d) Approx. 164 × 230.5 × 263 mm incl. projecting parts and controls Mass CMT-NE3: CMT-NE5: Approx. 3.7 kg Approx. 3.9 kg Supplied accessories Remote Commander (1) R6 (size AA) batteries (2) AM loop antenna (1) FM lead antenna (1) Design and specifications are subject to change without notice.

Operating Instructions
Page 30
..., 11) BASS/TREBLE 8 (17) Cassette compartment qf CD SYNCHRO qg (16) DISPLAY 0 (14, 20) Display window 5 DSGX 9 (17) P - Z PHONES jack qk PLAY MODE qj (9, 11) Remote sensor 2 TUNER/BAND qs (12, 13) TUNING +/- 4 (12, 13, 17) TUNING MODE qj (12, 13) VOLUME qa (18, 22) BUTTON DESCRIPTIONS ?/1 (power) 1 (7, 18, 19, 24...
..., 11) BASS/TREBLE 8 (17) Cassette compartment qf CD SYNCHRO qg (16) DISPLAY 0 (14, 20) Display window 5 DSGX 9 (17) P - Z PHONES jack qk PLAY MODE qj (9, 11) Remote sensor 2 TUNER/BAND qs (12, 13) TUNING +/- 4 (12, 13, 17) TUNING MODE qj (12, 13) VOLUME qa (18, 22) BUTTON DESCRIPTIONS ?/1 (power) 1 (7, 18, 19, 24...

Operating Instructions
Page 31
Remote control ALPHABETICAL ORDER A - Z PLAY MODE qk (9, 11) REPEAT 4 (10) SLEEP w; (17) TAPE qg (15, 18) TUNER/BAND 5 (12, 13, 18) TUNER MEMORY qj (12) TUNING ...
Remote control ALPHABETICAL ORDER A - Z PLAY MODE qk (9, 11) REPEAT 4 (10) SLEEP w; (17) TAPE qg (15, 18) TUNER/BAND 5 (12, 13, 18) TUNER MEMORY qj (12) TUNING ...


