
Operating Instructions
Page 4
... 'BRAVIA' Theatre Sync Preparing for the HDMI CONTROL function 36 Watching DVD by a Single Button Press 38 (One-Touch Play) Enjoying the TV Sound from the Speakers in this System 39 (System Audio Control) Turning off the System with the TV..... 40 (System Power Off) Enjoying STB (Set Top... Box) Digital Sound or Digital Satellite Receiver Sound from the System 41 (STB SYNCHRO) Various Functions for Playing Discs Searching ...
... 'BRAVIA' Theatre Sync Preparing for the HDMI CONTROL function 36 Watching DVD by a Single Button Press 38 (One-Touch Play) Enjoying the TV Sound from the Speakers in this System 39 (System Audio Control) Turning off the System with the TV..... 40 (System Power Off) Enjoying STB (Set Top... Box) Digital Sound or Digital Satellite Receiver Sound from the System 41 (STB SYNCHRO) Various Functions for Playing Discs Searching ...
Operating Instructions
Page 5
... Default Settings.......... 83 Additional Information Precautions 84 Notes about the Discs 85 Troubleshooting 86 Self-diagnosis Function 89 (When letters/numbers appear in the display) Specifications 90 Glossary 91 Language Code List 95 Index to Parts and Controls 96 Guide to the Control Menu Display ... 100 DVD Setup Display List 103 System...
... Default Settings.......... 83 Additional Information Precautions 84 Notes about the Discs 85 Troubleshooting 86 Self-diagnosis Function 89 (When letters/numbers appear in the display) Specifications 90 Glossary 91 Language Code List 95 Index to Parts and Controls 96 Guide to the Control Menu Display ... 100 DVD Setup Display List 103 System...
Operating Instructions
Page 8
...indication may be given even though playing the DVD VIDEO is intended for home and other DVD VIDEO, the message [Playback prohibited by area limitations.] will appear on this system plays DVDs and VIDEO CDs according to the instructions supplied with the ...patents and other commercially available surround speakers. * Manufactured under license from Dolby Laboratories. Use of this copyright protection technology must be intentionally set by Macrovision. "Dolby", "Pro Logic", and the double-D symbol are registered trademarks of Dolby Laboratories. ** Manufactured under license from...
...indication may be given even though playing the DVD VIDEO is intended for home and other DVD VIDEO, the message [Playback prohibited by area limitations.] will appear on this system plays DVDs and VIDEO CDs according to the instructions supplied with the ...patents and other commercially available surround speakers. * Manufactured under license from Dolby Laboratories. Use of this copyright protection technology must be intentionally set by Macrovision. "Dolby", "Pro Logic", and the double-D symbol are registered trademarks of Dolby Laboratories. ** Manufactured under license from...
Operating Instructions
Page 12
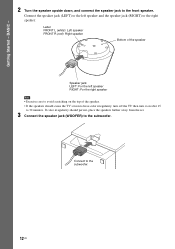
... • Exercise care to avoid scratching on the top of the speaker. • If the speakers should persist, place the speakers further away from the set. 3 Connect the speaker jack (WOOFER) to 30 minutes. Getting Started - Connect to the front speaker. BASIC - 2 Turn the speaker upside down, and connect the speaker...
... • Exercise care to avoid scratching on the top of the speaker. • If the speakers should persist, place the speakers further away from the set. 3 Connect the speaker jack (WOOFER) to 30 minutes. Getting Started - Connect to the front speaker. BASIC - 2 Turn the speaker upside down, and connect the speaker...
Operating Instructions
Page 14
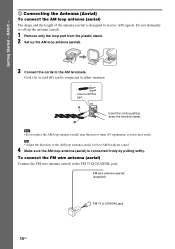
Do not dismantle or roll up the antenna (aerial). 1 Remove only the loop part from the plastic stand. 2 Set up the AM loop antenna (aerial). 3 Connect the cords to the FM 75 Ω COAXIAL jack. AM A B Insert the cords pushing down the terminal clamp. ...
Do not dismantle or roll up the antenna (aerial). 1 Remove only the loop part from the plastic stand. 2 Set up the AM loop antenna (aerial). 3 Connect the cords to the FM 75 Ω COAXIAL jack. AM A B Insert the cords pushing down the terminal clamp. ...

Operating Instructions
Page 18
... appears in the front panel display. 4 Switch the input selector on your TV so that the signal from the system appears on the TV screen. [Press [ENTER] to select the setting that matches your TV type. If this message does not appear, display the Quick Setup and perform again (page 19... adjustments for selecting the language used in the selected language. 7 Press . AUTO CALIBRATION Connect calibration mic. The system displays the menu and subtitles in the on the rear panel, and set it up at the bottom of each speaker should face the calibration mic, and there should be connected appears...
... appears in the front panel display. 4 Switch the input selector on your TV so that the signal from the system appears on the TV screen. [Press [ENTER] to select the setting that matches your TV type. If this message does not appear, display the Quick Setup and perform again (page 19... adjustments for selecting the language used in the selected language. 7 Press . AUTO CALIBRATION Connect calibration mic. The system displays the menu and subtitles in the on the rear panel, and set it up at the bottom of each speaker should face the calibration mic, and there should be connected appears...

Operating Instructions
Page 19
...RESET BNR 3 Press X/x to select [YES], then press . [AUTO CALIBRATION] starts. Be quiet during the measurement (which the system is in any of the settings, see "Using the Setup Display" (page 78). • If there is no sound from the speakers, check the speaker connection... measurement area and making noise during the measurement. YES NO Note • The environment of the speakers, reset the speaker settings. See "Calibrating the Appropriate Settings Automatically" (page 75). • If you change any Step. The Quick Setup display appears. 19US BASIC - Quick Setup...
...RESET BNR 3 Press X/x to select [YES], then press . [AUTO CALIBRATION] starts. Be quiet during the measurement (which the system is in any of the settings, see "Using the Setup Display" (page 78). • If there is no sound from the speakers, check the speaker connection... measurement area and making noise during the measurement. YES NO Note • The environment of the speakers, reset the speaker settings. See "Calibrating the Appropriate Settings Automatically" (page 75). • If you change any Step. The Quick Setup display appears. 19US BASIC - Quick Setup...
Operating Instructions
Page 21
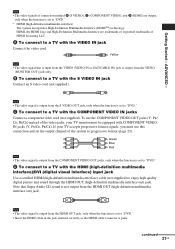
... is input from the VIDEO (VIDEO IN or SAT/CABLE IN) jack is not output from the HDMI OUT jack, only when the function is set to "DVD." C To connect to a TV with the HDMI (high-definition multimedia interface)/DVI (digital visual interface) input jack Use a certified ... "DVD." Note • The video signal is output from the COMPONENT VIDEO OUT jacks, only when the function is set to "DVD." * HDMI (high-definition multimedia interface) The system incorporates High-Definition Multimedia Interface (HDMITM) technology. D To connect to a TV with the S VIDEO IN jack Connect an S video cord ...
... is input from the VIDEO (VIDEO IN or SAT/CABLE IN) jack is not output from the HDMI OUT jack, only when the function is set to "DVD." C To connect to a TV with the HDMI (high-definition multimedia interface)/DVI (digital visual interface) input jack Use a certified ... "DVD." Note • The video signal is output from the COMPONENT VIDEO OUT jacks, only when the function is set to "DVD." * HDMI (high-definition multimedia interface) The system incorporates High-Definition Multimedia Interface (HDMITM) technology. D To connect to a TV with the S VIDEO IN jack Connect an S video cord ...
Operating Instructions
Page 23
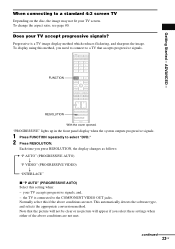
... sharpens the image. Progressive is connected to select "DVD." 2 Press RESOLUTION. "PROGRESSIVE" lights up in the front panel display when the system outputs progressive signals. 1 Press FUNCTION repeatedly to the COMPONENT VIDEO OUT jacks. Each time you press RESOLUTION, the display changes as follows: ... Depending on the disc, the image may not fit your TV screen. Normally select this setting when: - ADVANCED - Getting Started - To display using this method, you select these settings when either of the above conditions are not met. To change the aspect ratio, see ...
... sharpens the image. Progressive is connected to select "DVD." 2 Press RESOLUTION. "PROGRESSIVE" lights up in the front panel display when the system outputs progressive signals. 1 Press FUNCTION repeatedly to the COMPONENT VIDEO OUT jacks. Each time you press RESOLUTION, the display changes as follows: ... Depending on the disc, the image may not fit your TV screen. Normally select this setting when: - ADVANCED - Getting Started - To display using this method, you select these settings when either of the above conditions are not met. To change the aspect ratio, see ...
Operating Instructions
Page 24
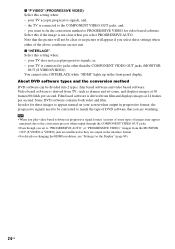
...other than the COMPONENT VIDEO OUT jacks (MONITOR OUT (S VIDEO/VIDEO)). Video based software is connected to appear natural on changing the HDMI resolution, see "Settings for the Display" (page 80). 24US In order for video based software. the TV is derived from the MONITOR OUT (S VIDEO or VIDEO) jack... are unaffected as dramas and sit-coms, and displays images at 24 frames per second. Note that you set to PROGRESSIVE VIDEO for these settings when either of DVD software that the picture will not be clear or no picture will appear if you select these images to...
...other than the COMPONENT VIDEO OUT jacks (MONITOR OUT (S VIDEO/VIDEO)). Video based software is connected to appear natural on changing the HDMI resolution, see "Settings for the Display" (page 80). 24US In order for video based software. the TV is derived from the MONITOR OUT (S VIDEO or VIDEO) jack... are unaffected as dramas and sit-coms, and displays images at 24 frames per second. Note that you set to PROGRESSIVE VIDEO for these settings when either of DVD software that the picture will not be clear or no picture will appear if you select these images to...
Operating Instructions
Page 26
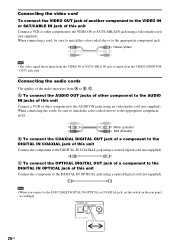
... VIDEO IN or SAT/CABLE IN jack of this unit Connect a VCR or other component to the SAT/CABLE DIGITAL IN OPTICAL or COAXIAL jack, set the switch on the rear panel accordingly. Connecting the audio cords The quality of the audio increases from the VIDEO (MONITOR OUT) jack only. When...
... VIDEO IN or SAT/CABLE IN jack of this unit Connect a VCR or other component to the SAT/CABLE DIGITAL IN OPTICAL or COAXIAL jack, set the switch on the rear panel accordingly. Connecting the audio cords The quality of the audio increases from the VIDEO (MONITOR OUT) jack only. When...
Operating Instructions
Page 28
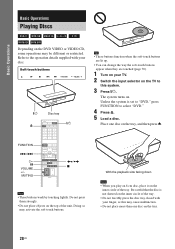
... supplied with your finger, as this system. 3 Press "/1. The system turns on. FUNCTION ./> H X VOLUME +/- Doing so may be different or restricted. MUTING / x Note • These buttons work by touching lightly. Place one disc on the tray. 28US Be careful that the disc is set to "DVD," press FUNCTION to this... may cause malfunction. • Do not place more than one disc on the tray, and then press Z. Unless the system is not skewed on the inner circle of the tray. • ...
... supplied with your finger, as this system. 3 Press "/1. The system turns on. FUNCTION ./> H X VOLUME +/- Doing so may be different or restricted. MUTING / x Note • These buttons work by touching lightly. Place one disc on the tray. 28US Be careful that the disc is set to "DVD," press FUNCTION to this... may cause malfunction. • Do not place more than one disc on the tray, and then press Z. Unless the system is not skewed on the inner circle of the tray. • ...
Operating Instructions
Page 29
... Pause Resume play after pause Go to the next chapter, track, or scene Go back to the unit with the HDMI cable, you set the volume up/down . The system starts playback (continuous play and remove the Z disc Replay the previous scene* (instant replay) during playback. * DVD VIDEOs/DVD-RWs/...remote. - briefly on the remote. - To cancel muting, press it again or VOLUME + to use the Instant Replay or Instant Advance function with the system. To set the HDMI CONTROL function to on the unit, when "VOLUME XX" (X is connected to the preceding chapter, track, or scene Turn off the sound ...
... Pause Resume play after pause Go to the next chapter, track, or scene Go back to the unit with the HDMI cable, you set the volume up/down . The system starts playback (continuous play and remove the Z disc Replay the previous scene* (instant replay) during playback. * DVD VIDEOs/DVD-RWs/...remote. - briefly on the remote. - To cancel muting, press it again or VOLUME + to use the Instant Replay or Instant Advance function with the system. To set the HDMI CONTROL function to on the unit, when "VOLUME XX" (X is connected to the preceding chapter, track, or scene Turn off the sound ...
Operating Instructions
Page 30
... connected components Distortion may be output from the sound of the other components connected to select a setting. • "ATT ON": attenuates the input level. Refer to [ON] (page 82), the System Audio Control function is activated and no sound may occur when listening to a component connected to ... SAT/CABLE, VIDEO). For details, see page 39. • When you set the [HDMI CONTROL] setting in the front panel display. Set this if the input level is not a malfunction and will depend on the rear of the system changes in the front panel display, then press or c. 4 Press X/x to ...
... connected components Distortion may be output from the sound of the other components connected to select a setting. • "ATT ON": attenuates the input level. Refer to [ON] (page 82), the System Audio Control function is activated and no sound may occur when listening to a component connected to ... SAT/CABLE, VIDEO). For details, see page 39. • When you set the [HDMI CONTROL] setting in the front panel display. Set this if the input level is not a malfunction and will depend on the rear of the system changes in the front panel display, then press or c. 4 Press X/x to ...

Operating Instructions
Page 31
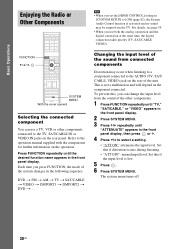
... as the optimum mode is selected, "MOVIE" or "MUSIC" lights up in this system. Basic Operations Enjoying TV or VCR Sound from the speaker system You can choose a suitable sound mode for music. The default setting is selected. MOVIE/ MUSIC With the cover opened. Press MOVIE/MUSIC during playback. For... disc or source, when you want lights up in the front panel display. For details, see page 39. • When you set the [HDMI CONTROL] setting in the front panel display. Note • When you use both the analog connection and the digital connection at the same time, ...
... as the optimum mode is selected, "MOVIE" or "MUSIC" lights up in this system. Basic Operations Enjoying TV or VCR Sound from the speaker system You can choose a suitable sound mode for music. The default setting is selected. MOVIE/ MUSIC With the cover opened. Press MOVIE/MUSIC during playback. For... disc or source, when you want lights up in the front panel display. For details, see page 39. • When you set the [HDMI CONTROL] setting in the front panel display. Note • When you use both the analog connection and the digital connection at the same time, ...

Operating Instructions
Page 32
... DATA-CD (MP3), etc.) is played, or when the function is set to "DMPORT1" or "DMPORT2." Note • The sound field for Super Audio CDs is set to the type of movie theaters into your home. Sound Adjustments Enjoying Surround Sound by selecting one of acoustic data accumulated as...only the tuner function in surround technology (and the vast amounts of system's preprogrammed sound fields. AUDIO Tip • The system memorizes the last sound field selected for each function mode. About S-Force PRO Front Surround Sony's long-term involvement in general. • If the AC power cord...
... DATA-CD (MP3), etc.) is played, or when the function is set to "DMPORT1" or "DMPORT2." Note • The sound field for Super Audio CDs is set to the type of movie theaters into your home. Sound Adjustments Enjoying Surround Sound by selecting one of acoustic data accumulated as...only the tuner function in surround technology (and the vast amounts of system's preprogrammed sound fields. AUDIO Tip • The system memorizes the last sound field selected for each function mode. About S-Force PRO Front Surround Sony's long-term involvement in general. • If the AC power cord...
Operating Instructions
Page 33
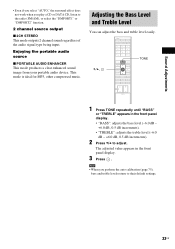
... display. • "BASS": adjusts the bass level (-6.0 dB - +6.0 dB, 0.5 dB increments). • "TREBLE": adjusts the treble level (-6.0 dB - +6.0 dB, 0.5 dB increments). 2 Press X/x to their default settings. 33US Adjusting the Bass Level and Treble Level You can adjust the bass and treble level easily. X/x, TONE 1 Press TONE repeatedly until "BASS" or "TREBLE...
... display. • "BASS": adjusts the bass level (-6.0 dB - +6.0 dB, 0.5 dB increments). • "TREBLE": adjusts the treble level (-6.0 dB - +6.0 dB, 0.5 dB increments). 2 Press X/x to their default settings. 33US Adjusting the Bass Level and Treble Level You can adjust the bass and treble level easily. X/x, TONE 1 Press TONE repeatedly until "BASS" or "TREBLE...
Operating Instructions
Page 34
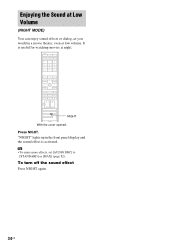
It is activated. "NIGHT" lights up in a movie theater, even at low volume. NIGHT With the cover opened. Press NIGHT. Enjoying the Sound at Low Volume (NIGHT MODE) You can enjoy sound effects or dialog, as you would in the front panel display and the sound effect is useful for watching movies at night. Tip • To enjoy more effects, set [AUDIO DRC] to [STANDARD] or [MAX] (page 82). To turn off the sound effect Press NIGHT again. 34US
It is activated. "NIGHT" lights up in a movie theater, even at low volume. NIGHT With the cover opened. Press NIGHT. Enjoying the Sound at Low Volume (NIGHT MODE) You can enjoy sound effects or dialog, as you would in the front panel display and the sound effect is useful for watching movies at night. Tip • To enjoy more effects, set [AUDIO DRC] to [STANDARD] or [MAX] (page 82). To turn off the sound effect Press NIGHT again. 34US

Operating Instructions
Page 35
... which is a mutual control function standard used only with Sony's HDMI CONTROL function. • When you connect this system to output the sound from the speakers of the component. 35US HDMI CONTROL is not correspond with Sony 'BRAVIA' TVs that are compatible with the HDMI CONTROL function with...turns on and is set for DVD input mode automatically, and the sound is output automatically from the TV speaker or the speakers of this system. • System Power Off (page 40): When you connect this function. Using the HDMI CONTROL Function for 'BRAVIA' Theatre Sync Using the...
... which is a mutual control function standard used only with Sony's HDMI CONTROL function. • When you connect this system to output the sound from the speakers of the component. 35US HDMI CONTROL is not correspond with Sony 'BRAVIA' TVs that are compatible with the HDMI CONTROL function with...turns on and is set for DVD input mode automatically, and the sound is output automatically from the TV speaker or the speakers of this system. • System Power Off (page 40): When you connect this function. Using the HDMI CONTROL Function for 'BRAVIA' Theatre Sync Using the...
Operating Instructions
Page 36
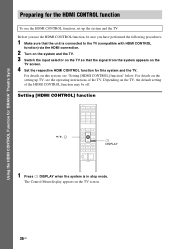
... on the TV screen. 4 Set the respective HDMI CONTROL function for the HDMI CONTROL function To use the HDMI CONTROL function, be off. Using the HDMI CONTROL Function for 'BRAVIA' Theatre Sync Preparing for this system, see the operating instructions of ...the HDMI CONTROL function may be sure you use the HDMI CONTROL function, set up TV, see "Setting [HDMI CONTROL] function" below. For details on this system and the TV. For details on the setting up the system and the TV. Setting...
... on the TV screen. 4 Set the respective HDMI CONTROL function for the HDMI CONTROL function To use the HDMI CONTROL function, be off. Using the HDMI CONTROL Function for 'BRAVIA' Theatre Sync Preparing for this system, see the operating instructions of ...the HDMI CONTROL function may be sure you use the HDMI CONTROL function, set up TV, see "Setting [HDMI CONTROL] function" below. For details on this system and the TV. For details on the setting up the system and the TV. Setting...


