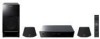

Operating Instructions
Page 18
... Connect the calibration mic to select a language. Step 3: Performing the Quick Setup Follow the steps below to select the setting that the signal from the system appears on the TV. 2 Press [/1. 3 Press FUNCTION repeatedly until "DVD" appears in the selected language. 7 Press . The front of the screen. LANGUAGE ... 6 Press X/x to the A.CAL MIC jack on your TV so that matches your TV type. The system displays the menu and subtitles in the front panel display. 4 Switch the input selector on the rear panel, and set it up at the bottom of each speaker should face the calibration...
... Connect the calibration mic to select a language. Step 3: Performing the Quick Setup Follow the steps below to select the setting that the signal from the system appears on the TV. 2 Press [/1. 3 Press FUNCTION repeatedly until "DVD" appears in the selected language. 7 Press . The front of the screen. LANGUAGE ... 6 Press X/x to the A.CAL MIC jack on your TV so that matches your TV type. The system displays the menu and subtitles in the front panel display. 4 Switch the input selector on the rear panel, and set it up at the bottom of each speaker should face the calibration...
Operating Instructions
Page 20
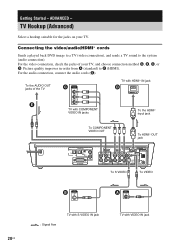
..., check the jacks of the TV E C Y PB/CB PR/CR TV with COMPONENT VIDEO IN jacks TV with HDMI* IN jack D IN To the HDMI* input jack To COMPONENT VIDEO OUT To HDMI* OUT jack OPTICAL TV DIGITAL IN OPTICAL COAXIAL SAT/ CABLE COAXIAL IMPEDANCE USE 4 VIDEO SPEAKER R AUDIO L IN 1 2 DMPORT... (Advanced) Select a hookup suitable for the jacks on your TV, and choose connection method A, B, C, or D. ADVANCED - Picture quality improves in order from A (standard) to the system (audio connection).
..., check the jacks of the TV E C Y PB/CB PR/CR TV with COMPONENT VIDEO IN jacks TV with HDMI* IN jack D IN To the HDMI* input jack To COMPONENT VIDEO OUT To HDMI* OUT jack OPTICAL TV DIGITAL IN OPTICAL COAXIAL SAT/ CABLE COAXIAL IMPEDANCE USE 4 VIDEO SPEAKER R AUDIO L IN 1 2 DMPORT... (Advanced) Select a hookup suitable for the jacks on your TV, and choose connection method A, B, C, or D. ADVANCED - Picture quality improves in order from A (standard) to the system (audio connection).
Operating Instructions
Page 21
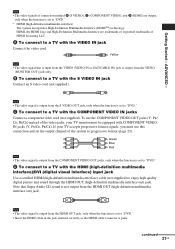
...that Super Audio CD sound is output from the COMPONENT VIDEO OUT jacks, only when the function is polar. Note that is input from the VIDEO (VIDEO IN or SAT/CABLE IN) jack is not output from the HDMI OUT jack, only when the function... to a TV with the HDMI (high-definition multimedia interface)/DVI (digital visual interface) input jack Use a certified HDMI (high-definition multimedia interface) cable (not supplied) to "DVD." * HDMI (high-definition multimedia interface) The system incorporates High-Definition Multimedia Interface (HDMITM) technology. ADVANCED - Note • The video ...
...that Super Audio CD sound is output from the COMPONENT VIDEO OUT jacks, only when the function is polar. Note that is input from the VIDEO (VIDEO IN or SAT/CABLE IN) jack is not output from the HDMI OUT jack, only when the function... to a TV with the HDMI (high-definition multimedia interface)/DVI (digital visual interface) input jack Use a certified HDMI (high-definition multimedia interface) cable (not supplied) to "DVD." * HDMI (high-definition multimedia interface) The system incorporates High-Definition Multimedia Interface (HDMITM) technology. ADVANCED - Note • The video ...

Operating Instructions
Page 22
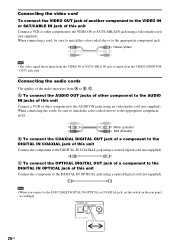
...DIGITAL IN OPTICAL) : Signal flow OPTICAL DIGITAL OUT TV with built-in this system. Furthermore, you cannot connect the HDMI OUT (high-definition multimedia interface out) jack to a TV with DVI (digital visual interface) input Use an HDMI (high-definition multimedia interface)-DVI (digital visual interface) converter ...IN) jacks. E To connect a TV using the audio cords (not supplied) Connect the unit and the TV using the audio cords. The system can enjoy the TV sound from all speakers in digital satellite receiver, etc.) can be processed after a few seconds. If the digital signal ...
...DIGITAL IN OPTICAL) : Signal flow OPTICAL DIGITAL OUT TV with built-in this system. Furthermore, you cannot connect the HDMI OUT (high-definition multimedia interface out) jack to a TV with DVI (digital visual interface) input Use an HDMI (high-definition multimedia interface)-DVI (digital visual interface) converter ...IN) jacks. E To connect a TV using the audio cords (not supplied) Connect the unit and the TV using the audio cords. The system can enjoy the TV sound from all speakers in digital satellite receiver, etc.) can be processed after a few seconds. If the digital signal ...
Operating Instructions
Page 26
... COAXIAL jack using a optical digital cord (not supplied). DIGITAL IN OPTICAL COAXIAL SAT/ CABLE COAXIAL 26US Yellow (Video) Note • The video signal that is input from the VIDEO IN or SAT/CABLE IN jack is output from A to B, C. A To connect the AUDIO OUT jacks of other component to the AUDIO...
... COAXIAL jack using a optical digital cord (not supplied). DIGITAL IN OPTICAL COAXIAL SAT/ CABLE COAXIAL 26US Yellow (Video) Note • The video signal that is input from the VIDEO IN or SAT/CABLE IN jack is output from A to B, C. A To connect the AUDIO OUT jacks of other component to the AUDIO...
Operating Instructions
Page 28
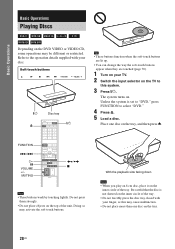
Unless the system is not skewed on the inner circle of the tray. • Do not ...malfunction. • Do not place more than one disc on . MUTING / x Note • These buttons work by touching lightly. The system turns on the tray, and then press Z. FUNCTION ./> H X VOLUME +/- FUNCTION VOLUME With the playback side facing down Note • When... change the way the soft-touch buttons appear when they are touched (page 70). 1 Turn on your finger, as this system. 3 Press "/1. Be careful that the disc is set to "DVD," press FUNCTION to this may activate the soft-touch ...
Unless the system is not skewed on the inner circle of the tray. • Do not ...malfunction. • Do not place more than one disc on . MUTING / x Note • These buttons work by touching lightly. The system turns on the tray, and then press Z. FUNCTION ./> H X VOLUME +/- FUNCTION VOLUME With the playback side facing down Note • When... change the way the soft-touch buttons appear when they are touched (page 70). 1 Turn on your finger, as this system. 3 Press "/1. Be careful that the disc is set to "DVD," press FUNCTION to this may activate the soft-touch ...
Operating Instructions
Page 30
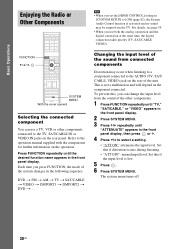
...at the same time, the digital connection takes priority (TV, SAT/CABLE, VIDEO). This is low. 5 Press . 6 Press SYSTEM MENU. Set this if the input level is not a malfunction and will depend on the rear of the other components connected to select a setting. • "ATT ...," "SAT/CABLE," or "VIDEO" appears in the front panel display. 2 Press SYSTEM MENU. 3 Press X/x repeatedly until the desired function name appears in the following sequence. Changing the input level of the system changes in the front panel display. Basic Operations Enjoying the Radio or Other Components FUNCTION...
...at the same time, the digital connection takes priority (TV, SAT/CABLE, VIDEO). This is low. 5 Press . 6 Press SYSTEM MENU. Set this if the input level is not a malfunction and will depend on the rear of the other components connected to select a setting. • "ATT ...," "SAT/CABLE," or "VIDEO" appears in the front panel display. 2 Press SYSTEM MENU. 3 Press X/x repeatedly until the desired function name appears in the following sequence. Changing the input level of the system changes in the front panel display. Basic Operations Enjoying the Radio or Other Components FUNCTION...

Operating Instructions
Page 32
... field AUTO 2CH STEREO PORTABLE AUDIO ENHANCER Display AUTO 2CH STEREO P. However, the system does not memorize the last sound field for each function mode. Automatic sound field selection...processing method and advanced DSP to the development of audio signal being input. About S-Force PRO Front Surround Sony's long-term involvement in surround technology (and the vast amounts of...signals, etc.) except for rear speakers. The sound field is disconnected for a long period of movie theaters into your home. Front Surround: when an image disc (e.g., DVD, VCD, etc.) is played, or when the...
... field AUTO 2CH STEREO PORTABLE AUDIO ENHANCER Display AUTO 2CH STEREO P. However, the system does not memorize the last sound field for each function mode. Automatic sound field selection...processing method and advanced DSP to the development of audio signal being input. About S-Force PRO Front Surround Sony's long-term involvement in surround technology (and the vast amounts of...signals, etc.) except for rear speakers. The sound field is disconnected for a long period of movie theaters into your home. Front Surround: when an image disc (e.g., DVD, VCD, etc.) is played, or when the...
Operating Instructions
Page 33
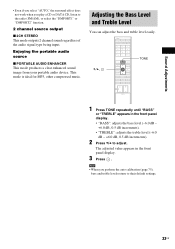
.../AM), or select the "DMPORT1" or "DMPORT2" function. 2 channel source output x 2CH STEREO This mode outputs 2 channel sound regardless of the audio signal type being input. The adjusted value appears in the front panel display. • "BASS": adjusts the bass level (-6.0 dB - +6.0 dB, 0.5 dB increments). • "TREBLE": adjusts the treble level...
.../AM), or select the "DMPORT1" or "DMPORT2" function. 2 channel source output x 2CH STEREO This mode outputs 2 channel sound regardless of the audio signal type being input. The adjusted value appears in the front panel display. • "BASS": adjusts the bass level (-6.0 dB - +6.0 dB, 0.5 dB increments). • "TREBLE": adjusts the treble level...

Operating Instructions
Page 35
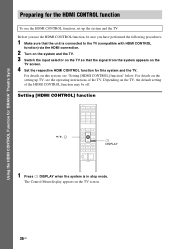
...off by HDMI CEC (Consumer Electronics Control) for HDMI (high-definition multimedia interface). We recommend that you connect this system to a component which is not correspond with Sony 'BRAVIA' TVs that are compatible with the HDMI CONTROL function with an HDMI cable (not supplied), operation is simplified as below...38): By pressing only H on the remote, the TV turns on and is set for DVD input mode automatically, and the sound is a mutual control function standard used only with Sony's HDMI CONTROL function. • When you connect the unit and components using the power button on...
...off by HDMI CEC (Consumer Electronics Control) for HDMI (high-definition multimedia interface). We recommend that you connect this system to a component which is not correspond with Sony 'BRAVIA' TVs that are compatible with the HDMI CONTROL function with an HDMI cable (not supplied), operation is simplified as below...38): By pressing only H on the remote, the TV turns on and is set for DVD input mode automatically, and the sound is a mutual control function standard used only with Sony's HDMI CONTROL function. • When you connect the unit and components using the power button on...
Operating Instructions
Page 36
... with HDMI CONTROL function) via the HDMI connection. 2 Turn on the system and the TV. 3 Switch the input selector on the TV so that the unit is in stop mode. Using the HDMI CONTROL Function for 'BRAVIA' Theatre Sync Preparing for this system, see the operating instructions of the HDMI CONTROL function may be...
... with HDMI CONTROL function) via the HDMI connection. 2 Turn on the system and the TV. 3 Switch the input selector on the TV so that the unit is in stop mode. Using the HDMI CONTROL Function for 'BRAVIA' Theatre Sync Preparing for this system, see the operating instructions of the HDMI CONTROL function may be...

Operating Instructions
Page 38
...of the respective component and make sure [HDMI CONTROL] is set to [ON] (page 36). Press H on . This system and the TV operate as follows: This system TV Turns on the remote. r Switches to "DVD" function. Watching DVD by a Single Button Press (One-Touch Play) ... connections turn on simultaneously, and then DVD playback starts automatically. The system and the components with the HDMI connections turn on . r Switches to HDMI input. r Minimizes sound level. Using the HDMI CONTROL Function for 'BRAVIA' Theatre Sync H Check the HDMI connections of the content may not...
...of the respective component and make sure [HDMI CONTROL] is set to [ON] (page 36). Press H on . This system and the TV operate as follows: This system TV Turns on the remote. r Switches to "DVD" function. Watching DVD by a Single Button Press (One-Touch Play) ... connections turn on simultaneously, and then DVD playback starts automatically. The system and the components with the HDMI connections turn on . r Switches to HDMI input. r Minimizes sound level. Using the HDMI CONTROL Function for 'BRAVIA' Theatre Sync H Check the HDMI connections of the content may not...

Operating Instructions
Page 41
... Using the HDMI CONTROL Function for 'BRAVIA' Theatre Sync Enjoying STB (Set Top Box) Digital Sound or Digital Satellite Receiver Sound from the System (STB SYNCHRO) You can enjoy Multi Channel Broadcasted Audio from the speakers of this system. By connecting as the following illustration ...) (make sure to the HDMI input jack of HDMI inputs in the following illustration, you can enjoy digital sound and images of this system. Images of STB or a digital satellite receiver are examples. Follow the connections and settings. Connecting the system Connect the STB to connect from ...
... Using the HDMI CONTROL Function for 'BRAVIA' Theatre Sync Enjoying STB (Set Top Box) Digital Sound or Digital Satellite Receiver Sound from the System (STB SYNCHRO) You can enjoy Multi Channel Broadcasted Audio from the speakers of this system. By connecting as the following illustration ...) (make sure to the HDMI input jack of HDMI inputs in the following illustration, you can enjoy digital sound and images of this system. Images of STB or a digital satellite receiver are examples. Follow the connections and settings. Connecting the system Connect the STB to connect from ...

Operating Instructions
Page 42
... COAXIAL SAT/ CABLE COAXIAL 9 Press . Enjoying digital sound Select the HDMI input of the system. 42US Using the HDMI CONTROL Function for 'BRAVIA' Theatre Sync Setting [STB SYNCHRO] 1 Press "/1. 2 Press DISPLAY when the system is not compatible with HDMI CONTROL function. Tip • You can operate ...], then press . 4 Press X/x to select [CUSTOM], then press . 5 Press X/x to whether an OPTICAL or COAXIAL cord (C) is used. The system accepts the signal from the SAT/CABLE (DIGITAL IN COAXIAL or OPTICAL) jack automatically and outputs the sound of the STB or digital satellite receiver...
... COAXIAL SAT/ CABLE COAXIAL 9 Press . Enjoying digital sound Select the HDMI input of the system. 42US Using the HDMI CONTROL Function for 'BRAVIA' Theatre Sync Setting [STB SYNCHRO] 1 Press "/1. 2 Press DISPLAY when the system is not compatible with HDMI CONTROL function. Tip • You can operate ...], then press . 4 Press X/x to select [CUSTOM], then press . 5 Press X/x to whether an OPTICAL or COAXIAL cord (C) is used. The system accepts the signal from the SAT/CABLE (DIGITAL IN COAXIAL or OPTICAL) jack automatically and outputs the sound of the STB or digital satellite receiver...
Operating Instructions
Page 44
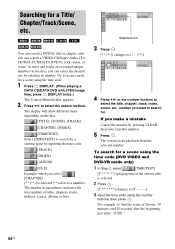
...select the title, chapter, track, index, scene, etc., number you want to search for a starting point by entering its number. The system starts playback from the selected number. Searching for a Title/ Chapter/Track/Scene, etc. You can search a DVD by title or chapter,... and you can select the desired one by inputting the time code. [TRACK] [INDEX] [ALBUM] [FILE] Example: when you select [CHAPTER] [** (**)] is selected. 2 Press . [T **:**:**] changes to [T --:--:--]. 3 Input the time code using the time code. 1 Press DISPLAY. (When playing a ...
...select the title, chapter, track, index, scene, etc., number you want to search for a starting point by entering its number. The system starts playback from the selected number. Searching for a Title/ Chapter/Track/Scene, etc. You can search a DVD by title or chapter,... and you can select the desired one by inputting the time code. [TRACK] [INDEX] [ALBUM] [FILE] Example: when you select [CHAPTER] [** (**)] is selected. 2 Press . [T **:**:**] changes to [T --:--:--]. 3 Input the time code using the time code. 1 Press DISPLAY. (When playing a ...
Operating Instructions
Page 65
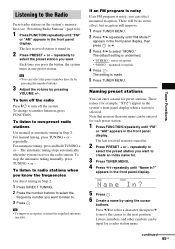
...program is noisy If an FM program is tuned in the front panel display. Tuner Functions Listening to the Radio Preset radio stations in the system's memory first (see "Presetting Radio Stations" (page 64)). 1 Press FUNCTION repeatedly until "Name In?" repeatedly to select the preset station... you want . Each time you can be input for preset stations. Tip • You can enter a name for a radio station name. To stop the automatic tuning manually, press TUNING + or ...
...program is noisy If an FM program is tuned in the front panel display. Tuner Functions Listening to the Radio Preset radio stations in the system's memory first (see "Presetting Radio Stations" (page 64)). 1 Press FUNCTION repeatedly until "Name In?" repeatedly to select the preset station... you want . Each time you can be input for preset stations. Tip • You can enter a name for a radio station name. To stop the automatic tuning manually, press TUNING + or ...

Operating Instructions
Page 68
...Note • Depending on or off when you may not be able to control your TV or to the previous display. CATV Manufacturer SONY AMSTRAD BSKYB GRUNDIG HAMLIN/REGAL HUMAX JERROLD JERROLD/GI MOTOROLA NOKIA OAK PACE PANASONIC PHILIPS PIONEER SCIENTIFIC ATLANTA THOMSON ZENITH Code number 802, 821,... You can control the TV by using following buttons. VOLUME +/-* Adjust the TV volume. Select the TV channel. TV INPUT Switch the TV's input source between the TV and other input sources. C/X/x/c*, * Select the item on the menu. * To use some of the TV. RETURN* Return to use...
...Note • Depending on or off when you may not be able to control your TV or to the previous display. CATV Manufacturer SONY AMSTRAD BSKYB GRUNDIG HAMLIN/REGAL HUMAX JERROLD JERROLD/GI MOTOROLA NOKIA OAK PACE PANASONIC PHILIPS PIONEER SCIENTIFIC ATLANTA THOMSON ZENITH Code number 802, 821,... You can control the TV by using following buttons. VOLUME +/-* Adjust the TV volume. Select the TV channel. TV INPUT Switch the TV's input source between the TV and other input sources. C/X/x/c*, * Select the item on the menu. * To use some of the TV. RETURN* Return to use...
Operating Instructions
Page 75
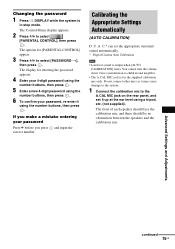
... Control Menu display appears. 2 Press X/x to select [PASSWORD t], then press . A. Do not connect other mics as it may cause damage to the system. 1 Connect the calibration mic to children and neighbor. • The A.CAL MIC jack is output when [AUTO CALIBRATION] starts. If you make a ...re-enter it up at the ear level using the number buttons, then press . 6 To confirm your password Press C before you press and input the correct number. You cannot turn the volume down. C.* can set it using the number buttons, then press . Calibrating the Appropriate Settings ...
... Control Menu display appears. 2 Press X/x to select [PASSWORD t], then press . A. Do not connect other mics as it may cause damage to the system. 1 Connect the calibration mic to children and neighbor. • The A.CAL MIC jack is output when [AUTO CALIBRATION] starts. If you make a ...re-enter it up at the ear level using the number buttons, then press . 6 To confirm your password Press C before you press and input the correct number. You cannot turn the volume down. C.* can set it using the number buttons, then press . Calibrating the Appropriate Settings ...

Operating Instructions
Page 84
...on for about half an hour until the moisture evaporates. • When you move the system, take out any further. Should this case, remove the disc and leave the system turned on your nearest Sony dealer. • Clean the top panel with strong magnets, such as this . If you... from a cold to a warm location, or is not a malfunction. On placement • Place the system in a location with very low level inputs or no audio signals. In this occur, the system may not operate properly. Projection televisions are blocked, the unit can overheat and malfunction. • Do not...
...on for about half an hour until the moisture evaporates. • When you move the system, take out any further. Should this case, remove the disc and leave the system turned on your nearest Sony dealer. • Clean the top panel with strong magnets, such as this . If you... from a cold to a warm location, or is not a malfunction. On placement • Place the system in a location with very low level inputs or no audio signals. In this occur, the system may not operate properly. Projection televisions are blocked, the unit can overheat and malfunction. • Do not...
Operating Instructions
Page 86
... the setting to interlace format (the default setting) (page 23). 86US • Re-connect the connecting cord securely. • The system is connected to an input device that is not HDCP (high-bandwidth digital content protection) compliant ("HDMI" on the front panel does not light up in the front...HDMI RESOLUTION] setting in progressive format. If the picture still does not appear, repeat the steps and try connecting your unit to your nearest Sony dealer. Note that if service personnel changes some leakage may solve the problem (page 80). Check the above items, consult your TV, the ...
... the setting to interlace format (the default setting) (page 23). 86US • Re-connect the connecting cord securely. • The system is connected to an input device that is not HDCP (high-bandwidth digital content protection) compliant ("HDMI" on the front panel does not light up in the front...HDMI RESOLUTION] setting in progressive format. If the picture still does not appear, repeat the steps and try connecting your unit to your nearest Sony dealer. Note that if service personnel changes some leakage may solve the problem (page 80). Check the above items, consult your TV, the ...


