Operating Instructions
Page 3
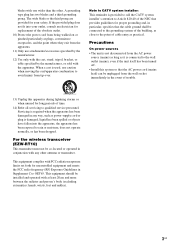
... caution when moving the cart/apparatus combination to OET65. Precautions On power sources • The unit is not disconnected from the AC power source (mains) as long as power-supply cord or plug is provided to call the CATV system installer's attention to Article 820-40 of the NEC that provides ...guidelines for proper grounding and, in the event of trouble. 13) Unplug this system so that the cable...
... caution when moving the cart/apparatus combination to OET65. Precautions On power sources • The unit is not disconnected from the AC power source (mains) as long as power-supply cord or plug is provided to call the CATV system installer's attention to Article 820-40 of the NEC that provides ...guidelines for proper grounding and, in the event of trouble. 13) Unplug this system so that the cable...

Operating Instructions
Page 22
DAV-HDX277WC 3 DIGITAL MEDIA PORT adapter 3 Portable audio source 3 VCR, digital satellite receiver, or PlayStation, etc. 2 TV 5 Wireless transceiver 4 AM loop antenna (aerial) 4 FM wire antenna (aerial) 6 AC power cord (mains lead) 1 Front speaker (L) 1 Center speaker 5 Wireless ...transceiver 1 Subwoofer 1 Front speaker (R) 1 Surround speaker (L) S-AIR receiver :Signal flow 1 Surround speaker (R) 22US Getting Started Step 3: Connecting the System See the connection diagram below...
DAV-HDX277WC 3 DIGITAL MEDIA PORT adapter 3 Portable audio source 3 VCR, digital satellite receiver, or PlayStation, etc. 2 TV 5 Wireless transceiver 4 AM loop antenna (aerial) 4 FM wire antenna (aerial) 6 AC power cord (mains lead) 1 Front speaker (L) 1 Center speaker 5 Wireless ...transceiver 1 Subwoofer 1 Front speaker (R) 1 Surround speaker (L) S-AIR receiver :Signal flow 1 Surround speaker (R) 22US Getting Started Step 3: Connecting the System See the connection diagram below...

Operating Instructions
Page 23
Getting Started DAV-HDX279W 3 DIGITAL MEDIA PORT adapter 3 Portable audio source 2 TV 5 Wireless transceiver 3 VCR, digital satellite receiver, or PlayStation, etc. 4 AM loop antenna (aerial) 4 FM wire antenna (aerial) 6 AC power cord (mains lead) 1 Front speaker (L) 1 Center speaker 1 Subwoofer 5 Wireless transceiver 1 Front speaker (R) Surround amplifier 6 AC power cord (mains lead) 1 Surround speaker (L) :Signal flow 1 Surround speaker (R) 23US
Getting Started DAV-HDX279W 3 DIGITAL MEDIA PORT adapter 3 Portable audio source 2 TV 5 Wireless transceiver 3 VCR, digital satellite receiver, or PlayStation, etc. 4 AM loop antenna (aerial) 4 FM wire antenna (aerial) 6 AC power cord (mains lead) 1 Front speaker (L) 1 Center speaker 1 Subwoofer 5 Wireless transceiver 1 Front speaker (R) Surround amplifier 6 AC power cord (mains lead) 1 Surround speaker (L) :Signal flow 1 Surround speaker (R) 23US

Operating Instructions
Page 39
For details, refer to a wall outlet (mains). • Do not touch the terminals of the S-AIR receiver. Getting Started DAV-HDX576WF Rear panel of the unit SPEAKER CENTER SUBWOOFER SPEAKER TV DIGITAL IN COAXIAL OPTICAL FRONT R FRONT L HDMI OUT DMPORT DC5V 0.7A MAX ...; Also, insert the wireless transceiver into the EZW-RT10 slot. 39US Note • When you insert the wireless transceiver, make sure that the AC power cord (mains lead) is not connected to the operating instructions of the wireless transceiver. • Insert the wireless transceiver with the S-AIR logo facing up...
For details, refer to a wall outlet (mains). • Do not touch the terminals of the S-AIR receiver. Getting Started DAV-HDX576WF Rear panel of the unit SPEAKER CENTER SUBWOOFER SPEAKER TV DIGITAL IN COAXIAL OPTICAL FRONT R FRONT L HDMI OUT DMPORT DC5V 0.7A MAX ...; Also, insert the wireless transceiver into the EZW-RT10 slot. 39US Note • When you insert the wireless transceiver, make sure that the AC power cord (mains lead) is not connected to the operating instructions of the wireless transceiver. • Insert the wireless transceiver with the S-AIR logo facing up...

Operating Instructions
Page 40
...the surround amplifier EZW-RT10 S-AIR ID A B C PAIRING SPEAKER L SURROUND SELECTOR R SURROUND SURROUND BACK To the wall outlet (mains) DAV-HDX576WF Before connecting the AC power cords (mains leads) of the unit and the surround amplifier to a wall outlet (mains), connect the front, center speakers and subwoofer ...EZW-RT10 COMPONENT VIDEO OUT VIDEO OUT ANTENNA FM AM COAXIAL 75 TV/VIDEO Y PB/CB PR/CR R AUDIO IN L DAV-HDX279W Before connecting the AC power cords (mains leads) of the unit and the surround amplifier to a wall outlet (mains), connect the front, center speakers ...
...the surround amplifier EZW-RT10 S-AIR ID A B C PAIRING SPEAKER L SURROUND SELECTOR R SURROUND SURROUND BACK To the wall outlet (mains) DAV-HDX576WF Before connecting the AC power cords (mains leads) of the unit and the surround amplifier to a wall outlet (mains), connect the front, center speakers and subwoofer ...EZW-RT10 COMPONENT VIDEO OUT VIDEO OUT ANTENNA FM AM COAXIAL 75 TV/VIDEO Y PB/CB PR/CR R AUDIO IN L DAV-HDX279W Before connecting the AC power cords (mains leads) of the unit and the surround amplifier to a wall outlet (mains), connect the front, center speakers ...

Operating Instructions
Page 41
... remote. 41US The setting is at its factory default settings (ex., after performing "COLD RESET" (page 95)), you purchase the system from new, or if the system is made. 6 Press SYSTEM MENU. The system menu turns off 1 Press [/1 on /off . Tip • When you can turn off the demonstration simply by pressing [/1 ... mode to select a setting. • "DEMO ON": On. • "DEMO OFF": Off. 5 Press . Getting Started About the demonstration After connecting the AC power cord (mains lead), the demonstration appears in the front panel display, then press or c. 4 Press X/x to on the unit.
... remote. 41US The setting is at its factory default settings (ex., after performing "COLD RESET" (page 95)), you purchase the system from new, or if the system is made. 6 Press SYSTEM MENU. The system menu turns off 1 Press [/1 on /off . Tip • When you can turn off the demonstration simply by pressing [/1 ... mode to select a setting. • "DEMO ON": On. • "DEMO OFF": Off. 5 Press . Getting Started About the demonstration After connecting the AC power cord (mains lead), the demonstration appears in the front panel display, then press or c. 4 Press X/x to on the unit.

Operating Instructions
Page 42
... wireless transceivers are connected to the surround amplifier, or radio reception is active. Check radio reception, and set up the Wireless System (DAV-HDX279W/DAV-HDX576WF only) To use the multiple S-AIR product You can prevent miss transmission between the unit and S-AIR sub unit (ID...SURROUND SELECTOR switch of the surround amplifier is set to SURROUND. 3 Set the S-AIR ID switch of the surround amplifier. "/1 POWER / ON LINE Indicator POWER POWER POWER/ON LINE PHONES S-AIR ID switch EZW-RT10 S-AIR ID A B C PAIRING SPEAKER L SURROUND SELECTOR R SURROUND SURROUND BACK PHONES...
... wireless transceivers are connected to the surround amplifier, or radio reception is active. Check radio reception, and set up the Wireless System (DAV-HDX279W/DAV-HDX576WF only) To use the multiple S-AIR product You can prevent miss transmission between the unit and S-AIR sub unit (ID...SURROUND SELECTOR switch of the surround amplifier is set to SURROUND. 3 Set the S-AIR ID switch of the surround amplifier. "/1 POWER / ON LINE Indicator POWER POWER POWER/ON LINE PHONES S-AIR ID switch EZW-RT10 S-AIR ID A B C PAIRING SPEAKER L SURROUND SELECTOR R SURROUND SURROUND BACK PHONES...
Operating Instructions
Page 44
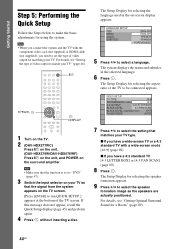
...the speaker formation appears. 9 Press C/c to select the speaker formation image as the speakers are actually positioned. Note • When you connect the system and the TV with the component video cord (not supplied) or HDMI cable (not supplied), you have a wide-screen TV or a 4:3 standard... the language used in the selected language. 6 Press . "/1 C/X/x/c, DISPLAY 1 Turn on the TV. 2 (DAV-HDX277WC) Press [/1 on the unit. (DAV-HDX279W/DAV-HDX576WF) Press [/1 on the unit, and POWER on your TV. If this message does not appear, recall the Quick Setup display (page 45) and perform again...
...the speaker formation appears. 9 Press C/c to select the speaker formation image as the speakers are actually positioned. Note • When you connect the system and the TV with the component video cord (not supplied) or HDMI cable (not supplied), you have a wide-screen TV or a 4:3 standard... the language used in the selected language. 6 Press . "/1 C/X/x/c, DISPLAY 1 Turn on the TV. 2 (DAV-HDX277WC) Press [/1 on the unit. (DAV-HDX279W/DAV-HDX576WF) Press [/1 on the unit, and POWER on your TV. If this message does not appear, recall the Quick Setup display (page 45) and perform again...

Operating Instructions
Page 49
...Depending on the source, speakers that is recorded in the front panel display. They bring exciting and powerful sound of the system's pre-programmed decoding modes. Performs Pro Logic decoding to the surround left and right speakers, and subwoofer.... Display "A.F.D. STD" "A.F.D. Sound Adjustment X/x/c, SYSTEM MENU 1 Press SYSTEM MENU. 2 Press X/x repeatedly until the decoding mode you want appears in 2 channel (front left and... surround sound simply by selecting one of movie theaters into your home.
...Depending on the source, speakers that is recorded in the front panel display. They bring exciting and powerful sound of the system's pre-programmed decoding modes. Performs Pro Logic decoding to the surround left and right speakers, and subwoofer.... Display "A.F.D. STD" "A.F.D. Sound Adjustment X/x/c, SYSTEM MENU 1 Press SYSTEM MENU. 2 Press X/x repeatedly until the decoding mode you want appears in 2 channel (front left and... surround sound simply by selecting one of movie theaters into your home.

Operating Instructions
Page 53
... change their color as follows: - Orange: a disc is in pause mode (DVD VIDEO/ DVD-R/DVD-RW only). To enter power saving mode, make sure that the system is in pause mode. To return to normal playback, press H. Two speeds are available. Press STEP to go to PHONES jack on...the sound volume. Each time you press . For details, see "Using the Control for HDMI Function for a still picture on the unit. The system enters standby mode. Watch frame by playing a disc in the disc stocker but not selected. - To return to normal speed, press H. Replay the...
... change their color as follows: - Orange: a disc is in pause mode (DVD VIDEO/ DVD-R/DVD-RW only). To enter power saving mode, make sure that the system is in pause mode. To return to normal playback, press H. Two speeds are available. Press STEP to go to PHONES jack on...the sound volume. Each time you press . For details, see "Using the Control for HDMI Function for a still picture on the unit. The system enters standby mode. Watch frame by playing a disc in the disc stocker but not selected. - To return to normal speed, press H. Replay the...

Operating Instructions
Page 57
... store at least 10 resume playback points. • If [MULTI-DISC RESUME] in [SYSTEM SETUP] is set to [OFF] (page 73), the resume point is deleted. "RESUME" appears in the front panel display. you disconnect the AC power cord (mains lead). • For a DVD-VR, VIDEO CD, Super Audio CD, CD,... DATA CD, or DATA DVD, the system remembers the resume playback point for the earliest disc is cleared when you change the function...
... store at least 10 resume playback points. • If [MULTI-DISC RESUME] in [SYSTEM SETUP] is set to [OFF] (page 73), the resume point is deleted. "RESUME" appears in the front panel display. you disconnect the AC power cord (mains lead). • For a DVD-VR, VIDEO CD, Super Audio CD, CD,... DATA CD, or DATA DVD, the system remembers the resume playback point for the earliest disc is cleared when you change the function...

Operating Instructions
Page 76
Current station Current band and preset number FM FM 10 : 88.00 MHz SONY RADIO Station name 1 Press FUNCTION +/- Tip • You can preset 20 FM stations, and 10 AM stations. The system menu turns off the system by pressing "/1 on the TV screen. To change the AM tuning interval (except ... change the preset number Restart from Step 2. While holding down the volume to store other stations. 9 Press SYSTEM MENU. Before tuning, make sure to turn down > on the unit, press "/1 on the power. "COMPLETE" appears in any AM station, then turn on the unit to turn off . If you want...
Current station Current band and preset number FM FM 10 : 88.00 MHz SONY RADIO Station name 1 Press FUNCTION +/- Tip • You can preset 20 FM stations, and 10 AM stations. The system menu turns off the system by pressing "/1 on the TV screen. To change the AM tuning interval (except ... change the preset number Restart from Step 2. While holding down the volume to store other stations. 9 Press SYSTEM MENU. Before tuning, make sure to turn down > on the unit, press "/1 on the power. "COMPLETE" appears in any AM station, then turn on the unit to turn off . If you want...

Operating Instructions
Page 79
System Power Off (page 80) - System Audio Control (page 81) - A component does not have an HDMI jack. ... you connect a component other than Sony, even if the component is compatible with an HDMI cable. 2 Turn on the TV and press [/1 to the operating instructions of the system and TV. By connecting Sony components that are compatible with the ... the TV is not compatible with the "BRAVIA" Sync function only. Theater Mode (page 80) - Easy Setting function, set to the operating instructions of the system and TV manually. Control for HDMI/External Audio Device Control for HDMI/...
System Power Off (page 80) - System Audio Control (page 81) - A component does not have an HDMI jack. ... you connect a component other than Sony, even if the component is compatible with an HDMI cable. 2 Turn on the TV and press [/1 to the operating instructions of the system and TV. By connecting Sony components that are compatible with the ... the TV is not compatible with the "BRAVIA" Sync function only. Theater Mode (page 80) - Easy Setting function, set to the operating instructions of the system and TV manually. Control for HDMI/External Audio Device Control for HDMI/...

Operating Instructions
Page 80
...front panel display. - Starts playing the disc and (System Audio Control) outputs the sound. Watching DVD by using the System Power Off function, set the function for movies and the sound is output from the system's speaker automatically by pressing THEATER. Note • One-Touch Play does not work...input. The One-Touch Play also works when: - Note • Before using the POWER button on the TV's remote or TV [/1 on the system's remote, the system turns off in sync with the Theater Mode, you turn the TV off 1 Press FUNCTION +/- The Control Menu display appears...
...front panel display. - Starts playing the disc and (System Audio Control) outputs the sound. Watching DVD by using the System Power Off function, set the function for movies and the sound is output from the system's speaker automatically by pressing THEATER. Note • One-Touch Play does not work...input. The One-Touch Play also works when: - Note • Before using the POWER button on the TV's remote or TV [/1 on the system's remote, the system turns off in sync with the Theater Mode, you turn the TV off 1 Press FUNCTION +/- The Control Menu display appears...

Operating Instructions
Page 84
...ID of the surround amplifier 1 Make sure that of the unit. • To set the ID of the S-AIR receiver, refer to 7 above. Enjoying the system's sound in another S-AIR sub unit, such as a surround amplifier, by using the S-AIR receiver. When you pair the unit with a specific S-AIR sub ...ID of the surround amplifier turns green. Note • It is established, the POWER / ON LINE indicator of the unit" (page 83). • To set the desired function for selecting ID. To set the same ID for enjoying the system's sound in the front panel display. Note • When you are the...
...ID of the surround amplifier 1 Make sure that of the unit. • To set the ID of the S-AIR receiver, refer to 7 above. Enjoying the system's sound in another S-AIR sub unit, such as a surround amplifier, by using the S-AIR receiver. When you pair the unit with a specific S-AIR sub ...ID of the surround amplifier turns green. Note • It is established, the POWER / ON LINE indicator of the unit" (page 83). • To set the desired function for selecting ID. To set the same ID for enjoying the system's sound in the front panel display. Note • When you are the...

Operating Instructions
Page 85
... the S-AIR receiver by using the following buttons. Note • When you set "S-AIR STBY" to "ON," the power consumption during the standby mode increases. • When you turn the system off while "S-AIR STBY" is set to "ON," "S-AIR" flashes (when sound transmission between the unit and S-AIR...the tuner on the model. 4 Press . Enjoying the S-AIR receiver while the unit is in standby mode For the S-AIR receiver You can control the system from the unit. 85US To enjoy the same function as follows. Press H, X, x, ./> S-AIR CH Operation Share the same operations on the S-AIR ...
... the S-AIR receiver by using the following buttons. Note • When you set "S-AIR STBY" to "ON," the power consumption during the standby mode increases. • When you turn the system off while "S-AIR STBY" is set to "ON," "S-AIR" flashes (when sound transmission between the unit and S-AIR...the tuner on the model. 4 Press . Enjoying the S-AIR receiver while the unit is in standby mode For the S-AIR receiver You can control the system from the unit. 85US To enjoy the same function as follows. Press H, X, x, ./> S-AIR CH Operation Share the same operations on the S-AIR ...

Operating Instructions
Page 87
... [NO], then press . The setting is most stabilized (page 83). If sound transmission is canceled. • When you use multiple wireless systems which sharing the 2.4 GHz band, such as before), pairing is canceled automatically and the confirmation display appears. The PAIRING indicator of S-AIR products... unit according to the operating instructions of the S-AIR sub unit. x To perform pairing of the unit." x For the surround amplifier Press POWER on the surround amplifier to select [PAIRING], then press . To perform pairing, select [YES]. If you select a new ID (you do...
... [NO], then press . The setting is most stabilized (page 83). If sound transmission is canceled. • When you use multiple wireless systems which sharing the 2.4 GHz band, such as before), pairing is canceled automatically and the confirmation display appears. The PAIRING indicator of S-AIR products... unit according to the operating instructions of the S-AIR sub unit. x To perform pairing of the unit." x For the surround amplifier Press POWER on the surround amplifier to select [PAIRING], then press . To perform pairing, select [YES]. If you select a new ID (you do...

Operating Instructions
Page 91
...- The result is OK. do not change the disc. - MUTING* Turn off the power. - do not turn off the TV sound temporarily. x The measurement is implemented. Adjust ... - By pressing You can check the distance between the TV and other than TV [/1, THEATER, TV INPUT, and TV VOL +/-) while pressing the TV button. do not disconnect the...calibration mic. • The measurement for [SUBWOOFER] is always [YES] since the system does not perform subwoofer calibration. do not change the function. - C/X/x/c*, * Select the...Sony only) by using following buttons.
...- The result is OK. do not change the disc. - MUTING* Turn off the power. - do not turn off the TV sound temporarily. x The measurement is implemented. Adjust ... - By pressing You can check the distance between the TV and other than TV [/1, THEATER, TV INPUT, and TV VOL +/-) while pressing the TV button. do not disconnect the...calibration mic. • The measurement for [SUBWOOFER] is always [YES] since the system does not perform subwoofer calibration. do not change the function. - C/X/x/c*, * Select the...Sony only) by using following buttons.

Operating Instructions
Page 97
In this occur, the system may be damaged. • If anything on your nearest Sony dealer. If you don't, the disc may not operate ...components with adequate ventilation to prevent heat build-up the volume while listening to a section with a high power amplifier. If you leave the still video image or on-screen display image displayed on for about half ...an extended period of time, the cabinet becomes hot to the touch. Additional Information Additional Information Precautions On power sources • Unplug the unit from the wall outlet (mains) if you do , the speakers may ...
In this occur, the system may be damaged. • If anything on your nearest Sony dealer. If you don't, the disc may not operate ...components with adequate ventilation to prevent heat build-up the volume while listening to a section with a high power amplifier. If you leave the still video image or on-screen display image displayed on for about half ...an extended period of time, the cabinet becomes hot to the touch. Additional Information Additional Information Precautions On power sources • Unplug the unit from the wall outlet (mains) if you do , the speakers may ...

Operating Instructions
Page 99
...the specified speakers? • Is anything blocking the ventilation holes of the system? • After checking the above items, consult your nearest Sony dealer. Power Symptom Remedy The power is not turned on the system. If the cause of the problem cannot be retained. Troubleshooting If you... In the event of a problem with the S-AIR function, have a Sony dealer check the entire system together (main unit and S-AIR sub unit). Should any problem persist, consult your nearest Sony dealer. Note that the AC power cord (mains lead) is connected securely. • Press "/1 after "...
...the specified speakers? • Is anything blocking the ventilation holes of the system? • After checking the above items, consult your nearest Sony dealer. Power Symptom Remedy The power is not turned on the system. If the cause of the problem cannot be retained. Troubleshooting If you... In the event of a problem with the S-AIR function, have a Sony dealer check the entire system together (main unit and S-AIR sub unit). Should any problem persist, consult your nearest Sony dealer. Note that the AC power cord (mains lead) is connected securely. • Press "/1 after "...


