
Operating Instructions
Page 1
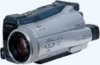
Owner's Record The model and serial numbers are located on the bottom. Model No. AC- Record the serial number in the space provided below. 3-076-897-11 (1) Digital Video Camera Recorder Operating Instructions Before operating the unit, please read this product. DCR-IP Model No. Serial No. Refer to these numbers whenever you call upon your Sony dealer regarding this manual thoroughly, and retain it for future reference. Serial No. DCR-IP220 DCR-IP210/IP220 ©2002 Sony Corporation
Owner's Record The model and serial numbers are located on the bottom. Model No. AC- Record the serial number in the space provided below. 3-076-897-11 (1) Digital Video Camera Recorder Operating Instructions Before operating the unit, please read this product. DCR-IP Model No. Serial No. Refer to these numbers whenever you call upon your Sony dealer regarding this manual thoroughly, and retain it for future reference. Serial No. DCR-IP220 DCR-IP210/IP220 ©2002 Sony Corporation

Operating Instructions
Page 3
...relocate the receiving antenna. - Operation is for a digital device pursuant to Part 15 of the FCC Rules. For customers in CANADA DCR-IP220 only The term "IC:" before the radio ...guarantee that may cause harmful interference to operate this product, you may call: Sony Customer Information Center 1-800-222SONY (7669) The number below is subject to the..., the following two conditions: (1) This device may not cause harmful interference, and (2)this manual could void your authority to radio communications. Address: 680 Kinderkamack Road, Oradell, NJ07649 U.S.A. This...
...relocate the receiving antenna. - Operation is for a digital device pursuant to Part 15 of the FCC Rules. For customers in CANADA DCR-IP220 only The term "IC:" before the radio ...guarantee that may cause harmful interference to operate this product, you may call: Sony Customer Information Center 1-800-222SONY (7669) The number below is subject to the..., the following two conditions: (1) This device may not cause harmful interference, and (2)this manual could void your authority to radio communications. Address: 680 Kinderkamack Road, Oradell, NJ07649 U.S.A. This...

Operating Instructions
Page 5
For details, refer to the Network Function Operating Instructions supplied with your camcorder. (DCR-IP220 only) (p. 175) Main Features Other uses Functions to adjust exposure in the recording mode •BACK LIGHT (p. 37) •NightShot/Super NightShot/... 49, 116) •White balance (p. 52) •PROGRAM AE (p. 62) •Adjusting the exposure manually (p. 65) •Flexible Spot Meter (p. 66) •HOLOGRAM AF (p. 117) •NightFraming (p. 119) Functions to give images more impact •Digital zoom (p. 33) The default setting is set to OFF. (To zoom greater than 10×...
For details, refer to the Network Function Operating Instructions supplied with your camcorder. (DCR-IP220 only) (p. 175) Main Features Other uses Functions to adjust exposure in the recording mode •BACK LIGHT (p. 37) •NightShot/Super NightShot/... 49, 116) •White balance (p. 52) •PROGRAM AE (p. 62) •Adjusting the exposure manually (p. 65) •Flexible Spot Meter (p. 66) •HOLOGRAM AF (p. 117) •NightFraming (p. 119) Functions to give images more impact •Digital zoom (p. 33) The default setting is set to OFF. (To zoom greater than 10×...

Operating Instructions
Page 6
............ 111 - MPEG MOVIE recording ......... 130 Adjusting the white balance manually 52 Recording a picture from a tape as a moving picture 133 Using the wide mode 54 Using the fader function 56 Viewing a still image - Digital effect ... 59 Copying still images recorded on a Recording moving picture... - Flexible Spot Meter 66 Focusing manually 67 Using the spot focus mode - Tape PB ZOOM 72 Searching for a ...
............ 111 - MPEG MOVIE recording ......... 130 Adjusting the white balance manually 52 Recording a picture from a tape as a moving picture 133 Using the wide mode 54 Using the fader function 56 Viewing a still image - Digital effect ... 59 Copying still images recorded on a Recording moving picture... - Flexible Spot Meter 66 Focusing manually 67 Using the spot focus mode - Tape PB ZOOM 72 Searching for a ...

Operating Instructions
Page 14
... 60 minutes with all MICROMV cassettes. Otherwise, the model name is indicated on your camcorder are shown in the table below. This format is the same as a data compression method. Getting Started - Using this manual The instructions in this manual and operating your camcorder. •Records and plays back for DVD (digital versatile disc). e.g. Types of...
... 60 minutes with all MICROMV cassettes. Otherwise, the model name is indicated on your camcorder are shown in the table below. This format is the same as a data compression method. Getting Started - Using this manual The instructions in this manual and operating your camcorder. •Records and plays back for DVD (digital versatile disc). e.g. Types of...
Operating Instructions
Page 15
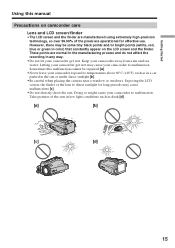
... to malfunction. However, there may be repaired [a]. • Never leave your camcorder to temperatures above 60°C (140°F), such as dusk [d]. [a] [b] [c] [d] 15 Keep your camcorder get wet may cause malfunctions [c]. • Do not directly shoot the sun. Sometimes this manual Precautions on the LCD screen and the finder. Getting Started Using this...
... to malfunction. However, there may be repaired [a]. • Never leave your camcorder to temperatures above 60°C (140°F), such as dusk [d]. [a] [b] [c] [d] 15 Keep your camcorder get wet may cause malfunctions [c]. • Do not directly shoot the sun. Sometimes this manual Precautions on the LCD screen and the finder. Getting Started Using this...

Operating Instructions
Page 27
Getting Started Step 4 Using the touch panel Your camcorder has operation buttons on a tape. (1) Prepare the power source (p. 17 to 21). (2).... To execute settings Press EXEC or OK. The display returns to PAGE1, 2 or 3. The operation buttons of this manual for each function. This section describes how to PAGE3. See relevant pages of PAGE3 appear on the LCD screen. (5) ...or playing back images on the LCD screen. Press the LCD screen with your finger or the supplied stylus (DCR-IP220 only) to operate each function. 3 POWER CAMERA (CHG)OFF ON MODE VCR MEMORY/NETWORK 4-6 FN ...
Getting Started Step 4 Using the touch panel Your camcorder has operation buttons on a tape. (1) Prepare the power source (p. 17 to 21). (2).... To execute settings Press EXEC or OK. The display returns to PAGE1, 2 or 3. The operation buttons of this manual for each function. This section describes how to PAGE3. See relevant pages of PAGE3 appear on the LCD screen. (5) ...or playing back images on the LCD screen. Press the LCD screen with your finger or the supplied stylus (DCR-IP220 only) to operate each function. 3 POWER CAMERA (CHG)OFF ON MODE VCR MEMORY/NETWORK 4-6 FN ...
Operating Instructions
Page 34
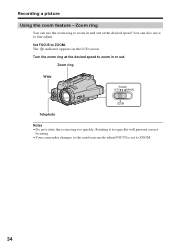
The indicator appears on the LCD screen. Zoom ring Wide FOCUS AUTO MANUAL ZOOM Telephoto Notes •Do not rotate the zoom ring too quickly. Recording a picture Using the zoom feature - Zoom ring You can also use the zoom ring to zoom in or out. Set FOCUS to ZOOM. 34 Rotating it to zoom in and out at the desired speed to fine adjust. You can use it too quickly will prevent correct focusing. •Your camcorder changes to the autofocus mode when FOCUS is set to ZOOM. Turn the zoom ring at the desired speed.
The indicator appears on the LCD screen. Zoom ring Wide FOCUS AUTO MANUAL ZOOM Telephoto Notes •Do not rotate the zoom ring too quickly. Recording a picture Using the zoom feature - Zoom ring You can also use the zoom ring to zoom in or out. Set FOCUS to ZOOM. 34 Rotating it to zoom in and out at the desired speed to fine adjust. You can use it too quickly will prevent correct focusing. •Your camcorder changes to the autofocus mode when FOCUS is set to ZOOM. Turn the zoom ring at the desired speed.
Operating Instructions
Page 37
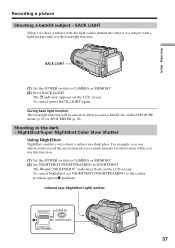
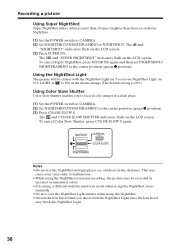
... SLOW S NIGHTFRAMING 37 Recording - BACK LIGHT When you use the backlight function. The . NightShot/Super NightShot/Color Slow Shutter Using NightShot NightShot enables you press MANUAL in the dark - BACK LIGHT (1) Set the POWER switch to NIGHTSHOT.
... SLOW S NIGHTFRAMING 37 Recording - BACK LIGHT When you use the backlight function. The . NightShot/Super NightShot/Color Slow Shutter Using NightShot NightShot enables you press MANUAL in the dark - BACK LIGHT (1) Set the POWER switch to NIGHTSHOT.
Operating Instructions
Page 38
...Shutter enables you shoot with the NightShot Light since the lens hood may be clearer with the autofocus mode when using the NightShot, focus manually. •Do not cover the NightShot Light emitter when using the NightShot in normal recording, the picture may block the NightShot Light. 38... NIGHTSHOT/NIGHTFRAMING to ON in the menu settings (The default setting is difficult with the NightShot Light on the LCD screen. This may cause your camcorder to malfunction. •While using the NightShot. •Detach the lens hood when you to record color images in a dark place. (1) Set...
...Shutter enables you shoot with the NightShot Light since the lens hood may be clearer with the autofocus mode when using the NightShot, focus manually. •Do not cover the NightShot Light emitter when using the NightShot in normal recording, the picture may block the NightShot Light. 38... NIGHTSHOT/NIGHTFRAMING to ON in the menu settings (The default setting is difficult with the NightShot Light on the LCD screen. This may cause your camcorder to malfunction. •While using the NightShot. •Detach the lens hood when you to record color images in a dark place. (1) Set...
Operating Instructions
Page 49
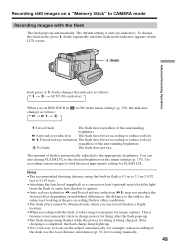
... No flash: The flash does not fire. The default setting is completed, the flash charge lamp lights up automatically. This is because your camcorder starts to charge power for firing after the flash pops up. • The flash charge lamp flashes while the power for image capture. ...Try recording various images to find the most appropriate setting for focusing manually. 49 Forced red-eye reduction: The flash fires before recording to reduce red-eye. Auto red-eye reduction: The flash fires before recording...
... No flash: The flash does not fire. The default setting is completed, the flash charge lamp lights up automatically. This is because your camcorder starts to charge power for firing after the flash pops up. • The flash charge lamp flashes while the power for image capture. ...Try recording various images to find the most appropriate setting for focusing manually. 49 Forced red-eye reduction: The flash fires before recording to reduce red-eye. Auto red-eye reduction: The flash fires before recording...

Operating Instructions
Page 52
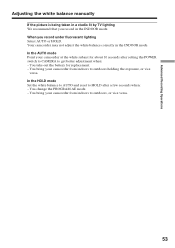
Adjusting the white balance manually You can manually adjust and set the white balance. HOLD : Recording a single-colored subject or background OUTDOOR ( ) : •Recording a sunset/sunrise, just after sunset, just before sunrise, neon ... INDOOR (n) : •When lighting conditions change quickly •In too bright places such as photography studios •Under sodium lamps or mercury lamps 2 FN 3 MENU MANUAL SET PROGRAM AE P EFFECT RED EYE R FLASH LVL WHT BAL SHARPNESS AUTO SHTR EXIT AUTO HOLD OUTDOOR INDOOR EXEC RET. To return to AUTO in...
Adjusting the white balance manually You can manually adjust and set the white balance. HOLD : Recording a single-colored subject or background OUTDOOR ( ) : •Recording a sunset/sunrise, just after sunset, just before sunrise, neon ... INDOOR (n) : •When lighting conditions change quickly •In too bright places such as photography studios •Under sodium lamps or mercury lamps 2 FN 3 MENU MANUAL SET PROGRAM AE P EFFECT RED EYE R FLASH LVL WHT BAL SHARPNESS AUTO SHTR EXIT AUTO HOLD OUTDOOR INDOOR EXEC RET. To return to AUTO in...
Operating Instructions
Page 53
... Operations Adjusting the white balance manually If the picture is being taken in a studio lit by TV lighting We recommend that you record under fluorescent lighting Select AUTO or HOLD. You take out the battery for about 10 seconds after a few seconds when: - You bring your camcorder from indoors to outdoors holding...
... Operations Adjusting the white balance manually If the picture is being taken in a studio lit by TV lighting We recommend that you record under fluorescent lighting Select AUTO or HOLD. You take out the battery for about 10 seconds after a few seconds when: - You bring your camcorder from indoors to outdoors holding...
Operating Instructions
Page 58
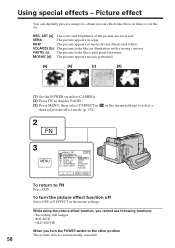
... effects - MOSAIC [d] : The picture appears mosaic-patterned. [a] [b] [c] [d] (1) Set the POWER switch to CAMERA. (2) Press FN to select a 2 FN 3 MENU MANUAL SET PROGRAM AE P EFFECT RED EYE R FLASH LVL WHT BAL SHARPNESS AUTO SHTR EXIT OFF NEG. While using the picture effect function, you turn the... NEG. B&W : The picture appears in films or on the TV. ART SEPIA B&W SOLARIZE PASTEL MOSAIC EXEC RET. Picture effect You can digitally process images to FN Press EXIT. SOLARIZE [b] : The picture looks like a pale pastel drawing. in the menu settings. BOUNCE -
... effects - MOSAIC [d] : The picture appears mosaic-patterned. [a] [b] [c] [d] (1) Set the POWER switch to CAMERA. (2) Press FN to select a 2 FN 3 MENU MANUAL SET PROGRAM AE P EFFECT RED EYE R FLASH LVL WHT BAL SHARPNESS AUTO SHTR EXIT OFF NEG. While using the picture effect function, you turn the... NEG. B&W : The picture appears in films or on the TV. ART SEPIA B&W SOLARIZE PASTEL MOSAIC EXEC RET. Picture effect You can digitally process images to FN Press EXIT. SOLARIZE [b] : The picture looks like a pale pastel drawing. in the menu settings. BOUNCE -
Operating Instructions
Page 61
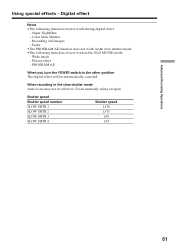
...8226;The following functions do not work during digital effect: - PROGRAM AE When you turn the POWER switch to the other position The digital effect will be effective. Advanced Recording Operations Using special effects - Digital effect Notes •The following functions do not... work in the slow shutter mode Auto focus may not be automatically canceled. Focus manually using a tripod. Super NightShot...
...8226;The following functions do not work during digital effect: - PROGRAM AE When you turn the POWER switch to the other position The digital effect will be effective. Advanced Recording Operations Using special effects - Digital effect Notes •The following functions do not... work in the slow shutter mode Auto focus may not be automatically canceled. Focus manually using a tripod. Super NightShot...
Operating Instructions
Page 63
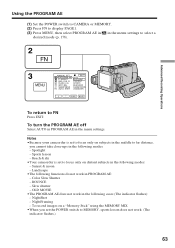
...images on distant subjects in the following cases (The indicator flashes): - To return to select a desired mode (p. 178). 2 FN 3 MENU MANUAL SET PROGRAM AE P EFFECT RED EYE R FLASH LVL WHT BAL SHARPNESS AUTO SHTR EXIT AUTO SPOTLIGHT PORTRAIT SPORTS BEACH&SKI SUNSETMOON LANDSCAPE EXEC RET. ... flashes.) 63 Sports lesson - Sunset & moon - Spotlight - Landscape •The following modes: - Slow shutter - Notes •Because your camcorder is set to focus only on a "Memory Stick" using the MEMORY MIX. •When you cannot take close-ups in the following functions do...
...images on distant subjects in the following cases (The indicator flashes): - To return to select a desired mode (p. 178). 2 FN 3 MENU MANUAL SET PROGRAM AE P EFFECT RED EYE R FLASH LVL WHT BAL SHARPNESS AUTO SHTR EXIT AUTO SPOTLIGHT PORTRAIT SPORTS BEACH&SKI SUNSETMOON LANDSCAPE EXEC RET. ... flashes.) 63 Sports lesson - Sunset & moon - Spotlight - Landscape •The following modes: - Slow shutter - Notes •Because your camcorder is set to focus only on a "Memory Stick" using the MEMORY MIX. •When you cannot take close-ups in the following functions do...

Operating Instructions
Page 65
...or MEMORY. (2) Press FN to the automatic exposure mode Press AUTO in the following functions do not work: - If you adjust the exposure manually, the following cases: - EXPOSURE + - + To return to PAGE1. The display returns to FN Press EXIT after step 6. To make ...appears. (4) Press MANUAL. (5) Adjust the exposure using -/+. - : To dim + : To brighten (6) Press OK. AL 2 FN AUTO OK MANU- Note When you change the PROGRAM AE mode - NightFraming 65 The display returns to the automatic exposure mode: - Color Slow Shutter Your camcorder automatically returns to PAGE1...
...or MEMORY. (2) Press FN to the automatic exposure mode Press AUTO in the following functions do not work: - If you adjust the exposure manually, the following cases: - EXPOSURE + - + To return to PAGE1. The display returns to FN Press EXIT after step 6. To make ...appears. (4) Press MANUAL. (5) Adjust the exposure using -/+. - : To dim + : To brighten (6) Press OK. AL 2 FN AUTO OK MANU- Note When you change the PROGRAM AE mode - NightFraming 65 The display returns to the automatic exposure mode: - Color Slow Shutter Your camcorder automatically returns to PAGE1...
Operating Instructions
Page 67
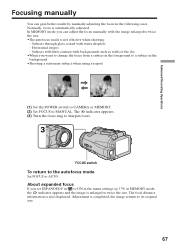
...The 9 indicator appears. (3) Turn the focus ring to sharpen focus. 3 FOCUS switch To return to the autofocus mode Set FOCUS to MANUAL. Adjustment is also displayed. Horizontal stripes - The focal distance information is completed, the image returns to twice the size. •The ...autofocus mode is not effective when shooting: - Advanced Recording Operations Focusing manually You can adjust the focus manually with water droplets - Normally, focus is automatically adjusted. Subjects with little contrast with backgrounds such as walls or the...
...The 9 indicator appears. (3) Turn the focus ring to sharpen focus. 3 FOCUS switch To return to the autofocus mode Set FOCUS to MANUAL. Adjustment is also displayed. Horizontal stripes - The focal distance information is completed, the image returns to twice the size. •The ...autofocus mode is not effective when shooting: - Advanced Recording Operations Focusing manually You can adjust the focus manually with water droplets - Normally, focus is automatically adjusted. Subjects with little contrast with backgrounds such as walls or the...
Operating Instructions
Page 68
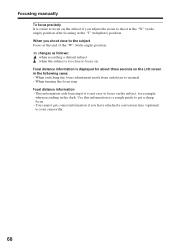
... Focal distance information - Focusing manually To focus precisely It is easier to focus on the LCD screen in the dark. This information aids focusing if it is displayed for example, when recording in the following cases: - When switching the focus adjustment mode from autofocus to your camcorder. 68 You cannot get a sharp... of the "W" (wide-angle) position. 9 changes as a rough guide to the subject Focus at the "T" (telephoto) position. When you have attached a conversion lens (optional) to manual -
... Focal distance information - Focusing manually To focus precisely It is easier to focus on the LCD screen in the dark. This information aids focusing if it is displayed for example, when recording in the following cases: - When switching the focus adjustment mode from autofocus to your camcorder. 68 You cannot get a sharp... of the "W" (wide-angle) position. 9 changes as a rough guide to the subject Focus at the "T" (telephoto) position. When you have attached a conversion lens (optional) to manual -
Operating Instructions
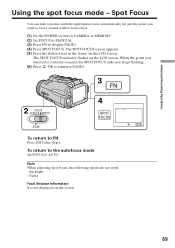
Page 69
... just the point you selected is not displayed on and with its focus fixed. (1) Set the POWER switch to CAMERA or MEMORY. (2) Set FOCUS to MANUAL. (3) Press FN to focus on the screen. 69 Advanced Recording Operations Using the spot focus mode - Fader Focal distance information It is correctly focused, the...
... just the point you selected is not displayed on and with its focus fixed. (1) Set the POWER switch to CAMERA or MEMORY. (2) Set FOCUS to MANUAL. (3) Press FN to focus on the screen. 69 Advanced Recording Operations Using the spot focus mode - Fader Focal distance information It is correctly focused, the...


