
Operating Instructions
Page 2
...your Handycam you can capture life's precious moments with this camcorder. WARNING To prevent fire or shock hazard, do not...superior picture and sound quality. Nous vous félicitons pour l'achat de ce caméscope Handycam de Sony. Français Bienvenue! Votre Handycam présente de nombreuses fonctions élaborées, trè...et de son exceptionnelle. This product has been tested and found compliant with BS1363 is very easy to this Sony Handycam. You will soon be replaced, a fuse of this equipment for using connection cables shorter than 3 ...
...your Handycam you can capture life's precious moments with this camcorder. WARNING To prevent fire or shock hazard, do not...superior picture and sound quality. Nous vous félicitons pour l'achat de ce caméscope Handycam de Sony. Français Bienvenue! Votre Handycam présente de nombreuses fonctions élaborées, trè...et de son exceptionnelle. This product has been tested and found compliant with BS1363 is very easy to this Sony Handycam. You will soon be replaced, a fuse of this equipment for using connection cables shorter than 3 ...

Operating Instructions
Page 4
...;Recording still images on the "Memory Stick" (DCR-TRV22E/ TRV33E only) (p. 62, 152) •Recording moving pictures on the "Memory Stick" (DCR-TRV22E/ TRV33E only) (p. 166) •Viewing still images recorded on the "Memory Stick" (DCRTRV22E/TRV33E only) (p.179) •Viewing moving pictures recorded...Memory Stick" using the USB cable (DCR-TRV22E/TRV33E only) (p. 201) •Capturing images on the computer from your camcorder using the USB cable (p. 217) •Converting an analog signal into digital to capture images onto the computer (DCR-TRV22E/TRV33E only) (p. 238) Capturing images on...
...;Recording still images on the "Memory Stick" (DCR-TRV22E/ TRV33E only) (p. 62, 152) •Recording moving pictures on the "Memory Stick" (DCR-TRV22E/ TRV33E only) (p. 166) •Viewing still images recorded on the "Memory Stick" (DCRTRV22E/TRV33E only) (p.179) •Viewing moving pictures recorded...Memory Stick" using the USB cable (DCR-TRV22E/TRV33E only) (p. 201) •Capturing images on the computer from your camcorder using the USB cable (p. 217) •Converting an analog signal into digital to capture images onto the computer (DCR-TRV22E/TRV33E only) (p. 238) Capturing images on...

Operating Instructions
Page 5
... memory** (p. 96) •Title search** (p. 98) •Digital program editing (p. 109, 173*) * DCR-TRV22E/TRV33E only **Except for DCR-TRV12E Before you start reading this manual and operating your camcorder, check the model number by looking at the bottom of your recordings •PROGRAM AE (p. 80) - The DCR-TRV33E is indicated in the illustrations. Main Features Main...
... memory** (p. 96) •Title search** (p. 98) •Digital program editing (p. 109, 173*) * DCR-TRV22E/TRV33E only **Except for DCR-TRV12E Before you start reading this manual and operating your camcorder, check the model number by looking at the bottom of your recordings •PROGRAM AE (p. 80) - The DCR-TRV33E is indicated in the illustrations. Main Features Main...

Operating Instructions
Page 9
Digital program editing (on "Memory Stick" - Slide show 188 Preventing accidental erasure - Resize (DCR-TRV33E only 196 Writing a print mark - Signal convert function (DCR-TRV22E/ TRV33E only 238 Customizing Your Camcorder Changing the menu settings 240 Troubleshooting Types of contents Labelling a cassette on a cassette with a computer - Memory Photo recording 152 Recording an image from tape as a ...
Digital program editing (on "Memory Stick" - Slide show 188 Preventing accidental erasure - Resize (DCR-TRV33E only 196 Writing a print mark - Signal convert function (DCR-TRV22E/ TRV33E only 238 Customizing Your Camcorder Changing the menu settings 240 Troubleshooting Types of contents Labelling a cassette on a cassette with a computer - Memory Photo recording 152 Recording an image from tape as a ...
Operating Instructions
Page 12
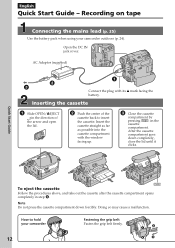
... the cassette compartment opens completely in the direction of the arrow and open the lid. 2 Push the centre of the cassette back to hold your camcorder outdoors (p. 24). How to insert the cassette. Recording on the cassette compartment. Inserting the cassette 1 Slide OPEN/ZEJECT in step 2. Note Do not ... window facing up. 3 Close the cassette compartment by pressing on tape Connecting the mains lead (p. 25) Use the battery pack when using your camcorder 12 Fastening the grip belt Fasten the grip belt firmly. 2 1 43 After the cassette compartment goes down forcibly.
... the cassette compartment opens completely in the direction of the arrow and open the lid. 2 Push the centre of the cassette back to hold your camcorder outdoors (p. 24). How to insert the cassette. Recording on the cassette compartment. Inserting the cassette 1 Slide OPEN/ZEJECT in step 2. Note Do not ... window facing up. 3 Close the cassette compartment by pressing on tape Connecting the mains lead (p. 25) Use the battery pack when using your camcorder 12 Fastening the grip belt Fasten the grip belt firmly. 2 1 43 After the cassette compartment goes down forcibly.

Operating Instructions
Page 13
...screen (p. 52) 1 Set the POWER switch to CAMERA while pressing the small green button. Your camcorder starts recording. Do not press the LCD screen with your finger supporting the LCD panel from the...STOP again. When you want to record the date and time for a picture, set to your camcorder by holding parts as illustrated. Adjust the viewfinder lens to off. POWER VCR OFF(CHG) CAMERA... When the LCD panel is set the clock setting before recording (p. 31). If you purchase your camcorder, the clock setting is closed, pull out the viewfinder and look at the picture in it ....
...screen (p. 52) 1 Set the POWER switch to CAMERA while pressing the small green button. Your camcorder starts recording. Do not press the LCD screen with your finger supporting the LCD panel from the...STOP again. When you want to record the date and time for a picture, set to your camcorder by holding parts as illustrated. Adjust the viewfinder lens to off. POWER VCR OFF(CHG) CAMERA... When the LCD panel is set the clock setting before recording (p. 31). If you purchase your camcorder, the clock setting is closed, pull out the viewfinder and look at the picture in it ....

Operating Instructions
Page 14
... reading the data from the "Memory Stick" or recording the data on "Memory Stick" (DCR-TRV22E/TRV33E only) Connecting the mains lead (p. 25) Use the battery pack when using your camcorder 14 Fastening the grip belt Fasten the grip belt firmly. 2 1 43 AC Adaptor (supplied) 2 3 1 Connect the plug ...EJECT in the "Memory Stick" slot as far as illustrated, then close the lid. Otherwise, image data breakdown may occur. How to hold your camcorder outdoors (p. 24). Inserting the "Memory Stick" (p. 146) Open the lid of the arrow. Quick Start Guide - Recording on the "Memory Stick...
... reading the data from the "Memory Stick" or recording the data on "Memory Stick" (DCR-TRV22E/TRV33E only) Connecting the mains lead (p. 25) Use the battery pack when using your camcorder 14 Fastening the grip belt Fasten the grip belt firmly. 2 1 43 AC Adaptor (supplied) 2 3 1 Connect the plug ...EJECT in the "Memory Stick" slot as far as illustrated, then close the lid. Otherwise, image data breakdown may occur. How to hold your camcorder outdoors (p. 24). Inserting the "Memory Stick" (p. 146) Open the lid of the arrow. Quick Start Guide - Recording on the "Memory Stick...
Operating Instructions
Page 15
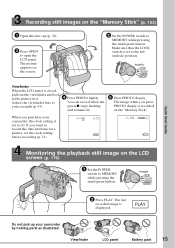
...picture in it. 4 Press PHOTO lightly. Make sure that the LOCK switch is set to the left (unlock) position. When you purchase your camcorder, the clock setting is set the clock setting before recording (p. 31). 640 FINE 12 101 640 FINE 101 Monitoring the playback still image on ...the "Memory Stick." If you press PHOTO deeply is recorded on the LCD screen (p. 179) 1 Set the POWER switch to your camcorder by holding parts as illustrated. POWER VCR OFF(CHG) CAMERA MEMORY 2 Press PLAY. You can record when the green z stops flashing and remains lit....
...picture in it. 4 Press PHOTO lightly. Make sure that the LOCK switch is set to the left (unlock) position. When you purchase your camcorder, the clock setting is set the clock setting before recording (p. 31). 640 FINE 12 101 640 FINE 101 Monitoring the playback still image on ...the "Memory Stick." If you press PHOTO deeply is recorded on the LCD screen (p. 179) 1 Set the POWER switch to your camcorder by holding parts as illustrated. POWER VCR OFF(CHG) CAMERA MEMORY 2 Press PLAY. You can record when the green z stops flashing and remains lit....

Operating Instructions
Page 20
- Using this manual and operating your camcorder. The DCR-TRV33E is shown by looking at the bottom of the POWER ...on your camcorder are clearly indicated in this manual, position of your camcorder, check the model number by the icons below. Toute différence de fonctionnement est clairement signalée dans le texte, par exemple, « DCR-TRV33E uniquement ...és dans le tableau à la page suivante. Les illustrations de ce mode d'emploi représentent le DCR-TRV33E. Après la section « Opérations d'enregistrement avancées » de ce mode d'emploi...
- Using this manual and operating your camcorder. The DCR-TRV33E is shown by looking at the bottom of the POWER ...on your camcorder are clearly indicated in this manual, position of your camcorder, check the model number by the icons below. Toute différence de fonctionnement est clairement signalée dans le texte, par exemple, « DCR-TRV33E uniquement ...és dans le tableau à la page suivante. Les illustrations de ce mode d'emploi représentent le DCR-TRV33E. Après la section « Opérations d'enregistrement avancées » de ce mode d'emploi...

Operating Instructions
Page 31
... procedure as the data code. In this case, charge the built-in your camcorder for the first time. Sinon, l'indicateur « CLOCK SET » s'affiche chaque fois que vous mettez le commutateur POWER sur CAMERA ou MEMORY (DCR-TRV22E/ TRV33E uniquement), à moins que vous ne régliez la date et l'heure. ... Step 2 Setting the date and time Etape 2 Réglage de la date et de l'heure Set the date and time when you use your camcorder will appear each time you set the POWER switch to CAMERA or MEMORY (DCR-TRV22E/TRV33E only) unless you set the date and time settings.
... procedure as the data code. In this case, charge the built-in your camcorder for the first time. Sinon, l'indicateur « CLOCK SET » s'affiche chaque fois que vous mettez le commutateur POWER sur CAMERA ou MEMORY (DCR-TRV22E/ TRV33E uniquement), à moins que vous ne régliez la date et l'heure. ... Step 2 Setting the date and time Etape 2 Réglage de la date et de l'heure Set the date and time when you use your camcorder will appear each time you set the POWER switch to CAMERA or MEMORY (DCR-TRV22E/TRV33E only) unless you set the date and time settings.

Operating Instructions
Page 33
...to display PAGE2/PAGE3. Reportez-vous aux pages correspondantes de ce manuel pour obtenir des informations sur chaque fonction. 1) DCR-TRV12E/TRV14E 2) DCR-TRV19E/TRV22E/TRV33E 3) DCR-TRV22E/TRV33E PAGE1 PAGE2 EXIT SPOT FOCUS FOCUS SPOT METER MENU FADER END EXPOSCH SURE 1 2 [a] When the POWER switch is... (3) Appuyez sur FN. Getting Started Préparation Step 3 Using the touch panel Etape 3 Utilisation de l'écran tactile Your camcorder has operation buttons on the LCD screen. (5) Press a desired operation item. Touch the LCD screen directly with your finger to open the...
...to display PAGE2/PAGE3. Reportez-vous aux pages correspondantes de ce manuel pour obtenir des informations sur chaque fonction. 1) DCR-TRV12E/TRV14E 2) DCR-TRV19E/TRV22E/TRV33E 3) DCR-TRV22E/TRV33E PAGE1 PAGE2 EXIT SPOT FOCUS FOCUS SPOT METER MENU FADER END EXPOSCH SURE 1 2 [a] When the POWER switch is... (3) Appuyez sur FN. Getting Started Préparation Step 3 Using the touch panel Etape 3 Utilisation de l'écran tactile Your camcorder has operation buttons on the LCD screen. (5) Press a desired operation item. Touch the LCD screen directly with your finger to open the...
Operating Instructions
Page 35
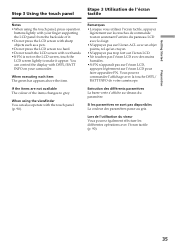
...;Do not press the LCD screen too hard. •Do not touch the LCD screen with wet hands. •If FN is not on your camcorder. You can also operate with the touch panel (p. 90). Getting Started Step 3 Using the touch panel Etape 3 Utilisation de l'écran tactile Notes •When...
...;Do not press the LCD screen too hard. •Do not touch the LCD screen with wet hands. •If FN is not on your camcorder. You can also operate with the touch panel (p. 90). Getting Started Step 3 Using the touch panel Etape 3 Utilisation de l'écran tactile Notes •When...
Operating Instructions
Page 112
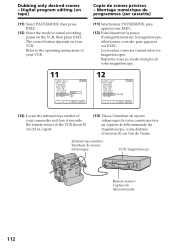
...button depends on the VCR, then press EXEC. Copie de scènes précises - Refer to cancel recording pause on your camcorder and face it towards the remote sensor of your VCR. Infrared rays emitter/ Emetteur de rayons infrarouges VCR/magnétoscope Remote sensor/ .... (12) Pour désactiver la pause d'enregistrement sur le magnétoscope, sélectionnez ce mode, puis appuyez sur EXEC. Dubbing only desired scenes - Digital program editing (on tape) (11) Select PAUSEMODE, then press EXEC. (12) Select the mode to the operating instructions of your VCR. 11 V I DEO ...
...button depends on the VCR, then press EXEC. Copie de scènes précises - Refer to cancel recording pause on your camcorder and face it towards the remote sensor of your VCR. Infrared rays emitter/ Emetteur de rayons infrarouges VCR/magnétoscope Remote sensor/ .... (12) Pour désactiver la pause d'enregistrement sur le magnétoscope, sélectionnez ce mode, puis appuyez sur EXEC. Dubbing only desired scenes - Digital program editing (on tape) (11) Select PAUSEMODE, then press EXEC. (12) Select the mode to the operating instructions of your VCR. 11 V I DEO ...
Operating Instructions
Page 114
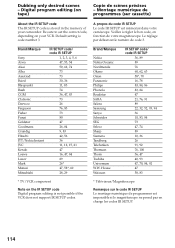
Digital program editing (on your camcorder. A propos du code IR SETUP Le code IR SETUP est mémorisé dans votre caméscope. Be sure to set the correct code, depending on tape) Copie de scènes précises - Brand/Marque Sony Aiwa Akai Alba Amstrad Baird Blaupunkt Bush CGM Clatronic... 36 11, 12, 15, 21 47 16, 47, 84 89 26* 47, 58*, 60 28, 29 * TV/VCR component Note on the IR SETUP code Digital program editing is code number 3. Veillez à régler le bon code, en fonction de votre magnétoscope. Brand/Marque Nokia Nokia Oceanic Nordmende...
Digital program editing (on your camcorder. A propos du code IR SETUP Le code IR SETUP est mémorisé dans votre caméscope. Be sure to set the correct code, depending on tape) Copie de scènes précises - Brand/Marque Sony Aiwa Akai Alba Amstrad Baird Blaupunkt Bush CGM Clatronic... 36 11, 12, 15, 21 47 16, 47, 84 89 26* 47, 58*, 60 28, 29 * TV/VCR component Note on the IR SETUP code Digital program editing is code number 3. Veillez à régler le bon code, en fonction de votre magnétoscope. Brand/Marque Nokia Nokia Oceanic Nordmende...

Operating Instructions
Page 136
Repeat the same procedure as steps 6 and 7 to complete your camcorder. Répétez les étapes 6 et 7 pour finir de saisir le titre. (8) Appuyez sur SET. Operate by touching the panel. (1) Press FN to display ... (p. 247). (4) Select , then press EXEC. (5) Select CUSTOM1 SET or CUSTOM2 SET, then press EXEC. (6) Select a desired character. Le titre est mémorisé. 1) DCR-TRV12E/TRV14E 2) DCR-TRV19E/TRV22E/TRV33E 4 TITLE SET EXIT CUSTOM1 SET CUSTOM2 SET r R EXEC RET. 5 TITLE SET EXIT ABC DEF T t GH I JKL MNO 123 678 45 90 PQR TUV...
Repeat the same procedure as steps 6 and 7 to complete your camcorder. Répétez les étapes 6 et 7 pour finir de saisir le titre. (8) Appuyez sur SET. Operate by touching the panel. (1) Press FN to display ... (p. 247). (4) Select , then press EXEC. (5) Select CUSTOM1 SET or CUSTOM2 SET, then press EXEC. (6) Select a desired character. Le titre est mémorisé. 1) DCR-TRV12E/TRV14E 2) DCR-TRV19E/TRV22E/TRV33E 4 TITLE SET EXIT CUSTOM1 SET CUSTOM2 SET r R EXEC RET. 5 TITLE SET EXIT ABC DEF T t GH I JKL MNO 123 678 45 90 PQR TUV...

Operating Instructions
Page 151
... The number of still images and the time of moving pictures that can record vary depending on the "Memory Stick" formatted with your camcorder. m. secondes) The table shows approximate number of still images and time of moving pictures you select and the complexity of... 200 640 120 240 485 980 1 970 3 650 7 200 14 500 "Memory Stick" Operations (DCR-TRV22E/TRV33E only) Opérations « Memory Stick » (DCR-TRV22E/TRV33E uniquement) * DCR-TRV33E only/DCR-TRV33E uniquement Moving pictures/Images animées Type of the subject. m. Still images/Images fixes Le nombre ...
... The number of still images and the time of moving pictures that can record vary depending on the "Memory Stick" formatted with your camcorder. m. secondes) The table shows approximate number of still images and time of moving pictures you select and the complexity of... 200 640 120 240 485 980 1 970 3 650 7 200 14 500 "Memory Stick" Operations (DCR-TRV22E/TRV33E only) Opérations « Memory Stick » (DCR-TRV22E/TRV33E uniquement) * DCR-TRV33E only/DCR-TRV33E uniquement Moving pictures/Images animées Type of the subject. m. Still images/Images fixes Le nombre ...
Operating Instructions
Page 152
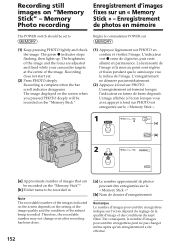
... disparaît. Recording is complete when the bar scroll indicator disappears. The brightness of the image and the focus are adjusted and fixed while your camcorder targets at the centre of images that can be recorded on "Memory Stick" - Therefore, the recordable number may not change even after recording has been...
... disparaît. Recording is complete when the bar scroll indicator disappears. The brightness of the image and the focus are adjusted and fixed while your camcorder targets at the centre of images that can be recorded on "Memory Stick" - Therefore, the recordable number may not change even after recording has been...

Operating Instructions
Page 154
...réglé sur MEMORY (DCR-TRV33E uniquement) L'angle de vue est légèrement plus grand par rapport à l'angle de vue affiché lorsque le commutateur POWER est réglé sur CAMERA. EXP BRKTG [b] ( ) Your camcorder automatically shoots 3 images at about ...photos en taille 1152 × 864 ou 13 photos en taille 640 × 480 à des intervalles d'environ 0,5 s. Recording images continuously (DCR-TRV33E only) You can record still images continuously. EXP BRKTG [b] ( ) Votre caméscope prend automatiquement trois photos à environ 0,5 secondes d'intervalle...
...réglé sur MEMORY (DCR-TRV33E uniquement) L'angle de vue est légèrement plus grand par rapport à l'angle de vue affiché lorsque le commutateur POWER est réglé sur CAMERA. EXP BRKTG [b] ( ) Your camcorder automatically shoots 3 images at about ...photos en taille 1152 × 864 ou 13 photos en taille 640 × 480 à des intervalles d'environ 0,5 s. Recording images continuously (DCR-TRV33E only) You can record still images continuously. EXP BRKTG [b] ( ) Votre caméscope prend automatiquement trois photos à environ 0,5 secondes d'intervalle...
Operating Instructions
Page 156
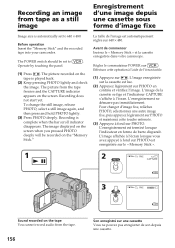
Before operation Insert the "Memory Stick" and the recorded tape into your camcorder. The picture recorded on the screen. To change the still image, release PHOTO, select a still image again, and then press and hold PHOTO lightly. (3) Press ...
Before operation Insert the "Memory Stick" and the recorded tape into your camcorder. The picture recorded on the screen. To change the still image, release PHOTO, select a still image again, and then press and hold PHOTO lightly. (3) Press ...
Operating Instructions
Page 158
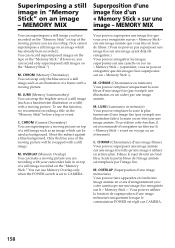
... fixe telle qu'une image à utiliser en arrière-plan. M. CHROM (Memory Chromakey) You can superimpose a still image you are recording with your camcorder fade in "Memory Stick" on the "Memory Stick" before a trip or event. LUMI (Memory Luminancekey) You can record only superimposed still images on top of...
... fixe telle qu'une image à utiliser en arrière-plan. M. CHROM (Memory Chromakey) You can superimpose a still image you are recording with your camcorder fade in "Memory Stick" on the "Memory Stick" before a trip or event. LUMI (Memory Luminancekey) You can record only superimposed still images on top of...


